key JEEP WRANGLER 2018 Owner handbook (in English)
[x] Cancel search | Manufacturer: JEEP, Model Year: 2018, Model line: WRANGLER, Model: JEEP WRANGLER 2018Pages: 276, PDF Size: 4.47 MB
Page 124 of 276
• This light only shows that the parking brake
is applied. It does not show the degree of
brake application.
When parking on a hill, it is important to turn
the front wheels toward the curb on a down-
hill grade and away from the curb on an uphill
grade. For vehicles equipped with an auto-
matic transmission, apply the parking brake
before placing the gear selector in PARK,
otherwise the load on the transmission lock-
ing mechanism may make it difficult to move
the gear selector out of PARK. The parking
brake should always be applied whenever the
driver is not in the vehicle.
WARNING!
• Never use the PARK position on an au-
tomatic transmission as a substitute for
the parking brake. Always apply the
parking brake fully when parked to guard
WARNING!
against vehicle movement and possible
injury or damage.
• When exiting the vehicle, always remove
the key fob from the ignition and lock
your vehicle.
• Never leave children alone in a vehicle,
or with access to an unlocked vehicle.
Allowing children to be in a vehicle un-
attended is dangerous for a number of
reasons. A child or others could be seri-
ously or fatally injured. Children should
be warned not to touch the parking
brake, brake pedal or the gear selector.
• Do not leave the key fob in or near the
vehicle, or in a location accessible to
children. A child could operate power
windows, other controls, or move the
vehicle.
• Be sure the parking brake is fully disen-
gaged before driving; failure to do so can
lead to brake failure and a collision.
WARNING!
• Always fully apply the parking brake
when leaving your vehicle or it may roll
and cause damage or injury. Also, be
certain to leave an automatic transmis-
sion in PARK, a manual transmission in
REVERSE or first gear. Failure to do so
may cause the vehicle to roll and cause
damage or injury.
CAUTION!
If the “Brake Warning Light” remains on
with the parking brake released, a brake
system malfunction is indicated. Have the
brake system serviced by an authorized
dealer immediately.
STARTING AND OPERATING
122
Page 128 of 276
AUTOMATIC
TRANSMISSION — IF
EQUIPPED
CAUTION!
Damage to the transmission may occur if
the following precautions are not ob-
served:
• Shift into or out of PARK or REVERSE
only after the vehicle has come to a
complete stop.
• Do not shift between PARK, REVERSE,
NEUTRAL, or DRIVE when the engine is
above idle speed.
• Before shifting into any gear, make sure
your foot is firmly pressing the brake
pedal.
NOTE:
You must press and hold the brake pedal
while shifting out of PARK.
WARNING!
•Never use the PARK position as a substi-
tute for the parking brake. Always apply
the parking brake fully when exiting the
vehicle to guard against vehicle move-
ment and possible injury or damage.
• Your vehicle could move and injure you
and others if it is not in PARK. Check by
trying to move the gear selector out of
PARK with the brake pedal released.
Make sure the transmission is in PARK
before exiting the vehicle.
• It is dangerous to shift out of PARK or
NEUTRAL if the engine speed is higher
than idle speed. If your foot is not firmly
pressing the brake pedal, the vehicle
could accelerate quickly forward or in
reverse. You could lose control of the
vehicle and hit someone or something.
Only shift into gear when the engine is
idling normally and your foot is firmly
pressing the brake pedal.
• Unintended movement of a vehicle
could injure those in or near the vehicle.
As with all vehicles, you should never
WARNING!
exit a vehicle while the engine is run-
ning. Before exiting a vehicle always
come to a complete stop, then apply the
parking brake, shift the transmission
into PARK, turn the engine OFF, and
remove the ignition key. Once the key is
removed, the transmission is locked in
PARK, securing the vehicle against un-
wanted movement.
• When exiting the vehicle, always remove
the ignition key from the vehicle and
lock the vehicle.
• Never leave children alone in a vehicle,
or with access to an unlocked vehicle.
Allowing children to be in a vehicle un-
attended is dangerous for a number of
reasons. A child or others could be seri-
ously or fatally injured. Children should
be warned not to touch the parking
brake, brake pedal or the transmission
gear selector.
• Do not leave the ignition key in or near
the vehicle (or in a location accessible to
children). A child could operate power
STARTING AND OPERATING
126
Page 129 of 276
WARNING!
windows, other controls, or move the
vehicle.
Key Ignition Park Interlock
This vehicle is equipped with a Key Ignition
Park Interlock which requires the transmis-
sion to be in PARK before the ignition can be
turned to the LOCK/OFF (key removal) posi-
tion. The key can only be removed from the
ignition when the ignition is in the LOCK/OFF
position, and once removed the transmission
is locked in PARK.
NOTE:
If a malfunction occurs, the system will trap
the key in the ignition to warn you that this
safety feature is inoperable. The engine can
be started and stopped but the key cannot be
removed until you obtain service.
Brake/Transmission Shift Interlock
System
This vehicle is equipped with a Brake Trans-
mission Shift Interlock System (BTSI) that
holds the transmission gear selector in PARK
unless the brakes are applied. To shift the
transmission out of PARK, the ignition must
be in the ON/RUN position (engine running or
not) and the brake pedal must be pressed.
Five-Speed Automatic Transmission — If
Equipped
The transmission gear position display (lo-
cated in the instrument cluster) indicates the
transmission gear range. You must press the
brake pedal to move the gear selector out of
PARK (refer to “Brake/Transmission Shift In-
terlock System” in this section). To drive,
move the gear selector from PARK or NEU-
TRAL to the DRIVE position.The electronically-controlled transmission
adapts its shift schedule based on driver
inputs, along with environmental and road
conditions. The transmission electronics are
self-calibrating; therefore, the first few shifts
on a new vehicle may be somewhat abrupt.
This is a normal condition, and precision
shifts will develop within a few hundred miles
(kilometers).
Only shift from DRIVE to PARK or REVERSE
when the accelerator pedal is released and
the vehicle is stopped. Be sure to keep your
foot on the brake pedal when shifting be-
tween these gears.
The transmission gear selector has only
PARK, REVERSE, NEUTRAL, and DRIVE
shift positions. Manual shifts can be made
using the Autostick shift control. Moving the
gear selector to the left or right (-/+) while in
the DRIVE position will manually select the
transmission gear and will display the current
127
Page 134 of 276
NOTE:
Shifting into or out of 4L is possible with the
vehicle completely stopped; however, diffi-
culty may occur due to the mating teeth not
being properly aligned. Several attempts may
be required for clutch teeth alignment and
shift completion to occur. The preferred
method is with the vehicle rolling at 2 to
3 mph (3 to 5 km/h). Avoid attempting to
engage or disengage 4L with the vehicle
moving faster than 2 to 3 mph (3 to 5 km/h).
WARNING!
Failure to engage a transfer case position
completely can cause transfer case dam-
age or loss of power and vehicle control.
You could have a collision. Do not drive the
vehicle unless the transfer case is fully
engaged.
Trac-Lok Rear Axle — If Equipped
The Trac-Lok rear axle provides a constant
driving force to both rear wheels and reduces
wheel spin caused by the loss of traction at
one driving wheel. If traction differs between
the two rear wheels, the differential auto-
matically proportions the usable torque by
providing more torque to the wheel that has
traction.
Trac-Lok is especially helpful during slippery
driving conditions. With both rear wheels on a
slippery surface, a slight application of the
accelerator will supply maximum traction.
WARNING!
On vehicles equipped with a limited-slip
differential, never run the engine with one
rear wheel off the ground. The vehicle may
drive through the rear wheel remaining on
the ground and cause you to lose control of
your vehicle.
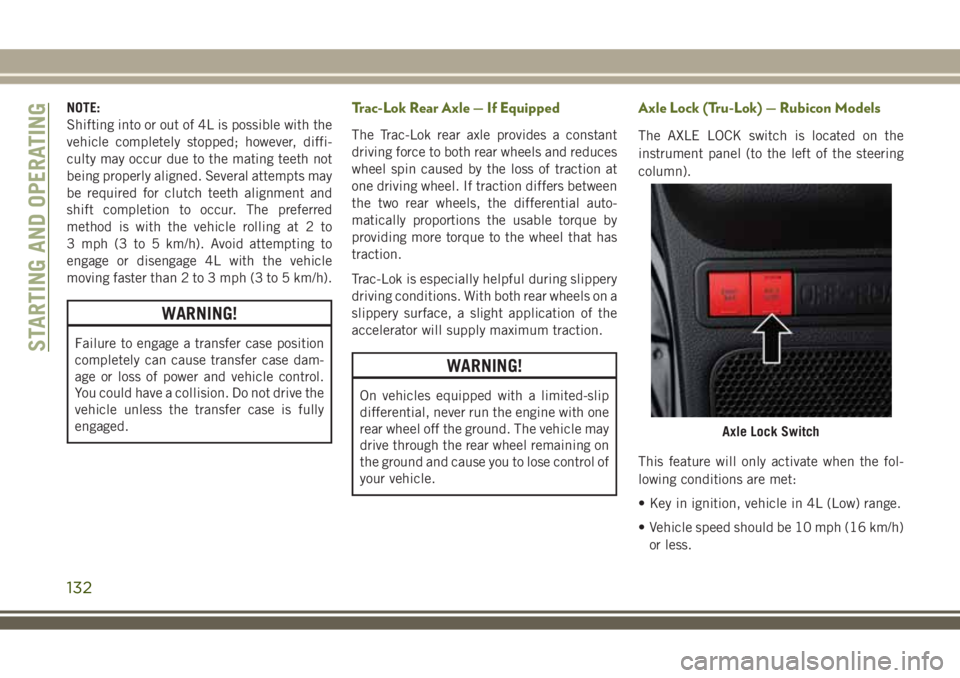
Axle Lock (Tru-Lok) — Rubicon Models
The AXLE LOCK switch is located on the
instrument panel (to the left of the steering
column).
This feature will only activate when the fol-
lowing conditions are met:
• Key in ignition, vehicle in 4L (Low) range.
• Vehicle speed should be 10 mph (16 km/h)
or less.
Axle Lock Switch
STARTING AND OPERATING
132
Page 137 of 276
Possible Reasons The Engine Does Not
AUTO STOP
Prior to engine shut down, the system will
check many safety and comfort conditions to
see if they are fulfilled. In following situations
the engine will not stop:
• Driver’s seat belt is not buckled.
• Outside temperature is less than 1°F
(–17°C) or greater than 104°F (40°C).
• Actual cabin temperature is significantly
different than temperature set on Auto
HVAC.
• HVAC is set to full defrost mode.
• Engine has not reached normal operating
temperature.
• Battery discharged.
• When driving in REVERSE.
• Hood is open.
• Vehicle is in 4LO transfer case mode.It may be possible for the vehicle to be driven
several times without the STOP/START sys-
tem going into a STOP/START READY state
under more extreme conditions of the items
listed above.
To Start The Engine While In The STOP/
START AUTO STOP ACTIVE Mode
When the gear selector is in NEUTRAL, the
engine will start when the clutch pedal is
pressed. The vehicle will go into STOP/START
SYSTEM NOT READY mode until the vehicle
speed is greater than 3 mph (5 km/h).
Conditions that will cause the engine to start
automatically while in STOP/START AUTO STOP
ACTIVE mode
The Engine Will Start Automatically When:
• Actual cabin temperature is significantly
different than temperature set on Auto
HVAC.
• HVAC is set to full defrost mode.
• STOP/START AUTO STOP ACTIVE time ex-
ceeds 5 minutes.• Battery voltage drops too low.
• Low brake vacuum e.g. after several brake
pedal applications.
•
Vehicle is moving faster than 3 mph (5 km/h).
• STOP/START OFF switch is pressed.
• 4WD system is put into 4LO mode.
Conditions that force a manual key cycle
start while in STOP/START AUTO STOP AC-
TIVE mode:
The Engine Will Not Start Automatically If:
• The driver’s seatbelt was unbuckled
• The engine hood has been opened
• A STOP/START system error occurs
The engine may then only be restarted with
an ignition key cycle. The STOP/START KEY
START REQUIRED message will appear in
the instrument cluster under these condi-
tions. Refer to “Instrument Cluster Display”
in “Getting To Know Your Instrument Panel”
for further information.
135
Page 138 of 276
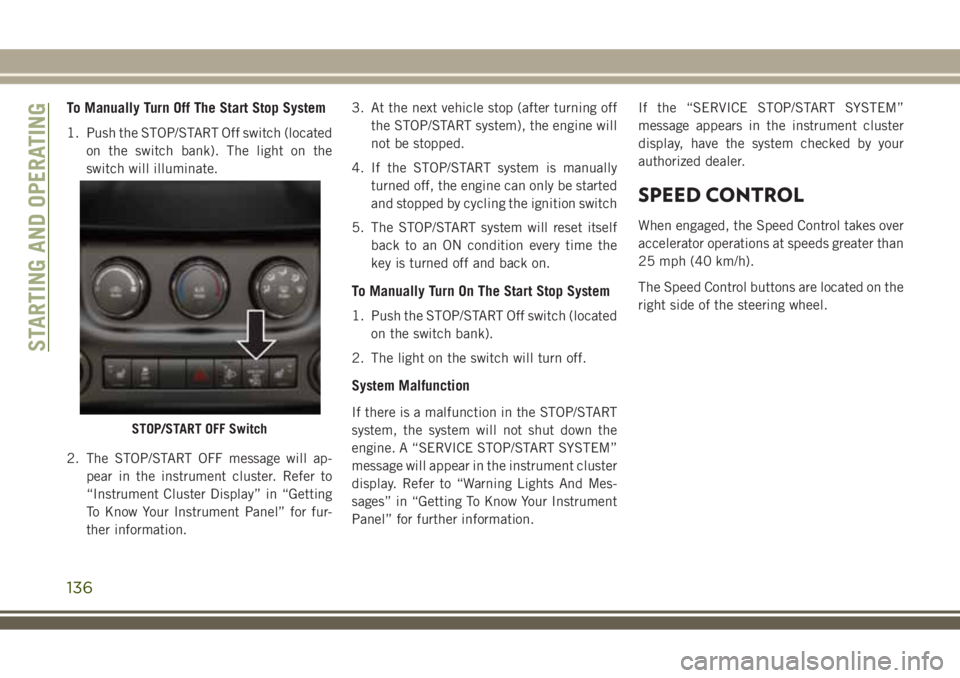
To Manually Turn Off The Start Stop System
1. Push the STOP/START Off switch (located
on the switch bank). The light on the
switch will illuminate.
2. The STOP/START OFF message will ap-
pear in the instrument cluster. Refer to
“Instrument Cluster Display” in “Getting
To Know Your Instrument Panel” for fur-
ther information.3. At the next vehicle stop (after turning off
the STOP/START system), the engine will
not be stopped.
4. If the STOP/START system is manually
turned off, the engine can only be started
and stopped by cycling the ignition switch
5. The STOP/START system will reset itself
back to an ON condition every time the
key is turned off and back on.
To Manually Turn On The Start Stop System
1. Push the STOP/START Off switch (located
on the switch bank).
2. The light on the switch will turn off.
System Malfunction
If there is a malfunction in the STOP/START
system, the system will not shut down the
engine. A “SERVICE STOP/START SYSTEM”
message will appear in the instrument cluster
display. Refer to “Warning Lights And Mes-
sages” in “Getting To Know Your Instrument
Panel” for further information.If the “SERVICE STOP/START SYSTEM”
message appears in the instrument cluster
display, have the system checked by your
authorized dealer.
SPEED CONTROL
When engaged, the Speed Control takes over
accelerator operations at speeds greater than
25 mph (40 km/h).
The Speed Control buttons are located on the
right side of the steering wheel.
STOP/START OFF Switch
STARTING AND OPERATING
136
Page 147 of 276
IN CASE OF EMERGENCY
HAZARD WARNING
FLASHERS................146
BULB REPLACEMENT........146
Replacement Bulbs............146
Bulb Replacement.............147
FUSES...................149
General Information.............150
Totally Integrated Power Module.....150
JACKING AND TIRE
CHANGING................154
Jack/Spare Tire Stowage..........154
Preparations For Jacking.........154
Jacking Instructions............155
Declaration Of Conformance.......157
Jack Usage Precautions..........160
JUMP STARTING............160
Preparations For Jump Start........161
Jump Starting Procedure..........162
IF YOUR ENGINE OVERHEATS . .163GEAR SELECTOR OVERRIDE . . .164
FREEING A STUCK VEHICLE . . .164
TOWING A DISABLED
VEHICLE..................165
Without The Ignition Key..........166
Four–Wheel Drive Models.........166
Tow Eye Usage................167
ENHANCED ACCIDENT RESPONSE
SYSTEM (EARS).............168
EVENT DATA RECORDER
(EDR)....................168
IN CASE OF EMERGENCY
145
Page 150 of 276
8. Pull the bulb from the housing.
9. Push connector locking tab to the unlock
position.
10. Remove connector from bulb.
11. Push connector onto new bulb base, and
push the connector locking tab to the
lock position.
CAUTION!
Do not touch the new bulb with your fin-
gers. Oil contamination will severely
shorten bulb life. If the bulb comes in
contact with any oily surface, clean the
bulb with rubbing alcohol.
12. Reinstall bulb housing. Rotate the bulb
1/4 turn clockwise.
Front Park/Turn Signal
1. Remove the front grille. Turn the retainers
along the top 1/4 turn counterclockwise
and remove.
2. Pull the bottom of the grille away starting
at one side and working toward the other.3. Turn the socket assembly 1/4 turn coun-
terclockwise and remove from housing.
Pull the bulb straight from the socket to
replace.
Front Side Marker
1. Reach under the front fender flare and
locate the front side marker socket.
2. Turn the socket assembly counterclock-
wise 1/3 turn and remove it from the
housing. Pull the bulb straight from the
socket to replace.
Front Fog Lamp
1. Reach under the vehicle to access the
back of the front fog lamp.
2. Disconnect the wire harness connector
from the front fog lamp connector
receptacle.
3. Firmly grasp the bulb by the two latch
features and squeeze them together to
unlock the bulb from the back of the front
fog lamp housing.4. Pull the bulb straight out from the keyed
opening in the housing and then connect
the replacement bulb.
CAUTION!
Do not touch the new bulb with your fin-
gers. Oil contamination will severely
shorten bulb life. If the bulb comes in
contact with any oily surface, clean the
bulb with rubbing alcohol.
Rear Fog Lamp
1. Reach under the vehicle to access the
back of the rear fog lamp.
2. Turn the socket assembly counterclock-
wise 1/4 turn and remove it from the
housing. Pull the bulb straight from the
socket to replace.IN CASE OF EMERGENCY
148
Page 168 of 276
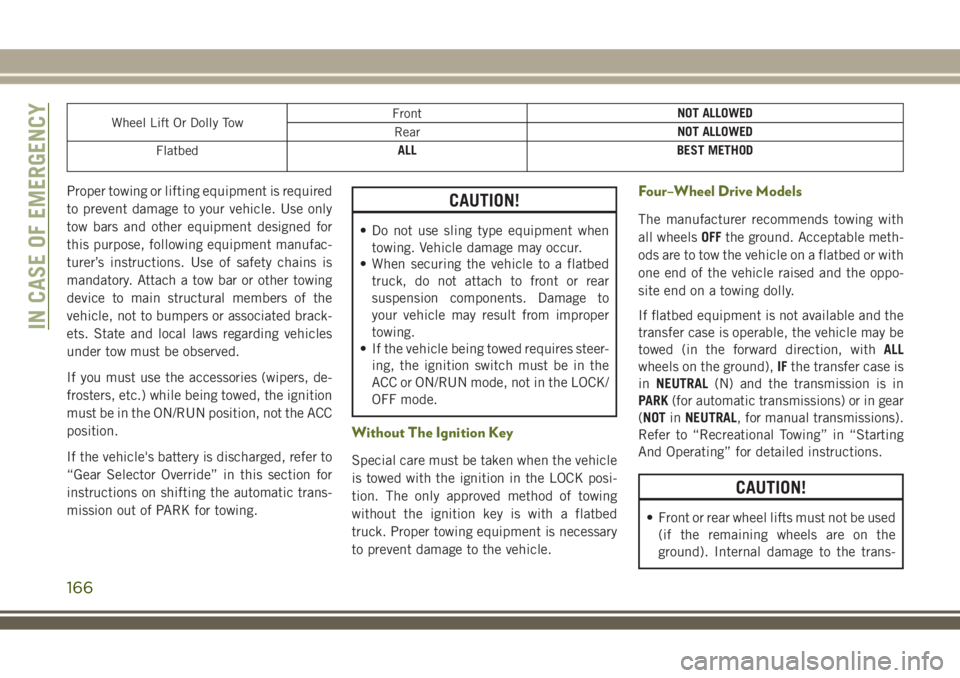
Wheel Lift Or Dolly TowFrontNOT ALLOWED
RearNOT ALLOWED
FlatbedALL BEST METHOD
Proper towing or lifting equipment is required
to prevent damage to your vehicle. Use only
tow bars and other equipment designed for
this purpose, following equipment manufac-
turer’s instructions. Use of safety chains is
mandatory. Attach a tow bar or other towing
device to main structural members of the
vehicle, not to bumpers or associated brack-
ets. State and local laws regarding vehicles
under tow must be observed.
If you must use the accessories (wipers, de-
frosters, etc.) while being towed, the ignition
must be in the ON/RUN position, not the ACC
position.
If the vehicle's battery is discharged, refer to
“Gear Selector Override” in this section for
instructions on shifting the automatic trans-
mission out of PARK for towing.CAUTION!
• Do not use sling type equipment when
towing. Vehicle damage may occur.
• When securing the vehicle to a flatbed
truck, do not attach to front or rear
suspension components. Damage to
your vehicle may result from improper
towing.
• If the vehicle being towed requires steer-
ing, the ignition switch must be in the
ACC or ON/RUN mode, not in the LOCK/
OFF mode.
Without The Ignition Key
Special care must be taken when the vehicle
is towed with the ignition in the LOCK posi-
tion. The only approved method of towing
without the ignition key is with a flatbed
truck. Proper towing equipment is necessary
to prevent damage to the vehicle.
Four–Wheel Drive Models
The manufacturer recommends towing with
all wheelsOFFthe ground. Acceptable meth-
ods are to tow the vehicle on a flatbed or with
one end of the vehicle raised and the oppo-
site end on a towing dolly.
If flatbed equipment is not available and the
transfer case is operable, the vehicle may be
towed (in the forward direction, withALL
wheels on the ground),IFthe transfer case is
inNEUTRAL(N) and the transmission is in
PARK(for automatic transmissions) or in gear
(NOTinNEUTRAL, for manual transmissions).
Refer to “Recreational Towing” in “Starting
And Operating” for detailed instructions.
CAUTION!
• Front or rear wheel lifts must not be used
(if the remaining wheels are on the
ground). Internal damage to the trans-
IN CASE OF EMERGENCY
166
Page 226 of 276
• To access Radio Mode, push the RADIO
button on the left side of the faceplate,
then press the “AM,” or “FM” button on the
touchscreen to select the band.
Seek Up/Seek Down
• Press the “SEEK UP” or “SEEK DOWN”
buttons on the touchscreen to seek through
radio stations in AM or FM bands. Hold
either seek button to bypass stations with-
out stopping.
Store Radio Presets Manually
• Select the radio band by pressing either the
“AM,” or “FM” button on the touchscreen.
• Find the station to store by either pressing
the “SEEK UP” or “SEEK DOWN” buttons
on the touchscreen, pressing the “Scan”
button on the touchscreen, or by using the
“Direct Tune” button on the touchscreen.• Once the desired station is found, press
and hold one of the “PRESETS” buttons on
the touchscreen in the list to the right, until
the preset key flashes and the station text
on the button on the touchscreen changes.
NOTE:
If the Presets are not visible on the right side
of the screen, press the “PRESETS” button
on the touchscreen.
MULTIMEDIA
224