washer fluid JEEP WRANGLER 2020 Owner handbook (in English)
[x] Cancel search | Manufacturer: JEEP, Model Year: 2020, Model line: WRANGLER, Model: JEEP WRANGLER 2020Pages: 276, PDF Size: 4.47 MB
Page 33 of 276
lever. For information on using the rear win-
dow wiper/washer, refer to “Rear Window
Wiper/Washer” in this section for more infor-
mation.
Windshield Wiper Operation
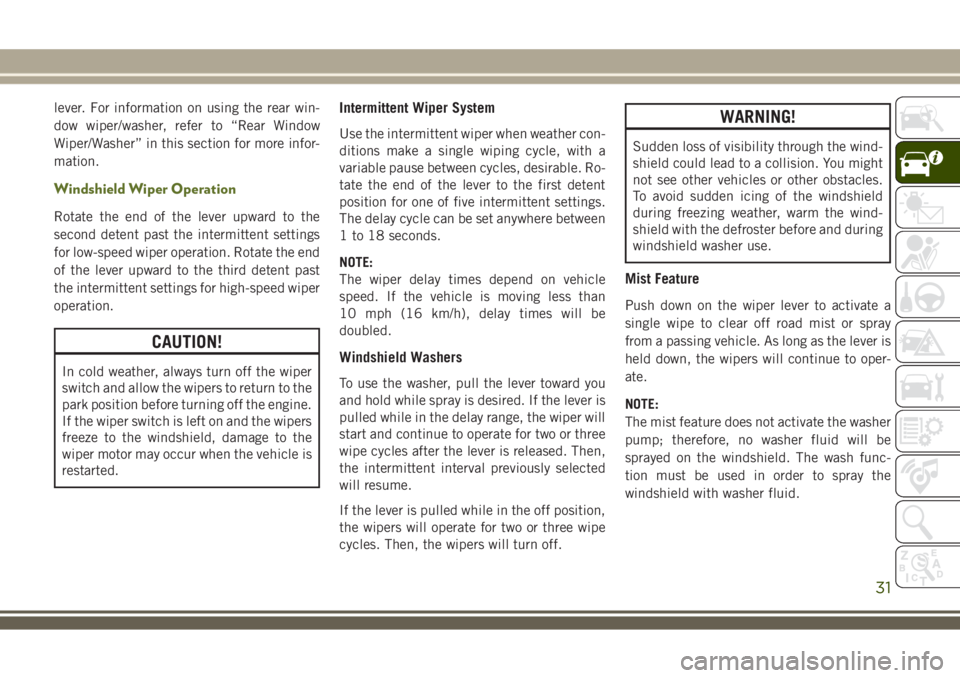
Rotate the end of the lever upward to the
second detent past the intermittent settings
for low-speed wiper operation. Rotate the end
of the lever upward to the third detent past
the intermittent settings for high-speed wiper
operation.
CAUTION!
In cold weather, always turn off the wiper
switch and allow the wipers to return to the
park position before turning off the engine.
If the wiper switch is left on and the wipers
freeze to the windshield, damage to the
wiper motor may occur when the vehicle is
restarted.
Intermittent Wiper System
Use the intermittent wiper when weather con-
ditions make a single wiping cycle, with a
variable pause between cycles, desirable. Ro-
tate the end of the lever to the first detent
position for one of five intermittent settings.
The delay cycle can be set anywhere between
1 to 18 seconds.
NOTE:
The wiper delay times depend on vehicle
speed. If the vehicle is moving less than
10 mph (16 km/h), delay times will be
doubled.
Windshield Washers
To use the washer, pull the lever toward you
and hold while spray is desired. If the lever is
pulled while in the delay range, the wiper will
start and continue to operate for two or three
wipe cycles after the lever is released. Then,
the intermittent interval previously selected
will resume.
If the lever is pulled while in the off position,
the wipers will operate for two or three wipe
cycles. Then, the wipers will turn off.
WARNING!
Sudden loss of visibility through the wind-
shield could lead to a collision. You might
not see other vehicles or other obstacles.
To avoid sudden icing of the windshield
during freezing weather, warm the wind-
shield with the defroster before and during
windshield washer use.
Mist Feature
Push down on the wiper lever to activate a
single wipe to clear off road mist or spray
from a passing vehicle. As long as the lever is
held down, the wipers will continue to oper-
ate.
NOTE:
The mist feature does not activate the washer
pump; therefore, no washer fluid will be
sprayed on the windshield. The wash func-
tion must be used in order to spray the
windshield with washer fluid.
31
Page 171 of 276
SERVICING AND MAINTENANCE
SCHEDULED SERVICING......170
Scheduled Servicing — Gasoline
Engine....................170
Scheduled Servicing — Diesel Engine. .175
ENGINE COMPARTMENT......180
3.6L Engine.................180
2.8L Diesel Engine.............181
Checking Oil Level — Gasoline Engine. .182
Checking Oil Level — Diesel Engine . . .182
Cooling System...............182
Adding Washer Fluid............183
Brake System................183
Manual Transmission...........184Automatic Transmission..........184
Maintenance-Free Battery........186
Air Conditioner Maintenance.......186
DEALER SERVICE...........189
Windshield Wiper Blades.........189
RAISING THE VEHICLE........192
TIRES....................193
Tires — General Information.......193
Tire Types...................197
Spare Tires — If Equipped........198
Wheel And Wheel Trim Care.......199Tire Chains (Traction Devices).......200
Tire Rotation Recommendations.....201
STORING THE VEHICLE.......201
BODYWORK...............202
Body And Underbody Maintenance . . .202
Preserving The Bodywork.........202
INTERIORS...............204
Seats And Fabric Parts...........204
Plastic And Coated Parts..........205
Leather Parts.................205
Glass Surfaces...............206
SERVICING AND MAINTENANCE
169
Page 172 of 276
SCHEDULED SERVICING
Scheduled Servicing — Gasoline Engine
The scheduled services listed in this manual
must be done at the times or mileages speci-
fied to protect your vehicle warranty and
ensure the best vehicle performance and re-
liability. More frequent maintenance may be
needed for vehicles in severe operating con-
ditions, such as dusty areas and very short
trip driving. Inspection and service should
also be done anytime a malfunction is sus-
pected.
The oil change indicator system will remind
you that it is time to take your vehicle in for
scheduled maintenance.
On non-instrument cluster display equipped
vehicles, “CHANgE OIL” will flash in the
instrument cluster odometer and a single
chime will sound, indicating that an oil
change is necessary.The oil change indicator message will illumi-
nate approximately 7,000 miles
(11,200 km) after the most recent oil change
was performed. Have your vehicle serviced as
soon as possible, within 500 miles (800 km).
However, an earlier oil change at 4,500 miles
(7,500 km) may be required if the vehicle is
operated under “Severe Duty Conditions”
later in this section.
NOTE:
• The oil change indicator message will not
monitor the time since the last oil change.
Change your vehicle's oil if it has been
6 months since your last oil change even if
the oil change indicator message is NOT
illuminated.
• Change your engine oil more often if you
drive your vehicle off-road for an extended
period of time.
• Under no circumstances should oil change
intervals exceed 7,500 miles (12,000 km)
or 6 months, whichever comes first.
Your authorized dealer will reset the oil
change indicator message after completing
the scheduled oil change.Once A Month Or Before A Long Trip
• Check the engine oil level about five min-
utes after a fully warmed engine is shut off.
Checking the oil level while the vehicle is
on level ground will improve the accuracy of
the oil level reading. Add oil only when the
level is at or below the ADD or MIN mark.
• Check the windshield washer solvent and
add if required.
• Check tire pressure and look for unusual
wear or damage. Rotate tires at the first
sign of irregular wear, even if it occurs
before the oil indicator system turns on.
• Inspect the battery and clean and tighten
the terminals as required.
• Check the fluid levels of coolant reservoir,
automatic transmission, brake master cyl-
inder and power steering and fill as needed.
• Check all lights and other electrical items
for correct operation.
SERVICING AND MAINTENANCE
170
Page 177 of 276
WARNING!
doubt about your ability to perform a
service job, take your vehicle to a com-
petent mechanic.
• Failure to properly inspect and maintain
your vehicle could result in a component
malfunction and effect vehicle handling
and performance. This could cause an
accident.
Severe Duty Conditions
†† Change the engine oil and engine oil filter
at every 4500 miles (7,500 km) or 6 months
if using your vehicle under any of the follow-
ing severe duty conditions:
• Stop and go driving.
• Driving in dusty conditions.
• Short trips of less than 10 miles (16 km).
• Trailer towing.
• Taxi, police, or delivery service (commercial
service).
• Off-road or desert operation.
Scheduled Servicing — Diesel Engine
At Each Stop for Fuel
• Check the engine oil level about five min-
utes after a fully warmed engine is shut off.
Checking the oil level while the vehicle is
on level ground will improve the accuracy of
the oil level reading. Add oil only when the
level is at or below the ADD or MIN mark.
• Check the windshield washer solvent, add
as required.
Once a Month
• Check tire pressure and look for unusual
wear or damage. Rotate tires at the first
sign of irregular wear, even if it occurs
before the oil indicator system turns on.
• Inspect the battery; clean and tighten the
terminals as required.
• Check the fluid levels of engine coolant/
antifreeze deaeration bottle, and brake
master cylinder, add as needed.
• Check all lights and all other electrical
items for correct operation.At Each Oil Change
• Change the engine oil filter.
• Inspect the exhaust system.
• Inspect brake hoses.
• Check the engine coolant/antifreeze level,
hoses, and clamps.
• Inspect engine accessory drive belts. Re-
place as necessary.
• Inspect for the presence of water in the fuel
filter/water separator unit.
Inspection and service should be performed
anytime a malfunction is observed or sus-
pected. Retain all receipts.
175
Page 182 of 276
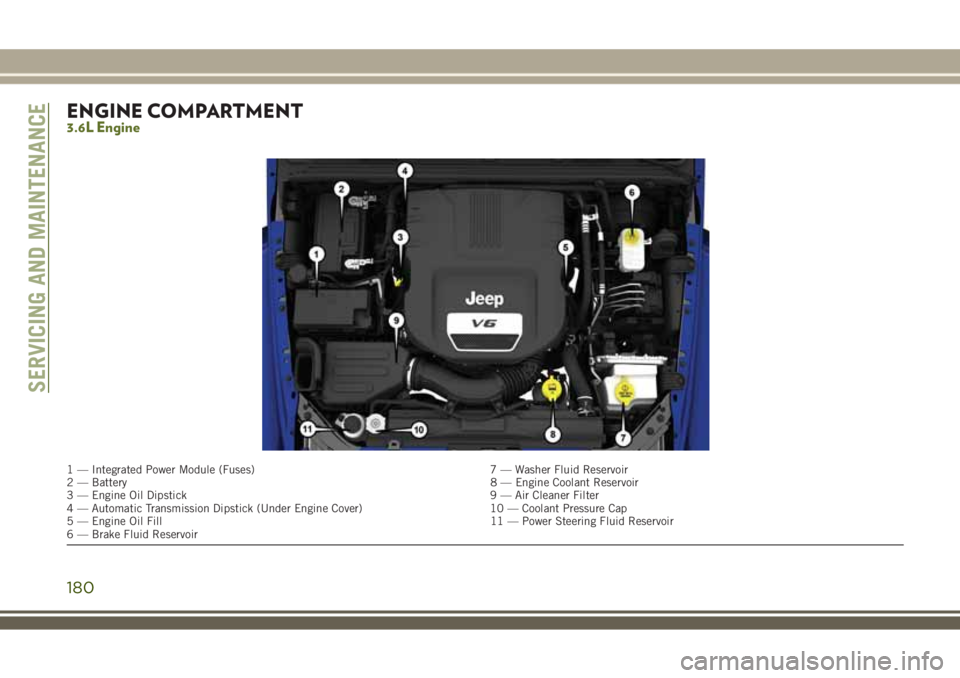
ENGINE COMPARTMENT3.6L Engine
1 — Integrated Power Module (Fuses) 7 — Washer Fluid Reservoir
2 — Battery8 — Engine Coolant Reservoir
3 — Engine Oil Dipstick 9 — Air Cleaner Filter
4 — Automatic Transmission Dipstick (Under Engine Cover) 10 — Coolant Pressure Cap
5 — Engine Oil Fill 11 — Power Steering Fluid Reservoir
6 — Brake Fluid Reservoir
SERVICING AND MAINTENANCE
180
Page 183 of 276
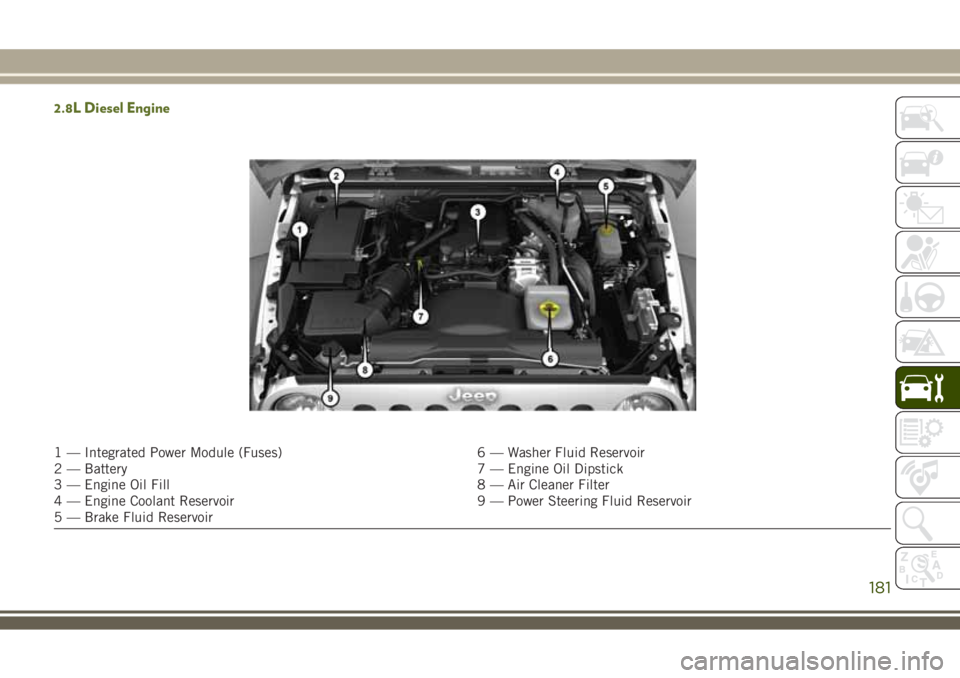
2.8L Diesel Engine
1 — Integrated Power Module (Fuses) 6 — Washer Fluid Reservoir
2 — Battery 7 — Engine Oil Dipstick
3 — Engine Oil Fill 8 — Air Cleaner Filter
4 — Engine Coolant Reservoir 9 — Power Steering Fluid Reservoir
5 — Brake Fluid Reservoir
181
Page 185 of 276
by gently spraying water from a garden hose
vertically down the face of the A/C condenser
(if equipped) or the back of the radiator core.
Check the engine cooling system hoses for
brittle rubber, cracking, tears, cuts, and
tightness of the connection at the coolant
recovery bottle and radiator. Inspect the en-
tire system for leaks. DO NOT REMOVE THE
COOLANT PRESSURE CAP WHEN THE
COOLING SYSTEM IS HOT.
Adding Washer Fluid
The fluid reservoir for the windshield washers
and the rear window washer (if equipped) is
shared. The fluid reservoir is located in the
engine compartment. Be sure to check the
fluid level at regular intervals. Fill the reservoir
with windshield washer solvent only (not radia-
tor antifreeze). When refilling the washer fluid
reservoir, take some washer fluid and apply it to
a cloth or towel and wipe clean the wiper
blades; this will help blade performance.
To prevent freeze-up of your windshield
washer system in cold weather, select a solu-
tion or mixture that meets or exceeds the
temperature range of your climate. This rat-
ing information can be found on most washer
fluid containers.
WARNING!
Commercial windshield washer solvents
are flammable. They could ignite and burn
you. Care must be exercised when filling or
working around the washer solution.
Brake System
In order to assure brake system performance,
all brake system components should be in-
spected periodically. Refer to the “Mainte-
nance Plan” in this section for the proper
maintenance intervals.
WARNING!
Riding the brakes can lead to brake failure
and possibly a collision. Driving with your
foot resting or riding on the brake pedal
WARNING!
can result in abnormally high brake tem-
peratures, excessive lining wear, and pos-
sible brake damage. You would not have
your full braking capacity in an emergency.
Fluid Level Check — Brake Master Cylinder
The fluid level of the master cylinder should
be checked whenever the vehicle is serviced,
or immediately if the brake system warning
light is on. If necessary, add fluid to bring
level within the designated marks on the side
of the reservoir of the brake master cylinder.
Be sure to clean the top of the master cylin-
der area before removing cap. With disc
brakes, fluid level can be expected to fall as
the brake pads wear. Brake fluid level should
be checked when pads are replaced. If the
brake fluid is abnormally low, check the sys-
tem for leaks.
Refer to “Fluids And Lubricants” in “Techni-
cal Specifications” for further information.
183
Page 191 of 276
CAUTION!
The cabin air filter is identified with an
arrow to indicate airflow direction through
the filter. Failure to properly install the
filter will result in the need to replace it
more often.
8. Close A/C Air Filter access doors and se-
cure retaining tabs.
9. Rotate the glove compartment door back
into position.
Refer to the “Maintenance Plan” for the
proper maintenance intervals.
DEALER SERVICE
An authorized dealer has the qualified service
personnel, special tools, and equipment to
perform all service operations in an expert
manner. Service Manuals are available which
include detailed service information for your
vehicle. Refer to these Service Manuals be-
fore attempting any procedure yourself.NOTE:
Intentional tampering with emissions control
systems may void your warranty and could
result in civil penalties being assessed
against you.
WARNING!
You can be badly injured working on or
around a motor vehicle. Only do service
work for which you have the knowledge
and the proper equipment. If you have any
doubt about your ability to perform a ser-
vice job, take your vehicle to a competent
mechanic.
Windshield Wiper Blades
Clean the rubber edges of the wiper blades
and the windshield periodically with a sponge
or soft cloth and a mild nonabrasive cleaner.
This will remove accumulations of salt or road
film.Operation of the wipers on dry glass for long
periods may cause deterioration of the wiper
blades. Always use washer fluid when using
the wipers to remove salt or dirt from a dry
windshield.
Avoid using the wiper blades to remove frost
or ice from the windshield. Keep the blade
rubber out of contact with petroleum prod-
ucts such as engine oil, gasoline, etc.
NOTE:
Life expectancy of wiper blades varies de-
pending on geographical area and frequency
of use. Poor performance of blades may be
present with chattering, marks, water lines or
wet spots. If any of these conditions are
present, clean the wiper blades or replace as
necessary.
The wiper blades and wiper arms should be
inspected periodically, not just when wiper
performance problems are experienced. This
inspection should include the following
points:
• Wear Or Uneven Edges
• Foreign Material
189
Page 206 of 276
CAUTION!
immediately and thoroughly as the acid
they contain is particularly aggressive.
• Avoid (if at all possible) parking the
vehicle under trees; remove vegetable
resins immediately as, when dried, it
may only be possible to remove them
with abrasive products and/or polishes,
which is highly inadvisable as they could
alter the typical opaqueness of the
paint.
• Do not use pure windshield washer fluid
for cleaning the front windshield and
rear window; dilute it min. 50% with
water. Only use pure windshield washer
fluid when strictly necessary due to out-
side temperature conditions.
Care Of Fabric Top Windows
Your vehicle's fabric top has pliable plastic
windows which can be scratched unless spe-
cial care is taken by following these directions:
1. Never use a dry cloth to remove dust.
Instead,use a microfiber towel or soft cot-
ton cloth moistened with cold or warm,clean water, and wipe across the window,
not up and down.
2. When washing,never use hot wateror any-
thing stronger than a mild soap. Never use
solvents such as alcohol or harsh cleaning
agents.
3. Always rinse thoroughly with cold water,
then wipe with a soft and slightly moist,
clean cloth.
4. When removing frost, snow or ice,never
use a scraper or de-icing chemicals.Use
warm water only if you must clean the
window quickly.
5. Debris (sand, mud/dirt, dust, or salt) from
off-road driving will have a major impact
on zipper operation. Even normal on-road
driving and vehicle washing will eventu-
ally impact window zipper operation. To
maintain ease of use of the window zip-
pers, each window zipper should be
cleaned and lubricated regularly. Before
applying, make sure the zipper teeth are
clear of sand, mud, and other materials.
Clean both sides of the zipper, not justone side. Rinse both zipper halves with
fresh water and allow to dry. Several ap-
plications may be required before the zip-
per comes free.
6. Never paste stickers, gummed labels or
any tape to the windows. Adhesives are
hard to remove and may damage the
windows.
INTERIORS
Seats And Fabric Parts
WARNING!
Do not use volatile solvents for cleaning
purposes. Many are potentially flam-
mable, and if used in closed areas they
may cause respiratory harm.
Seat Belt Maintenance
Do not bleach, dye or clean the belts with
chemical solvents or abrasive cleaners. This
will weaken the fabric. Sun damage can also
weaken the fabric.
SERVICING AND MAINTENANCE
204
Page 265 of 276
Owner's Manual (Operator Manual).....4
Parking Brake................121
Pets......................112
Phone (Uconnect)..............234
Power
Outlet (Auxiliary Electrical Outlet) . .52
Windows..................38
Power Steering Fluid............211
Pregnant Women And Seat Belts......90
Preparation For Jacking..........154
Pretensioners
Seat Belts.................90
Radial Ply Tires...............194
Radio
Presets...............218, 223
Radio 130
Operating Instructions Radio
Mode...................217
Radio Operation...............218
Rear Seat, Folding..............21
Rear Swing Gate...............51
Rear Wiper/Washer..............32
Recreational Towing.............142
Shifting Into Transfer Case
Neutral (N)...............143Shifting Out Of Transfer Case Neutral (N)
.......................144
Refrigerant..................187
Release, Hood.................51
Reminder, Seat Belt.............85
Remote Control
Starting System.............14
Remote Sound System (Radio)
Controls..................232
Remote Starting System...........14
Replacement Bulbs.............146
Replacement Keys..............17
Replacement Tires.............196
Resetting Oil Change Indicator.......58
Restraint, Head................25
Roll Over Warning................4
Rotation, Tires................201
Safety Checks Inside Vehicle.......113
Safety Checks Outside Vehicle......114
Safety, Exhaust Gas.............112
Safety Tips..................112
Schedule, Maintenance
.......170, 175
Seat Belt
Adjustable Upper Shoulder Belt
Anchorage.................89
Automatic Locking Retractor (ALR) . .90Energy Management Feature......90
Lap/Shoulder Belt Operation......88
Lap/Shoulder Belts............86
Lap/Shoulder Belt Untwisting.....89
Pregnant Women.............90
Seat Belt Pretensioner.........90
Seat Belt Reminder............85
Seat Belt Maintenance...........204
Seat Belt Reminder..............85
Seat Belts................85, 113
Adjustable Shoulder Belt........89
Adjustable Upper Shoulder
Anchorage.................89
Front Seat............85, 86, 88
Inspection................113
Operating Instructions.........88
Pregnant Women.............90
Pretensioners...............90
Rear Seat.................86
Reminder.................60
Untwisting Procedure..........89
Seats......................21
Adjustment................21
Easy Entry..............21, 23
Fold And Tumble Rear.........24
Heated...................21
Memory..................21
263