tow bar JEEP WRANGLER 2020 Owner handbook (in English)
[x] Cancel search | Manufacturer: JEEP, Model Year: 2020, Model line: WRANGLER, Model: JEEP WRANGLER 2020Pages: 276, PDF Size: 4.47 MB
Page 66 of 276
— 4WD Indicator Light — If Equipped
This light alerts the driver that the vehicle is
in the four-wheel drive mode, and the front
and rear driveshafts are mechanically locked
together forcing the front and rear wheels to
rotate at the same speed.
— Sway Bar Indicator Light — If
Equipped
This indicator will illuminate when the front
sway bar is disconnected.
Green Indicator Lights
— Front Fog Indicator Light — If
Equipped
This indicator will illuminate when the front
fog lights are on.
— Turn Signal Indicator Lights
When the left or right turn signal is activated,
the turn signal indicator will flash indepen-
dently and the corresponding exterior turn
signal lamps will flash. Turn signals can be
activated when the multifunction lever is
moved down (left) or up (right).NOTE:
• A continuous chime will sound if the ve-
hicle is driven more than 1 mile (1.6 km)
with either turn signal on.
• Check for an inoperative outside light bulb
if either indicator flashes at a rapid rate.
White Indicator Lights
CRUISE— Cruise Indicator
This indicator shows that the Speed Control
System is ON.
— Hill Descent Control (HDC) Indicator
Light — If Equipped
This indicator shows when the Hill Descent
Control (HDC) feature is turned on. The lamp
will be on solid when HDC is armed. HDC can
only be armed when the transfer case is in the
“4WD LOW” position and the vehicle speed
is less then 30 mph (48 km/h). If these
conditions are not met while attempting to
use the HDC feature, the HDC indicator light
will flash on/off.
Blue Indicator Lights
— High Beam Indicator Light
This indicator shows that the high beam
headlights are on. With the low beams acti-
vated, push the multifunction lever forward
(toward the front of the vehicle) to turn on the
high beams. Pull the multifunction lever rear-
ward (toward the rear of the vehicle) to turn
off the high beams. If the high beams are off,
pull the lever toward you for a temporary high
beam on, "flash to pass" scenario.
ONBOARD DIAGNOSTIC
SYSTEM — OBD II
Your vehicle is equipped with a sophisticated
Onboard Diagnostic system called OBD II.
This system monitors the performance of the
emissions, engine, and automatic transmis-
sion control systems. When these systems are
operating properly, your vehicle will provide
excellent performance and fuel economy, as
well as engine emissions well within current
government regulations.
GETTING TO KNOW YOUR INSTRUMENT PANEL
64
Page 145 of 276
CAUTION!
• Automatic transmissions must be
placed in PARK for recreational towing.
• Manual transmissions must be placed in
gear (not in Neutral) for recreational
towing.
• Before recreational towing, perform the
procedure outlined under “Shifting Into
NEUTRAL (N)” to be certain that the
transfer case is fully in NEUTRAL (N).
Otherwise, internal damage will result.
• Towing this vehicle in violation of the
above requirements can cause severe
transmission and/or transfer case dam-
age. Damage from improper towing is
not covered under the New Vehicle Lim-
ited Warranty.
• Do not use a bumper-mounted clamp-on
tow bar on your vehicle. The bumper
face bar will be damaged.
Shifting Into NEUTRAL (N)
Use the following procedure to prepare your
vehicle for recreational towing.
WARNING!
You or others could be injured or killed if
you leave the vehicle unattended with the
transfer case in the NEUTRAL (N) position
without first fully engaging the parking
brake. The transfer case NEUTRAL (N)
position disengages both the front and rear
driveshafts from the powertrain, and will
allow the vehicle to roll, even if the auto-
matic transmission is in PARK (or manual
transmission is in gear). The parking brake
should always be applied when the driver
is not in the vehicle.
CAUTION!
It is necessary to follow these steps to be
certain that the transfer case is fully in
NEUTRAL (N) before recreational towing
to prevent damage to internal parts.
1. Bring the vehicle to a complete stop on
level ground.
2. Press and hold the brake pedal.3. Shift the automatic transmission into
NEUTRAL or depress the clutch pedal on
a manual transmission.
4. Turn the engine OFF.
5. Shift the transfer case lever into NEU-
TRAL (N).
6. Start the engine.
7. Shift the transmission into REVERSE.
8. Release the brake pedal (and clutch pedal
on manual transmissions) for five seconds
and ensure that there is no vehicle
movement.
9. Repeat steps seven and eight with auto-
matic transmission in DRIVE or manual
transmission in first gear.
10. Turn the engine OFF and leave the igni-
tion in the unlocked ACC position.
11. Firmly apply the parking brake.
12. Shift the transmission into PARK or
place manual transmission in gear (NOT
in NEUTRAL).
143
Page 146 of 276
CAUTION!
Damage to the transmission may occur if
the transmission is shifted into PARK with
the transfer case in NEUTRAL (N) and the
engine running. With the transfer case in
NEUTRAL (N) ensure that the engine is
OFF before shifting the transmission into
PARK.
13. Attach the vehicle to the tow vehicle
using a suitable tow bar.
14. Release the parking brake.
15. Disconnect the negative battery cable,
and secure it away from the negative
battery post.
Shifting Out of NEUTRAL (N)
Use the following procedure to prepare your
vehicle for normal usage.
1. Bring the vehicle to a complete stop,
leaving it connected to the tow vehicle.
2. Firmly apply the parking brake.
3. Reconnect the negative battery cable.
4. Turn the ignition to the LOCK position.
5. Turn the ignition to the ON/RUN position,
but do not start the engine.
6. Press and hold the brake pedal.
7. Shift the transmission into NEUTRAL.8. Shift the transfer case lever to the desired
position.
NOTE:
When shifting the transfer case out of
NEUTRAL (N), the engine should remain
OFF to avoid gear clash.
9. Shift the automatic transmission into
PARK, or place manual transmission in
NEUTRAL.
10. Release the brake pedal.
11. Disconnect vehicle from the tow vehicle.
12. Start the engine.
13. Press and hold the brake pedal.
14. Release the parking brake.
15. Shift the transmission into gear, release
the brake pedal (and clutch pedal on
manual transmissions), and check that
the vehicle operates normally.
STARTING AND OPERATING
144
Page 168 of 276
Wheel Lift Or Dolly TowFrontNOT ALLOWED
RearNOT ALLOWED
FlatbedALL BEST METHOD
Proper towing or lifting equipment is required
to prevent damage to your vehicle. Use only
tow bars and other equipment designed for
this purpose, following equipment manufac-
turer’s instructions. Use of safety chains is
mandatory. Attach a tow bar or other towing
device to main structural members of the
vehicle, not to bumpers or associated brack-
ets. State and local laws regarding vehicles
under tow must be observed.
If you must use the accessories (wipers, de-
frosters, etc.) while being towed, the ignition
must be in the ON/RUN position, not the ACC
position.
If the vehicle's battery is discharged, refer to
“Gear Selector Override” in this section for
instructions on shifting the automatic trans-
mission out of PARK for towing.CAUTION!
• Do not use sling type equipment when
towing. Vehicle damage may occur.
• When securing the vehicle to a flatbed
truck, do not attach to front or rear
suspension components. Damage to
your vehicle may result from improper
towing.
• If the vehicle being towed requires steer-
ing, the ignition switch must be in the
ACC or ON/RUN mode, not in the LOCK/
OFF mode.
Without The Ignition Key
Special care must be taken when the vehicle
is towed with the ignition in the LOCK posi-
tion. The only approved method of towing
without the ignition key is with a flatbed
truck. Proper towing equipment is necessary
to prevent damage to the vehicle.
Four–Wheel Drive Models
The manufacturer recommends towing with
all wheelsOFFthe ground. Acceptable meth-
ods are to tow the vehicle on a flatbed or with
one end of the vehicle raised and the oppo-
site end on a towing dolly.
If flatbed equipment is not available and the
transfer case is operable, the vehicle may be
towed (in the forward direction, withALL
wheels on the ground),IFthe transfer case is
inNEUTRAL(N) and the transmission is in
PARK(for automatic transmissions) or in gear
(NOTinNEUTRAL, for manual transmissions).
Refer to “Recreational Towing” in “Starting
And Operating” for detailed instructions.
CAUTION!
• Front or rear wheel lifts must not be used
(if the remaining wheels are on the
ground). Internal damage to the trans-
IN CASE OF EMERGENCY
166
Page 169 of 276
CAUTION!
mission or transfer case will occur if a
front or rear wheel lift is used when
towing.
• Towing this vehicle in violation of the
above requirements can cause severe
transmission and/or transfer case dam-
age. Damage from improper towing is
not covered under the New Vehicle Lim-
ited Warranty.
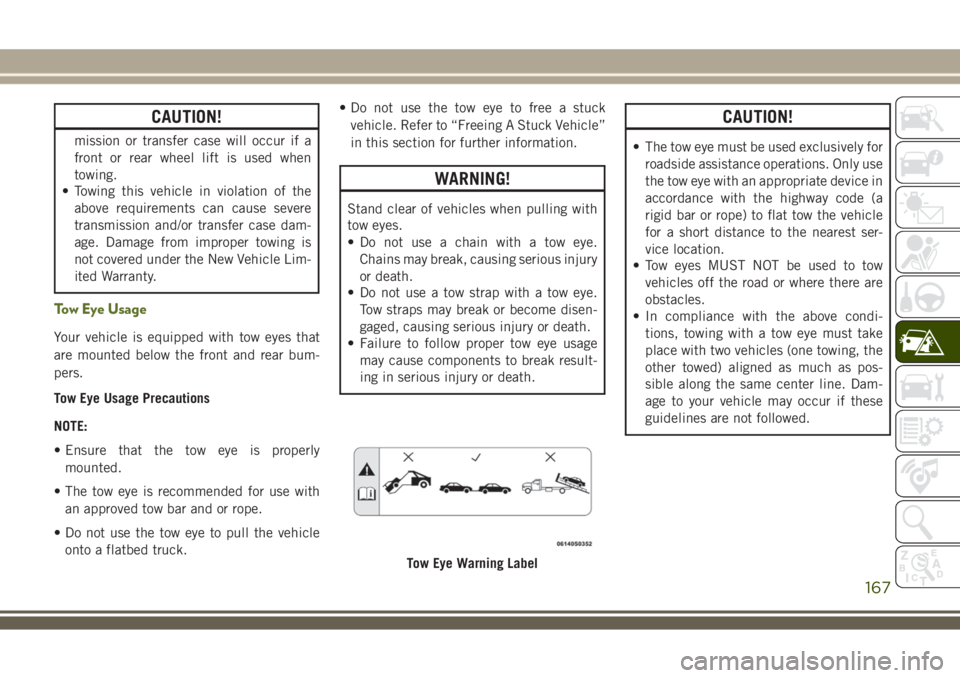
Tow Eye Usage
Your vehicle is equipped with tow eyes that
are mounted below the front and rear bum-
pers.
Tow Eye Usage Precautions
NOTE:
• Ensure that the tow eye is properly
mounted.
• The tow eye is recommended for use with
an approved tow bar and or rope.
• Do not use the tow eye to pull the vehicle
onto a flatbed truck.• Do not use the tow eye to free a stuck
vehicle. Refer to “Freeing A Stuck Vehicle”
in this section for further information.
WARNING!
Stand clear of vehicles when pulling with
tow eyes.
• Do not use a chain with a tow eye.
Chains may break, causing serious injury
or death.
• Do not use a tow strap with a tow eye.
Tow straps may break or become disen-
gaged, causing serious injury or death.
• Failure to follow proper tow eye usage
may cause components to break result-
ing in serious injury or death.
CAUTION!
• The tow eye must be used exclusively for
roadside assistance operations. Only use
the tow eye with an appropriate device in
accordance with the highway code (a
rigid bar or rope) to flat tow the vehicle
for a short distance to the nearest ser-
vice location.
• Tow eyes MUST NOT be used to tow
vehicles off the road or where there are
obstacles.
• In compliance with the above condi-
tions, towing with a tow eye must take
place with two vehicles (one towing, the
other towed) aligned as much as pos-
sible along the same center line. Dam-
age to your vehicle may occur if these
guidelines are not followed.
Tow Eye Warning Label
167