stop start JEEP WRANGLER 2020 Owner handbook (in English)
[x] Cancel search | Manufacturer: JEEP, Model Year: 2020, Model line: WRANGLER, Model: JEEP WRANGLER 2020Pages: 276, PDF Size: 4.47 MB
Page 145 of 276
CAUTION!
• Automatic transmissions must be
placed in PARK for recreational towing.
• Manual transmissions must be placed in
gear (not in Neutral) for recreational
towing.
• Before recreational towing, perform the
procedure outlined under “Shifting Into
NEUTRAL (N)” to be certain that the
transfer case is fully in NEUTRAL (N).
Otherwise, internal damage will result.
• Towing this vehicle in violation of the
above requirements can cause severe
transmission and/or transfer case dam-
age. Damage from improper towing is
not covered under the New Vehicle Lim-
ited Warranty.
• Do not use a bumper-mounted clamp-on
tow bar on your vehicle. The bumper
face bar will be damaged.
Shifting Into NEUTRAL (N)
Use the following procedure to prepare your
vehicle for recreational towing.
WARNING!
You or others could be injured or killed if
you leave the vehicle unattended with the
transfer case in the NEUTRAL (N) position
without first fully engaging the parking
brake. The transfer case NEUTRAL (N)
position disengages both the front and rear
driveshafts from the powertrain, and will
allow the vehicle to roll, even if the auto-
matic transmission is in PARK (or manual
transmission is in gear). The parking brake
should always be applied when the driver
is not in the vehicle.
CAUTION!
It is necessary to follow these steps to be
certain that the transfer case is fully in
NEUTRAL (N) before recreational towing
to prevent damage to internal parts.
1. Bring the vehicle to a complete stop on
level ground.
2. Press and hold the brake pedal.3. Shift the automatic transmission into
NEUTRAL or depress the clutch pedal on
a manual transmission.
4. Turn the engine OFF.
5. Shift the transfer case lever into NEU-
TRAL (N).
6. Start the engine.
7. Shift the transmission into REVERSE.
8. Release the brake pedal (and clutch pedal
on manual transmissions) for five seconds
and ensure that there is no vehicle
movement.
9. Repeat steps seven and eight with auto-
matic transmission in DRIVE or manual
transmission in first gear.
10. Turn the engine OFF and leave the igni-
tion in the unlocked ACC position.
11. Firmly apply the parking brake.
12. Shift the transmission into PARK or
place manual transmission in gear (NOT
in NEUTRAL).
143
Page 146 of 276
CAUTION!
Damage to the transmission may occur if
the transmission is shifted into PARK with
the transfer case in NEUTRAL (N) and the
engine running. With the transfer case in
NEUTRAL (N) ensure that the engine is
OFF before shifting the transmission into
PARK.
13. Attach the vehicle to the tow vehicle
using a suitable tow bar.
14. Release the parking brake.
15. Disconnect the negative battery cable,
and secure it away from the negative
battery post.
Shifting Out of NEUTRAL (N)
Use the following procedure to prepare your
vehicle for normal usage.
1. Bring the vehicle to a complete stop,
leaving it connected to the tow vehicle.
2. Firmly apply the parking brake.
3. Reconnect the negative battery cable.
4. Turn the ignition to the LOCK position.
5. Turn the ignition to the ON/RUN position,
but do not start the engine.
6. Press and hold the brake pedal.
7. Shift the transmission into NEUTRAL.8. Shift the transfer case lever to the desired
position.
NOTE:
When shifting the transfer case out of
NEUTRAL (N), the engine should remain
OFF to avoid gear clash.
9. Shift the automatic transmission into
PARK, or place manual transmission in
NEUTRAL.
10. Release the brake pedal.
11. Disconnect vehicle from the tow vehicle.
12. Start the engine.
13. Press and hold the brake pedal.
14. Release the parking brake.
15. Shift the transmission into gear, release
the brake pedal (and clutch pedal on
manual transmissions), and check that
the vehicle operates normally.
STARTING AND OPERATING
144
Page 149 of 276
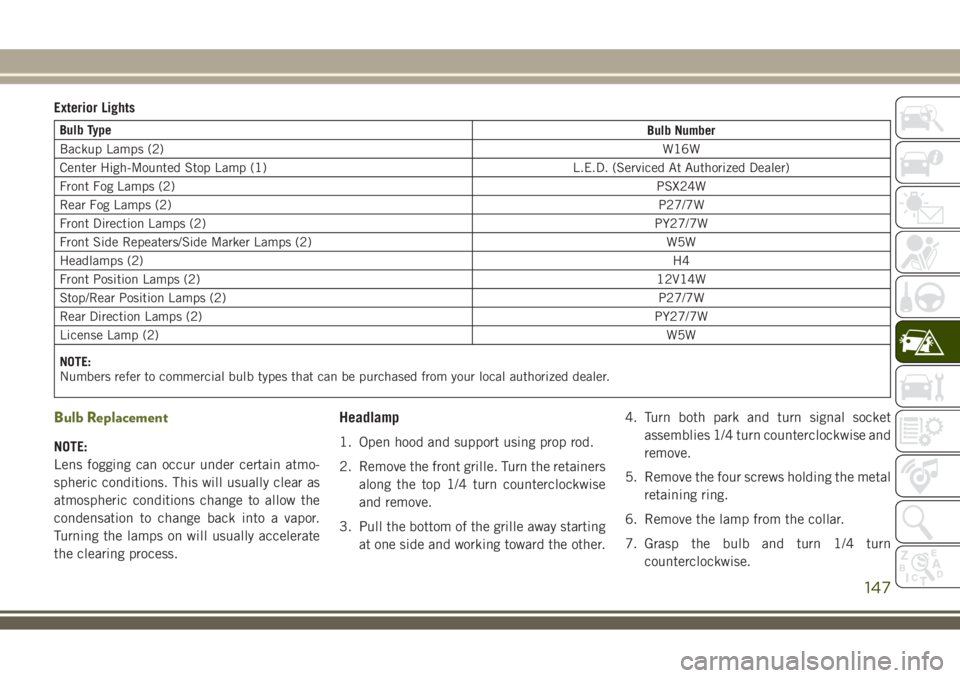
Exterior Lights
Bulb Type
Bulb Number
Backup Lamps (2)W16W
Center High-Mounted Stop Lamp (1) L.E.D. (Serviced At Authorized Dealer)
Front Fog Lamps (2)PSX24W
Rear Fog Lamps (2)P27/7W
Front Direction Lamps (2)PY27/7W
Front Side Repeaters/Side Marker Lamps (2) W5W
Headlamps (2)H4
Front Position Lamps (2)12V14W
Stop/Rear Position Lamps (2)P27/7W
Rear Direction Lamps (2)PY27/7W
License Lamp (2)W5W
NOTE:
Numbers refer to commercial bulb types that can be purchased from your local authorized dealer.
Bulb Replacement
NOTE:
Lens fogging can occur under certain atmo-
spheric conditions. This will usually clear as
atmospheric conditions change to allow the
condensation to change back into a vapor.
Turning the lamps on will usually accelerate
the clearing process.
Headlamp
1. Open hood and support using prop rod.
2. Remove the front grille. Turn the retainers
along the top 1/4 turn counterclockwise
and remove.
3. Pull the bottom of the grille away starting
at one side and working toward the other.4. Turn both park and turn signal socket
assemblies 1/4 turn counterclockwise and
remove.
5. Remove the four screws holding the metal
retaining ring.
6. Remove the lamp from the collar.
7. Grasp the bulb and turn 1/4 turn
counterclockwise.
147
Page 153 of 276
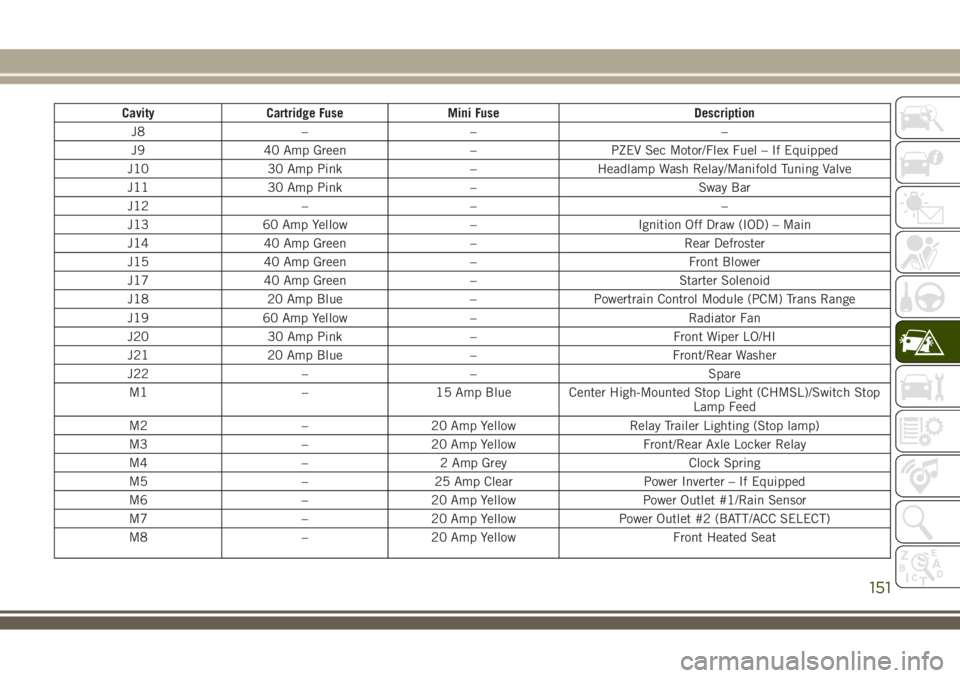
Cavity Cartridge Fuse Mini Fuse Description
J8 – – –
J9 40 Amp Green – PZEV Sec Motor/Flex Fuel – If Equipped
J10 30 Amp Pink – Headlamp Wash Relay/Manifold Tuning Valve
J11 30 Amp Pink – Sway Bar
J12 – – –
J13 60 Amp Yellow – Ignition Off Draw (IOD) – Main
J14 40 Amp Green – Rear Defroster
J15 40 Amp Green – Front Blower
J17 40 Amp Green – Starter Solenoid
J18 20 Amp Blue – Powertrain Control Module (PCM) Trans Range
J19 60 Amp Yellow – Radiator Fan
J20 30 Amp Pink – Front Wiper LO/HI
J21 20 Amp Blue – Front/Rear Washer
J22 – – Spare
M1 – 15 Amp Blue Center High-Mounted Stop Light (CHMSL)/Switch Stop
Lamp Feed
M2 – 20 Amp Yellow Relay Trailer Lighting (Stop lamp)
M3 – 20 Amp Yellow Front/Rear Axle Locker Relay
M4 – 2 Amp Grey Clock Spring
M5 – 25 Amp Clear Power Inverter – If Equipped
M6 – 20 Amp Yellow Power Outlet #1/Rain Sensor
M7 – 20 Amp Yellow Power Outlet #2 (BATT/ACC SELECT)
M8 – 20 Amp Yellow Front Heated Seat
151
Page 165 of 276
5. Reinstall the protective cover over the
remote positive(+)post of the discharged
vehicle.
If frequent jump starting is required to start
your vehicle you should have the battery and
charging system tested at an authorized
dealer.
CAUTION!
Accessories plugged into the vehicle
power outlets draw power from the vehi-
cle’s battery, even when not in use (i.e.,
cellular devices, etc.). Eventually, if
plugged in long enough without engine
operation, the vehicle’s battery will dis-
charge sufficiently to degrade battery life
and/or prevent the engine from starting.
IF YOUR ENGINE
OVERHEATS
In any of the following situations, you can
reduce the potential for overheating by taking
the appropriate action.
• On the highways — slow down.
• In city traffic — while stopped, shift trans-
mission into NEUTRAL, but do not increase
engine idle speed.
CAUTION!
Driving with a hot cooling system could
damage your vehicle. If the temperature
gauge reads HOT (H), pull over and stop
the vehicle. Idle the vehicle with the air
conditioner turned off until the pointer
drops back into the normal range. If the
pointer remains on HOT (H), and you hear
continuous chimes, turn the engine off
immediately and call for service.NOTE:
There are steps that you can take to slow
down an impending overheat condition:
• If your air conditioner (A/C) is on, turn it off.
The A/C system adds heat to the engine
cooling system and turning the A/C off can
help remove this heat.
• You can also turn the temperature control to
maximum heat, the mode control to floor
and the blower control to high. This allows
the heater core to act as a supplement to
the radiator and aids in removing heat from
the engine cooling system.WARNING!
You or others can be badly burned by hot
engine coolant (antifreeze) or steam from
your radiator. If you see or hear steam
coming from under the hood, do not open
the hood until the radiator has had time to
cool. Never try to open a cooling system
pressure cap when the radiator or coolant
bottle is hot.
163
Page 167 of 276
NOTE:
Push the "ESC Off" switch, to place the Elec-
tronic Stability Control (ESC) system in "Par-
tial Off" mode, before rocking the vehicle.
Refer to “Electronic Brake Control System”
in “Safety” in your Owner’s Manual for fur-
ther details. Once the vehicle has been freed,
push the "ESC Off" switch again to restore
"ESC On" mode.
WARNING!
Fast spinning tires can be dangerous.
Forces generated by excessive wheel
speeds may cause damage, or even failure,
of the axle and tires. A tire could explode
and injure someone. Do not spin your ve-
WARNING!
hicle's wheels faster than 30 mph
(48 km/h) or for longer than 30 seconds
continuously without stopping when you
are stuck and do not let anyone near a
spinning wheel, no matter what the speed.
CAUTION!
• When “rocking” a stuck vehicle by shift-
ing between DRIVE/SECOND GEAR and
REVERSE, do not spin the wheels faster
than 15 mph (24 km/h), or drivetrain
damage may result.
• Revving the engine or spinning the
wheels too fast may lead to transmission
CAUTION!
overheating and failure. It can also dam-
age the tires. Do not spin the wheels
above 30 mph (48 km/h) while in gear
(no transmission shifting occurring).
TOWING A DISABLED
VEHICLE
This section describes procedures for towing
a disabled vehicle using a commercial towing
service. If the transmission and drivetrain are
operable, disabled vehicles may also be
towed as described under “Recreational Tow-
ing” in the “Starting And Operating” section.
Towing Condition Wheels OFF The Ground 4WD MODELS
Flat Tow NONESee instructions under “Recreational Towing” in
“Starting And Operating”.
• Automatic Transmission inPARK
• Manual Transmission in gear (NOTin NEUTRAL)
• Transfer Case inNEUTRAL
• Ignition in ACC or ON/RUN position
• Tow inforwarddirection
165
Page 184 of 276
Checking Oil Level — Gasoline Engine
To ensure proper lubrication of your vehicle's
engine, the engine oil must be maintained at
the correct level. The engine oil level should
be checked five minutes after a warmed up
engine has been shut off.
Checking the oil while the vehicle is on level
ground will improve the accuracy of the oil
level readings. Always maintain the oil level
within the SAFE zone on the dipstick. Adding
1 quart (0.95 liters) of oil when the reading is
at the bottom of the crosshatch zone will
result in a reading at the top of the cross-
hatch zone on these engines.
CAUTION!
Overfilling or underfilling the crankcase
will cause aeration or loss of oil pressure.
This could damage your engine.
Checking Oil Level — Diesel Engine
To assure proper engine lubrication, the en-
gine oil must be maintained at the correct
level. Check the oil level at regular intervals,
such as every fuel stop.For vehicles equipped with a Diesel Particu-
late Filter (DPF), it is acceptable to have an
oil level up to 3/8 inch (10 mm) above the
MAX line. Beyond 3/8 inch (10 mm) it is
recommended to change the oil.
The best time to check the engine oil level is
about five minutes after a fully warmed en-
gine is shut off.
Checking the oil while the vehicle is on level
ground will improve the accuracy of the oil
level readings. Maintain the oil level between
the MIN and MAX markings on the dipstick.
Adding 1 U.S. Quart (0.95 L) of oil when the
reading is at the MIN mark will result in a
MAX reading on these engines.
Cooling System
WARNING!
• You or others can be badly burned by hot
engine coolant (antifreeze) or steam
from your radiator. If you see or hear
steam coming from under the hood, do
not open the hood until the radiator has
had time to cool. Never open a cooling
WARNING!
system pressure cap when the radiator
or coolant bottle is hot.
• Keep hands, tools, clothing, and jewelry
away from the radiator cooling fan when
the hood is raised. The fan starts auto-
matically and may start at any time,
whether the engine is running or not.
• When working near the radiator cooling
fan, disconnect the fan motor lead or
turn the ignition to the OFF mode. The
fan is temperature controlled and can
start at any time the ignition is in the ON
mode.
Engine Coolant Checks
Check the engine coolant (antifreeze) protec-
tion every 12 months (before the onset of
freezing weather, where applicable). If the
engine coolant (antifreeze) is dirty or rusty in
appearance, the system should be drained,
flushed and refilled with fresh engine coolant
(antifreeze). Check the front of the A/C con-
denser (if equipped) or radiator for any accu-
mulation of bugs, leaves, etc. If dirty, clean
SERVICING AND MAINTENANCE
182
Page 261 of 276
Accessories..................212
Mopar...................212
Adding Fuel.................139
AirBag .....................93
Advance Front Air Bag.........93
Air Bag Operation.............94
Air Bag Warning Light..........92
Enhanced Accident Response . .98, 168
Event Data Recorder (EDR)......168
Front Air Bag...............93
If A Deployment Occurs.........97
Knee Impact Bolsters..........95
Maintaining Your Air Bag System . . .98
Transporting Pets............112
Air Bag Light............58, 92, 113
Air Bag Maintenance.............98
Air Conditioner Maintenance.......186
Air Conditioning Filter.........38, 187
Air Conditioning, Operating Tips......37
Air Conditioning Refrigerant. . . .186, 187
Air Conditioning System.......37, 186
Air Pressure, Tires..............193
Alarm (Security Alarm).........18, 61
Alterations/Modifications, Vehicle......4
Antifreeze (Engine Coolant)........210Anti-Lock Brake System (ABS).......68
Anti-Lock Warning Light...........61
Arming System (Security Alarm)......18
Assist, Hill Start................70
Audio Jack...............219, 226
Audio Settings................218
Automatic Headlights............29
Automatic Oil Change Indicator......58
Automatic Temperature Control (ATC) . . .37
Automatic Transmission..........127
Fluid Level Check...........184
Fluid Type................211
Autostick...................128
Axle Fluid...................211
Axle Lock...................132
Battery..................60, 186
Charging System Light.........60
Belts, Seat
.................
.113
Brake Assist System.............69
Brake Control System, Electronic.....69
Brake Fluid..............183, 211
Brake System................183
Fluid Check...............183
Master Cylinder.............183Parking..................121
Brake/Transmission Interlock.......127
Bulb Replacement..........146, 147
Bulbs, Light.................114
Capacities, Fluid..............210
Caps, Filler
Fuel....................139
Oil (Engine)...............180
Carbon Monoxide Warning.........112
Car Washes..................202
CD (Compact Disc) Player.........218
Center High Mounted Stop Light.....149
Chains, Tire..................200
Changing A Flat Tire.........154, 192
Checking Your Vehicle For Safety. . . .112
Checks, Safety................112
Child Restraints
How To Stow An Unused ALR Seat
Belt....................110
Cleaning
Wheels..................199
Climate Control................33
Manual...................33
Clock Setting.............218, 221
INDEX
259