window JEEP WRANGLER 2020 Owner handbook (in English)
[x] Cancel search | Manufacturer: JEEP, Model Year: 2020, Model line: WRANGLER, Model: JEEP WRANGLER 2020Pages: 276, PDF Size: 4.47 MB
Page 49 of 276
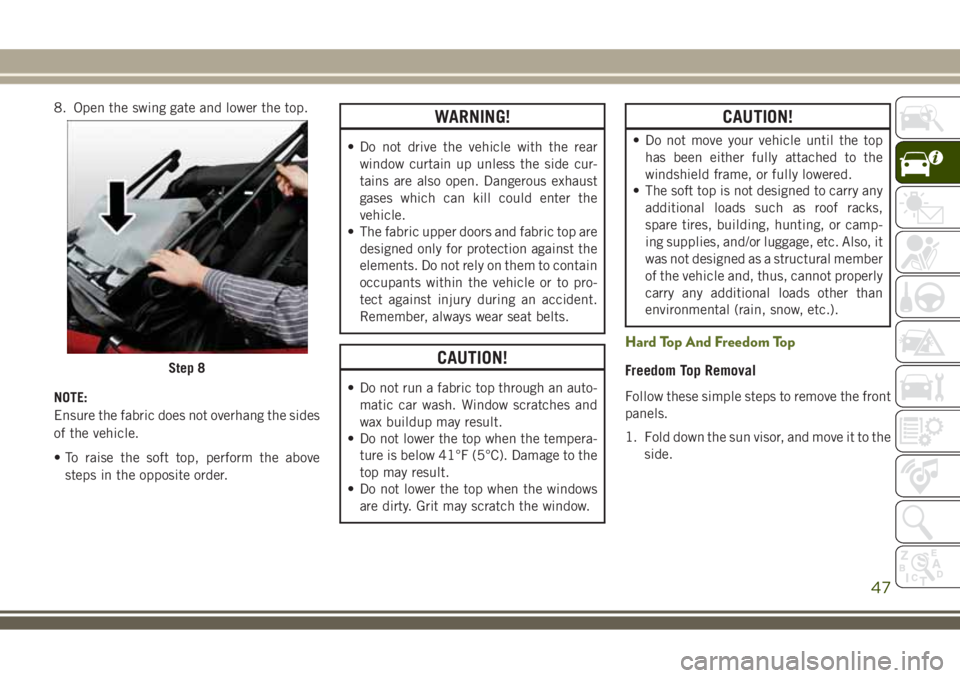
8. Open the swing gate and lower the top.
NOTE:
Ensure the fabric does not overhang the sides
of the vehicle.
• To raise the soft top, perform the above
steps in the opposite order.WARNING!
• Do not drive the vehicle with the rear
window curtain up unless the side cur-
tains are also open. Dangerous exhaust
gases which can kill could enter the
vehicle.
• The fabric upper doors and fabric top are
designed only for protection against the
elements. Do not rely on them to contain
occupants within the vehicle or to pro-
tect against injury during an accident.
Remember, always wear seat belts.
CAUTION!
• Do not run a fabric top through an auto-
matic car wash. Window scratches and
wax buildup may result.
• Do not lower the top when the tempera-
ture is below 41°F (5°C). Damage to the
top may result.
• Do not lower the top when the windows
are dirty. Grit may scratch the window.
CAUTION!
• Do not move your vehicle until the top
has been either fully attached to the
windshield frame, or fully lowered.
• The soft top is not designed to carry any
additional loads such as roof racks,
spare tires, building, hunting, or camp-
ing supplies, and/or luggage, etc. Also, it
was not designed as a structural member
of the vehicle and, thus, cannot properly
carry any additional loads other than
environmental (rain, snow, etc.).
Hard Top And Freedom Top
Freedom Top Removal
Follow these simple steps to remove the front
panels.
1. Fold down the sun visor, and move it to the
side.
Step 8
47
Page 51 of 276
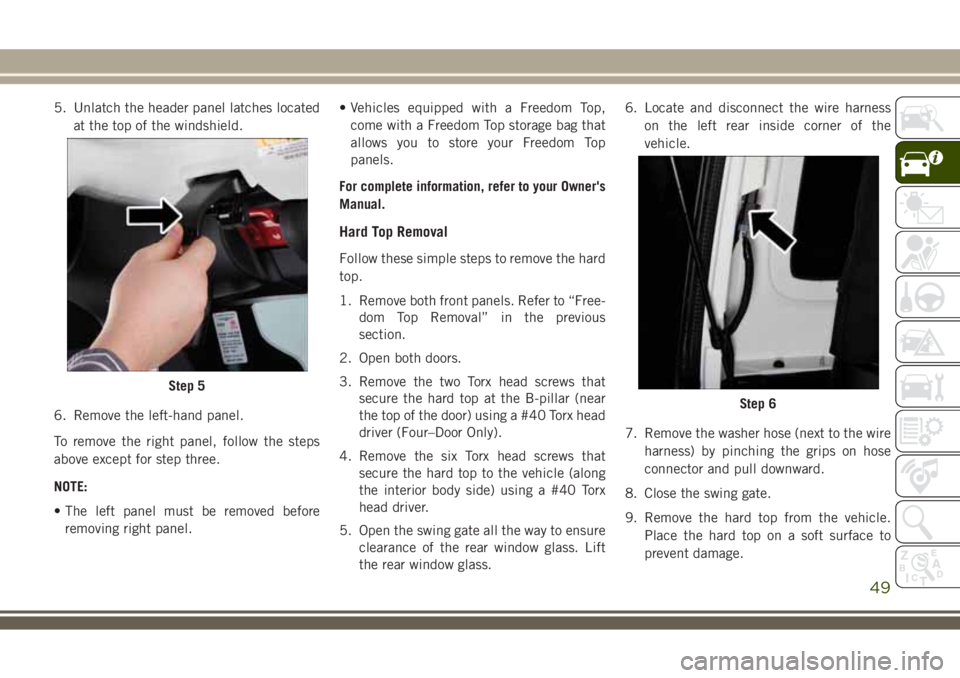
5. Unlatch the header panel latches located
at the top of the windshield.
6. Remove the left-hand panel.
To remove the right panel, follow the steps
above except for step three.
NOTE:
• The left panel must be removed before
removing right panel.• Vehicles equipped with a Freedom Top,
come with a Freedom Top storage bag that
allows you to store your Freedom Top
panels.
For complete information, refer to your Owner's
Manual.
Hard Top Removal
Follow these simple steps to remove the hard
top.
1. Remove both front panels. Refer to “Free-
dom Top Removal” in the previous
section.
2. Open both doors.
3. Remove the two Torx head screws that
secure the hard top at the B-pillar (near
the top of the door) using a #40 Torx head
driver (Four–Door Only).
4. Remove the six Torx head screws that
secure the hard top to the vehicle (along
the interior body side) using a #40 Torx
head driver.
5. Open the swing gate all the way to ensure
clearance of the rear window glass. Lift
the rear window glass.6. Locate and disconnect the wire harness
on the left rear inside corner of the
vehicle.
7. Remove the washer hose (next to the wire
harness) by pinching the grips on hose
connector and pull downward.
8. Close the swing gate.
9. Remove the hard top from the vehicle.
Place the hard top on a soft surface to
prevent damage.
Step 5
Step 6
49
Page 53 of 276
Wind Buffeting
Wind buffeting can be described as a
helicopter-type percussion sound. If buffet-
ing occurs with the rear windows open, adjust
the front and rear windows together.
HOOD
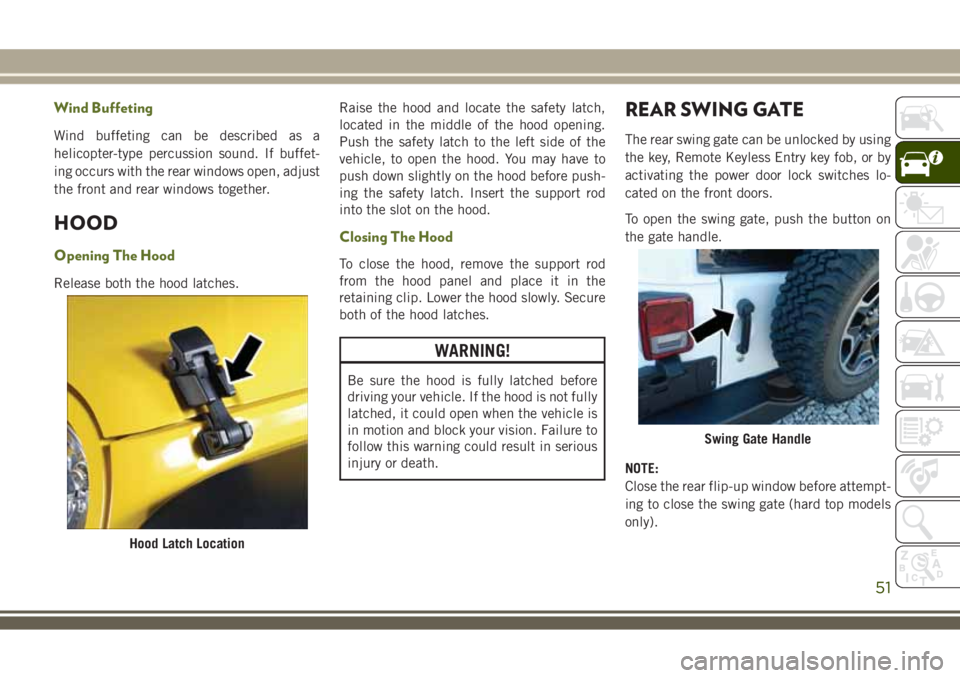
Opening The Hood
Release both the hood latches.Raise the hood and locate the safety latch,
located in the middle of the hood opening.
Push the safety latch to the left side of the
vehicle, to open the hood. You may have to
push down slightly on the hood before push-
ing the safety latch. Insert the support rod
into the slot on the hood.
Closing The Hood
To close the hood, remove the support rod
from the hood panel and place it in the
retaining clip. Lower the hood slowly. Secure
both of the hood latches.
WARNING!
Be sure the hood is fully latched before
driving your vehicle. If the hood is not fully
latched, it could open when the vehicle is
in motion and block your vision. Failure to
follow this warning could result in serious
injury or death.
REAR SWING GATE
The rear swing gate can be unlocked by using
the key, Remote Keyless Entry key fob, or by
activating the power door lock switches lo-
cated on the front doors.
To open the swing gate, push the button on
the gate handle.
NOTE:
Close the rear flip-up window before attempt-
ing to close the swing gate (hard top models
only).
Hood Latch Location
Swing Gate Handle
51
Page 54 of 276
WARNING!
Driving with the flip-up window open can
allow poisonous exhaust gases into your
vehicle. You and your passengers could be
injured by these fumes. Keep the flip-up
window closed when you are operating the
vehicle.
CAUTION!
Do not push on rear wiper blade when
closing the rear flip-up window, as damage
to the blade will result.
INTERNAL EQUIPMENT
Power Outlets
There are three possible 12 Volt Power Out-
lets in this vehicle.
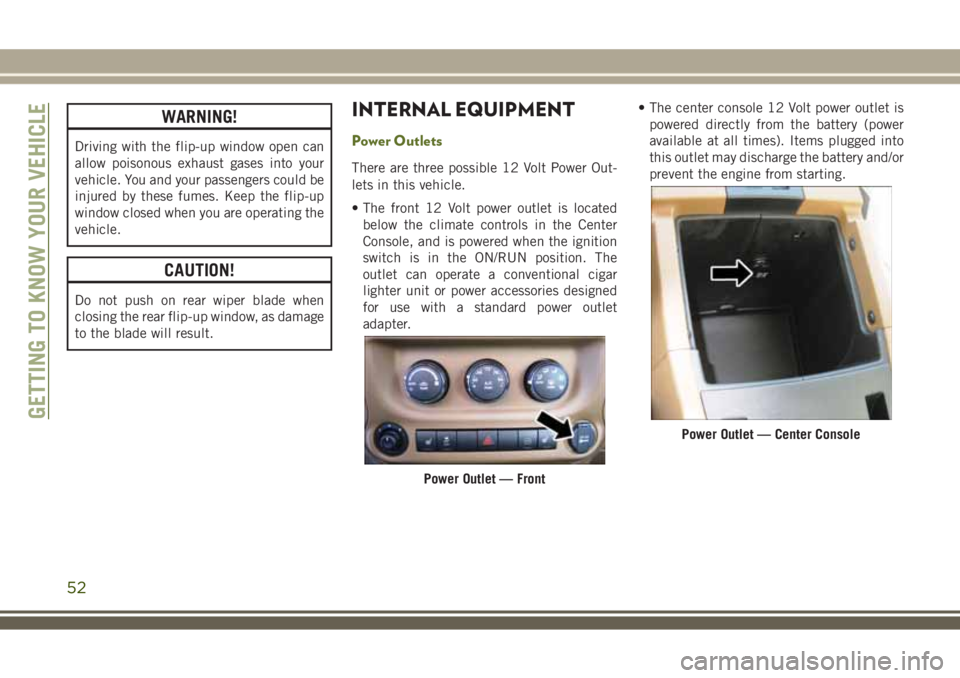
• The front 12 Volt power outlet is located
below the climate controls in the Center
Console, and is powered when the ignition
switch is in the ON/RUN position. The
outlet can operate a conventional cigar
lighter unit or power accessories designed
for use with a standard power outlet
adapter.• The center console 12 Volt power outlet is
powered directly from the battery (power
available at all times). Items plugged into
this outlet may discharge the battery and/or
prevent the engine from starting.
Power Outlet — Front
Power Outlet — Center Console
GETTING TO KNOW YOUR VEHICLE
52
Page 84 of 276
will no longer be highlighted or shown in a
different color and the Tire Pressure Monitor-
ing Telltale Light will extinguish once the
updated tire pressure(s) have been received.
NOTE:
When filling warm tires, the tire pressure may
need to be increased up to an additional 4 psi
(30 kPa) above the recommended cold plac-
ard pressure in order to turn the Tire Pressure
Monitoring Telltale Light off.
The vehicle may need to be driven for up to
10 minutes above 15 mph (24 km/h) to
receive this information.
Service TPM System Warning
The “Tire Pressure Monitoring Telltale Light”
will flash on and off for 75 seconds, and
remain on solid when a system fault is de-
tected. The system fault will also sound a
chime. The instrument cluster will display a
“SERVICE TPM SYSTEM” message for a
minimum of five seconds. This message is
then followed by a graphic display, with “- -“
in place of the pressure value(s), indicating
which Tire Pressure Monitoring Sensor(s) is
not being received.If the ignition switch is cycled, this sequence
will repeat, providing the system fault still
exists. If the system fault no longer exists, the
“Tire Pressure Monitoring Telltale Light” will
no longer flash, the "SERVICE TPM SYSTEM"
message will not be present, and a pressure
value will be displayed instead of dashes. A
system fault can occur by any of the follow-
ing:
• Jamming due to electronic devices or driv-
ing next to facilities emitting the same
Radio Frequencies as the TPM sensors.
• Installing some form of aftermarket window
tinting that affects radio wave signals.
• Lots of snow or ice around the wheels or
wheel housings.
• Using tire chains on the vehicle.
• Using wheels/tires not equipped with TPM
sensors.
NOTE:
• If your vehicle is equipped with a matching
full-size spare wheel and tire assembly, it
has a tire pressure monitoring sensor, and
can be monitored by the Tire Pressure
Monitoring System (TPMS) when swappedwith a low pressure road tire. In the event
that the matching full-size spare tire is
swapped with a low pressure road tire, the
next ignition switch cycle will still show the
“Tire Pressure Monitoring Telltale Light” to
be ON, a chime to sound, a “LOW TIRE”
message to appear in the instrument clus-
ter, and the graphic display will still show
the low tire pressure value highlighted or
shown in a different color. Driving the ve-
hicle for up to 10 minutes above 15 mph
(24 km/h) will turn OFF the “Tire Pressure
Monitoring Telltale Light” as long as none
of road tires are below the low pressure
warning threshold.
• If your vehicle is not equipped with a
matching full-size spare wheel and tire as-
sembly, it does not have a tire pressure
monitoring sensor in the spare tire. The
TPMS will not be able to monitor the tire
pressure. If you install the spare tire in
place of a road tire that has a pressure
below the low-pressure warning limit, upon
the next ignition switch cycle, the “Tire
Pressure Monitoring Telltale Light” will re-
main ON, a chime will sound, and the
instrument cluster will still display a high-
lighted or different color pressure value in
SAFETY
82
Page 87 of 276
8. Do not lean against the door or window. If
your vehicle has side air bags, and deploy-
ment occurs, the side air bags will inflate
forcefully into the space between occu-
pants and the door and occupants could
be injured.
9. If the air bag system in this vehicle needs
to be modified to accommodate a dis-
abled person, refer to the “Customer As-
sistance” section for customer service
contact information.
WARNING!
• NEVER use a rearward facing child re-
straint on a seat protected by an ACTIVE
AIRBAG in front of it, DEATH or SERI-
OUS INJURY to the CHILD can occur.
• Only use a rear-facing child restraint in a
vehicle with a rear seat.
• A deploying passenger front air bag can
cause death or serious injury to a child
12 years or younger, including a child in
a rear-facing child restraint.
Seat Belt Systems
Buckle up even though you are an excellent
driver, even on short trips. Someone on the
road may be a poor driver and could cause a
collision that includes you. This can happen
far away from home or on your own street.
Research has shown that seat belts save
lives, and they can reduce the seriousness of
injuries in a collision. Some of the worst
injuries happen when people are thrown from
the vehicle. Seat belts reduce the possibility
of ejection and the risk of injury caused by
striking the inside of the vehicle. Everyone in
a motor vehicle should be belted at all times.
Enhanced Seat Belt Use Reminder System
(BeltAlert)
Driver And Passenger BeltAlert — If Equipped
BeltAlert is a feature intended to remind
the driver and outboard front seat passenger (if
equipped with outboard front passenger seat
BeltAlert) to buckle their seat belts. The Belt
Alert feature is active whenever the ignition
switch is in the START or ON/RUN position.
Initial Indication
If the driver is unbuckled when the ignition
switch is first in the START or ON/RUN posi-
tion, a chime will signal for a few seconds. If
the driver or outboard front seat passenger (if
equipped with outboard front passenger seat
BeltAlert) is unbuckled when the ignition
switch is first in the START or ON/RUN posi-
tion the Seat Belt Reminder Light will turn on
and remain on until both outboard front seat
belts are buckled. The outboard front passen-
ger seat BeltAlert is not active when an out-
board front passenger seat is unoccupied.
BeltAlert Warning Sequence
The BeltAlert warning sequence is activated
when the vehicle is moving above a specified
vehicle speed range and the driver or out-
board front seat passenger is unbuckled (if
equipped with outboard front passenger seat
BeltAlert) (the outboard front passenger seat
BeltAlert is not active when the outboard
front passenger seat is unoccupied). The
BeltAlert warning sequence starts by blinking
the Seat Belt Reminder Light and sounding
an intermittent chime. Once the BeltAlert
warning sequence has completed, the Seat
85
Page 98 of 276
properly, or if items are positioned in the area
where the SAB inflates. Children are at an
even greater risk of injury from a deploying air
bag.
WARNING!
Do not use accessory seat covers or place
objects between you and the Side Air
Bags; the performance could be adversely
affected and/or objects could be pushed
into you, causing serious injury.
Side Impacts
The Side Air Bags are designed to activate in
certain side impacts. The Occupant Restraint
Controller (ORC) determines whether the de-
ployment of the Side Air Bags in a particular
impact event is appropriate, based on the
severity and type of collision. The side impact
sensors aid the ORC in determining the ap-
propriate response to impact events. The
system is calibrated to deploy the Side Air
Bags on the impact side of the vehicle during
impacts that require Side Air Bag occupant
protection. In side impacts, the Side Air Bags
deploy independently; a left side impact de-ploys the left Side Air Bags only and a right-
side impact deploys the right Side Air Bags
only. Vehicle damage by itself is not a good
indicator of whether or not Side Air Bags
should have deployed.
The Side Air Bags will not deploy in all side
collisions, including some collisions at cer-
tain angles, or some side collisions that do
not impact the area of the passenger com-
partment. The Side Air Bags may deploy
during angled or offset frontal collisions
where the front air bags deploy.
Side Air Bags are a supplement to the seat
belt restraint system. Side Air Bags deploy in
less time than it takes to blink your eyes.
WARNING!
• Occupants, including children, who are
up against or very close to Side Air Bags
can be seriously injured or killed. Occu-
pants, including children, should never
lean on or sleep against the door, side
windows, or area where the side air bags
inflate, even if they are in an infant or
child restraint.
WARNING!
• Seat belts (and child restraints where
appropriate) are necessary for your pro-
tection in all collisions. They also help
keep you in position, away from an in-
flating Side Air Bag. To get the best
protection from the Side Air Bags, occu-
pants must wear their seat belts properly
and sit upright with their backs against
the seats. Children must be properly
restrained in a child restraint or booster
seat that is appropriate for the size of the
child.
WARNING!
• Side Air Bags need room to inflate. Do
not lean against the door or window. Sit
upright in the center of the seat.
• Being too close to the Side Air Bags
during deployment could cause you to
be severely injured or killed.
• Relying on the Side Air Bags alone could
lead to more severe injuries in a colli-
sion. The Side Air Bags work with your
seat belt to restrain you properly. In
SAFETY
96
Page 114 of 276
Transporting Pets
Air Bags deploying in the front seat could harm
your pet. An unrestrained pet will be thrown
about and possibly injured, or injure a passen-
ger during panic braking or in a collision.
Pets should be restrained in the rear seat in
pet harnesses or pet carriers that are secured
by seat belts.
SAFETY TIPS
Transporting Passengers
NEVER TRANSPORT PASSENGERS IN THE
CARGO AREA.
WARNING!
• Do not leave children or animals inside
parked vehicles in hot weather. Interior
heat build-up may cause serious injury
or death.
• It is extremely dangerous to ride in a
cargo area, inside or outside of a vehicle.
In a collision, people riding in these
WARNING!
areas are more likely to be seriously
injured or killed.
• Do not allow people to ride in any area of
your vehicle that is not equipped with
seats and seat belts.
• Be sure everyone in your vehicle is in a
seat and using a seat belt properly.
Exhaust Gas
WARNING!
Exhaust gases can injure or kill. They con-
tain carbon monoxide (CO), which is col-
orless and odorless. Breathing it can make
you unconscious and can eventually poi-
son you. To avoid breathing (CO), follow
these safety tips:
• Do not run the engine in a closed garage
or in confined areas any longer than
needed to move your vehicle in or out of
the area.
• If you are required to drive with the
trunk/liftgate/rear doors open, make
WARNING!
sure that all windows are closed and the
climate control BLOWER switch is set at
high speed. DO NOT use the recircula-
tion mode.
• If it is necessary to sit in a parked
vehicle with the engine running, adjust
your heating or cooling controls to force
outside air into the vehicle. Set the
blower at high speed.
The best protection against carbon monoxide
entry into the vehicle body is a properly
maintained engine exhaust system.
Whenever a change is noticed in the sound of
the exhaust system, when exhaust fumes can
be detected inside the vehicle, or when the
underside or rear of the vehicle is damaged,
have a competent mechanic inspect the com-
plete exhaust system and adjacent body ar-
eas for broken, damaged, deteriorated, or
mispositioned parts. Open seams or loose
connections could permit exhaust fumes to
seep into the passenger compartment. In
SAFETY
112
Page 119 of 276
STARTING THE ENGINE
Before starting your vehicle, adjust your seat,
adjust both inside and outside mirrors, and
fasten your seat belts.
WARNING!
• When exiting the vehicle, always remove
the key fob from the ignition and lock
your vehicle.
• Never leave children alone in a vehicle,
or with access to an unlocked vehicle.
• Allowing children to be in a vehicle un-
attended is dangerous for a number of
reasons. A child or others could be seri-
ously or fatally injured. Children should
be warned not to touch the parking
brake, brake pedal or the gear selector.
• Do not leave the key fob in or near the
vehicle, or in a location accessible to
children. A child could operate power
windows, other controls, or move the
vehicle.
• Do not leave children or animals inside
parked vehicles in hot weather. Interior
WARNING!
heat build-up may cause serious injury
or death.
Manual Transmission — If Equipped
Apply the parking brake, place the gear se-
lector in NEUTRAL, and press the clutch
pedal before starting the vehicle. This vehicle
is equipped with a clutch interlocking igni-
tion system. It will not start unless the clutch
pedal is pressed to the floor.
Four-Wheel Drive Models Only
In 4L mode, this vehicle will start regardless
of whether or not the clutch pedal is pressed
to the floor. This feature enhances off-road
performance by allowing the vehicle to start
when in 4L without having to press the clutch
pedal. The “4WD Low Indicator Light” will
illuminate when the transfer case has been
shifted into this mode.
Automatic Transmission — If Equipped
Start the vehicle with the gear selector in the
PARK position (vehicle can also be started in
NEUTRAL). Apply the brake before shifting
to any driving range.
Normal Starting — Gasoline Engine
NOTE:
Normal starting of either a cold or a warm
engine is obtained without pumping or press-
ing the accelerator pedal.
Cycle the ignition switch to the START posi-
tion and release when the engine starts. If the
engine fails to start within 10 seconds, cycle
the ignition switch to the LOCK/OFF position,
wait 10 to 15 seconds, then repeat the “Nor-
mal Starting” procedure.
Extreme Cold Weather (Below –22°F Or
−30°C)
To ensure reliable starting at these tempera-
tures, use of an externally powered electric
engine block heater (available from your au-
thorized dealer) is recommended.
117
Page 124 of 276
• This light only shows that the parking brake
is applied. It does not show the degree of
brake application.
When parking on a hill, it is important to turn
the front wheels toward the curb on a down-
hill grade and away from the curb on an uphill
grade. For vehicles equipped with an auto-
matic transmission, apply the parking brake
before placing the gear selector in PARK,
otherwise the load on the transmission lock-
ing mechanism may make it difficult to move
the gear selector out of PARK. The parking
brake should always be applied whenever the
driver is not in the vehicle.
WARNING!
• Never use the PARK position on an au-
tomatic transmission as a substitute for
the parking brake. Always apply the
parking brake fully when parked to guard
WARNING!
against vehicle movement and possible
injury or damage.
• When exiting the vehicle, always remove
the key fob from the ignition and lock
your vehicle.
• Never leave children alone in a vehicle,
or with access to an unlocked vehicle.
Allowing children to be in a vehicle un-
attended is dangerous for a number of
reasons. A child or others could be seri-
ously or fatally injured. Children should
be warned not to touch the parking
brake, brake pedal or the gear selector.
• Do not leave the key fob in or near the
vehicle, or in a location accessible to
children. A child could operate power
windows, other controls, or move the
vehicle.
• Be sure the parking brake is fully disen-
gaged before driving; failure to do so can
lead to brake failure and a collision.
WARNING!
• Always fully apply the parking brake
when leaving your vehicle or it may roll
and cause damage or injury. Also, be
certain to leave an automatic transmis-
sion in PARK, a manual transmission in
REVERSE or first gear. Failure to do so
may cause the vehicle to roll and cause
damage or injury.
CAUTION!
If the “Brake Warning Light” remains on
with the parking brake released, a brake
system malfunction is indicated. Have the
brake system serviced by an authorized
dealer immediately.
STARTING AND OPERATING
122