ignition JEEP WRANGLER 2020 Owner handbook (in English)
[x] Cancel search | Manufacturer: JEEP, Model Year: 2020, Model line: WRANGLER, Model: JEEP WRANGLER 2020Pages: 276, PDF Size: 4.47 MB
Page 154 of 276
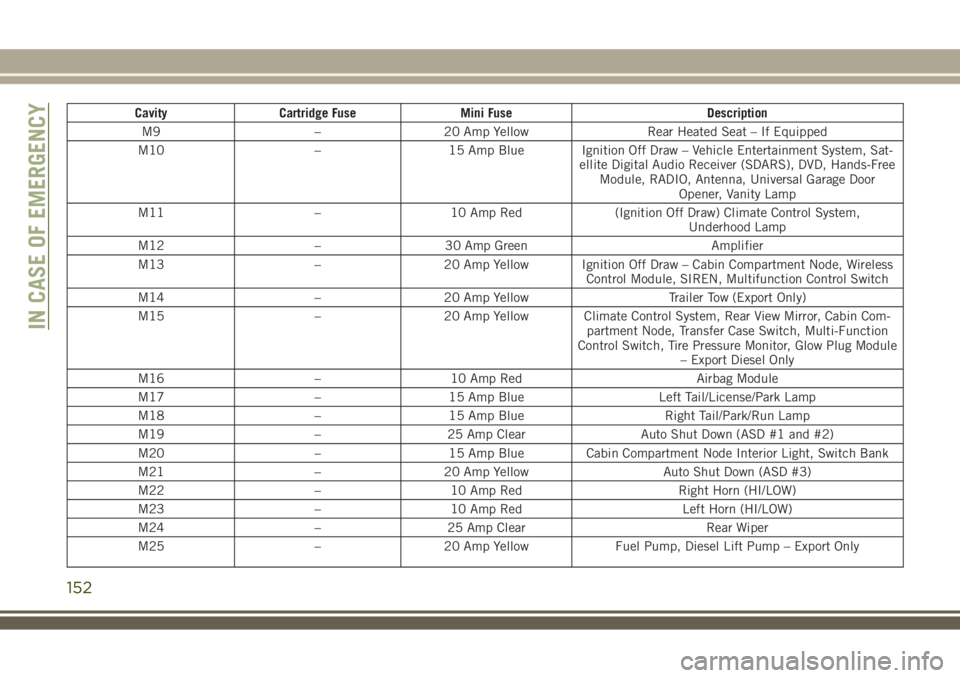
Cavity Cartridge Fuse Mini Fuse Description
M9 – 20 Amp Yellow Rear Heated Seat – If Equipped
M10 – 15 Amp Blue Ignition Off Draw – Vehicle Entertainment System, Sat-
ellite Digital Audio Receiver (SDARS), DVD, Hands-Free
Module, RADIO, Antenna, Universal Garage Door
Opener, Vanity Lamp
M11 – 10 Amp Red (Ignition Off Draw) Climate Control System,
Underhood Lamp
M12 – 30 Amp Green Amplifier
M13 – 20 Amp Yellow Ignition Off Draw – Cabin Compartment Node, Wireless
Control Module, SIREN, Multifunction Control Switch
M14 – 20 Amp Yellow Trailer Tow (Export Only)
M15 – 20 Amp Yellow Climate Control System, Rear View Mirror, Cabin Com-
partment Node, Transfer Case Switch, Multi-Function
Control Switch, Tire Pressure Monitor, Glow Plug Module
– Export Diesel Only
M16 – 10 Amp Red Airbag Module
M17 – 15 Amp Blue Left Tail/License/Park Lamp
M18 – 15 Amp Blue Right Tail/Park/Run Lamp
M19 – 25 Amp Clear Auto Shut Down (ASD #1 and #2)
M20 – 15 Amp Blue Cabin Compartment Node Interior Light, Switch Bank
M21 – 20 Amp Yellow Auto Shut Down (ASD #3)
M22 – 10 Amp Red Right Horn (HI/LOW)
M23 – 10 Amp Red Left Horn (HI/LOW)
M24 – 25 Amp Clear Rear Wiper
M25 – 20 Amp Yellow Fuel Pump, Diesel Lift Pump – Export Only
IN CASE OF EMERGENCY
152
Page 155 of 276
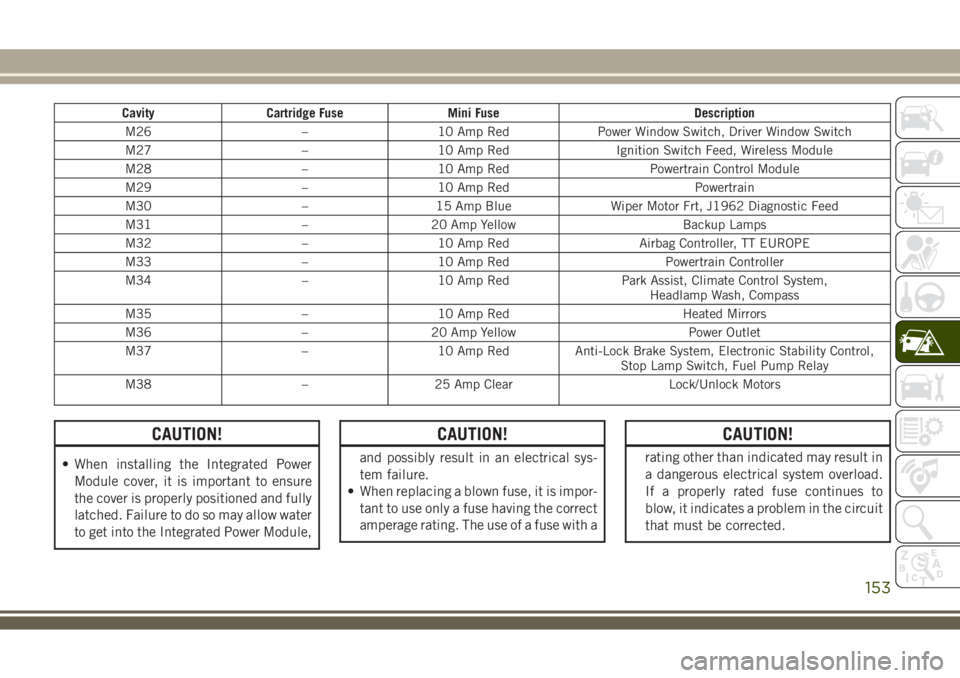
Cavity Cartridge Fuse Mini Fuse Description
M26 – 10 Amp Red Power Window Switch, Driver Window Switch
M27 – 10 Amp Red Ignition Switch Feed, Wireless Module
M28 – 10 Amp Red Powertrain Control Module
M29 – 10 Amp Red Powertrain
M30 – 15 Amp Blue Wiper Motor Frt, J1962 Diagnostic Feed
M31 – 20 Amp Yellow Backup Lamps
M32 – 10 Amp Red Airbag Controller, TT EUROPE
M33 – 10 Amp Red Powertrain Controller
M34 – 10 Amp Red Park Assist, Climate Control System,
Headlamp Wash, Compass
M35 – 10 Amp Red Heated Mirrors
M36 – 20 Amp Yellow Power Outlet
M37 – 10 Amp Red Anti-Lock Brake System, Electronic Stability Control,
Stop Lamp Switch, Fuel Pump Relay
M38 – 25 Amp Clear Lock/Unlock Motors
CAUTION!
• When installing the Integrated Power
Module cover, it is important to ensure
the cover is properly positioned and fully
latched. Failure to do so may allow water
to get into the Integrated Power Module,
CAUTION!
and possibly result in an electrical sys-
tem failure.
• When replacing a blown fuse, it is impor-
tant to use only a fuse having the correct
amperage rating. The use of a fuse with a
CAUTION!
rating other than indicated may result in
a dangerous electrical system overload.
If a properly rated fuse continues to
blow, it indicates a problem in the circuit
that must be corrected.
153
Page 157 of 276
4. Shift the automatic transmission into
PARK, or a manual transmission into
REVERSE.
5. Turn the ignition to LOCK.
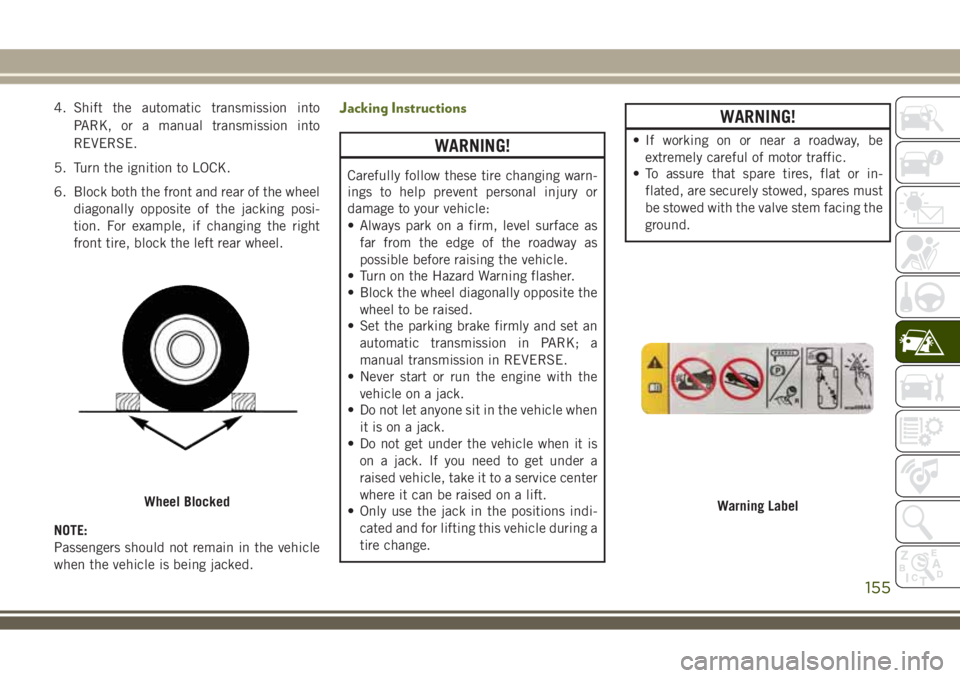
6. Block both the front and rear of the wheel
diagonally opposite of the jacking posi-
tion. For example, if changing the right
front tire, block the left rear wheel.
NOTE:
Passengers should not remain in the vehicle
when the vehicle is being jacked.Jacking Instructions
WARNING!
Carefully follow these tire changing warn-
ings to help prevent personal injury or
damage to your vehicle:
• Always park on a firm, level surface as
far from the edge of the roadway as
possible before raising the vehicle.
• Turn on the Hazard Warning flasher.
• Block the wheel diagonally opposite the
wheel to be raised.
• Set the parking brake firmly and set an
automatic transmission in PARK; a
manual transmission in REVERSE.
• Never start or run the engine with the
vehicle on a jack.
• Do not let anyone sit in the vehicle when
it is on a jack.
• Do not get under the vehicle when it is
on a jack. If you need to get under a
raised vehicle, take it to a service center
where it can be raised on a lift.
• Only use the jack in the positions indi-
cated and for lifting this vehicle during a
tire change.
WARNING!
• If working on or near a roadway, be
extremely careful of motor traffic.
• To assure that spare tires, flat or in-
flated, are securely stowed, spares must
be stowed with the valve stem facing the
ground.
Wheel BlockedWarning Label
155
Page 163 of 276
CAUTION!
voltage greater than 12 Volts or damage to
the battery, starter motor, alternator or
electrical system may occur.
NOTE:
When using a portable battery booster pack,
follow the manufacturer's operating instruc-
tions and precautions.
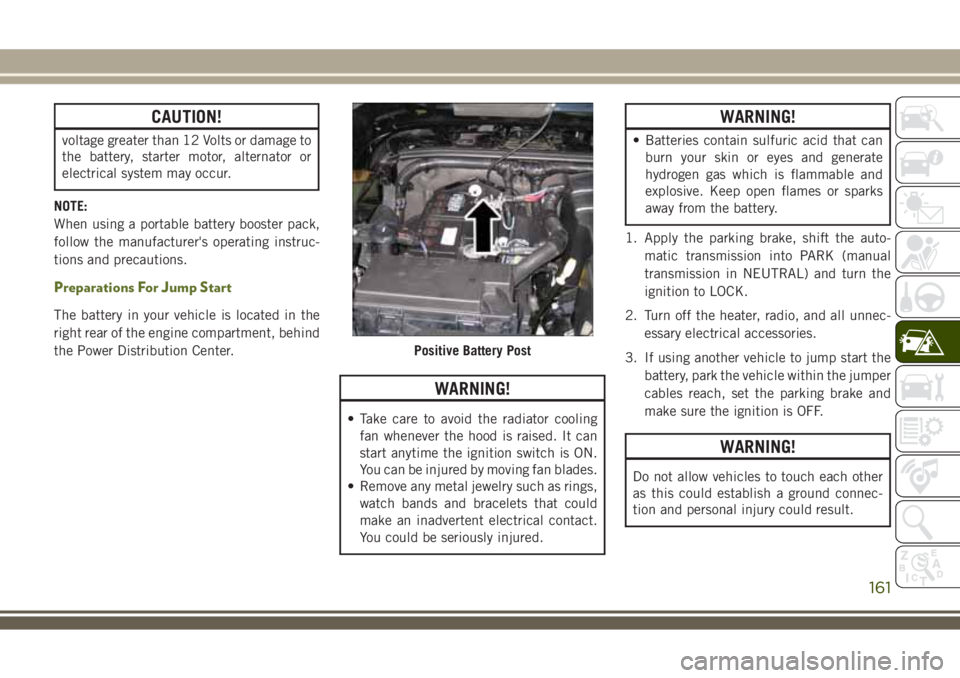
Preparations For Jump Start
The battery in your vehicle is located in the
right rear of the engine compartment, behind
the Power Distribution Center.
WARNING!
• Take care to avoid the radiator cooling
fan whenever the hood is raised. It can
start anytime the ignition switch is ON.
You can be injured by moving fan blades.
• Remove any metal jewelry such as rings,
watch bands and bracelets that could
make an inadvertent electrical contact.
You could be seriously injured.
WARNING!
• Batteries contain sulfuric acid that can
burn your skin or eyes and generate
hydrogen gas which is flammable and
explosive. Keep open flames or sparks
away from the battery.
1. Apply the parking brake, shift the auto-
matic transmission into PARK (manual
transmission in NEUTRAL) and turn the
ignition to LOCK.
2. Turn off the heater, radio, and all unnec-
essary electrical accessories.
3. If using another vehicle to jump start the
battery, park the vehicle within the jumper
cables reach, set the parking brake and
make sure the ignition is OFF.
WARNING!
Do not allow vehicles to touch each other
as this could establish a ground connec-
tion and personal injury could result.
Positive Battery Post
161
Page 166 of 276
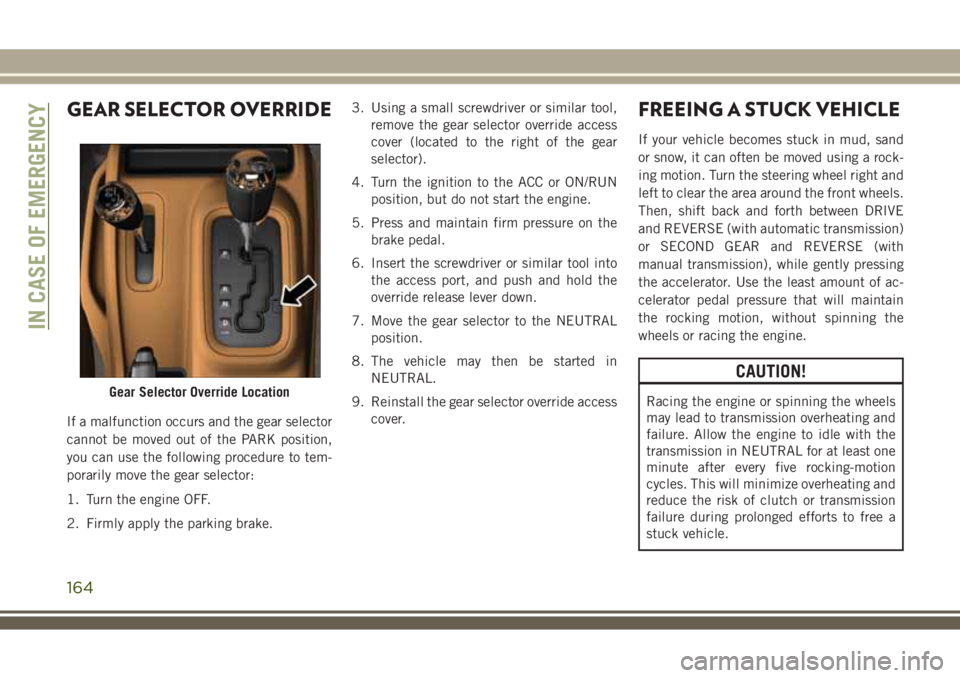
GEAR SELECTOR OVERRIDE
If a malfunction occurs and the gear selector
cannot be moved out of the PARK position,
you can use the following procedure to tem-
porarily move the gear selector:
1. Turn the engine OFF.
2. Firmly apply the parking brake.3. Using a small screwdriver or similar tool,
remove the gear selector override access
cover (located to the right of the gear
selector).
4. Turn the ignition to the ACC or ON/RUN
position, but do not start the engine.
5. Press and maintain firm pressure on the
brake pedal.
6. Insert the screwdriver or similar tool into
the access port, and push and hold the
override release lever down.
7. Move the gear selector to the NEUTRAL
position.
8. The vehicle may then be started in
NEUTRAL.
9. Reinstall the gear selector override access
cover.
FREEING A STUCK VEHICLE
If your vehicle becomes stuck in mud, sand
or snow, it can often be moved using a rock-
ing motion. Turn the steering wheel right and
left to clear the area around the front wheels.
Then, shift back and forth between DRIVE
and REVERSE (with automatic transmission)
or SECOND GEAR and REVERSE (with
manual transmission), while gently pressing
the accelerator. Use the least amount of ac-
celerator pedal pressure that will maintain
the rocking motion, without spinning the
wheels or racing the engine.
CAUTION!
Racing the engine or spinning the wheels
may lead to transmission overheating and
failure. Allow the engine to idle with the
transmission in NEUTRAL for at least one
minute after every five rocking-motion
cycles. This will minimize overheating and
reduce the risk of clutch or transmission
failure during prolonged efforts to free a
stuck vehicle.Gear Selector Override Location
IN CASE OF EMERGENCY
164
Page 167 of 276
NOTE:
Push the "ESC Off" switch, to place the Elec-
tronic Stability Control (ESC) system in "Par-
tial Off" mode, before rocking the vehicle.
Refer to “Electronic Brake Control System”
in “Safety” in your Owner’s Manual for fur-
ther details. Once the vehicle has been freed,
push the "ESC Off" switch again to restore
"ESC On" mode.
WARNING!
Fast spinning tires can be dangerous.
Forces generated by excessive wheel
speeds may cause damage, or even failure,
of the axle and tires. A tire could explode
and injure someone. Do not spin your ve-
WARNING!
hicle's wheels faster than 30 mph
(48 km/h) or for longer than 30 seconds
continuously without stopping when you
are stuck and do not let anyone near a
spinning wheel, no matter what the speed.
CAUTION!
• When “rocking” a stuck vehicle by shift-
ing between DRIVE/SECOND GEAR and
REVERSE, do not spin the wheels faster
than 15 mph (24 km/h), or drivetrain
damage may result.
• Revving the engine or spinning the
wheels too fast may lead to transmission
CAUTION!
overheating and failure. It can also dam-
age the tires. Do not spin the wheels
above 30 mph (48 km/h) while in gear
(no transmission shifting occurring).
TOWING A DISABLED
VEHICLE
This section describes procedures for towing
a disabled vehicle using a commercial towing
service. If the transmission and drivetrain are
operable, disabled vehicles may also be
towed as described under “Recreational Tow-
ing” in the “Starting And Operating” section.
Towing Condition Wheels OFF The Ground 4WD MODELS
Flat Tow NONESee instructions under “Recreational Towing” in
“Starting And Operating”.
• Automatic Transmission inPARK
• Manual Transmission in gear (NOTin NEUTRAL)
• Transfer Case inNEUTRAL
• Ignition in ACC or ON/RUN position
• Tow inforwarddirection
165
Page 168 of 276
Wheel Lift Or Dolly TowFrontNOT ALLOWED
RearNOT ALLOWED
FlatbedALL BEST METHOD
Proper towing or lifting equipment is required
to prevent damage to your vehicle. Use only
tow bars and other equipment designed for
this purpose, following equipment manufac-
turer’s instructions. Use of safety chains is
mandatory. Attach a tow bar or other towing
device to main structural members of the
vehicle, not to bumpers or associated brack-
ets. State and local laws regarding vehicles
under tow must be observed.
If you must use the accessories (wipers, de-
frosters, etc.) while being towed, the ignition
must be in the ON/RUN position, not the ACC
position.
If the vehicle's battery is discharged, refer to
“Gear Selector Override” in this section for
instructions on shifting the automatic trans-
mission out of PARK for towing.CAUTION!
• Do not use sling type equipment when
towing. Vehicle damage may occur.
• When securing the vehicle to a flatbed
truck, do not attach to front or rear
suspension components. Damage to
your vehicle may result from improper
towing.
• If the vehicle being towed requires steer-
ing, the ignition switch must be in the
ACC or ON/RUN mode, not in the LOCK/
OFF mode.
Without The Ignition Key
Special care must be taken when the vehicle
is towed with the ignition in the LOCK posi-
tion. The only approved method of towing
without the ignition key is with a flatbed
truck. Proper towing equipment is necessary
to prevent damage to the vehicle.
Four–Wheel Drive Models
The manufacturer recommends towing with
all wheelsOFFthe ground. Acceptable meth-
ods are to tow the vehicle on a flatbed or with
one end of the vehicle raised and the oppo-
site end on a towing dolly.
If flatbed equipment is not available and the
transfer case is operable, the vehicle may be
towed (in the forward direction, withALL
wheels on the ground),IFthe transfer case is
inNEUTRAL(N) and the transmission is in
PARK(for automatic transmissions) or in gear
(NOTinNEUTRAL, for manual transmissions).
Refer to “Recreational Towing” in “Starting
And Operating” for detailed instructions.
CAUTION!
• Front or rear wheel lifts must not be used
(if the remaining wheels are on the
ground). Internal damage to the trans-
IN CASE OF EMERGENCY
166
Page 184 of 276
Checking Oil Level — Gasoline Engine
To ensure proper lubrication of your vehicle's
engine, the engine oil must be maintained at
the correct level. The engine oil level should
be checked five minutes after a warmed up
engine has been shut off.
Checking the oil while the vehicle is on level
ground will improve the accuracy of the oil
level readings. Always maintain the oil level
within the SAFE zone on the dipstick. Adding
1 quart (0.95 liters) of oil when the reading is
at the bottom of the crosshatch zone will
result in a reading at the top of the cross-
hatch zone on these engines.
CAUTION!
Overfilling or underfilling the crankcase
will cause aeration or loss of oil pressure.
This could damage your engine.
Checking Oil Level — Diesel Engine
To assure proper engine lubrication, the en-
gine oil must be maintained at the correct
level. Check the oil level at regular intervals,
such as every fuel stop.For vehicles equipped with a Diesel Particu-
late Filter (DPF), it is acceptable to have an
oil level up to 3/8 inch (10 mm) above the
MAX line. Beyond 3/8 inch (10 mm) it is
recommended to change the oil.
The best time to check the engine oil level is
about five minutes after a fully warmed en-
gine is shut off.
Checking the oil while the vehicle is on level
ground will improve the accuracy of the oil
level readings. Maintain the oil level between
the MIN and MAX markings on the dipstick.
Adding 1 U.S. Quart (0.95 L) of oil when the
reading is at the MIN mark will result in a
MAX reading on these engines.
Cooling System
WARNING!
• You or others can be badly burned by hot
engine coolant (antifreeze) or steam
from your radiator. If you see or hear
steam coming from under the hood, do
not open the hood until the radiator has
had time to cool. Never open a cooling
WARNING!
system pressure cap when the radiator
or coolant bottle is hot.
• Keep hands, tools, clothing, and jewelry
away from the radiator cooling fan when
the hood is raised. The fan starts auto-
matically and may start at any time,
whether the engine is running or not.
• When working near the radiator cooling
fan, disconnect the fan motor lead or
turn the ignition to the OFF mode. The
fan is temperature controlled and can
start at any time the ignition is in the ON
mode.
Engine Coolant Checks
Check the engine coolant (antifreeze) protec-
tion every 12 months (before the onset of
freezing weather, where applicable). If the
engine coolant (antifreeze) is dirty or rusty in
appearance, the system should be drained,
flushed and refilled with fresh engine coolant
(antifreeze). Check the front of the A/C con-
denser (if equipped) or radiator for any accu-
mulation of bugs, leaves, etc. If dirty, clean
SERVICING AND MAINTENANCE
182
Page 189 of 276
WARNING!
requiring lines to be disconnected
should be done by an experienced tech-
nician.
CAUTION!
Do not use chemical flushes in your air
conditioning system as the chemicals can
damage your air conditioning components.
Such damage is not covered by the New
Vehicle Limited Warranty.
Refrigerant Recovery And Recycling R-134a
— If Equipped
R-134a Air Conditioning Refrigerant is a
hydrofluorocarbon (HFC) that is an ozone-
friendly substance. The manufacturer recom-
mends that air conditioning service be per-
formed by an authorized dealer or other
service facilities using recovery and recycling
equipment.NOTE:
Use only manufacturer approved A/C system
PAG compressor oil and refrigerants.
Refrigerant Recovery And Recycling —
R–1234yf
R–1234yf Air Conditioning Refrigerant is a
hydrofluoroolefin (HFO) that is endorsed by
the Environmental Protection Agency and is
an ozone-friendly substance with a low
global-warming potential. The manufacturer
recommends that air conditioning service be
performed by an authorized dealer using re-
covery and recycling equipment.
NOTE:
Use only manufacturer approved A/C system
PAG compressor oil, and refrigerants.
Air Conditioning Filter Replacement (A/C Air
Filter)
WARNING!
Do not remove the cabin air filter while the
vehicle is running, or while the ignition is
in the ACC or ON/RUN mode. With the
cabin air filter removed and the blower
operating, the blower can contact hands
and may propel dirt and debris into your
eyes, resulting in personal injury.
The A/C air filter is located in the fresh air
inlet behind the glove compartment. Perform
the following procedure to replace the filter:
1. Open the glove compartment and remove
all contents.
2. Push in on the sides of the glove compart-
ment and lower the door.
187