maintenance JEEP WRANGLER 2020 Owner handbook (in English)
[x] Cancel search | Manufacturer: JEEP, Model Year: 2020, Model line: WRANGLER, Model: JEEP WRANGLER 2020Pages: 276, PDF Size: 4.47 MB
Page 2 of 276
This User Guide is intended
to show the vehicle’s
operating conditions.
For the enthusiast user who
wants to have insights,
curiosities and detailed
information about the
characteristics and functions
of the vehicle, Jeep gives the
opportunity to consult a
dedicated section which is
available in electronic format.ONLINE VEHICLE OWNER’S INFORMATION
For an electronic version of your Owner’s Information, go to the
www.mopar.eu/owner website and access your personal area. The
“Maintenance and Care” page includes all the information about your
vehicle and the link to access eLUM, where you will find all the details
of the Owner’s Information.
Alternatively, to access this information, go to the Internet website at
http://aftersales.fiat.com/elum/.
The eLUM website is free and will allow you, among
many other things, to easily consult the on-board
documents of all the other vehicles of the Group.
HAVE A NICE READING AND HAPPY MOTORING!
Page 7 of 276
GRAPHICAL TABLE OF CONTENTS
GETTING TO KNOW YOUR VEHICLE
GETTING TO KNOW YOUR INSTRUMENT PANEL
SAFETY
STARTING AND OPERATING
IN CASE OF EMERGENCY
SERVICING AND MAINTENANCE
TECHNICAL SPECIFICATIONS
MULTIMEDIA
CUSTOMER ASSISTANCE
INDEX
Page 65 of 276
As an added safety feature, your vehicle has
been equipped with a tire pressure monitor-
ing system (TPMS) that illuminates a low tire
pressure telltale when one or more of your
tires is significantly under-inflated. Accord-
ingly, when the low tire pressure telltale illu-
minates, you should stop and check your tires
as soon as possible, and inflate them to the
proper pressure. Driving on a significantly
under-inflated tire causes the tire to overheat
and can lead to tire failure. Under-inflation
also reduces fuel efficiency and tire tread
life, and may affect the vehicle’s handling
and stopping ability.
Please note that the TPMS is not a substitute
for proper tire maintenance, and it is the
driver’s responsibility to maintain correct tire
pressure, even if under-inflation has not
reached the level to trigger illumination of the
TPMS low tire pressure telltale.
Your vehicle has also been equipped with a
TPMS malfunction indicator to indicate when
the system is not operating properly. The
TPMS malfunction indicator is combined
with the low tire pressure telltale. When the
system detects a malfunction, the telltale willflash for approximately one minute and then
remain continuously illuminated. This se-
quence will continue upon subsequent ve-
hicle start-ups as long as the malfunction
exists. When the malfunction indicator is
illuminated, the system may not be able to
detect or signal low tire pressure as intended.
TPMS malfunctions may occur for a variety of
reasons, including the installation of replace-
ment or alternate tires or wheels on the ve-
hicle that prevent the TPMS from functioning
properly. Always check the TPMS malfunc-
tion telltale after replacing one or more tires
or wheels on your vehicle to ensure that the
replacement or alternate tires and wheels
allow the TPMS to continue to function
properly.
CAUTION!
The TPMS has been optimized for the
original equipment tires and wheels.
TPMS pressures and warning have been
established for the tire size equipped on
your vehicle. Undesirable system opera-
tion or sensor damage may result when
using replacement equipment that is not
CAUTION!
of the same size, type, and/or style. After-
market wheels can cause sensor damage.
Using aftermarket tire sealants may cause
the Tire Pressure Monitoring System
(TPMS) sensor to become inoperable. Af-
ter using an aftermarket tire sealant it is
recommended that you take your vehicle to
your authorized dealer to have your sensor
function checked.
Yellow Indicator Lights
— Front Axle Lock Indicator Light — If
Equipped
Indicates when the front axle lock has been
activated.
— Rear Axle Lock Indicator Light — If
Equipped
This light indicates when the rear axle lock
has been activated.
63
Page 74 of 276
WARNING!
ESC also cannot prevent accidents re-
sulting from loss of vehicle control due
to inappropriate driver input for the con-
ditions. Only a safe, attentive, and skill-
ful driver can prevent accidents. The
capabilities of an ESC equipped vehicle
must never be exploited in a reckless or
dangerous manner which could jeopar-
dize the user’s safety or the safety of
others.
• Vehicle modifications, or failure to prop-
erly maintain your vehicle, may change
the handling characteristics of your ve-
hicle, and may negatively affect the per-
formance of the ESC system. Changes to
the steering system, suspension, brak-
ing system, tire type and size or wheel
size may adversely affect ESC perfor-
mance. Improperly inflated and un-
evenly worn tires may also degrade ESC
performance. Any vehicle modification
or poor vehicle maintenance that re-
duces the effectiveness of the ESC sys-
tem can increase the risk of loss of
WARNING!
vehicle control, vehicle rollover, per-
sonal injury and death.
The ESC system has three available operating
modes in 4H range. The system has one
operating mode in 4L range. Two-wheel drive
vehicles and four-wheel drive vehicles in 2H
range have two operating modes.
4H Range (4WD Models)
ESC On
This is the normal operating mode for ESC in
4H range.
ESC Partial Off
This mode is entered by momentarily pushing
the ESC OFF switch. When in "ESC Partial
Off" mode, the TCS portion of ESC (except for
the limited slip feature described in the TCS
section), has been disabled and the "ESC Off
Indicator Light" will be illuminated.
This mode is intended to be used if the
vehicle is in deep snow, sand, or gravel con-
ditions and more wheel spin than ESC would
normally allow is required to gain traction. Toturn ESC on again, momentarily push the
ESC OFF switch. This will restore the normal
“ESC On” mode of operation.
NOTE:
To improve the vehicle’s traction when driving
with snow chains, or starting off in deep
snow, sand, or gravel, it may be desirable to
switch to the "ESC Partial Off" mode by
pushing the ESC OFF switch. Once the situ-
ation requiring ESC to be switched to the
"ESC Partial Off" mode is overcome, turn ESC
back on by momentarily pushing the ESC
OFF switch. This may be done while the
vehicle is in motion.
WARNING!
• When in "ESC Partial Off" mode, the TCS
functionality of ESC, (except for the lim-
ited slip feature described in the TCS
section), has been disabled and the
“ESC Off Indicator Light” will be illumi-
nated. When in "ESC Partial Off" mode,
the engine power reduction feature of
TCS is disabled, and the enhanced ve-
SAFETY
72
Page 79 of 276
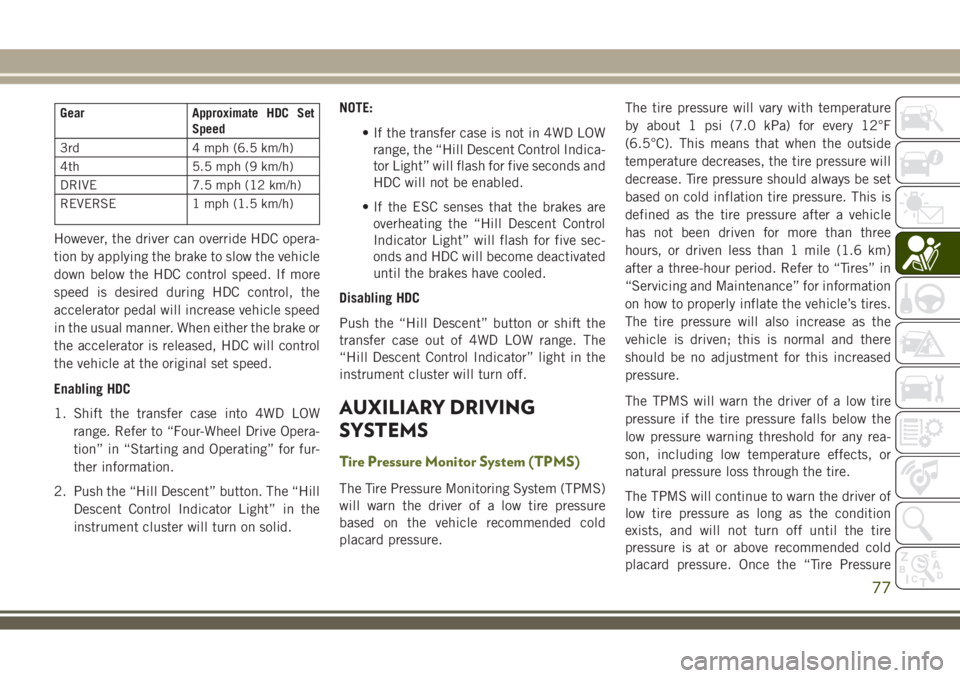
Gear Approximate HDC Set
Speed
3rd 4 mph (6.5 km/h)
4th 5.5 mph (9 km/h)
DRIVE 7.5 mph (12 km/h)
REVERSE 1 mph (1.5 km/h)
However, the driver can override HDC opera-
tion by applying the brake to slow the vehicle
down below the HDC control speed. If more
speed is desired during HDC control, the
accelerator pedal will increase vehicle speed
in the usual manner. When either the brake or
the accelerator is released, HDC will control
the vehicle at the original set speed.
Enabling HDC
1. Shift the transfer case into 4WD LOW
range. Refer to “Four-Wheel Drive Opera-
tion” in “Starting and Operating” for fur-
ther information.
2. Push the “Hill Descent” button. The “Hill
Descent Control Indicator Light” in the
instrument cluster will turn on solid.NOTE:
• If the transfer case is not in 4WD LOW
range, the “Hill Descent Control Indica-
tor Light” will flash for five seconds and
HDC will not be enabled.
• If the ESC senses that the brakes are
overheating the “Hill Descent Control
Indicator Light” will flash for five sec-
onds and HDC will become deactivated
until the brakes have cooled.
Disabling HDC
Push the “Hill Descent” button or shift the
transfer case out of 4WD LOW range. The
“Hill Descent Control Indicator” light in the
instrument cluster will turn off.
AUXILIARY DRIVING
SYSTEMS
Tire Pressure Monitor System (TPMS)
The Tire Pressure Monitoring System (TPMS)
will warn the driver of a low tire pressure
based on the vehicle recommended cold
placard pressure.The tire pressure will vary with temperature
by about 1 psi (7.0 kPa) for every 12°F
(6.5°C). This means that when the outside
temperature decreases, the tire pressure will
decrease. Tire pressure should always be set
based on cold inflation tire pressure. This is
defined as the tire pressure after a vehicle
has not been driven for more than three
hours, or driven less than 1 mile (1.6 km)
after a three-hour period. Refer to “Tires” in
“Servicing and Maintenance” for information
on how to properly inflate the vehicle’s tires.
The tire pressure will also increase as the
vehicle is driven; this is normal and there
should be no adjustment for this increased
pressure.
The TPMS will warn the driver of a low tire
pressure if the tire pressure falls below the
low pressure warning threshold for any rea-
son, including low temperature effects, or
natural pressure loss through the tire.
The TPMS will continue to warn the driver of
low tire pressure as long as the condition
exists, and will not turn off until the tire
pressure is at or above recommended cold
placard pressure. Once the “Tire Pressure
77
Page 80 of 276
Monitoring Telltale Light” has been illumi-
nated, the tire pressure must be increased to
the recommended cold placard pressure in
order for the “Tire Pressure Monitoring Tell-
tale Light” to be turned OFF.
NOTE:
When filling warm tires, the tire pressure may
need to be increased up to an additional 4 psi
(30 kPa) above the recommended cold plac-
ard pressure in order to turn the Tire Pressure
Monitoring Telltale Light off.
The system will automatically update and the
“Tire Pressure Monitoring Telltale Light” will
extinguish once the updated tire pressures
have been received. The vehicle may need to
be driven for up to 10 minutes above 15 mph
(24 km/h) to receive this information.
For example, your vehicle may have a recom-
mended cold (parked for more than three
hours) air pressure of 35 psi (241 kPa). If the
ambient temperature is 68°F (20°C) and the
measured tire pressure is 30 psi (207 kPa), a
temperature drop to 20°F (-7°C) will de-
crease the tire pressure to approximately
26 psi (179 kPa). This tire pressure is suffi-
ciently low enough to turn ON the “Tire Pres-sure Monitoring Telltale Light.” Driving the
vehicle may cause the tire pressure to rise to
approximately 30 psi (207 kPa), but the “Tire
Pressure Monitoring Telltale Light” will still
be ON. In this situation, the “Tire Pressure
Monitoring Telltale Light” will turn OFF only
after the tires have been inflated to the vehi-
cle’s recommended cold placard pressure
value.
CAUTION!
• The TPMS has been optimized for the
original equipment tires and wheels.
TPMS pressures and warnings have
been established for the tire size
equipped on your vehicle. Undesirable
system operation or sensor damage may
result when using replacement equip-
ment that is not of the same size, type,
and/or style. The TPM sensor is not de-
signed for use on aftermarket wheels
and may contribute to a poor overall
system performance or sensor damage.
Customers are encouraged to use OEM
wheels to assure proper TPM feature
operation.
CAUTION!
• Using aftermarket tire sealants may
cause the Tire Pressure Monitoring Sys-
tem (TPMS) sensor to become inoper-
able. After using an aftermarket tire
sealant it is recommended that you take
your vehicle to an authorized dealership
to have your sensor function checked.
• After inspecting or adjusting the tire
pressure, always reinstall the valve stem
cap. This will prevent moisture and dirt
from entering the valve stem, which
could damage the Tire Pressure Monitor-
ing Sensor.
NOTE:
• The TPMS is not intended to replace nor-
mal tire care and maintenance, nor to pro-
vide warning of a tire failure or condition.
• The TPMS should not be used as a tire
pressure gauge while adjusting your tire
pressure.
SAFETY
78
Page 81 of 276
• Driving on a significantly under-inflated tire
causes the tire to overheat and can lead to
tire failure. Under-inflation also reduces
fuel efficiency and tire tread life, and may
affect the vehicle’s handling and stopping
ability.
• The TPMS is not a substitute for proper tire
maintenance, and it is the driver’s respon-
sibility to maintain correct tire pressure,
even if under-inflation has not reached the
level to trigger illumination of the “Tire
Pressure Monitoring Telltale Light.”
• Seasonal temperature changes will affect
tire pressure, and the TPMS will monitor
the actual tire pressure in the tire.
Base System
The Tire Pressure Monitor System (TPMS)
uses wireless technology with wheel rim-
mounted electronic sensors to monitor tire
pressure levels. Sensors, mounted to each
wheel as part of the valve stem, transmit tire
pressure readings to the Receiver Module.NOTE:
It is particularly important for you to check
the tire pressure in all of your tires regularly
and to maintain the proper pressure.
The Tire Pressure Monitor System (TPMS)
consists of the following components:
• Receiver Module
• Four Tire Pressure Monitoring Sensors
• Tire Pressure Monitoring Telltale Light
A tire pressure monitoring sensor is located in
the spare wheel if the vehicle is equipped
with a matching full size spare wheel and tire
assembly. The matching full size spare tire
can be used in place of any of the four road
tires. A low spare tire will not cause the “Tire
Pressure Monitoring Telltale Light” to illumi-
nate or the chime to sound while stowed in
the spare location.
The “Tire Pressure Monitoring Tell-
tale Light” will illuminate in the in-
strument cluster, a “LOW TIRE
PRESSURE” message will display in the in-
strument cluster, and an audible chime will
be activated when one or more of the four
active road tire pressures are low. Should thisoccur, you should stop as soon as possible,
check the inflation pressure of each tire on
your vehicle, and inflate each tire to the
vehicle's recommended cold placard pres-
sure value. The system will automatically
update and the “Tire Pressure Monitoring
Telltale Light” will extinguish once the up-
dated tire pressures have been received. The
vehicle may need to be driven for up to
10 minutes above 15 mph (24 km/h) to
receive this information
The “Tire Pressure Monitoring Telltale Light”
will flash on and off for 75 seconds, and will
remain on solid when a system fault is de-
tected. The system fault will also sound a
chime. If the ignition key is cycled, this
sequence will repeat, providing the system
fault still exists. The “Tire Pressure Monitor-
ing Telltale Light” will turn off when the fault
condition no longer exists. A system fault can
occur by any of the following scenarios:
1. Jamming due to electronic devices or driv-
ing next to facilities emitting the same
Radio Frequencies as the TPM sensors.
79
Page 95 of 276
The ORC also includes diagnostics that will
illuminate the instrument panel Air Bag
Warning Light if a malfunction is detected
that could affect the air bag system. The
diagnostics also record the nature of the
malfunction. While the air bag system is
designed to be maintenance free, if any of the
following occurs, have an authorized dealer
service the air bag system immediately.
• The Air Bag Warning Light does not come
on during the four to eight seconds when
the ignition switch is first in the ON/RUN
position.
• The Air Bag Warning Light remains on after
the four to eight-second interval.
• The Air Bag Warning Light comes on inter-
mittently or remains on while driving.
NOTE:
If the speedometer, tachometer, or any en-
gine related gauges are not working, the Oc-
cupant Restraint Controller (ORC) may also
be disabled. In this condition the air bags
may not be ready to inflate for your protec-
tion. Have an authorized dealer service the air
bag system immediately.WARNING!
Ignoring the Air Bag Warning Light in your
instrument panel could mean you won’t
have the air bag system to protect you in a
collision. If the light does not come on as a
bulb check when the ignition is first turned
on, stays on after you start the vehicle, or if
it comes on as you drive, have an autho-
rized dealer service the air bag system
immediately.
Front Air Bags
This vehicle has front air bags and lap/
shoulder belts for both the driver and front
passenger. The front air bags are a supple-
ment to the seat belt restraint systems. The
driver front air bag is mounted in the center of
the steering wheel. The passenger front air
bag is mounted in the instrument panel,
above the glove compartment. The words
“SRS AIRBAG” or “AIRBAG” are embossed
on the air bag covers.
WARNING!
• Being too close to the steering wheel or
instrument panel during front air bag
deployment could cause serious injury,
including death. Air bags need room to
inflate. Sit back, comfortably extending
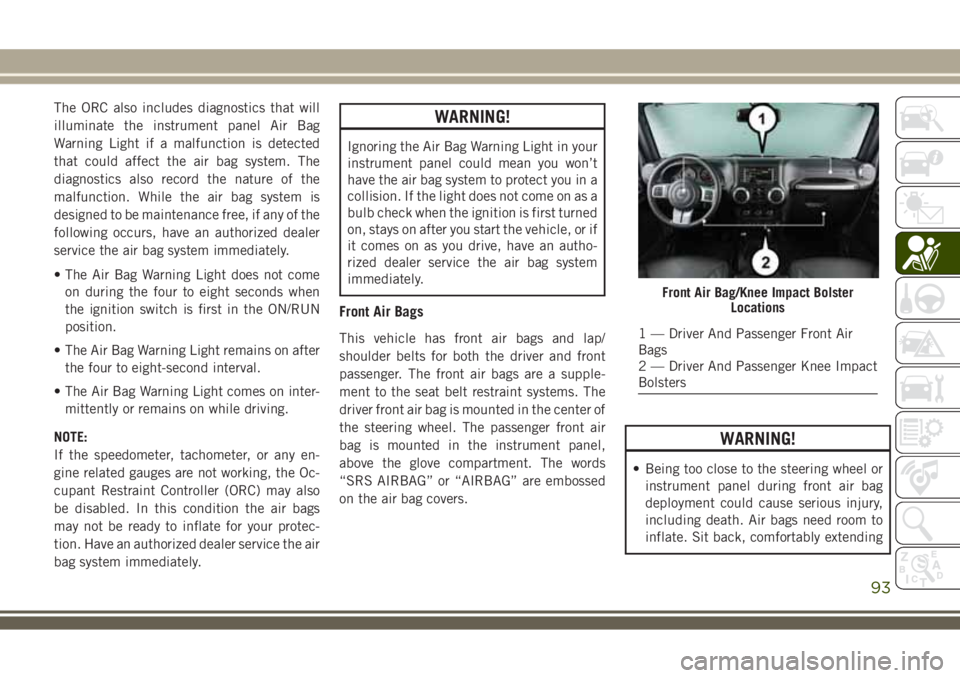
Front Air Bag/Knee Impact Bolster
Locations
1 — Driver And Passenger Front Air
Bags
2 — Driver And Passenger Knee Impact
Bolsters
93
Page 123 of 276
ENGINE BREAK-IN
RECOMMENDATIONS
A long break-in period is not required for the
engine and drivetrain (transmission and axle)
in your vehicle.
Drive moderately during the first 300 miles
(500 km). After the initial 60 miles
(100 km), speeds up to 50 or 55 mph (80 or
90 km/h) are desirable.
While cruising, brief full-throttle acceleration
within the limits of local traffic laws contrib-
utes to a good break-in. Wide-open throttle
acceleration in low gear can be detrimental
and should be avoided.
The engine oil installed in the engine at the
factory is a high-quality energy conserving
type lubricant. Oil changes should be consis-
tent with anticipated climate conditions un-
der which vehicle operations will occur. For
the recommended viscosity and quality
grades, refer to “Dealer Service” in “Servic-
ing And Maintenance”.
CAUTION!
Never use Non-Detergent Oil or Straight
Mineral Oil in the engine or damage may
result.
NOTE:
A new engine may consume some oil during
its first few thousand miles (kilometers) of
operation. This should be considered a nor-
mal part of the break-in and not interpreted
as a problem.
PARKING BRAKE
Before exiting the vehicle, make sure that the
parking brake is fully applied. Also, be cer-
tain to leave an automatic transmission in
PARK, or manual transmission in REVERSE
or FIRST gear.
The parking brake lever is located in the
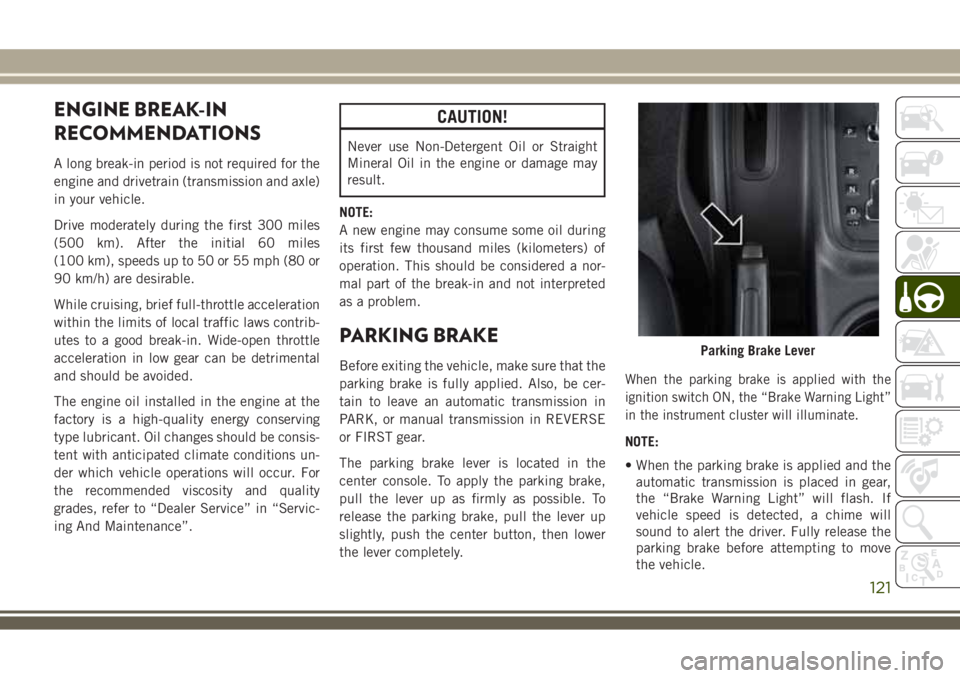
center console. To apply the parking brake,
pull the lever up as firmly as possible. To
release the parking brake, pull the lever up
slightly, push the center button, then lower
the lever completely.When the parking brake is applied with the
ignition switch ON, the “Brake Warning Light”
in the instrument cluster will illuminate.
NOTE:
• When the parking brake is applied and the
automatic transmission is placed in gear,
the “Brake Warning Light” will flash. If
vehicle speed is detected, a chime will
sound to alert the driver. Fully release the
parking brake before attempting to move
the vehicle.
Parking Brake Lever
121
Page 162 of 276
Jack Usage Precautions
To complete the Use and Maintenance Hand-
book to which this supplement is attached,
given below are some instructions on the
proper use of the jack.
WARNING!
When using the crank, make sure it turns
freely without the risk of scraping hands
against the ground.
Even the moving parts of the jack, the
“worm screw” and joints can cause inju-
ries: avoid contact with them. Clean it
thoroughly if dirtied with grease.
CAUTION!
The jack is a tool designed exclusively for
changing a wheel, in case of a puncture or
damage to a tire of the vehicle on which it
is fitted or on vehicles of the same model.
Any other use, e.g. to jack up other vehicle
models or different things, is strictly pro-
hibited. Never use it to carry out mainte-
nance or repairs under the vehicle or to
CAUTION!
change summer/winter wheels and vice
versa. Never go under the raised vehicle. If
any work under the vehicle is necessary,
contact the Fiat Service Network. Incor-
rect placing of the jack can cause the
vehicle to drop: use it only in the positions
indicated. Do not use the jack for loads
higher than that specified on the label.
Never start the engine with vehicle raised.
If the vehicle is raised more than neces-
sary, everything can become more un-
stable, with the risk of the vehicle drop-
ping violently. Therefore raise the vehicle
only as much as necessary for the wheel/
spare.
Maintenance
• Make sure grime does not build up on the
“worm screw.”
• Keep the “worm screw” lubricated.
• Never modify the jack.
Conditions Of Non-Use:
• Temperatures below −40°C.
• On sandy or muddy ground.• On uneven ground.
• On steep roads.
• In extreme weather conditions: thunder-
storms, typhoons, hurricanes, blizzards,
storms, etc.
JUMP STARTING
If your vehicle has a discharged battery, it can
be jump started using a set of jumper cables
and a battery in another vehicle, or by using a
portable battery booster pack. Jump starting
can be dangerous if done improperly, so
please follow the procedures in this section
carefully.
WARNING!
Do not attempt jump starting if the battery
is frozen. It could rupture or explode and
cause personal injury.
CAUTION!
Do not use a portable battery booster pack
or any other booster source with a system
IN CASE OF EMERGENCY
160