battery JEEP WRANGLER 2021 Owner handbook (in English)
[x] Cancel search | Manufacturer: JEEP, Model Year: 2021, Model line: WRANGLER, Model: JEEP WRANGLER 2021Pages: 276, PDF Size: 4.47 MB
Page 17 of 276
• Ignition key removed from ignition
• Battery at an acceptable charge level
• System not disabled from previous remote
start event
• Vehicle security alarm not active
WARNING!
• Do not start or run an engine in a closed
garage or confined area. Exhaust gas
contains Carbon Monoxide (CO) which is
odorless and colorless. Carbon Monox-
ide is poisonous and can cause serious
injury or death when inhaled.
• Keep key fobs away from children. Op-
eration of the Remote Start System, win-
dows, door locks or other controls could
cause serious injury or death.
Remote Start Abort Message
The following messages will display in the
instrument cluster display if the vehicle fails to
remote start or exits remote start prematurely:
• Remote Start Aborted — Door Open
• Remote Start Aborted — Hood Open
• Remote Start Aborted — Fuel Low
• Remote Start Aborted — Swing Gate Open
• Remote Start Aborted — System Fault
The instrument cluster display message stays
active until the ignition is turned to the ON/
RUN position.
To Enter Remote Start
Push and release the remote start button on
the key fob twice within five seconds. The
vehicle doors will lock, the parking lights will
flash and the horn will chirp twice (if pro-
grammed). Then, the engine will start and the
vehicle will remain in the remote start mode
for a 15-minute cycle.NOTE:
• The park lamps will turn on and remain on
during remote start mode.
• For security, power window operation is
disabled when the vehicle is in the remote
start mode.
• The engine can be started two consecutive
times (two 15-minute cycles) with the key
fob. However, the ignition switch must be
cycled to the ON/RUN position before you
can repeat the start sequence for a third
cycle.
Remote start will also cancel if any of the
following occur:
• The engine stalls or RPM exceeds 2500.
• Any engine warning lamps come on.
• The hood is opened.
• The hazard switch is pushed.
• The transmission is moved out of PARK.
• The brake pedal is pushed.
15
Page 54 of 276
WARNING!
Driving with the flip-up window open can
allow poisonous exhaust gases into your
vehicle. You and your passengers could be
injured by these fumes. Keep the flip-up
window closed when you are operating the
vehicle.
CAUTION!
Do not push on rear wiper blade when
closing the rear flip-up window, as damage
to the blade will result.
INTERNAL EQUIPMENT
Power Outlets
There are three possible 12 Volt Power Out-
lets in this vehicle.
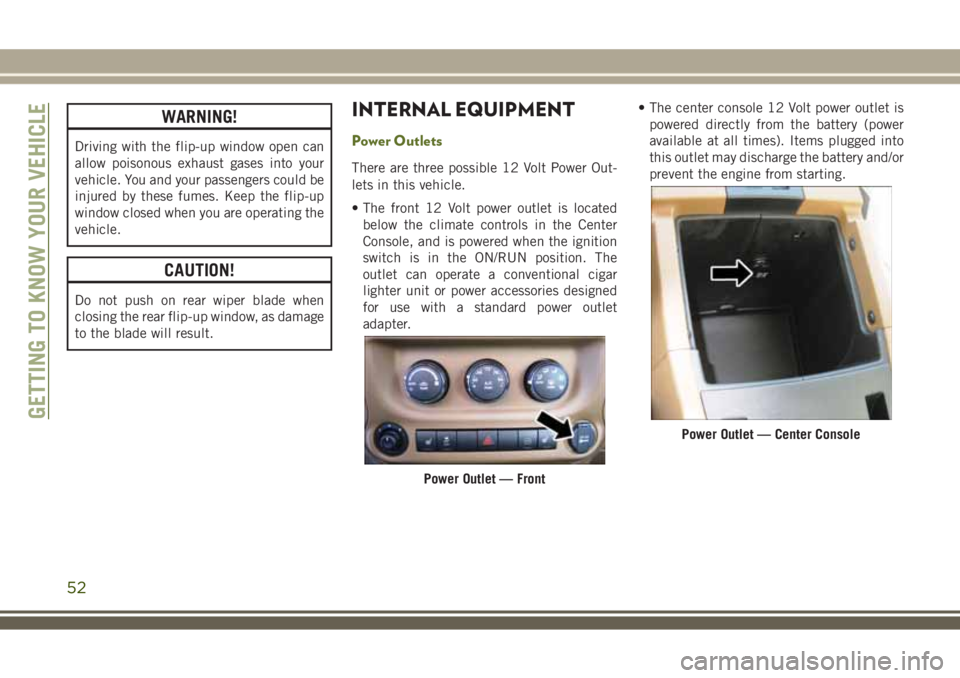
• The front 12 Volt power outlet is located
below the climate controls in the Center
Console, and is powered when the ignition
switch is in the ON/RUN position. The
outlet can operate a conventional cigar
lighter unit or power accessories designed
for use with a standard power outlet
adapter.• The center console 12 Volt power outlet is
powered directly from the battery (power
available at all times). Items plugged into
this outlet may discharge the battery and/or
prevent the engine from starting.
Power Outlet — Front
Power Outlet — Center Console
GETTING TO KNOW YOUR VEHICLE
52
Page 55 of 276
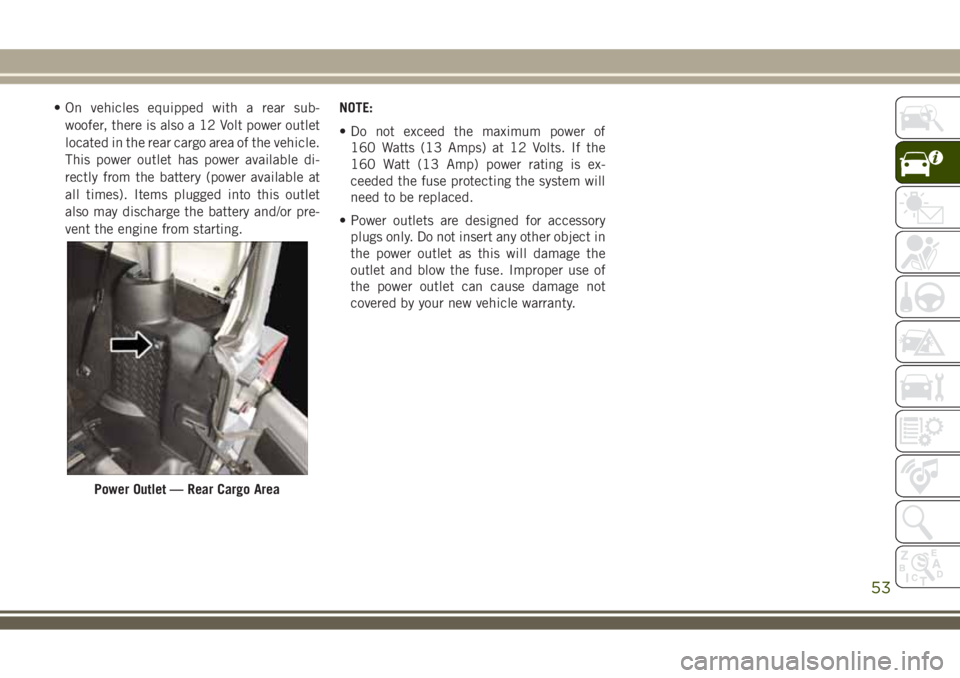
• On vehicles equipped with a rear sub-
woofer, there is also a 12 Volt power outlet
located in the rear cargo area of the vehicle.
This power outlet has power available di-
rectly from the battery (power available at
all times). Items plugged into this outlet
also may discharge the battery and/or pre-
vent the engine from starting.NOTE:
• Do not exceed the maximum power of
160 Watts (13 Amps) at 12 Volts. If the
160 Watt (13 Amp) power rating is ex-
ceeded the fuse protecting the system will
need to be replaced.
• Power outlets are designed for accessory
plugs only. Do not insert any other object in
the power outlet as this will damage the
outlet and blow the fuse. Improper use of
the power outlet can cause damage not
covered by your new vehicle warranty.
Power Outlet — Rear Cargo Area
53
Page 59 of 276
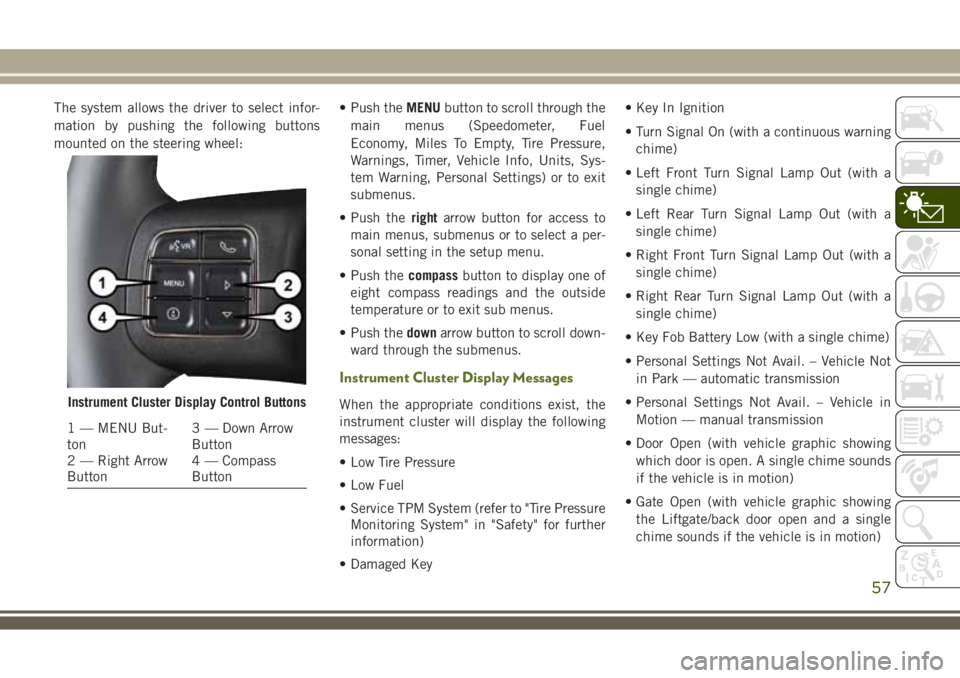
The system allows the driver to select infor-
mation by pushing the following buttons
mounted on the steering wheel:• Push theMENUbutton to scroll through the
main menus (Speedometer, Fuel
Economy, Miles To Empty, Tire Pressure,
Warnings, Timer, Vehicle Info, Units, Sys-
tem Warning, Personal Settings) or to exit
submenus.
• Push therightarrow button for access to
main menus, submenus or to select a per-
sonal setting in the setup menu.
• Push thecompassbutton to display one of
eight compass readings and the outside
temperature or to exit sub menus.
• Push thedownarrow button to scroll down-
ward through the submenus.
Instrument Cluster Display Messages
When the appropriate conditions exist, the
instrument cluster will display the following
messages:
• Low Tire Pressure
• Low Fuel
• Service TPM System (refer to "Tire Pressure
Monitoring System" in "Safety" for further
information)
• Damaged Key• Key In Ignition
• Turn Signal On (with a continuous warning
chime)
• Left Front Turn Signal Lamp Out (with a
single chime)
• Left Rear Turn Signal Lamp Out (with a
single chime)
• Right Front Turn Signal Lamp Out (with a
single chime)
• Right Rear Turn Signal Lamp Out (with a
single chime)
• Key Fob Battery Low (with a single chime)
• Personal Settings Not Avail. – Vehicle Not
in Park — automatic transmission
• Personal Settings Not Avail. – Vehicle in
Motion — manual transmission
• Door Open (with vehicle graphic showing
which door is open. A single chime sounds
if the vehicle is in motion)
• Gate Open (with vehicle graphic showing
the Liftgate/back door open and a single
chime sounds if the vehicle is in motion)Instrument Cluster Display Control Buttons
1 — MENU But-
ton3 — Down Arrow
Button
2 — Right Arrow
Button4 — Compass
Button
57
Page 62 of 276
— Battery Charge Warning Light
This light illuminates when the battery is not
charging properly. If it stays on while the
engine is running, there may be a malfunc-
tion with the charging system. Contact your
authorized dealer as soon as possible.
This indicates a possible problem with the
electrical system or a related component.
— Coolant Temperature Warning Light
This light warns of an overheated engine
condition. If the light turns on while driving,
safely pull over and stop the vehicle. If the
A/C system is on, turn it off. Also, shift the
transmission into NEUTRAL and idle the ve-
hicle. If the temperature reading does not
return to normal, turn the engine off imme-
diately and call for service.
NOTE:
As the coolant temperature gauge ap-
proaches "H," this indicator will illuminate
and a single chime will sound.
— Electronic Throttle Control (ETC)
Warning Light
This light informs you of a problem with the
Electronic Throttle Control (ETC) system. If a
problem is detected while the vehicle is run-
ning, the light will either stay on or flash
depending on the nature of the problem.
Cycle the ignition when the vehicle is safely
and completely stopped and the transmission
is placed in the PARK position. The light
should turn off. If the light remains on with
the vehicle running, your vehicle will usually
be drivable; however, see an authorized
dealer for service as soon as possible.
NOTE:
This light may turn on if the accelerator and
brake pedals are pressed at the same time.
If the light continues to flash when the ve-
hicle is running, immediate service is re-
quired and you may experience reduced per-
formance, an elevated/rough idle, or engine
stall and your vehicle may require towing.
The light will come on when the ignition is
placed in the ON/RUN or ACC/ON/RUN posi-tion and remain on briefly as a bulb check. If
the light does not come on during starting,
have the system checked by an authorized
dealer.
— Oil Pressure Warning Light
This light indicates low engine oil pressure. If
the light turns on while driving, stop the
vehicle and shut off the engine as soon as
possible. A chime will sound when this light
turns on.
Do not operate the vehicle until the cause is
corrected. This light does not indicate how
much oil is in the engine. The engine oil level
must be checked under the hood.
— Seat Belt Reminder Warning Light
This light indicates when the driver or pas-
senger seat belt is unbuckled. When the
ignition is first placed in the ON/RUN or
ACC/ON/RUN position and if the driver’s seat
belt is unbuckled, a chime will sound and the
light will turn on. When driving, if the driver
or front passenger seat belt remains unbuck-
led, the Seat Belt Reminder Light will flash or
GETTING TO KNOW YOUR INSTRUMENT PANEL
60
Page 94 of 276
How To Disengage The Automatic Locking Mode
Unbuckle the combination lap/shoulder belt
and allow it to retract completely to disen-
gage the Automatic Locking Mode and acti-
vate the vehicle sensitive (emergency) lock-
ing mode.
WARNING!
• The seat belt assembly must be replaced
if the switchable Automatic Locking Re-
tractor (ALR) feature or any other seat
belt function is not working properly
when checked according to the proce-
dures in the Service Manual.
• Failure to replace the seat belt assembly
could increase the risk of injury in colli-
sions.
• Do not use the Automatic Locking Mode
to restrain occupants who are wearing
the seat belt or children who are using
booster seats. The locked mode is only
used to install rear-facing or forward-
facing child restraints that have a har-
ness for restraining the child.
Supplemental Restraint Systems (SRS)
Some of the safety features described in this
section may be standard equipment on some
models, or may be optional equipment on
others. If you are not sure, ask your autho-
rized dealer.
The air bag system must be ready to protect
you in a collision. The Occupant Restraint
Controller (ORC) monitors the internal cir-
cuits and interconnecting wiring associated
with the electrical Air Bag System Compo-
nents. Your vehicle may be equipped with the
following Air Bag System Components:
Air Bag System Components
•Occupant Restraint Controller (ORC)
•Air Bag Warning Light
•Steering Wheel and Column
•Instrument Panel
•Knee Impact Bolsters
•Driver and Front Passenger Air Bags
•Seat Belt Buckle Switch
•Supplemental Side Air Bags
•Front and Side Impact Sensors
•Seat Belt Pretensioners
Air Bag Warning Light
The ORC monitors the readiness of the
electronic parts of the air bag system when-
ever the ignition switch is in the START or
ON/RUN position. If the ignition switch is in
the OFF position or in the ACC position, the
air bag system is not on and the air bags will
not inflate.
The ORC contains a backup power supply
system that may deploy the air bag system
even if the battery loses power or it becomes
disconnected prior to deployment.
The ORC turns on the Air Bag Warning Light
in the instrument panel for approximately
four to eight seconds for a self-check when
the ignition switch is first in the ON/RUN
position. After the self-check, the Air Bag
Warning Light will turn off. If the ORC detects
a malfunction in any part of the system, it
turns on the Air Bag Warning Light, either
momentarily or continuously. A single chime
will sound to alert you if the light comes on
again after initial startup.
SAFETY
92
Page 100 of 276
NOTE:
• Air bag covers may not be obvious in the
interior trim, but they will open during air
bag deployment.
• After any collision, the vehicle should be
taken to an authorized dealer immediately.
Enhanced Accident Response System
In the event of an impact, if the communica-
tion network remains intact, and the power
remains intact, depending on the nature of
the event, the ORC will determine whether to
have the Enhanced Accident Response Sys-
tem perform the following functions:
• Cut off fuel to the engine.
• Flash hazard lights as long as the battery
has power or until the hazard light button is
pressed. The hazard lights can be deacti-
vated by pressing the hazard light button.
• Turn on the interior lights, which remain on
as long as the battery has power.
• Unlock the power door locks.
Enhanced Accident Response System Reset
Procedure
In order to reset the Enhanced Accident Re-
sponse System functions after an event, the
ignition switch must be changed from igni-
tion START or ON/RUN to ignition OFF. Care-
fully check the vehicle for fuel leaks in the
engine compartment and on the ground near
the engine compartment and fuel tank before
resetting the system and starting the engine.
Maintaining Your Air Bag System
WARNING!
• Modifications to any part of the air bag
system could cause it to fail when you
need it. You could be injured if the air
bag system is not there to protect you.
Do not modify the components or wiring,
including adding any kind of badges or
stickers to the steering wheel hub trim
cover or the upper right side of the
instrument panel. Do not modify the
front bumper, vehicle body structure, or
add aftermarket side steps or running
boards.
WARNING!
• It is dangerous to try to repair any part of
the air bag system yourself. Be sure to
tell anyone who works on your vehicle
that it has an air bag system.
• Do not attempt to modify any part of your
air bag system. The air bag may inflate
accidentally or may not function prop-
erly if modifications are made. Take your
vehicle to an authorized dealer for any
air bag system service. If your seat, in-
cluding your trim cover and cushion,
needs to be serviced in any way (includ-
ing removal or loosening/tightening of
seat attachment bolts), take the vehicle
to your authorized dealer. Only manufac-
turer approved seat accessories may be
used. If it is necessary to modify the air
bag system for persons with disabilities,
contact your authorized dealer.
Event Data Recorder (EDR)
This vehicle is equipped with an event data
recorder (EDR). The main purpose of an EDR
is to record, in certain crash or near crash-
like situations, such as an air bag deployment
SAFETY
98
Page 120 of 276
If Engine Fails To Start
WARNING!
• Never pour fuel or other flammable liq-
uid into the throttle body air inlet open-
ing in an attempt to start the vehicle.
This could result in flash fire causing
serious personal injury.
• Do not attempt to push or tow your
vehicle to get it started. Vehicles
equipped with an automatic transmis-
sion cannot be started this way. Un-
burned fuel could enter the catalytic
converter and once the engine has
started, ignite and damage the converter
and vehicle.
• If the vehicle has a discharged battery,
booster cables may be used to obtain a
start from a booster battery or the battery
in another vehicle. This type of start can
be dangerous if done improperly. Refer
to “Jump Starting Procedure” in “In
Case Of Emergency” for further informa-
tion.Without Tip Start — Manual Transmission Only
If the engine fails to start after you have
followed the “Normal Starting” or “Extreme
Cold Weather” procedures, it may be flooded.
Push the accelerator pedal all the way to the
floor and hold it there while cranking the
engine. This should clear any excess fuel in
case the engine is flooded.
CAUTION!
To prevent damage to the starter, do not
crank the engine for more than 15 seconds
at a time. Wait 10 to 15 seconds before
trying again.
If the engine has been flooded, it may start to
run, but not have enough power to continue
running when the key is released. If this
occurs, continue cranking with the accelera-
tor pedal pushed all the way to the floor.
Release the accelerator pedal and the key
once the engine is running smoothly.If the engine shows no sign of starting after
two 15-second periods of cranking with the
accelerator pedal held to the floor, repeat the
“Normal Starting” or “Extreme Cold
Weather” procedures.
With Tip Start — Automatic Transmission Only
If the engine fails to start after you have
followed the “Normal Starting” or “Extreme
Cold Weather” procedures, it may be flooded.
To clear any excess fuel, push the accelerator
pedal all the way to the floor and hold it.
Then, turn the ignition switch to the START
position and release it as soon as the starter
engages. The starter motor will disengage
automatically in 10 seconds. Once this oc-
curs, release the accelerator pedal, turn the
ignition switch to the LOCK position, wait
10 to 15 seconds, then repeat the “Normal
Starting” procedure.
CAUTION!
To prevent damage to the starter, wait
10 to 15 seconds before trying again.
STARTING AND OPERATING
118
Page 137 of 276
Possible Reasons The Engine Does Not
AUTO STOP
Prior to engine shut down, the system will
check many safety and comfort conditions to
see if they are fulfilled. In following situations
the engine will not stop:
• Driver’s seat belt is not buckled.
• Outside temperature is less than 1°F
(–17°C) or greater than 104°F (40°C).
• Actual cabin temperature is significantly
different than temperature set on Auto
HVAC.
• HVAC is set to full defrost mode.
• Engine has not reached normal operating
temperature.
• Battery discharged.
• When driving in REVERSE.
• Hood is open.
• Vehicle is in 4LO transfer case mode.It may be possible for the vehicle to be driven
several times without the STOP/START sys-
tem going into a STOP/START READY state
under more extreme conditions of the items
listed above.
To Start The Engine While In The STOP/
START AUTO STOP ACTIVE Mode
When the gear selector is in NEUTRAL, the
engine will start when the clutch pedal is
pressed. The vehicle will go into STOP/START
SYSTEM NOT READY mode until the vehicle
speed is greater than 3 mph (5 km/h).
Conditions that will cause the engine to start
automatically while in STOP/START AUTO STOP
ACTIVE mode
The Engine Will Start Automatically When:
• Actual cabin temperature is significantly
different than temperature set on Auto
HVAC.
• HVAC is set to full defrost mode.
• STOP/START AUTO STOP ACTIVE time ex-
ceeds 5 minutes.• Battery voltage drops too low.
• Low brake vacuum e.g. after several brake
pedal applications.
•
Vehicle is moving faster than 3 mph (5 km/h).
• STOP/START OFF switch is pressed.
• 4WD system is put into 4LO mode.
Conditions that force a manual key cycle
start while in STOP/START AUTO STOP AC-
TIVE mode:
The Engine Will Not Start Automatically If:
• The driver’s seatbelt was unbuckled
• The engine hood has been opened
• A STOP/START system error occurs
The engine may then only be restarted with
an ignition key cycle. The STOP/START KEY
START REQUIRED message will appear in
the instrument cluster under these condi-
tions. Refer to “Instrument Cluster Display”
in “Getting To Know Your Instrument Panel”
for further information.
135
Page 146 of 276
CAUTION!
Damage to the transmission may occur if
the transmission is shifted into PARK with
the transfer case in NEUTRAL (N) and the
engine running. With the transfer case in
NEUTRAL (N) ensure that the engine is
OFF before shifting the transmission into
PARK.
13. Attach the vehicle to the tow vehicle
using a suitable tow bar.
14. Release the parking brake.
15. Disconnect the negative battery cable,
and secure it away from the negative
battery post.
Shifting Out of NEUTRAL (N)
Use the following procedure to prepare your
vehicle for normal usage.
1. Bring the vehicle to a complete stop,
leaving it connected to the tow vehicle.
2. Firmly apply the parking brake.
3. Reconnect the negative battery cable.
4. Turn the ignition to the LOCK position.
5. Turn the ignition to the ON/RUN position,
but do not start the engine.
6. Press and hold the brake pedal.
7. Shift the transmission into NEUTRAL.8. Shift the transfer case lever to the desired
position.
NOTE:
When shifting the transfer case out of
NEUTRAL (N), the engine should remain
OFF to avoid gear clash.
9. Shift the automatic transmission into
PARK, or place manual transmission in
NEUTRAL.
10. Release the brake pedal.
11. Disconnect vehicle from the tow vehicle.
12. Start the engine.
13. Press and hold the brake pedal.
14. Release the parking brake.
15. Shift the transmission into gear, release
the brake pedal (and clutch pedal on
manual transmissions), and check that
the vehicle operates normally.
STARTING AND OPERATING
144