door lock JEEP WRANGLER 2023 Service Manual
[x] Cancel search | Manufacturer: JEEP, Model Year: 2023, Model line: WRANGLER, Model: JEEP WRANGLER 2023Pages: 396, PDF Size: 25.15 MB
Page 194 of 396
192MULTIMEDIA
Seats & Comfort/Auto-On Comfort Systems
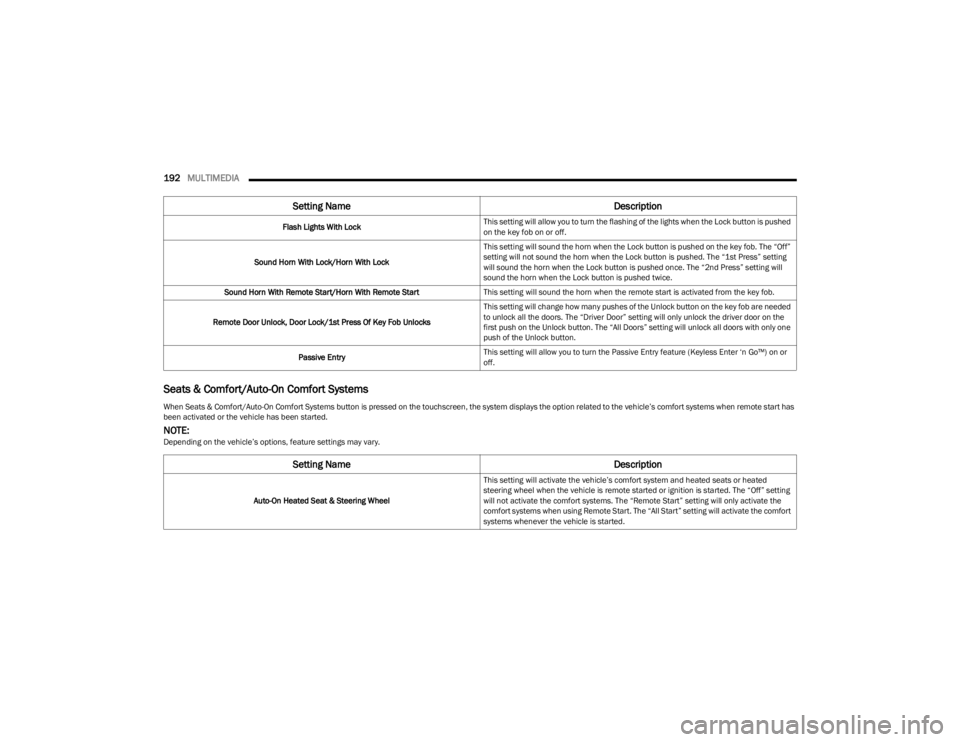
Flash Lights With Lock This setting will allow you to turn the flashing of the lights when the Lock button is pushed
on the key fob on or off.
Sound Horn With Lock/Horn With Lock This setting will sound the horn when the Lock button is pushed on the key fob. The “Off”
setting will not sound the horn when the Lock button is pushed. The “1st Press” setting
will sound the horn when the Lock button is pushed once. The “2nd Press” setting will
sound the horn when the Lock button is pushed twice.
Sound Horn With Remote Start/Horn With Remote Start This setting will sound the horn when the remote start is activated from the key fob.
Remote Door Unlock, Door Lock/1st Press Of Key Fob Unlocks This setting will change how many pushes of the Unlock button on the key fob are needed
to unlock all the doors. The “Driver Door” setting will only unlock the driver door on the
first push on the Unlock button. The “All Doors” setting will unlock all doors with only one
push of the Unlock button.
Passive Entry This setting will allow you to turn the Passive Entry feature (Keyless Enter ‘n Go™) on or
off.
When Seats & Comfort/Auto-On Comfort Systems button is pressed on the touchscreen, the system displays the option related to the vehicle’s comfort systems when remote start has
been activated or the vehicle has been started.
NOTE:Depending on the vehicle’s options, feature settings may vary.
Setting Name Description
Auto-On Heated Seat & Steering WheelThis setting will activate the vehicle’s comfort system and heated seats or heated
steering wheel when the vehicle is remote started or ignition is started. The “Off” setting
will not activate the comfort systems. The “Remote Start” setting will only activate the
comfort systems when using Remote Start. The “All Start” setting will activate the comfort
systems whenever the vehicle is started.
Setting Name
Description
23_JL_OM_EN_USC_t.book Page 192
Page 229 of 396
MULTIMEDIA227
Included Trial Period For New Vehicles
Your new vehicle may come with an included trial* period
for use of SiriusXM Guardian™ connected services
starting on the date of vehicle purchase. To get started
with your trial, enrollment in SiriusXM Guardian™ is
required.
* Included trial applies to new vehicles only.
Features And Packages
After the trial period, you must purchase a subscription to
continue your services by calling a SiriusXM Guardian™
Customer Care agent.
GETTING STARTED WITH CONNECTED
V
EHICLE SERVICES
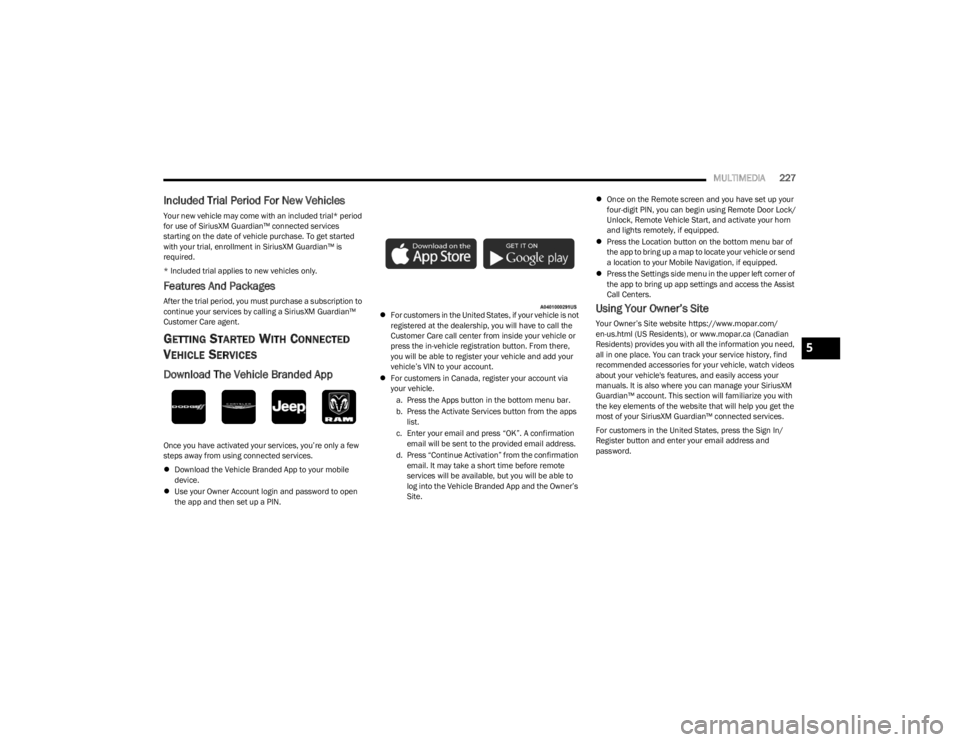
Download The Vehicle Branded App
Once you have activated your services, you’re only a few
steps away from using connected services.
Download the Vehicle Branded App to your mobile
device.
Use your Owner Account login and password to open
the app and then set up a PIN.
For customers in the United States, if your vehicle is not
registered at the dealership, you will have to call the
Customer Care call center from inside your vehicle or
press the in-vehicle registration button. From there,
you will be able to register your vehicle and add your
vehicle’s VIN to your account.
For customers in Canada, register your account via
your vehicle.
a. Press the Apps button in the bottom menu bar.
b. Press the Activate Services button from the apps list.
c. Enter your email and press “OK”. A confirmation email will be sent to the provided email address.
d. Press “Continue Activation” from the confirmation email. It may take a short time before remote
services will be available, but you will be able to
log into the Vehicle Branded App and the Owner’s
Site.
Once on the Remote screen and you have set up your
four-digit PIN, you can begin using Remote Door Lock/
Unlock, Remote Vehicle Start, and activate your horn
and lights remotely, if equipped.
Press the Location button on the bottom menu bar of
the app to bring up a map to locate your vehicle or send
a location to your Mobile Navigation, if equipped.
Press the Settings side menu in the upper left corner of
the app to bring up app settings and access the Assist
Call Centers.
Using Your Owner’s Site
Your Owner’s Site website https://www.mopar.com/
en-us.html (US Residents), or www.mopar.ca (Canadian
Residents) provides you with all the information you need,
all in one place. You can track your service history, find
recommended accessories for your vehicle, watch videos
about your vehicle's features, and easily access your
manuals. It is also where you can manage your SiriusXM
Guardian™ account. This section will familiarize you with
the key elements of the website that will help you get the
most of your SiriusXM Guardian™ connected services.
For customers in the United States, press the Sign In/
Register button and enter your email address and
password.
5
23_JL_OM_EN_USC_t.book Page 227
Page 230 of 396
228MULTIMEDIA
For customers in Canada, press the My Vehicle button.
Select from “Dashboard”, “Vehicle Health Report”, and
“Recalls”. The website will then prompt you to log in using
your email address and password.
Edit/Edit Profile:
To manage the details of your SiriusXM Guardian™
account, such as your contact information, password
and SiriusXM Guardian™ PIN, click on the Edit/Edit
Profile button to access the details of your account.
Connected Services Status:
This statement will indicate your SiriusXM
Guardian™-equipped vehicle.
Remote Commands:
For vehicles with an active SiriusXM Guardian™
subscription, press one of these icons and enter your
four-digit SiriusXM Guardian™ Security PIN to remotely
start (if equipped), lock/unlock doors or sound the horn
and flash the lights.
Editing Your Notifications
Notifications are an important element of your SiriusXM
Guardian™ account. For example, any time you use your
remote services (such as Remote Door Unlock), you can
elect to receive a text message, push notification, and/or
E-mail to notify you of the event. To set up the
notifications, please follow these instructions.
1. Log on to your Owner’s Account at
https://
www.mopar.com/en-us.html (US Residents) and
select “Dashboard”, or www.mopar.ca
(Canadian
Residents), select “My Vehicle” and then
“Dashboard”.
2. Click the Edit/Edit Profile button. 3. Once there, select “SiriusXM Guardian™” where you
can edit Notification Preferences.
4. You can enter a mobile phone and/or email address to notify you, and you can customize the types of
messages.
USING SIRIUSXM GUARDIAN™
SOS Call — If Equipped
Access To Emergency Services At The Push Of A Button
SiriusXM Guardian™ In-Vehicle Assistance Features
With SiriusXM Guardian™, your vehicle has onboard
assistance features located on the rearview mirror or
overhead console designed to enhance your driving
experience if you should ever need assistance or support. Description
SOS Call offers a convenient way to get in contact with a
SiriusXM Guardian™ Customer Care agent in the event of
an emergency. When the connection between the vehicle
and the live agent is made, your vehicle will automatically
transmit location information. In the event of a minor
collision, medical or any other emergency, press the SOS
button to be connected to a call center agent who can
send emergency assistance to your vehicle’s location.
NOTE:Certain SiriusXM Guardian™ connected services are
dependent on an operational Uconnect system, cellular
network availability that is compatible with the device in
your vehicle, and GPS network availability. Not all features
of SiriusXM Guardian™ are available everywhere at all
times, particularly in remote or enclosed areas.
How It Works
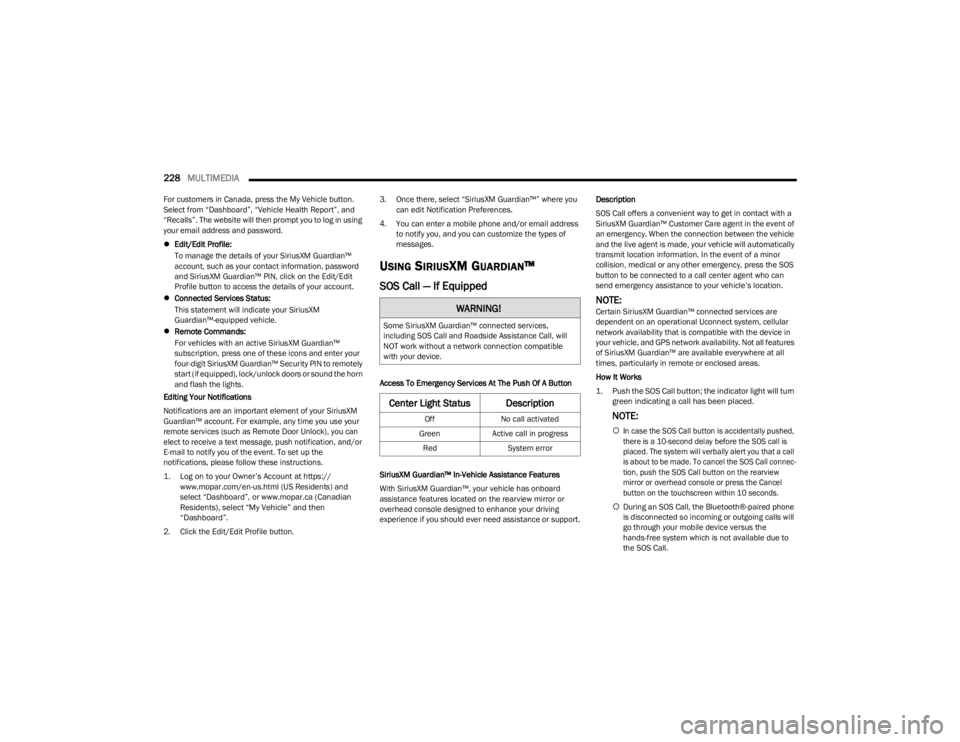
1. Push the SOS Call button; the indicator light will turn green indicating a call has been placed.
NOTE:
In case the SOS Call button is accidentally pushed,
there is a 10-second delay before the SOS call is
placed. The system will verbally alert you that a call
is about to be made. To cancel the SOS Call connec -
tion, push the SOS Call button on the rearview
mirror or overhead console or press the Cancel
button on the touchscreen within 10 seconds.
During an SOS Call, the Bluetooth®-paired phone
is disconnected so incoming or outgoing calls will
go through your mobile device versus the
hands-free system which is not available due to
the SOS Call.
WARNING!
Some SiriusXM Guardian™ connected services,
including SOS Call and Roadside Assistance Call, will
NOT work without a network connection compatible
with your device.
Center Light Status Description
Off No call activated
Green Active call in progress
Red System error
23_JL_OM_EN_USC_t.book Page 228
Page 233 of 396
MULTIMEDIA231
Using A Remote Command Through Your Owner’s Site
1. Log on to your Owner’s Site using the username and password you used when activating your SiriusXM
Guardian™ connected services in your vehicle.
NOTE:If you forgot your username or password, links are
provided on the website to help you retrieve them.
2. If you have more than one vehicle registered into your Owner’s Site, select the vehicle you want to send the
command to by clicking on its image along the top.
3. On your dashboard, you will see remote commands. Press the desired icon to activate that feature.
4. You will then be asked to enter your SiriusXM Guardian™ Security PIN (this is the same four-digit
code established when you activated your SiriusXM
Guardian™ connected services). Please enter your
SiriusXM Guardian™ Security PIN.
5. A message will appear on the screen to let you know if the command was received by your vehicle.
Contacting SiriusXM Guardian™ Customer Care (for
example, in case of an accidental lock-out):
1. Contact SiriusXM Guardian™ Customer Care if you are unable to lock your vehicle through the Vehicle
Branded App or your key fob.
2. For security purposes, the SiriusXM Guardian™ Customer Care agent will verify your identity by asking
for your four-digit SiriusXM Guardian™ Security PIN.
3. After providing your SiriusXM Guardian™ Security PIN, you can ask them to perform a remote
command.
NOTE:Anyone with access to your PIN may request Remote Door
Lock/Unlock. It is your responsibility to protect your PIN
appropriately.
Remote Door Lock/Unlock
Description
The Remote Door Lock/Unlock feature provides you the
ability to lock or unlock the door on your vehicle without
the keys and from virtually any distance.
Working Vehicle Conditions
The vehicle must in PARK or at a standstill.
The vehicle must be in an open area with cell tower
reception.
Your mobile device must have a cellular or Wi-Fi
connection.
Requirements
Vehicle must be properly equipped with SiriusXM
Guardian™.
Vehicle must have an operable LTE (voice/data) or 4G
(data) network connection. If using the Vehicle
Branded App to command your vehicle, your device
must be compatible and be connected to an operable
LTE (voice/data) or 4G (data) network connection.
Vehicle must be registered with SiriusXM Guardian™
and have an active subscription that includes the appli -
cable feature.
An ignition cycle is required for some remote
commands, such as Remote Vehicle Start and Remote
Door Lock/Unlock if following a Remote Horn & Lights
activation.
Your Remote Door Lock/Unlock request will not be
processed if the vehicle is in motion, the ignition key is
on or during an emergency call.NOTE:All other remote services should be performed via your
Owner’s Site or through the Vehicle Branded App on your
compatible device.
Remote Vehicle Start
Description
The Remote Vehicle Start feature provides you with the
ability to start the engine on your vehicle without the keys
and from virtually any distance. Once started, the preset
climate controls in your vehicle can warm up or cool down
the interior.
You can also send a command to turn off an engine that
has been started using Remote Vehicle Start. After
15 minutes, if you have not entered your vehicle with the
key, the engine will shut off automatically.
This remote function requires your vehicle to be equipped
with a factory-installed Remote Start system.
You can set up push notifications every time a command
is sent to activate or cancel Remote Start.5
23_JL_OM_EN_USC_t.book Page 231
Page 239 of 396
MULTIMEDIA237
MANAGE MY SIRIUSXM GUARDIAN™
A
CCOUNT
To manage your SiriusXM Guardian™ account, press the
ASSIST button in your vehicle, or call SiriusXM Guardian™
Customer Care.
NOTE:It is recommended, when selling your vehicle, or turning in
your lease, to call SiriusXM Guardian™ Care to remove
your personal data.
CONNECTED SERVICES FAQS
For additional information about SiriusXM Guardian™,
active subscribers can push the ASSIST button (if
equipped) and then select SiriusXM Guardian™ Call on
your in-vehicle touchscreen to contact SiriusXM
Guardian™. Your call will be directed to a SiriusXM
Guardian™ agent or held in a queue until an agent is
available. If you do not have an active subscription, push
the ASSIST button and press the Activate button on the
touchscreen to activate services.
CONNECTED SERVICES SOS FAQS —
I
F EQUIPPED
1.
What happens if I accidentally push the SOS Call
button on the mirror or overhead console?
You have
10 seconds after pushing the SOS Call button to
cancel the call. To cancel the call, either push the
SOS Call button again, or press the Cancel button on
the in-vehicle touchscreen.
2.
What type of information is sent when I use the SOS
Call button from my vehicle? Certain vehicle
information, such as make and model, is transmitted
along with the last known GPS location.
3. When could I use the SOS Call button? You can use
the SOS Call button to make a call if you or someone
else needs emergency assistance.
CONNECTED SERVICES REMOTE DOOR
L
OCK/UNLOCK FAQS
1.
How long does it take to unlock or lock the door?
Depending on various conditions, it can take up to
three minutes or more for the request to get to your
vehicle.
2. Which is faster, my key fob or the Vehicle Branded
App? Your key fob will lock/unlock the door more
quickly, however its range is limited and your Vehicle
Branded App comes in handy for these and other
situations.
3. Will my vehicle be safe if I lose my device? People
sometimes lose their mobile devices, which is why
security measures have been engineered into the
Vehicle Branded App. Asking for your username,
password and SiriusXM Guardian™ Security PIN are
required for the activation of Remote services
through your mobile device. It is your responsibility to
protect your passwords and PINs. 4.
Why can’t all mobile devices use the Vehicle Branded
App? The Vehicle Branded App is compatible with
most devices with the Apple® and Android™
operating systems. The capabilities of these devices
allow us to remotely command your vehicle. Other
operating systems may be supported in the future.
5. Why is the Vehicle Branded App running slow? The
Vehicle Branded App relies on a mobile network
connection from your device to send commands to
your vehicle which must have an operable LTE (voice/
data), 4G (data), or 5G (data) network connection. If
either your device or your vehicle is in an area with
below average coverage, it may take longer to log in
and send commands.
CONNECTED SERVICES ROADSIDE
A
SSISTANCE FAQS
1.
What is the phone number for roadside assistance
call? The phone number is:
US: 1-800-521-2779
Canada: 1-800-363-4869
2. If I am subscribed to SiriusXM Guardian™, does it
cover towing or other expenses incurred by using
roadside assistance? No, however your new vehicle
may include Roadside Assistance Call services.
5
23_JL_OM_EN_USC_t.book Page 237
Page 241 of 396
MULTIMEDIA239
5.Can I stop a vehicle that is being driven with the
cancel Remote Vehicle Start command? No. If the
vehicle is in motion, the cancel Remote Vehicle Start
button will not stop the vehicle.
6. Why can’t all mobile devices use the Vehicle Branded
App? The Vehicle Branded App has been designed to
work on most devices with the Apple® and Android™
operating systems. The capabilities of these devices
allow us to remotely command your vehicle. Other
operating systems may be supported in the future.
CONNECTED SERVICES REMOTE HORN
& L
IGHTS FAQS
1.
How long does it take to sound my horn and flash the
lights?
Depending on various conditions, it can take
three minutes or more for the request to get through
to your vehicle.
2. Which is faster, my key fob or the Vehicle Branded
App? Your key fob will sound the horn and flash the
lights quicker; however, its range is limited.
3. How do I turn off the horn and lights after I turn them
on? If you are close enough to the vehicle, you can
use the key fob to turn off the horn and lights by
pressing the red Panic button. Otherwise, Remote
Horn & Lights will continue for a maximum of three
minutes.
4. Why can’t all mobile devices use the Vehicle Branded
App? The Vehicle Branded App has been designed to
work on most devices with the Apple® and Android™
operating systems. The capabilities of these devices
allow us to remotely command your vehicle. Other
operating systems may be supported in the future.
CONNECTED SERVICES ACCOUNT FAQS —
I
F EQUIPPED
1.
How do I register for my SiriusXM Guardian™
account? There are three ways that you can register
your SiriusXM Guardian™ Account:
Push the ASSIST button. A call will be placed to an
agent who can assist in registering your new
account.
Press the Activate Services icon in the Apps menu.
Select the button to speak with an agent, who can
assist in registering your new account.
Press the Activate Services icon in the Apps menu.
Enter your email on the touchscreen and then
follow the prompts from the provided email. You
will receive an email with an activation link that
will be good for 72 hours. Once you click the acti -
vation link, you will be prompted to fill out your
information and accept Terms and Conditions.
Then, you will be directed to the SiriusXM
Guardian™ home page to complete your profile
and demo the remote services.
2. Why do I need an email address? Without an email
address, customers cannot register for SiriusXM
Guardian™. Customers need to register so they can
subscribe to receive additional services and create a
SiriusXM Guardian™ Security PIN for remote
command requests.
3. How do I create a SiriusXM Guardian™ security PIN?
Set up your SiriusXM Guardian™ Security PIN during
the registration process. The SiriusXM Guardian™
Security PIN will be required to authenticate you
when accessing your account via SiriusXM Guardian™ Call or performing any remote services,
such as Remote Door Lock/Unlock, Remote Horn &
Lights, or Remote Vehicle Start.
4. What if I forgot my SiriusXM Guardian™ security PIN?
If you’ve already activated services and forgot your
SiriusXM Guardian™ Security PIN, you can reset the
PIN by selecting Edit Profile on your Owner’s Site.
5. How do I update my SiriusXM Guardian™ payment
account address? Your SiriusXM Guardian™ Payment
Account address can be updated online, or by calling
SiriusXM Guardian™ Customer Care from ASSIST in
your vehicle. To update online: login to your Owner’s
Site, and select Edit Profile > SiriusXM Guardian™
Payment Account.
6. How do I update my SiriusXM Guardian™ profile?
Your name, home address, phone number, email
address and SiriusXM Guardian™ Security PIN can be
updated online on your Owner’s Site. Log in to your
Owner’s Site then select Edit Profile to edit your
personal information. Make your edits and click Save.
7. Can I try features or packages before I buy them?
Your new vehicle purchase may have come with an
included trial period for certain Apps and services.
8. Can I access every App and service while driving? No,
some applications and services are not available
while driving. For your own safety, it is not possible to
use some of the touchscreen features while the
vehicle is in motion (e.g. key pad).
9. What happens when my subscription comes up for
renewal? If you have added a credit card to your
account information, your subscription will be
automatically renewed for a term length in
accordance with the service plan that you have
5
23_JL_OM_EN_USC_t.book Page 239
Page 246 of 396
244
SAFETY
SAFETY FEATURES
ANTI-LOCK BRAKE SYSTEM (ABS)
The ABS provides increased vehicle stability and brake
performance under most braking conditions. The system
automatically prevents wheel lock and enhances vehicle
control during braking.
The ABS performs a self-check cycle to ensure that the
ABS is working properly each time the vehicle is started
and driven. During this self-check, you may hear a slight
clicking sound as well as some related motor noises.
The ABS is activated during braking when the system
detects one or more wheels are beginning to lock. Road
conditions such as ice, snow, gravel, bumps, railroad
tracks, loose debris, or panic stops may increase the
likelihood of ABS activation(s).
You also may experience the following normal
characteristics when the ABS activates:
ABS motor noise or clicking sounds (you may continue
to hear for a short time after the stop)
Brake pedal pulsations
A slight drop of the brake pedal at the end of the stop
The ABS is designed to function with the Original
Equipment Manufacturer (OEM) tires. Modification may
result in degraded ABS performance.
Anti-Lock Brake System (ABS) Warning
Light
The yellow ABS Warning Light will turn on when the ignition
is placed in the ON/RUN mode and may stay on for as long
as four seconds.
If the ABS Warning Light remains on or comes on while
driving, it indicates that the anti-lock portion of the brake
system is not functioning and that service is required.
However, the conventional brake system will continue to
operate normally if the ABS Warning Light is on.
If the ABS Warning Light is on, the brake system should be
serviced as soon as possible to restore the benefits of
Anti-Lock Brakes. If the ABS Warning Light does not come
on when the ignition is placed in the ON/RUN mode, have
the light repaired as soon as possible.
REAR SEAT REMINDER ALERT (RSRA) —
I
F EQUIPPED
RSRA alerts you through a visual and auditory notification
of the possible presence of an object, passenger, or pet in
the rear seats if a rear door was opened up to 10 minutes
before the ignition was placed in the ON/RUN position.
RSRA does not directly detect objects, passengers, or pets
in the rear seats. When the previous conditions are met,
RSRA displays the message “Check Rear Seat” on the
instrument cluster display and sounds an auditory alert
upon the driver placing the ignition in the OFF position to
exit the vehicle.
WARNING!
The ABS contains sophisticated electronic equip -
ment that may be susceptible to interference caused
by improperly installed or high output radio transmit -
ting equipment. This interference can cause possible
loss of anti-lock braking capability. Installation of
such equipment should be performed by qualified
professionals.
Pumping of the Anti-Lock Brakes will diminish their
effectiveness and may lead to a collision. Pumping
makes the stopping distance longer. Just press firmly
on your brake pedal when you need to slow down or
stop.
The ABS cannot prevent the natural laws of physics
from acting on the vehicle, nor can it increase
braking or steering efficiency beyond that afforded
by the condition of the vehicle brakes and tires or the
traction afforded.
The ABS cannot prevent collisions, including those
resulting from excessive speed in turns, following
another vehicle too closely, or hydroplaning.
The capabilities of an ABS equipped vehicle must
never be exploited in a reckless or dangerous
manner that could jeopardize the user’s safety or the
safety of others.
23_JL_OM_EN_USC_t.book Page 244
Page 268 of 396
266SAFETY
(Continued)
(Continued)
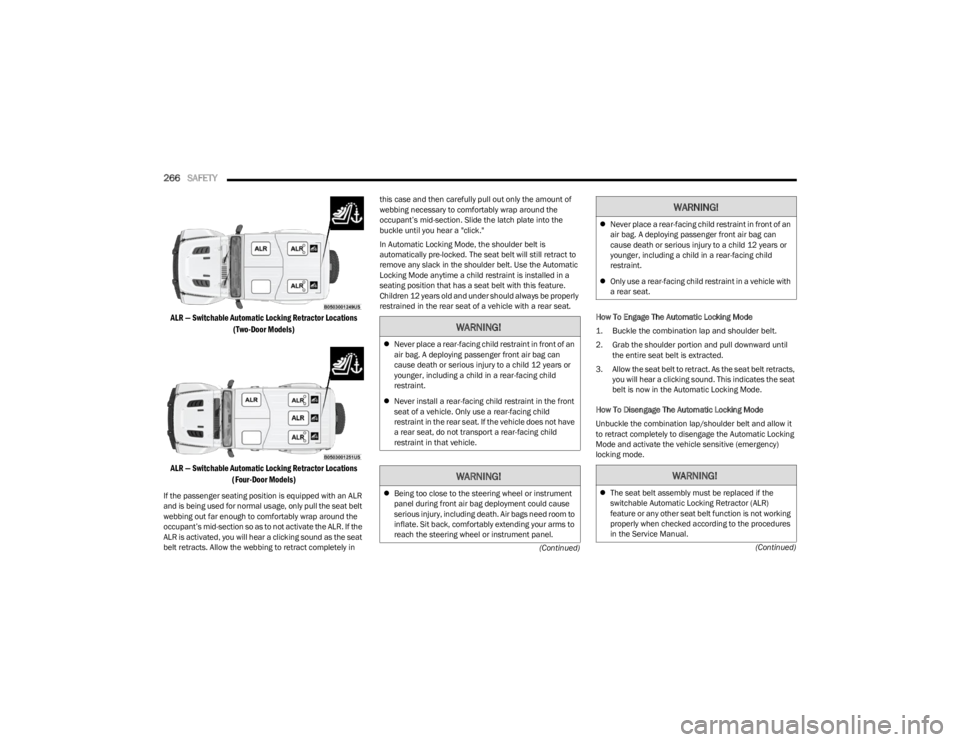
ALR — Switchable Automatic Locking Retractor Locations
(Two-Door Models)
ALR — Switchable Automatic Locking Retractor Locations (Four-Door Models)
If the passenger seating position is equipped with an ALR
and is being used for normal usage, only pull the seat belt
webbing out far enough to comfortably wrap around the
occupant’s mid-section so as to not activate the ALR. If the
ALR is activated, you will hear a clicking sound as the seat
belt retracts. Allow the webbing to retract completely in this case and then carefully pull out only the amount of
webbing necessary to comfortably wrap around the
occupant’s mid-section. Slide the latch plate into the
buckle until you hear a "click."
In Automatic Locking Mode, the shoulder belt is
automatically pre-locked. The seat belt will still retract to
remove any slack in the shoulder belt. Use the Automatic
Locking Mode anytime a child restraint is installed in a
seating position that has a seat belt with this feature.
Children 12 years old and under should always be properly
restrained in the rear seat of a vehicle with a rear seat.
How To Engage The Automatic Locking Mode
1. Buckle the combination lap and shoulder belt.
2. Grab the shoulder portion and pull downward until the entire seat belt is extracted.
3. Allow the seat belt to retract. As the seat belt retracts, you will hear a clicking sound. This indicates the seat
belt is now in the Automatic Locking Mode.
How To Disengage The Automatic Locking Mode
Unbuckle the combination lap/shoulder belt and allow it
to retract completely to disengage the Automatic Locking
Mode and activate the vehicle sensitive (emergency)
locking mode.
WARNING!
Never place a rear-facing child restraint in front of an
air bag. A deploying passenger front air bag can
cause death or serious injury to a child 12 years or
younger, including a child in a rear-facing child
restraint.
Never install a rear-facing child restraint in the front
seat of a vehicle. Only use a rear-facing child
restraint in the rear seat. If the vehicle does not have
a rear seat, do not transport a rear-facing child
restraint in that vehicle.
WARNING!
Being too close to the steering wheel or instrument
panel during front air bag deployment could cause
serious injury, including death. Air bags need room to
inflate. Sit back, comfortably extending your arms to
reach the steering wheel or instrument panel.
Never place a rear-facing child restraint in front of an
air bag. A deploying passenger front air bag can
cause death or serious injury to a child 12 years or
younger, including a child in a rear-facing child
restraint.
Only use a rear-facing child restraint in a vehicle with
a rear seat.
WARNING!
The seat belt assembly must be replaced if the
switchable Automatic Locking Retractor (ALR)
feature or any other seat belt function is not working
properly when checked according to the procedures
in the Service Manual.
WARNING!
23_JL_OM_EN_USC_t.book Page 266
Page 278 of 396
276SAFETY
If you do have a collision which deploys the air bags, any
or all of the following may occur:
The air bag material may sometimes cause abrasions
and/or skin reddening to the occupants as the air bags
deploy and unfold. The abrasions are similar to friction
rope burns or those you might get sliding along a carpet
or gymnasium floor. They are not caused by contact
with chemicals. They are not permanent and normally
heal quickly. However, if you haven’t healed signifi -
cantly within a few days, or if you have any blistering,
see your doctor immediately.
As the air bags deflate, you may see some smoke-like
particles. The particles are a normal by-product of the
process that generates the non-toxic gas used for air
bag inflation. These airborne particles may irritate the
skin, eyes, nose, or throat. If you have skin or eye irrita -
tion, rinse the area with cool water. For nose or throat
irritation, move to fresh air. If the irritation continues,
see your doctor. If these particles settle on your
clothing, follow the garment manufacturer’s instruc -
tions for cleaning.
Do not drive your vehicle after the air bags have deployed.
If you are involved in another collision, the air bags will not
be in place to protect you.NOTE:
Air bag covers may not be obvious in the interior trim,
but they will open during air bag deployment.
After any collision, the vehicle should be taken to an
authorized dealer immediately.
Enhanced Accident Response System
In the event of an impact, if the communication network
remains intact, and the power remains intact, depending
on the nature of the event, the Occupant Restraint
Controller (ORC) will determine whether to have the
Enhanced Accident Response System perform the
following functions:
Cut off fuel to the engine (if equipped).
Cut off battery power to the electric motor (if equipped).
Flash hazard lights as long as the battery has power.
Turn on the interior lights, which remain on as long as
the battery has power or for 15 minutes from the inter -
vention of the Enhanced Accident Response System.
Unlock the power door locks.
Your vehicle may also be designed to perform any of these
other functions in response to the Enhanced Accident
Response System:
Turn off the Fuel Filter Heater, Turn off the HVAC Blower
Motor, Close the HVAC Circulation Door
Cut off battery power to the:
Engine
Electric Motor (if equipped)
Electric power steering
Brake booster
Electric park brake
Automatic transmission gear selector
Horn
Front wiper
NOTE:After an accident, remember to cycle the ignition to the
START or ON/OFF position and remove the key from the
ignition switch to avoid draining the battery. Carefully
check the vehicle for fuel leaks in the engine compartment
and on the ground near the engine compartment and fuel
tank before resetting the system and starting the engine.
If there are no fuel leaks or damage to the vehicle elec -
trical devices (e.g. headlights) after an accident, reset the
system by following the procedure described below. If you
have any doubt, contact an authorized dealer.
Enhanced Accident Response System
Reset Procedure
If applicable, refer to the “Hybrid Supplement” for
additional information.
In order to reset the Enhanced Accident Response System
functions after an event, the ignition switch must be
changed from ignition START or ON/RUN to ignition OFF.
Carefully check the vehicle for fuel leaks in the engine
compartment and on the ground near the engine
compartment and fuel tank before resetting the system
and starting the engine.
After an accident, if the vehicle will not start after
performing the reset procedure, the vehicle must be
towed to an authorized dealer to be inspected and to have
the Enhanced Accident Response System reset.
WARNING!
Deployed air bags and seat belt pretensioners cannot
protect you in another collision. Have the air bags, seat
belt pretensioners, and the seat belt retractor
assemblies replaced by an authorized dealer
immediately. Also, have the Occupant Restraint
Controller System serviced as well.
23_JL_OM_EN_USC_t.book Page 276
Page 287 of 396
SAFETY285
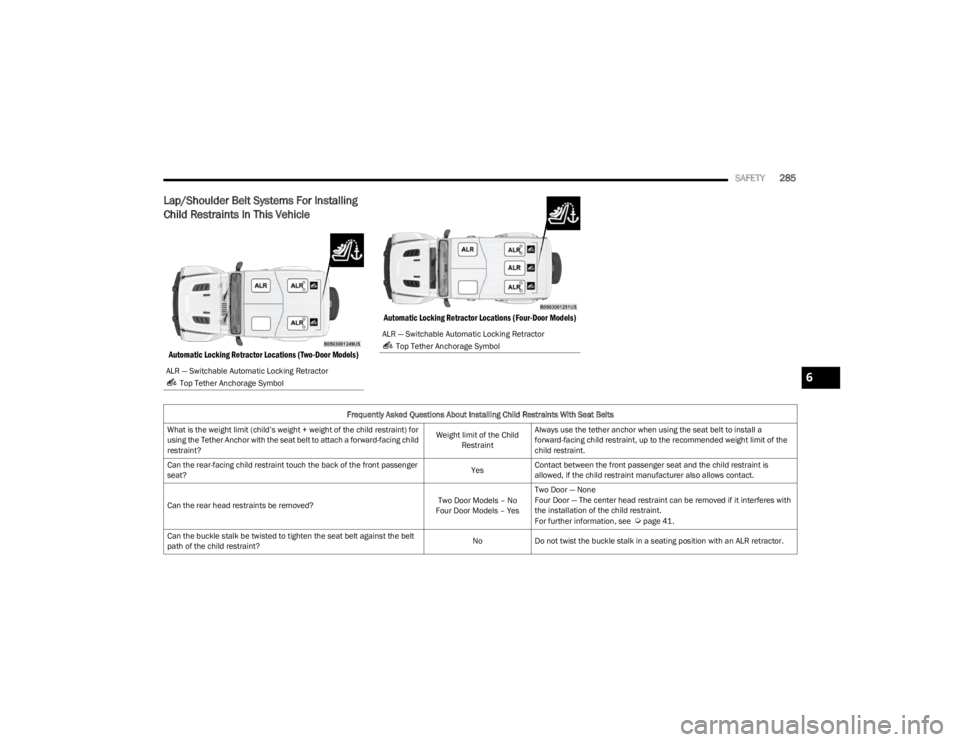
Lap/Shoulder Belt Systems For Installing
Child Restraints In This Vehicle
Automatic Locking Retractor Locations (Two-Door Models) Automatic Locking Retractor Locations (Four-Door Models)
ALR — Switchable Automatic Locking Retractor
Top Tether Anchorage Symbol
ALR — Switchable Automatic Locking Retractor Top Tether Anchorage Symbol
Frequently Asked Questions About Installing Child Restraints With Seat Belts
What is the weight limit (child’s weight + weight of the child restraint) for
using the Tether Anchor with the seat belt to attach a forward-facing child
restraint? Weight limit of the Child
Restraint Always use the tether anchor when using the seat belt to install a
forward-facing child restraint, up to the recommended weight limit of the
child restraint.
Can the rear-facing child restraint touch the back of the front passenger
seat? YesContact between the front passenger seat and the child restraint is
allowed, if the child restraint manufacturer also allows contact.
Can the rear head restraints be removed? Two Door Models – No
Four Door Models – Yes Two Door — None
Four Door — The center head restraint can be removed if it interferes with
the installation of the child restraint.
For further information, see
Úpage 41.
Can the buckle stalk be twisted to tighten the seat belt against the belt
path of the child restraint? No
Do not twist the buckle stalk in a seating position with an ALR retractor.
6
23_JL_OM_EN_USC_t.book Page 285