tow JEEP WRANGLER 2023 Repair Manual
[x] Cancel search | Manufacturer: JEEP, Model Year: 2023, Model line: WRANGLER, Model: JEEP WRANGLER 2023Pages: 396, PDF Size: 25.15 MB
Page 302 of 396
300IN CASE OF EMERGENCY
5. Start the engine in the vehicle that has the booster
battery, let the engine idle a few minutes, and then
start the engine in the vehicle with the discharged
battery.
6. Once the engine is started, remove the jumper cables in the reverse sequence.
Disconnecting The Jumper Cables
1. Disconnect the negative
(-)
end of the jumper cable
from the engine ground of the vehicle with the
discharged battery.
2. Disconnect the opposite end of the negative (-)
jumper cable from the negative (-) post of the booster
battery.
3. Disconnect the positive (+) end of the jumper cable
from the positive (+) post of the booster battery. 4. Disconnect the opposite end of the positive
(+)
jumper cable from the positive (+) post of the
discharged vehicle.
5. Reinstall the protective cover over the positive (+)
post of the discharged vehicle.
NOTE:If frequent jump starting is required to start your vehicle
you should have the battery and charging system tested at
an authorized dealer.
IF YOUR ENGINE OVERHEATS
If the vehicle is overheating, it will need to be serviced by
an authorized dealer.
Potential signs of vehicle overheating:
Temperature gauge is at HOT (H)
Strong smell of coolant
White smoke coming from engine or exhaust
Coolant bottle coolant has bubbles present In the event it is observed that the temperature gauge is
moving towards or close to the HOT (H) position, you can
reduce the potential for overheating by taking the
appropriate action.
On the highways — slow down.
In city traffic — while stopped, place the transmission in
NEUTRAL (N), but do not increase the engine idle speed
while preventing vehicle motion with the brakes.
If your Air Conditioner (A/C) is on, turn it off. The A/C
system adds heat to the engine cooling system and
turning the A/C off can help remove this heat.
You can also turn the temperature control to maximum
heat, the mode control to floor and the blower control
to high. This allows the heater core to act as a supple -
ment to the radiator and aids in removing heat from the
engine cooling system.
CAUTION!
Make sure at all times that unused ends of jumper
cables are not contacting each other or either vehicle
while making connections. Failure to follow these
procedures could result in damage to the charging
system of the booster vehicle or the discharged vehicle.
CAUTION!
Do not run the booster vehicle engine above 2,000 RPM
since it provides no charging benefit, wastes fuel, and
can damage booster vehicle engine.
CAUTION!
Accessories plugged into the vehicle power outlets draw
power from the vehicle’s battery, even when not in use
(i.e., cellular devices, etc.). Eventually, if plugged in long
enough without engine operation, the vehicle’s battery
will discharge sufficiently to degrade battery life and/or
prevent the engine from starting.
WARNING!
You or others can be badly burned by hot engine
coolant (antifreeze) or steam from your radiator. If you
see or hear steam coming from under the hood, do not
open the hood until the radiator has had time to cool.
Never try to open a cooling system pressure cap when
the radiator or coolant bottle is hot.
23_JL_OM_EN_USC_t.book Page 300
Page 303 of 396
IN CASE OF EMERGENCY301
MANUAL PARK RELEASE
In order to move the vehicle in cases where the
transmission will not shift out of PARK (P) (such as a
depleted battery), a Manual Park Release is available. See the following steps to use the Manual Park Release:
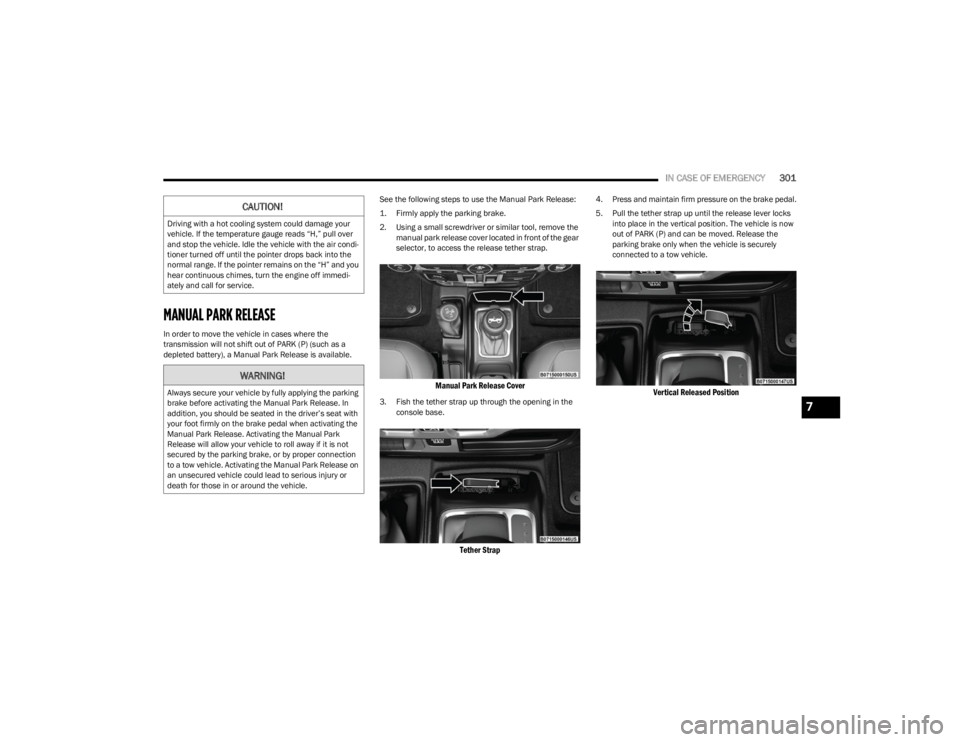
1. Firmly apply the parking brake.
2. Using a small screwdriver or similar tool, remove the
manual park release cover located in front of the gear
selector, to access the release tether strap.
Manual Park Release Cover
3. Fish the tether strap up through the opening in the console base.
Tether Strap
4. Press and maintain firm pressure on the brake pedal.
5. Pull the tether strap up until the release lever locks into place in the vertical position. The vehicle is now
out of PARK (P) and can be moved. Release the
parking brake only when the vehicle is securely
connected to a tow vehicle.
Vertical Released Position
CAUTION!
Driving with a hot cooling system could damage your
vehicle. If the temperature gauge reads “H,” pull over
and stop the vehicle. Idle the vehicle with the air condi -
tioner turned off until the pointer drops back into the
normal range. If the pointer remains on the “H” and you
hear continuous chimes, turn the engine off immedi -
ately and call for service.
WARNING!
Always secure your vehicle by fully applying the parking
brake before activating the Manual Park Release. In
addition, you should be seated in the driver’s seat with
your foot firmly on the brake pedal when activating the
Manual Park Release. Activating the Manual Park
Release will allow your vehicle to roll away if it is not
secured by the parking brake, or by proper connection
to a tow vehicle. Activating the Manual Park Release on
an unsecured vehicle could lead to serious injury or
death for those in or around the vehicle.
7
23_JL_OM_EN_USC_t.book Page 301
Page 305 of 396
IN CASE OF EMERGENCY303
TOWING A DISABLED VEHICLE
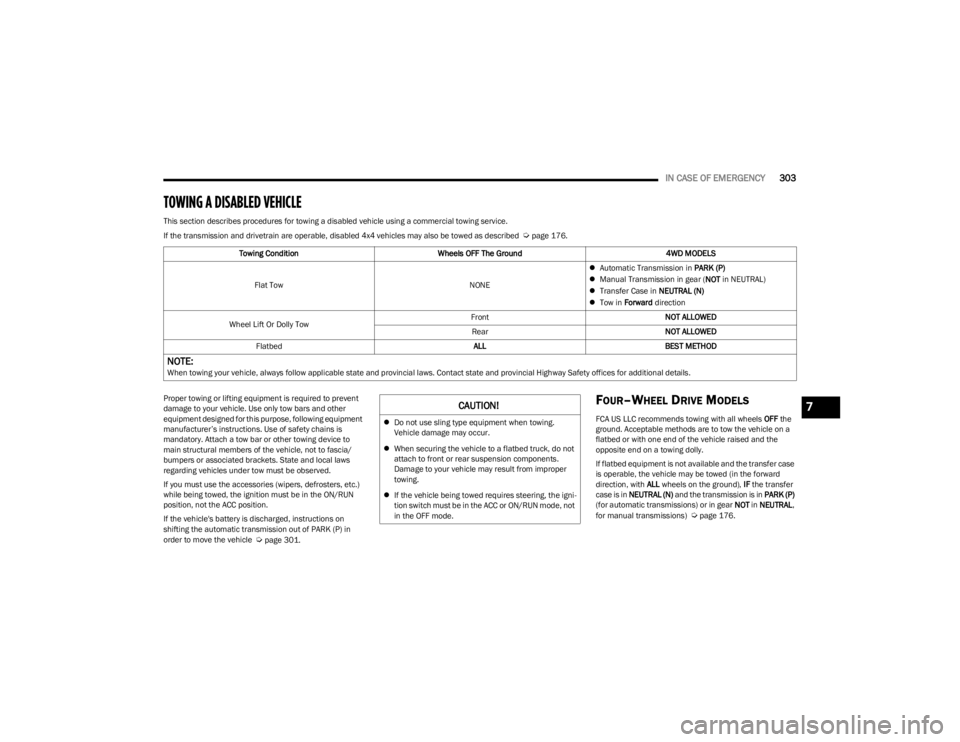
This section describes procedures for towing a disabled vehicle using a commercial towing service.
If the transmission and drivetrain are operable, disabled 4x4 vehicles may also be towed as described
Úpage 176.
Proper towing or lifting equipment is required to prevent
damage to your vehicle. Use only tow bars and other
equipment designed for this purpose, following equipment
manufacturer’s instructions. Use of safety chains is
mandatory. Attach a tow bar or other towing device to
main structural members of the vehicle, not to fascia/
bumpers or associated brackets. State and local laws
regarding vehicles under tow must be observed.
If you must use the accessories (wipers, defrosters, etc.)
while being towed, the ignition must be in the ON/RUN
position, not the ACC position.
If the vehicle's battery is discharged, instructions on
shifting the automatic transmission out of PARK (P) in
order to move the vehicle
Úpage 301.
FOUR–WHEEL DRIVE MODELS
FCA US LLC recommends towing with all wheels OFF the
ground. Acceptable methods are to tow the vehicle on a
flatbed or with one end of the vehicle raised and the
opposite end on a towing dolly.
If flatbed equipment is not available and the transfer case
is operable, the vehicle may be towed (in the forward
direction, with ALL wheels on the ground), IF the transfer
case is in NEUTRAL (N) and the transmission is in PARK (P)
(for automatic transmissions) or in gear NOT in NEUTRAL ,
for manual transmissions)
Úpage 176.
Towing Condition
Wheels OFF The Ground 4WD MODELS
Flat Tow NONE
Automatic Transmission in PARK (P)
Manual Transmission in gear ( NOT in NEUTRAL)
Transfer Case in NEUTRAL (N)
Tow in Forward direction
Wheel Lift Or Dolly Tow Front
NOT ALLOWED
Rear NOT ALLOWED
Flatbed ALLBEST METHOD
NOTE:When towing your vehicle, always follow applicable state and provincial laws. Contact state and provincial Highway Safety offices for additional details.
CAUTION!
Do not use sling type equipment when towing.
Vehicle damage may occur.
When securing the vehicle to a flatbed truck, do not
attach to front or rear suspension components.
Damage to your vehicle may result from improper
towing.
If the vehicle being towed requires steering, the igni -
tion switch must be in the ACC or ON/RUN mode, not
in the OFF mode.
7
23_JL_OM_EN_USC_t.book Page 303
Page 306 of 396
304IN CASE OF EMERGENCY
(Continued)
WITHOUT THE KEY FOB
Special care must be taken when the vehicle is towed with
the ignition in the OFF mode. The only approved method of
towing without the key fob is with a flatbed truck. Proper
towing equipment is necessary to prevent damage to the
vehicle.
EMERGENCY TOW HOOKS —
I
F EQUIPPED
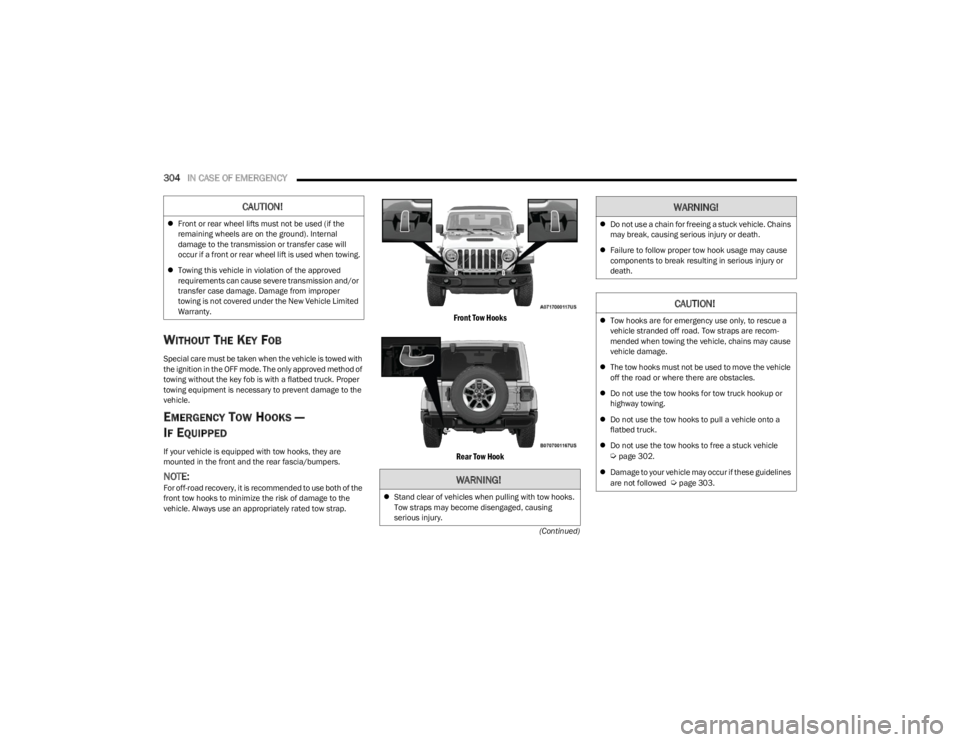
If your vehicle is equipped with tow hooks, they are
mounted in the front and the rear fascia/bumpers.
NOTE:For off-road recovery, it is recommended to use both of the
front tow hooks to minimize the risk of damage to the
vehicle. Always use an appropriately rated tow strap.
Front Tow Hooks
Rear Tow Hook
CAUTION!
Front or rear wheel lifts must not be used (if the
remaining wheels are on the ground). Internal
damage to the transmission or transfer case will
occur if a front or rear wheel lift is used when towing.
Towing this vehicle in violation of the approved
requirements can cause severe transmission and/or
transfer case damage. Damage from improper
towing is not covered under the New Vehicle Limited
Warranty.
WARNING!
Stand clear of vehicles when pulling with tow hooks.
Tow straps may become disengaged, causing
serious injury.
Do not use a chain for freeing a stuck vehicle. Chains
may break, causing serious injury or death.
Failure to follow proper tow hook usage may cause
components to break resulting in serious injury or
death.
CAUTION!
Tow hooks are for emergency use only, to rescue a
vehicle stranded off road. Tow straps are recom -
mended when towing the vehicle, chains may cause
vehicle damage.
The tow hooks must not be used to move the vehicle
off the road or where there are obstacles.
Do not use the tow hooks for tow truck hookup or
highway towing.
Do not use the tow hooks to pull a vehicle onto a
flatbed truck.
Do not use the tow hooks to free a stuck vehicle
Úpage 302.
Damage to your vehicle may occur if these guidelines
are not followed
Úpage 303.
WARNING!
23_JL_OM_EN_USC_t.book Page 304
Page 308 of 396
306
SERVICING AND MAINTENANCE
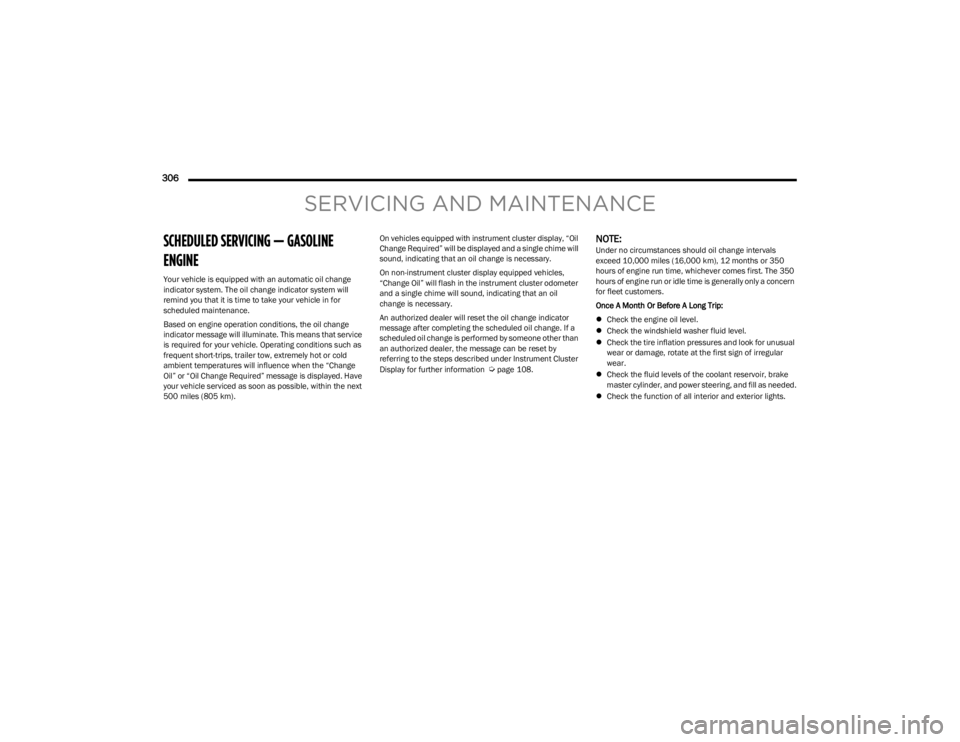
SCHEDULED SERVICING — GASOLINE
ENGINE
Your vehicle is equipped with an automatic oil change
indicator system. The oil change indicator system will
remind you that it is time to take your vehicle in for
scheduled maintenance.
Based on engine operation conditions, the oil change
indicator message will illuminate. This means that service
is required for your vehicle. Operating conditions such as
frequent short-trips, trailer tow, extremely hot or cold
ambient temperatures will influence when the “Change
Oil” or “Oil Change Required” message is displayed. Have
your vehicle serviced as soon as possible, within the next
500 miles (805 km).On vehicles equipped with instrument cluster display, “Oil
Change Required” will be displayed and a single chime will
sound, indicating that an oil change is necessary.
On non-instrument cluster display equipped vehicles,
“Change Oil” will flash in the instrument cluster odometer
and a single chime will sound, indicating that an oil
change is necessary.
An authorized dealer will reset the oil change indicator
message after completing the scheduled oil change. If a
scheduled oil change is performed by someone other than
an authorized dealer, the message can be reset by
referring to the steps described under Instrument Cluster
Display for further information
Úpage 108.
NOTE:Under no circumstances should oil change intervals
exceed 10,000 miles (16,000 km), 12 months or 350
hours of engine run time, whichever comes first. The 350
hours of engine run or idle time is generally only a concern
for fleet customers.
Once A Month Or Before A Long Trip:
Check the engine oil level.
Check the windshield washer fluid level.
Check the tire inflation pressures and look for unusual
wear or damage, rotate at the first sign of irregular
wear.
Check the fluid levels of the coolant reservoir, brake
master cylinder, and power steering, and fill as needed.
Check the function of all interior and exterior lights.
23_JL_OM_EN_USC_t.book Page 306
Page 311 of 396
SERVICING AND MAINTENANCE309
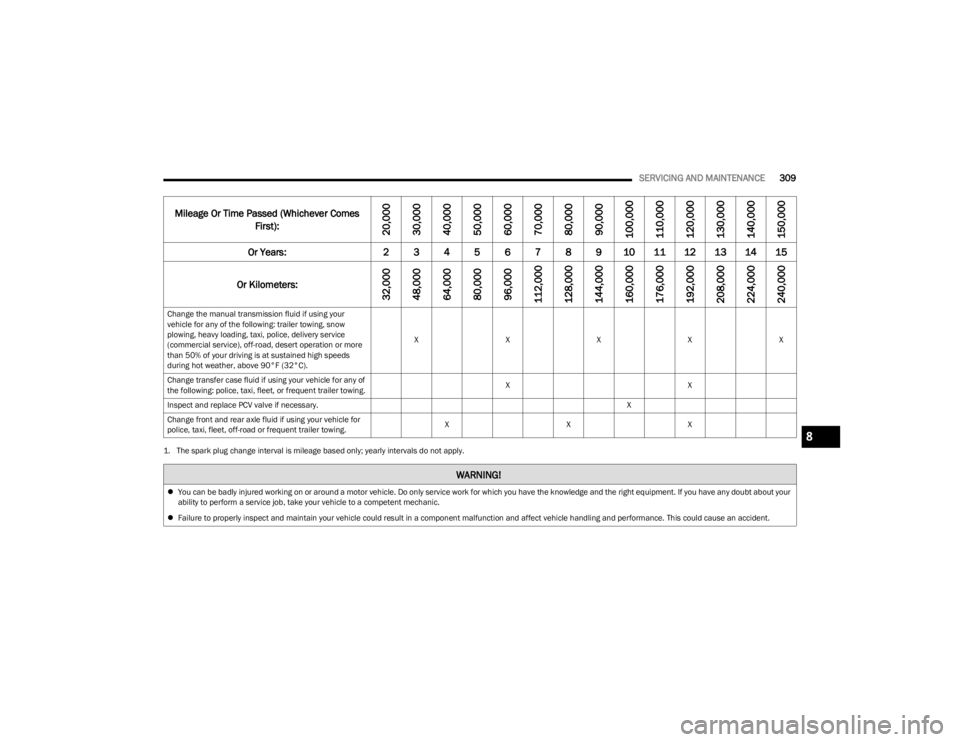
Change the manual transmission fluid if using your
vehicle for any of the following: trailer towing, snow
plowing, heavy loading, taxi, police, delivery service
(commercial service), off-road, desert operation or more
than 50% of your driving is at sustained high speeds
during hot weather, above 90°F (32°C). X
XXXX
Change transfer case fluid if using your vehicle for any of
the following: police, taxi, fleet, or frequent trailer towing. X
X
Inspect and replace PCV valve if necessary. X
Change front and rear axle fluid if using your vehicle for
police, taxi, fleet, off-road or frequent trailer towing. X
XX
1. The spark plug change interval is mileage based only; yearly intervals do not apply.
Mileage Or Time Passed (Whichever Comes
First):
20,000
30,000
40,000
50,000
60,000
70,000
80,000
90,000
100,000
110,000
120,000
130,000
140,000
150,000
Or Years: 2 3 4 5 6 7 8 9 10 11 12 13 14 15
Or Kilometers:
32,000
48,000
64,000
80,000
96,000
112,000
128,000
144,000
160,000
176,000
192,000
208,000
224,000
240,000
WARNING!
You can be badly injured working on or around a motor vehicle. Do only service work for which you have the knowledge and the right equipment. If you have any doubt about your
ability to perform a service job, take your vehicle to a competent mechanic.
Failure to properly inspect and maintain your vehicle could result in a component malfunction and affect vehicle handling and performance. This could cause an accident.
8
23_JL_OM_EN_USC_t.book Page 309
Page 312 of 396
310SERVICING AND MAINTENANCE
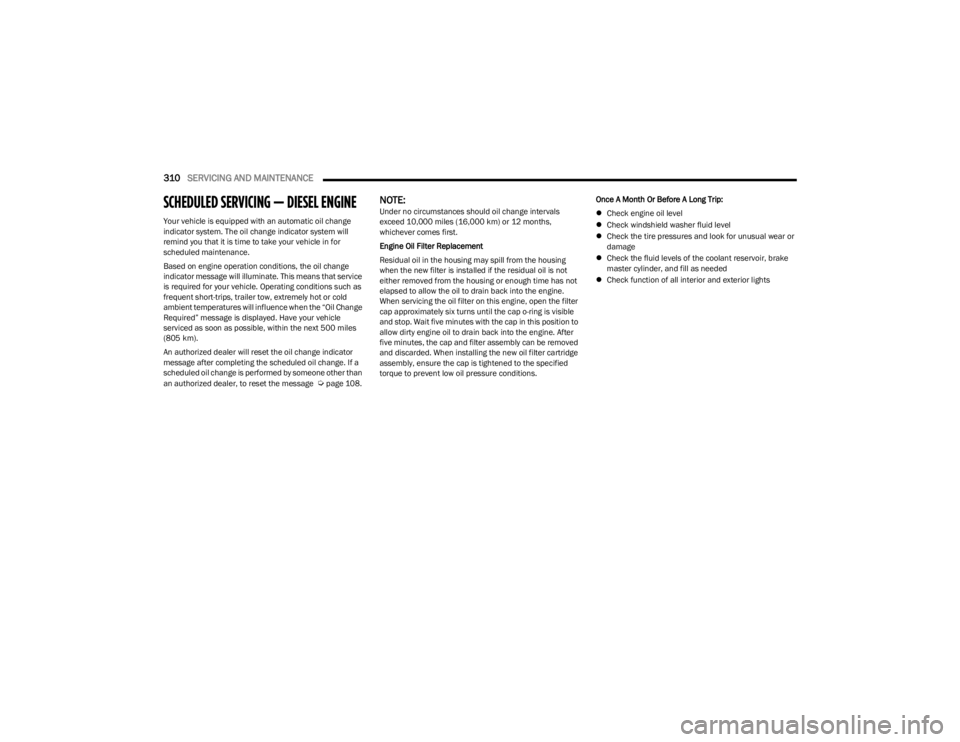
SCHEDULED SERVICING — DIESEL ENGINE
Your vehicle is equipped with an automatic oil change
indicator system. The oil change indicator system will
remind you that it is time to take your vehicle in for
scheduled maintenance.
Based on engine operation conditions, the oil change
indicator message will illuminate. This means that service
is required for your vehicle. Operating conditions such as
frequent short-trips, trailer tow, extremely hot or cold
ambient temperatures will influence when the “Oil Change
Required” message is displayed. Have your vehicle
serviced as soon as possible, within the next 500 miles
(805 km).
An authorized dealer will reset the oil change indicator
message after completing the scheduled oil change. If a
scheduled oil change is performed by someone other than
an authorized dealer, to reset the message
Úpage 108.
NOTE:Under no circumstances should oil change intervals
exceed 10,000 miles (16,000 km) or 12 months,
whichever comes first.
Engine Oil Filter Replacement
Residual oil in the housing may spill from the housing
when the new filter is installed if the residual oil is not
either removed from the housing or enough time has not
elapsed to allow the oil to drain back into the engine.
When servicing the oil filter on this engine, open the filter
cap approximately six turns until the cap o-ring is visible
and stop. Wait five minutes with the cap in this position to
allow dirty engine oil to drain back into the engine. After
five minutes, the cap and filter assembly can be removed
and discarded. When installing the new oil filter cartridge
assembly, ensure the cap is tightened to the specified
torque to prevent low oil pressure conditions. Once A Month Or Before A Long Trip:
Check engine oil level
Check windshield washer fluid level
Check the tire pressures and look for unusual wear or
damage
Check the fluid levels of the coolant reservoir, brake
master cylinder, and fill as needed
Check function of all interior and exterior lights
23_JL_OM_EN_USC_t.book Page 310
Page 314 of 396
312SERVICING AND MAINTENANCE
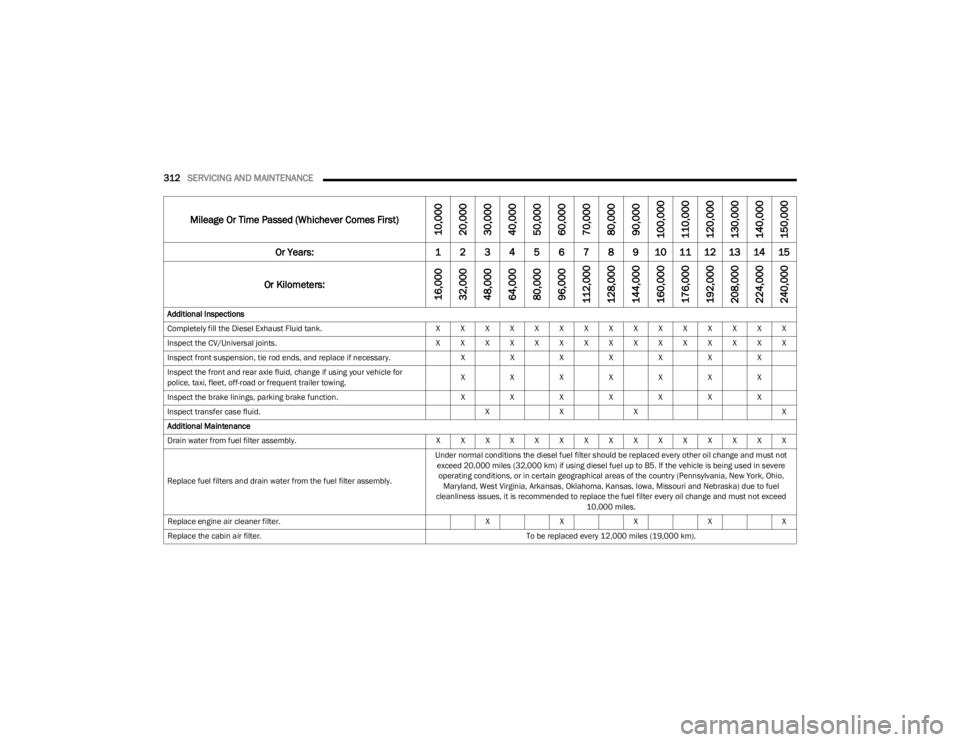
Mileage Or Time Passed (Whichever Comes First)
10,000
20,000
30,000
40,000
50,000
60,000
70,000
80,000
90,000
100,000
110,000
120,000
130,000
140,000
150,000
Or Years: 1 2 3 4 5 6 7 8 9 10 11 12 13 14 15
Or Kilometers:
16,000
32,000
48,000
64,000
80,000
96,000
112,000
128,000
144,000
160,000
176,000
192,000
208,000
224,000
240,000
Additional Inspections
Completely fill the Diesel Exhaust Fluid tank. X X X X X X X X X X X X X X X
Inspect the CV/Universal joints. X X X X X X X X X X X X X X X
Inspect front suspension, tie rod ends, and replace if necessary. XXXXXXX
Inspect the front and rear axle fluid, change if using your vehicle for
police, taxi, fleet, off-road or frequent trailer towing. X
XXXXXX
Inspect the brake linings, parking brake function. XXXXXXX
Inspect transfer case fluid. XXX X
Additional Maintenance
Drain water from fuel filter assembly. X X X X X X X X X X X X X X X
Replace fuel filters and drain water from the fuel filter assembly. Under normal conditions the diesel fuel filter should be replaced every other oil change and must not
exceed 20,000 miles (32,000 km) if using diesel fuel up to B5. If the vehicle is being used in severe operating conditions, or in certain geographical areas of the country (Pennsylvania, New York, Ohio, Maryland, West Virginia, Arkansas, Oklahoma, Kansas, Iowa, Missouri and Nebraska) due to fuel
cleanliness issues, it is recommended to replace the fuel filter every oil change and must not exceed 10,000 miles.
Replace engine air cleaner filter. XXXXX
Replace the cabin air filter. To be replaced every 12,000 miles (19,000 km).
23_JL_OM_EN_USC_t.book Page 312
Page 319 of 396
SERVICING AND MAINTENANCE317
CHECKING OIL LEVEL
To ensure proper engine lubrication, the engine oil must
be maintained at the correct level. Check the oil level at
regular intervals, such as every fuel stop. The best time to
check the engine oil level is about five minutes after a fully
warmed up engine is shut off.
Checking the oil while the vehicle is on level ground will
improve the accuracy of the oil level readings.
There are four possible dipstick types:
Crosshatched zone.
Crosshatched zone marked SAFE.
Crosshatched zone marked with MIN at the low end of
the range and MAX at the high end of the range.
Crosshatched zone marked with dimples at the MIN
and the MAX ends of the range.
NOTE:Always maintain the oil level within the crosshatch
markings on the dipstick.
NOTE:Use care when filling under hood fluids such as engine oil,
washer fluid, antifreeze, etc., to minimize spillage onto the
top of the engine. Any excess fluid that is spilled onto the
top of the engine should be removed using compressed
air or an absorbent cloth.
Adding 1 qt (1 L) of oil when the reading is at the low end
of the dipstick range will raise the oil level to the high end
of the range marking.
ADDING WASHER FLUID
The fluid reservoir for the windshield washers and the rear
window washer (if equipped) is shared. The fluid reservoir
is located in the engine compartment. Be sure to check
the fluid level at regular intervals. Fill the reservoir with
windshield washer solvent only (not radiator antifreeze).
When refilling the washer fluid reservoir, take some
washer fluid and apply it to a cloth or towel and wipe clean
the wiper blades; this will help blade performance.
To prevent freeze-up of your windshield washer system in
cold weather, select a solution or mixture that meets or
exceeds the temperature range of your climate. This rating
information can be found on most washer fluid containers.
NOTE:Use care when filling under hood fluids such as engine oil,
washer fluid, antifreeze, etc., to minimize spillage onto the
top of the engine. Any excess fluid that is spilled onto the
top of the engine should be removed using compressed
air or an absorbent cloth.
MAINTENANCE-FREE BATTERY
Your vehicle is equipped with a maintenance-free battery.
You will never have to add water, and periodic
maintenance is not required.
CAUTION!
Overfilling or underfilling the crankcase will cause
aeration or loss of oil pressure. This could damage your
engine.
WARNING!
Commercial windshield washer solvents are flammable.
They could ignite and burn you. Care must be exercised
when filling or working around the washer solution.
WARNING!
Battery fluid is a corrosive acid solution and can burn
or even blind you. Do not allow battery fluid to
contact your eyes, skin, or clothing. Do not lean over
a battery when attaching clamps. If acid splashes in
eyes or on skin, flush the area immediately with large
amounts of water
Úpage 298.
Battery gas is flammable and explosive. Keep flame
or sparks away from the battery. Do not use a
booster battery or any other booster source with an
output greater than 12 Volts. Do not allow cable
clamps to touch each other.
Battery posts, terminals, and related accessories
contain lead and lead compounds. Wash hands after
handling.
Vehicles with the Stop/Start system will be equipped
with two batteries. Both the main and the supple -
mental batteries must be disconnected to
completely de-energize the 12 Volt electrical system.
Serious injury or death could result if you do not
disconnect both batteries. To learn how to properly
disconnect, see an authorized dealer.
8
23_JL_OM_EN_USC_t.book Page 317
Page 329 of 396
SERVICING AND MAINTENANCE327
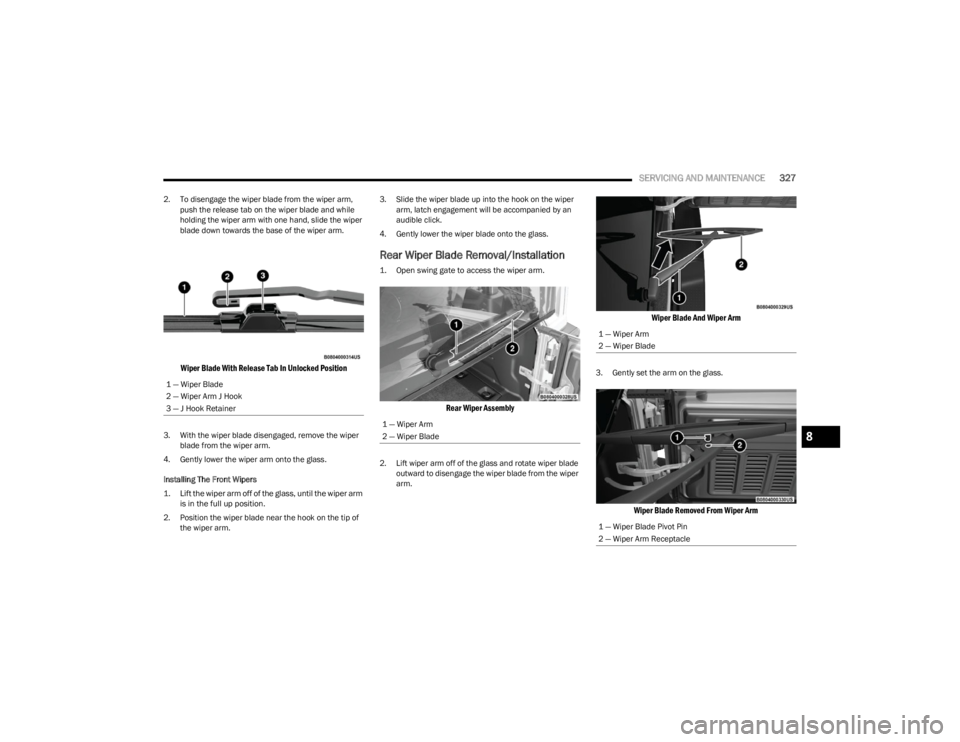
2. To disengage the wiper blade from the wiper arm,
push the release tab on the wiper blade and while
holding the wiper arm with one hand, slide the wiper
blade down towards the base of the wiper arm.
Wiper Blade With Release Tab In Unlocked Position
3. With the wiper blade disengaged, remove the wiper blade from the wiper arm.
4. Gently lower the wiper arm onto the glass.
Installing The Front Wipers
1. Lift the wiper arm off of the glass, until the wiper arm is in the full up position.
2. Position the wiper blade near the hook on the tip of the wiper arm. 3. Slide the wiper blade up into the hook on the wiper
arm, latch engagement will be accompanied by an
audible click.
4. Gently lower the wiper blade onto the glass.
Rear Wiper Blade Removal/Installation
1. Open swing gate to access the wiper arm.
Rear Wiper Assembly
2. Lift wiper arm off of the glass and rotate wiper blade outward to disengage the wiper blade from the wiper
arm.
Wiper Blade And Wiper Arm
3. Gently set the arm on the glass.
Wiper Blade Removed From Wiper Arm
1 — Wiper Blade
2 — Wiper Arm J Hook
3 — J Hook Retainer
1 — Wiper Arm
2 — Wiper Blade
1 — Wiper Arm
2 — Wiper Blade
1 — Wiper Blade Pivot Pin
2 — Wiper Arm Receptacle
8
23_JL_OM_EN_USC_t.book Page 327