tow JEEP WRANGLER 2023 Manual PDF
[x] Cancel search | Manufacturer: JEEP, Model Year: 2023, Model line: WRANGLER, Model: JEEP WRANGLER 2023Pages: 396, PDF Size: 25.15 MB
Page 330 of 396
328SERVICING AND MAINTENANCE
(Continued)
(Continued)
Installing The Rear Wiper
1. Lift the wiper arm off of the glass.
2. Insert the wiper blade pivot pin into the opening on
the end of the wiper arm and rotate the wiper in to
place.
3. Place with wiper on the glass and close the tail gate.
EXHAUST SYSTEM
The best protection against carbon monoxide entry into
the vehicle body is a properly maintained engine exhaust
system.
If you notice a change in the sound of the exhaust system;
or if the exhaust fumes can be detected inside the vehicle;
or when the underside or rear of the vehicle is damaged;
have an authorized technician inspect the complete
exhaust system and adjacent body areas for broken,
damaged, deteriorated, or mispositioned parts. Open
seams or loose connections could permit exhaust fumes
to seep into the passenger compartment. In addition, have
the exhaust system inspected each time the vehicle is
raised for lubrication or oil change. Replace as required.
Under normal operating conditions, the catalytic converter
will not require maintenance. However, it is important to
keep the engine properly tuned to ensure proper catalyst
operation and prevent possible catalyst damage.
NOTE:Intentional tampering with emissions control systems can
result in civil penalties being assessed against you.
In unusual situations involving grossly malfunctioning
engine operation, a scorching odor may suggest severe
and abnormal catalyst overheating. If this occurs, stop the
vehicle, turn off the engine and allow it to cool. Service,
including a tune-up to manufacturer's specifications,
should be obtained immediately.
To minimize the possibility of catalytic converter damage:
Do not interrupt the ignition when the transmission is
in gear and the vehicle is in motion.
Do not try to start the vehicle by pushing or towing the
vehicle.
Do not idle the engine with any ignition components
disconnected or removed, such as when diagnostic
testing, or for prolonged periods during very rough idle
or malfunctioning operating conditions.
COOLING SYSTEM
WARNING!
Exhaust gases can injure or kill. They contain Carbon
Monoxide (CO), which is colorless and odorless.
Breathing it can make you unconscious and can
eventually poison you
Úpage 288.
A hot exhaust system can start a fire if you park over
materials that can burn. Such materials might be
grass or leaves coming into contact with your
exhaust system. Do not park or operate your vehicle
in areas where your exhaust system can contact
anything that can burn.
CAUTION!
The catalytic converter requires the use of unleaded
fuel only. Leaded gasoline will destroy the effective -
ness of the catalyst as an emissions control device
and may seriously reduce engine performance and
cause serious damage to the engine.
Damage to the catalytic converter can result if your
vehicle is not kept in proper operating condition. In
the event of engine malfunction, particularly
involving engine misfire or other apparent loss of
performance, have your vehicle serviced promptly.
Continued operation of your vehicle with a severe
malfunction could cause the converter to overheat,
resulting in possible damage to the converter and
vehicle.
WARNING!
WARNING!
You or others can be badly burned by hot engine
coolant (antifreeze) or steam from your radiator. If
you see or hear steam coming from under the hood,
do not open the hood until the radiator has had time
to cool. Never open a cooling system pressure cap
when the radiator or coolant bottle is hot.
Keep hands, tools, clothing, and jewelry away from
the radiator cooling fan when the hood is raised. The
fan starts automatically and may start at any time,
whether the engine is running or not.
23_JL_OM_EN_USC_t.book Page 328
Page 340 of 396
338SERVICING AND MAINTENANCE
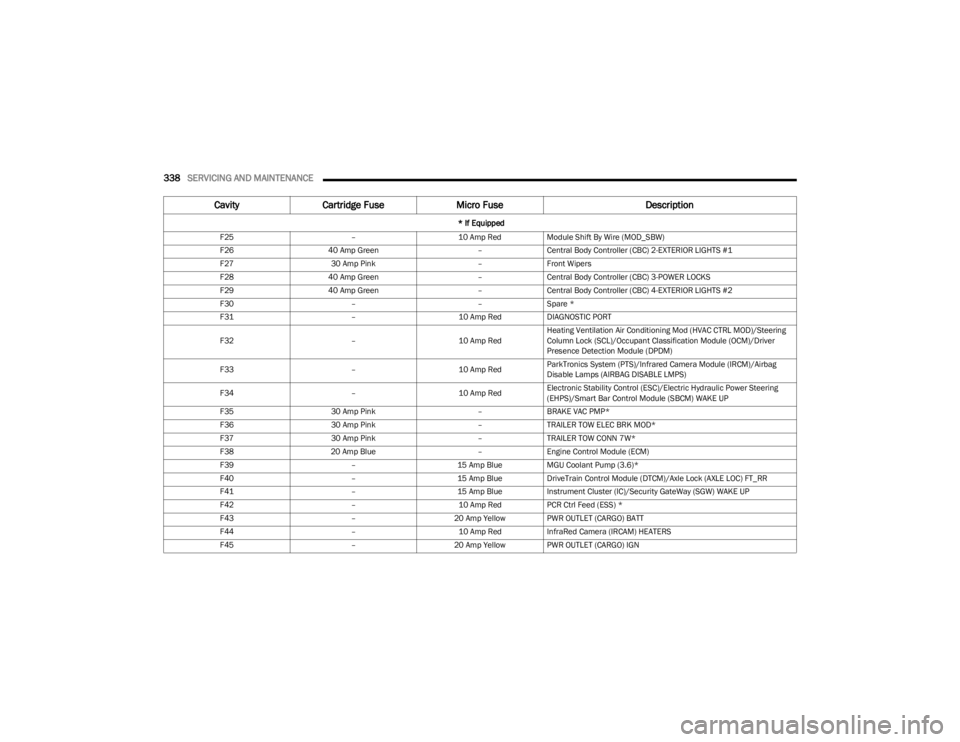
F25 –10 Amp RedModule Shift By Wire (MOD_SBW)
F26 40 Amp Green –Central Body Controller (CBC) 2-EXTERIOR LIGHTS #1
F27 30 Amp Pink –Front Wipers
F28 40 Amp Green –Central Body Controller (CBC) 3-POWER LOCKS
F29 40 Amp Green –Central Body Controller (CBC) 4-EXTERIOR LIGHTS #2
F30 ––Spare *
F31 –10 Amp RedDIAGNOSTIC PORT
F32 –10 Amp RedHeating Ventilation Air Conditioning Mod (HVAC CTRL MOD)/Steering
Column Lock (SCL)/Occupant Classification Module (OCM)/Driver
Presence Detection Module (DPDM)
F33 –10 Amp RedParkTronics System (PTS)/Infrared Camera Module (IRCM)/Airbag
Disable Lamps (AIRBAG DISABLE LMPS)
F34 –10 Amp RedElectronic Stability Control (ESC)/Electric Hydraulic Power Steering
(EHPS)/Smart Bar Control Module (SBCM) WAKE UP
F35 30 Amp Pink –BRAKE VAC PMP*
F36 30 Amp Pink –TRAILER TOW ELEC BRK MOD*
F37 30 Amp Pink –TRAILER TOW CONN 7W*
F38 20 Amp Blue –Engine Control Module (ECM)
F39 –15 Amp BlueMGU Coolant Pump (3.6)*
F40 –15 Amp BlueDriveTrain Control Module (DTCM)/Axle Lock (AXLE LOC) FT_RR
F41 –15 Amp BlueInstrument Cluster (IC)/Security GateWay (SGW) WAKE UP
F42 –10 Amp RedPCR Ctrl Feed (ESS) *
F43 –20 Amp Yellow PWR OUTLET (CARGO) BATT
F44 –10 Amp RedInfraRed Camera (IRCAM) HEATERS
F45 –20 Amp Yellow PWR OUTLET (CARGO) IGN
CavityCartridge Fuse Micro Fuse Description
* If Equipped
23_JL_OM_EN_USC_t.book Page 338
Page 343 of 396
SERVICING AND MAINTENANCE341
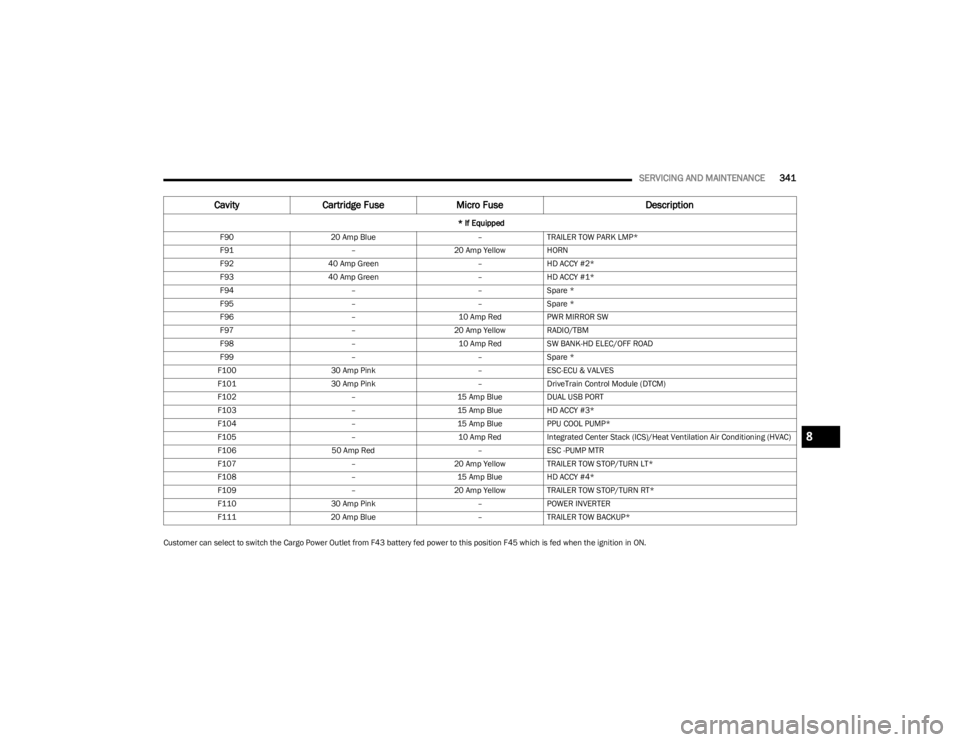
Customer can select to switch the Cargo Power Outlet from F43 battery fed power to this position F45 which is fed when the ignition in ON.F90
20 Amp Blue –TRAILER TOW PARK LMP*
F91 –20 Amp Yellow HORN
F92 40 Amp Green –HD ACCY #2*
F93 40 Amp Green –HD ACCY #1*
F94 ––Spare *
F95 ––Spare *
F96 –10 Amp RedPWR MIRROR SW
F97 –20 Amp Yellow RADIO/TBM
F98 –10 Amp RedSW BANK-HD ELEC/OFF ROAD
F99 ––Spare *
F100 30 Amp Pink –ESC-ECU & VALVES
F101 30 Amp Pink –DriveTrain Control Module (DTCM)
F102 –15 Amp BlueDUAL USB PORT
F103 –15 Amp BlueHD ACCY #3*
F104 –15 Amp BluePPU COOL PUMP*
F105 –10 Amp RedIntegrated Center Stack (ICS)/Heat Ventilation Air Conditioning (HVAC)
F106 50 Amp Red –ESC -PUMP MTR
F107 –20 Amp Yellow TRAILER TOW STOP/TURN LT*
F108 –15 Amp BlueHD ACCY #4*
F109 –20 Amp Yellow TRAILER TOW STOP/TURN RT*
F110 30 Amp Pink –POWER INVERTER
F111 20 Amp Blue –TRAILER TOW BACKUP*
Cavity Cartridge Fuse Micro Fuse Description
* If Equipped
8
23_JL_OM_EN_USC_t.book Page 341
Page 345 of 396
SERVICING AND MAINTENANCE343
Bulb Replacement
NOTE:Lens fogging can occur under certain atmospheric condi -
tions. This will usually clear as atmospheric conditions
change to allow the condensation to change back into a
vapor. Turning the lamps on will usually accelerate the
clearing process.
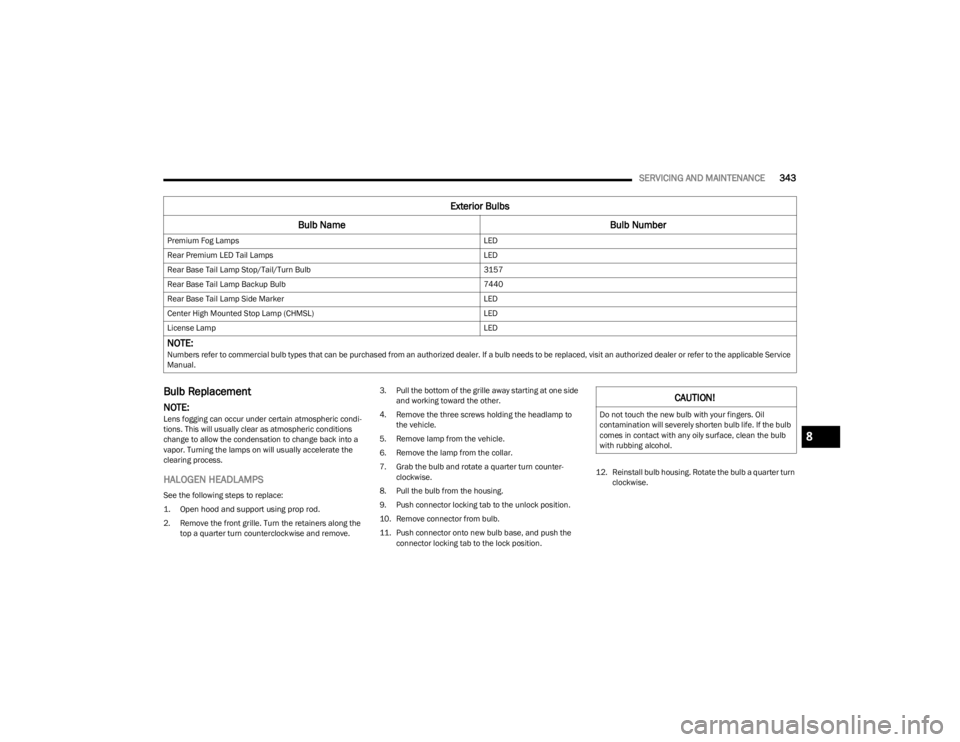
HALOGEN HEADLAMPS
See the following steps to replace:
1. Open hood and support using prop rod.
2. Remove the front grille. Turn the retainers along the top a quarter turn counterclockwise and remove. 3. Pull the bottom of the grille away starting at one side
and working toward the other.
4. Remove the three screws holding the headlamp to the vehicle.
5. Remove lamp from the vehicle.
6. Remove the lamp from the collar.
7. Grab the bulb and rotate a quarter turn counter -
clockwise.
8. Pull the bulb from the housing.
9. Push connector locking tab to the unlock position.
10. Remove connector from bulb.
11. Push connector onto new bulb base, and push the connector locking tab to the lock position. 12. Reinstall bulb housing. Rotate the bulb a quarter turn
clockwise.
Premium Fog Lamps
LED
Rear Premium LED Tail Lamps LED
Rear Base Tail Lamp Stop/Tail/Turn Bulb 3157
Rear Base Tail Lamp Backup Bulb 7440
Rear Base Tail Lamp Side Marker LED
Center High Mounted Stop Lamp (CHMSL) LED
License Lamp LED
NOTE: Numbers refer to commercial bulb types that can be purchased from an authorized dealer. If a bulb needs to be replaced, visit an authorized dealer or refer to the applicable Service
Manual.
Exterior Bulbs
Bulb Name Bulb Number
CAUTION!
Do not touch the new bulb with your fingers. Oil
contamination will severely shorten bulb life. If the bulb
comes in contact with any oily surface, clean the bulb
with rubbing alcohol.
8
23_JL_OM_EN_USC_t.book Page 343
Page 352 of 396
350SERVICING AND MAINTENANCE
For further information on GAWR, vehicle loading, and
trailer towing Úpage 169.
To determine the maximum loading conditions of your
vehicle, locate the statement “The combined weight of
occupants and cargo should never exceed XXX kg or XXX
lbs” on the Tire And Loading Information Placard. The
combined weight of occupants, cargo/luggage and trailer
tongue weight (if applicable) should never exceed the
weight referenced here.
Steps For Determining Correct Load Limit—
(1) Locate the statement “The combined
weight of occupants and cargo should
never exceed XXX kg or XXX lbs.” on your
vehicle's placard.
(2) Determine the combined weight of
the driver and passengers that will be
riding in your vehicle.
(3) Subtract the combined weight of the
driver and passengers from XXX kg or
XXX lbs. (4) The resulting figure equals the
available amount of cargo and luggage
load capacity. For example, if “XXX”
amount equals 1400 lbs. and there will
be five 150 lb passengers in your
vehicle, the amount of available cargo
and luggage load capacity is 650 lbs.
(1400-750 (5x150) = 650 lbs.)
(5) Determine the combined weight of
luggage and cargo being loaded on the
vehicle. That weight may not safely
exceed the available cargo and luggage
load capacity calculated in Step 4.
(6) If your vehicle will be towing a trailer,
load from your trailer will be transferred
to your vehicle. Consult this manual to
determine how this reduces the
available cargo and luggage load
capacity of your vehicle.
Metric Example For Load Limit
For example, if “XXX” amount equals 635 kg and there will
be five 68 kg passengers in your vehicle, the amount of
available cargo and luggage load capacity is 295 kg
(635-340 (5x68) = 295 kg) as shown in step 4.
NOTE:
If your vehicle will be towing a trailer, load from your
trailer will be transferred to your vehicle. The following
table shows examples on how to calculate total load,
cargo/luggage, and towing capacities of your vehicle
with varying seating configurations and number and
size of occupants. This table is for illustration purposes
only and may not be accurate for the seating and load
carry capacity of your vehicle.
For the following example, the combined weight of
occupants and cargo should never exceed 865 lb (392
kg).
23_JL_OM_EN_USC_t.book Page 350
Page 355 of 396
SERVICING AND MAINTENANCE353
Example: If garage temperature = 68°F (20°C) and the
outside temperature = 32°F (0°C) then the cold tire
inflation pressure should be increased by 3 psi (21 kPa),
which equals 1 psi (7 kPa) for every 12°F (7°C) for this
outside temperature condition.
Tire pressure may increase from 2 to 6 psi (13 to 40 kPa)
during operation. DO NOT reduce this normal pressure
build up or your tire pressure will be too low.
Tire Pressures For High Speed Operation
The manufacturer advocates driving at safe speeds and
within posted speed limits. Where speed limits or
conditions are such that the vehicle can be driven at high
speeds, maintaining correct tire inflation pressure is very
important. Increased tire pressure and reduced vehicle
loading may be required for high-speed vehicle operation.
Refer to an authorized tire dealer or original equipment
vehicle dealer for recommended safe operating speeds,
loading and cold tire inflation pressures.
Radial Ply Tires
Tire Repair
If your tire becomes damaged, it may be repaired if it
meets the following criteria:
The tire has not been driven on when flat.
The damage is only on the tread section of your tire
(sidewall damage is not repairable).
The puncture is no greater than ¼ of an inch (6 mm).
Consult an authorized tire dealer for tire repairs and
additional information.
Damaged Run Flat tires, or Run Flat tires that have
experienced a loss of pressure should be replaced
immediately with another Run Flat tire of identical size and
service description (Load Index and Speed Symbol).
Replace the tire pressure sensor as well as it is not
designed to be reused.
Run Flat Tires — If Equipped
Run Flat tires allow you the capability to drive 50 miles
(80 km) at 50 mph (80 km/h) after a rapid loss of inflation
pressure. This rapid loss of inflation is referred to as the
Run Flat mode. A Run Flat mode occurs when the tire
inflation pressure is of/or below 14 psi (96 kPa). Once a
Run Flat tire reaches the run flat mode it has limited driving capabilities and needs to be replaced immediately.
A Run Flat tire is not repairable. When a Run Flat tire is
changed after being driven in a Run Flat mode 14 psi
(96 kPa) condition, please replace the TPMS sensor as it
is not designed to be reused.
NOTE:TPMS sensor must be replaced after driving the vehicle on
a flat tire condition.
It is not recommended driving a vehicle loaded at full
capacity or to tow a trailer while a tire is in the Run Flat
mode.
See the Tire Pressure Monitoring System section for more
information.
Tire Spinning
When stuck in mud, sand, snow, or ice conditions, do not
spin your vehicle's wheels above 30 mph (48 km/h) or for
longer than 30 seconds continuously without stopping.
For further information
Úpage 302.WARNING!
High speed driving with your vehicle under maximum
load is dangerous. The added strain on your tires could
cause them to fail. You could have a serious collision.
Do not drive a vehicle loaded to the maximum capacity
at continuous speeds above 75 mph (120 km/h).
WARNING!
Combining radial ply tires with other types of tires on
your vehicle will cause your vehicle to handle poorly.
The instability could cause a collision. Always use radial
ply tires in sets of four. Never combine them with other
types of tires.
WARNING!
Fast spinning tires can be dangerous. Forces generated
by excessive wheel speeds may cause tire damage or
failure. A tire could explode and injure someone. Do not
spin your vehicle's wheels faster than 30 mph
(48 km/h) for more than 30 seconds continuously
when you are stuck, and do not let anyone near a spin
-
ning wheel, no matter what the speed.8
23_JL_OM_EN_USC_t.book Page 353
Page 357 of 396
SERVICING AND MAINTENANCE355
TIRE TYPES
All Season Tires — If Equipped
All Season tires provide traction for all seasons (Spring,
Summer, Autumn, and Winter). Traction levels may vary
between different all season tires. All season tires can be
identified by the M+S, M&S, M/S or MS designation on the
tire sidewall. Use all season tires only in sets of four;
failure to do so may adversely affect the safety and
handling of your vehicle.
Summer Or Three Season Tires — If
Equipped
Summer tires provide traction in both wet and dry
conditions, and are not intended to be driven in snow or on
ice. If your vehicle is equipped with Summer tires, be
aware these tires are not designed for Winter or cold
driving conditions. Install Winter tires on your vehicle when
ambient temperatures are less than 40°F (5°C) or if
roads are covered with ice or snow. For more information,
contact an authorized dealer. Summer tires do not contain the all season designation or
mountain/snowflake symbol on the tire sidewall. Use
Summer tires only in sets of four; failure to do so may
adversely affect the safety and handling of your vehicle.
Snow Tires
Some areas of the country require the use of snow tires
during the Winter. Snow tires can be identified by a
“mountain/snowflake” symbol on the tire sidewall.
If you need snow tires, select tires equivalent in
size and type to the original equipment tires.
Use snow tires only in sets of four; failure to do
so may adversely affect the safety and handling
of your vehicle.
Snow tires generally have lower speed ratings than what
was originally equipped with your vehicle and should not be
operated at sustained speeds over 75 mph (120 km/h). For speeds above 75 mph (120 km/h) refer to original
equipment or an authorized tire dealer for recommended
safe operating speeds, loading and cold tire inflation
pressures.
While studded tires improve performance on ice, skid and
traction capability on wet or dry surfaces may be poorer
than that of non-studded tires. Some states prohibit
studded tires; therefore, local laws should be checked
before using these tire types.
SPARE TIRES — IF EQUIPPED
NOTE:For vehicles equipped with Tire Service Kit instead of a
spare tire, please refer to “Tire Service Kit” in “In Case Of
Emergency” for further information.
For restrictions when towing with a spare tire designated
for temporary emergency use
Úpage 174.
Spare Tire Matching Original Equipped Tire
And Wheel — If Equipped
Your vehicle may be equipped with a spare tire and wheel
equivalent in look and function to the original equipment
tire and wheel found on the front or rear axle of your
vehicle. This spare tire may be used in the tire rotation for
your vehicle. If your vehicle has this option, refer to an
authorized tire dealer for the recommended tire rotation
pattern.
Compact Spare Tire — If Equipped
The compact spare is for temporary emergency use only.
You can identify if your vehicle is equipped with a compact
spare by looking at the spare tire description on the Tire
And Loading Information Placard located on the driver’s
side door opening or on the sidewall of the tire. Compact
Failure to equip your vehicle with tires having
adequate speed capability can result in sudden tire
failure and loss of vehicle control.
CAUTION!
Replacing original tires with tires of a different size may
result in false speedometer and odometer readings.
WARNING!
WARNING!
Do not use Summer tires in snow/ice conditions. You
could lose vehicle control, resulting in severe injury or
death. Driving too fast for conditions also creates the
possibility of loss of vehicle control.CAUTION!
Because of the reduced ground clearance, do not take
your vehicle through an automatic car wash with a
compact or limited use temporary spare installed.
Damage to the vehicle may result.
8
23_JL_OM_EN_USC_t.book Page 355
Page 364 of 396
362SERVICING AND MAINTENANCE
(Continued)
Care Of Fabric Top Windows
Your vehicle's fabric top has pliable plastic windows which
can be scratched unless special care is taken by following
these directions:
Never use a dry cloth to remove dust. Instead, use a
microfiber towel or soft cotton cloth moistened with
cold or warm, clean water, and wipe across the
window, not up and down. Mopar® Jeep® Soft Glass
Window Cleaner or equivalent will safely clean all
plastic windows without scratching. It removes fine
scratches to improve visibility and provides UV protec -
tion to help prevent yellowing.
When washing, never use hot water or anything
stronger than a mild soap. Never use solvents such as
alcohol or harsh cleaning agents.
Always rinse thoroughly with cold water, then wipe with
a soft and slightly moist, clean cloth.
When removing frost, snow or ice, never use a scraper
or de-icing chemicals. Use warm water only if you must
clean the window quickly.
Debris (sand, mud/dirt, dust, or salt) from off-road
driving will have an impact on plastic retainer opera -
tion. Even normal on-road driving and vehicle washing
will eventually impact window plastic retainer opera -
tion. To maintain ease of use of the window plastic
retainers, each window plastic retainer should be
cleaned and lubricated regularly. Clean them with a
mild soap solution and a small brush. Cleaning prod -
ucts are available through an authorized dealer.
Never paste stickers, gummed labels or any tape to the
windows. Adhesives are hard to remove and may
damage the windows.
INTERIORS
CARPET SAFETY INFORMATION
Always use carpet designed to fit your vehicle. Only use
carpet that does not interfere with the operation of the
pedal assemblies. Only operate the vehicle when the
carpet is securely attached by the grommets so it cannot
slip out of position and interfere with the pedal assemblies
or impair safe operation of your vehicle in other ways.
CAUTION!
Failure to follow these cautions may cause interior
water damage, stains, or mildew of the top material:
Do not run a fabric top through an automatic car
wash. Window scratches and wax build-up may
result.
It is recommended that the top be free of water prior
to opening it. Operating the top, opening a door or
lowering a window while the top is wet may allow
water to drip into the vehicle’s interior.
Use care when washing the vehicle, water pressure
directed at the weather strip seals may cause water
to leak into the vehicle’s interior.
Careless handling and storage of the removable roof
panels may damage the seals, causing water to leak
into the vehicle’s interior.
The front panel(s) must be positioned properly to
ensure sealing. Improper installation can cause
water to leak into the vehicle’s interior.
CAUTION!
Avoid washing with rollers and/or brushes in washing
stations. Wash the vehicle only by hand using neutral
pH detergents; dry it with a wet chamois leather.
Abrasive products and/or polishes should not be
used for cleaning the car.
Bird droppings must be washed off immediately and
thoroughly as the acid they contain is particularly
aggressive.
Avoid (if at all possible) parking the vehicle under
trees; remove vegetable resins immediately as, when
dried, it may only be possible to remove them with
abrasive products and/or polishes, which is highly
inadvisable as they could alter the typical opaque -
ness of the paint.
Do not use pure windshield washer fluid for cleaning
the front windshield and rear window; dilute it to a
minimum of 50% water. Only use pure windshield
washer fluid when strictly necessary due to outside
temperature conditions.
CAUTION!
23_JL_OM_EN_USC_t.book Page 362
Page 365 of 396
SERVICING AND MAINTENANCE363
CARPET REMOVAL
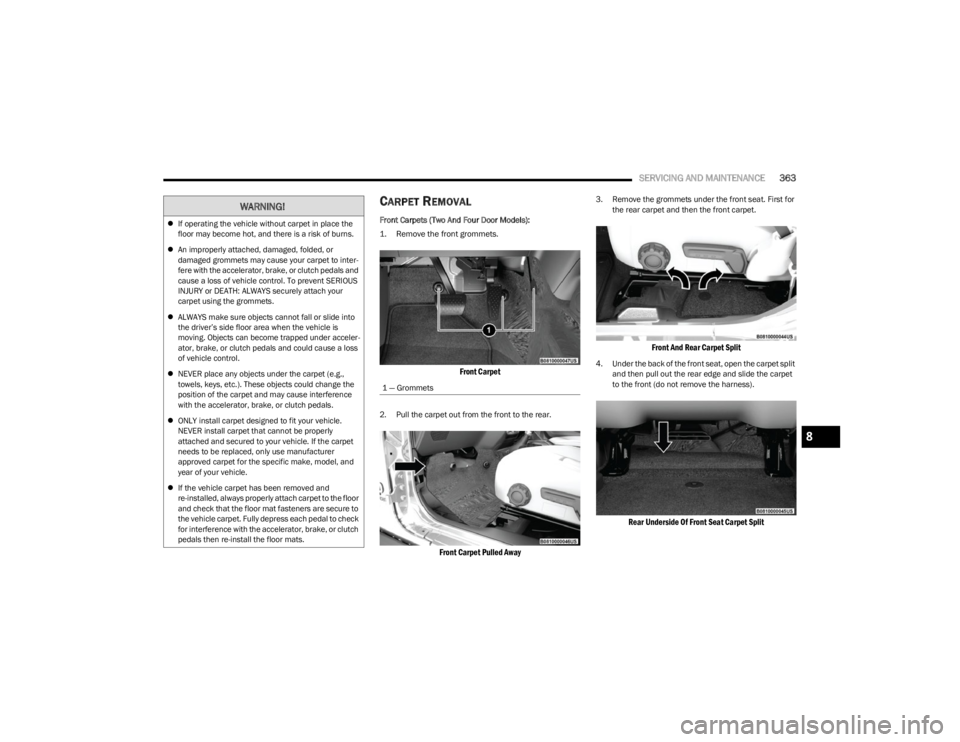
Front Carpets (Two And Four Door Models):
1. Remove the front grommets.
Front Carpet
2. Pull the carpet out from the front to the rear.
Front Carpet Pulled Away
3. Remove the grommets under the front seat. First for
the rear carpet and then the front carpet.
Front And Rear Carpet Split
4. Under the back of the front seat, open the carpet split and then pull out the rear edge and slide the carpet
to the front (do not remove the harness).
Rear Underside Of Front Seat Carpet Split
WARNING!
If operating the vehicle without carpet in place the
floor may become hot, and there is a risk of burns.
An improperly attached, damaged, folded, or
damaged grommets may cause your carpet to inter -
fere with the accelerator, brake, or clutch pedals and
cause a loss of vehicle control. To prevent SERIOUS
INJURY or DEATH: ALWAYS securely attach your
carpet using the grommets.
ALWAYS make sure objects cannot fall or slide into
the driver’s side floor area when the vehicle is
moving. Objects can become trapped under acceler -
ator, brake, or clutch pedals and could cause a loss
of vehicle control.
NEVER place any objects under the carpet (e.g.,
towels, keys, etc.). These objects could change the
position of the carpet and may cause interference
with the accelerator, brake, or clutch pedals.
ONLY install carpet designed to fit your vehicle.
NEVER install carpet that cannot be properly
attached and secured to your vehicle. If the carpet
needs to be replaced, only use manufacturer
approved carpet for the specific make, model, and
year of your vehicle.
If the vehicle carpet has been removed and
re-installed, always properly attach carpet to the floor
and check that the floor mat fasteners are secure to
the vehicle carpet. Fully depress each pedal to check
for interference with the accelerator, brake, or clutch
pedals then re-install the floor mats.
1 — Grommets
8
23_JL_OM_EN_USC_t.book Page 363
Page 366 of 396
364SERVICING AND MAINTENANCE
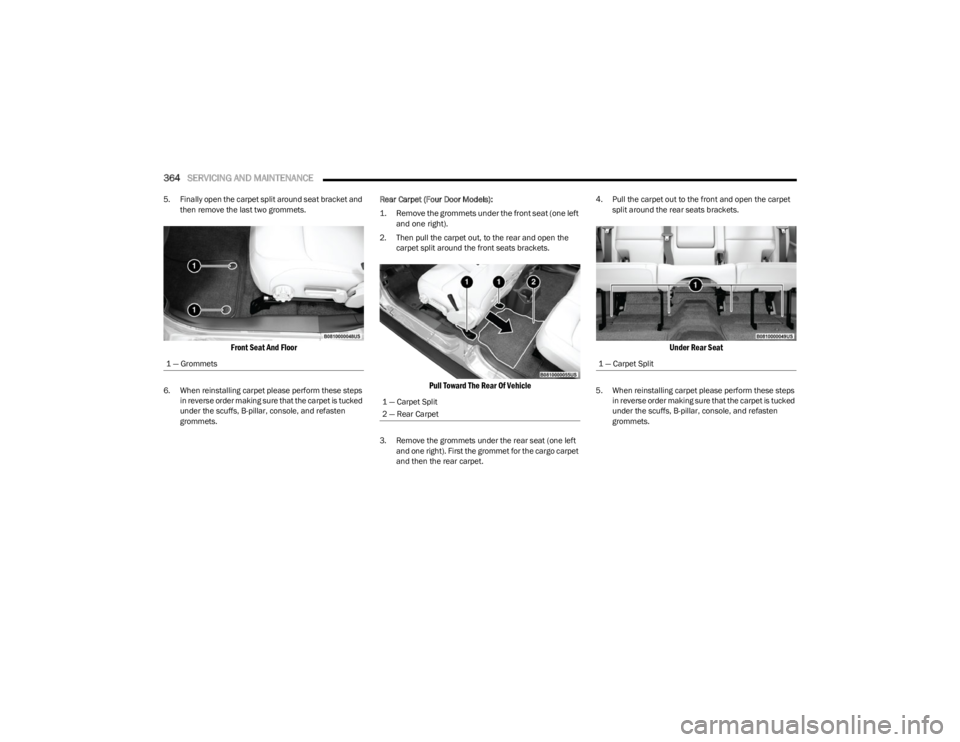
5. Finally open the carpet split around seat bracket and
then remove the last two grommets.
Front Seat And Floor
6. When reinstalling carpet please perform these steps in reverse order making sure that the carpet is tucked
under the scuffs, B-pillar, console, and refasten
grommets. Rear Carpet (Four Door Models):
1. Remove the grommets under the front seat (one left
and one right).
2. Then pull the carpet out, to the rear and open the carpet split around the front seats brackets.
Pull Toward The Rear Of Vehicle
3. Remove the grommets under the rear seat (one left and one right). First the grommet for the cargo carpet
and then the rear carpet. 4. Pull the carpet out to the front and open the carpet
split around the rear seats brackets.
Under Rear Seat
5. When reinstalling carpet please perform these steps in reverse order making sure that the carpet is tucked
under the scuffs, B-pillar, console, and refasten
grommets.
1 — Grommets1 — Carpet Split
2 — Rear Carpet
1 — Carpet Split
23_JL_OM_EN_USC_t.book Page 364