USB JEEP WRANGLER 2023 Owners Manual
[x] Cancel search | Manufacturer: JEEP, Model Year: 2023, Model line: WRANGLER, Model: JEEP WRANGLER 2023Pages: 396, PDF Size: 25.15 MB
Page 5 of 396
3
CLIMATE CONTROLS ..........................................................54Automatic Climate Control Descriptions
And Functions.............................................................. 54
Manual Climate Control Descriptions And
Functions ..................................................................... 57
Automatic Temperature Control (ATC) —
If Equipped .................................................................. 59
Climate Voice Commands ......................................... 59
Operating Tips ............................................................ 59
INTERIOR STORAGE AND EQUIPMENT ............................60 Storage ........................................................................ 60
Lighted Cupholders — If Equipped ............................. 61
USB/AUX Control ......................................................... 61
Power Outlets ............................................................. 62
Power Inverter — If Equipped .................................... 63
Auxiliary Switches — If Equipped ............................... 64
POWER WINDOWS — IF EQUIPPED ................................65 Auto-Down Feature .................................................... 66
Window Lockout Switch.............................................. 66
Wind Buffeting ............................................................ 66
WRANGLER TOPS ..............................................................66 Provided Tools ............................................................. 66
Lowering The Soft Top Into Sunrider®
Position
S
................................................................. 67
Raising The Soft Top
S
............................................ 77
Removing The Soft Top
S
....................................... 80
Installing The Soft Top ................................................ 81
Hard Top Front Panel(s) Removal
S
....................... 83
Hard Top Front Panel(s) Installation .......................... 87
Removing The Hard Top ............................................. 87
Installing The Hard Top............................................... 89
Sunrider® For Hard Top ............................................. 89
Power Sliding Top — If Equipped ................................ 91 DOOR FRAME ..................................................................... 95
Door Frame Removal................................................... 95
Door Frame Installation Four Door Models —
If Equipped ................................................................... 96
Door Frame Installation Two Door Models —
If Equipped ................................................................... 97
FOLDING WINDSHIELD ..................................................... 97 Lowering The Windshield ............................................ 98
Raising The Windshield ............................................... 99
HOOD ................................................................................ 100 Opening The Hood .................................................... 100
Closing The Hood ...................................................... 101
REAR SWING GATE ......................................................... 101 Cargo Area Features................................................. 102
ROOF LUGGAGE RACK — IF EQUIPPED ........................ 102
GETTING TO KNOW YOUR
INSTRUMENT PANEL
INSTRUMENT CLUSTER .................................................. 104 Instrument Cluster Descriptions
S
...................... 108
INSTRUMENT CLUSTER DISPLAY .................................. 108 Instrument Cluster Display Location And
Controls ..................................................................... 109
Oil Change Reset — If Equipped
S
....................... 110
Display And Messages ............................................. 110
Instrument Cluster Display Selectable Items ......... 112
Battery Saver On/Battery Saver Mode Message —
Electrical Load Reduction Actions — If Equipped ... 114
Diesel Displays.......................................................... 115
Diesel Particulate Filter (DPF) Messages ............... 115 Fuel System Messages ............................................ 116 WARNING LIGHTS AND MESSAGES ..............................116
Red Warning Lights ................................................... 117
Yellow Warning Lights ............................................... 119Yellow Indicator Lights .............................................. 122Green Indicator Lights............................................... 123White Indicator Lights ............................................... 123Blue Indicator Lights ................................................. 124
Gray Indicator Lights ................................................. 124
ONBOARD DIAGNOSTIC SYSTEM — OBD II ................... 124 Onboard Diagnostic System (OBD II)
Cybersecurity ............................................................. 125
EMISSIONS INSPECTION AND MAINTENANCE
PROGRAMS ....................................................................... 125
STARTING AND OPERATING
STARTING THE ENGINE — GASOLINE ENGINE
(IF EQUIPPED) ...................................................................126 Manual Transmission — If Equipped ....................... 126
Automatic Transmission — If Equipped ................... 126
Normal Starting ........................................................ 126
AutoPark .................................................................... 127Extended Park Starting ............................................. 128If Engine Fails To Start .............................................. 128Extreme Cold Weather (Below –22°F Or −30°C) .. 128
After Starting.............................................................. 129
STARTING THE ENGINE — DIESEL ENGINE
(IF EQUIPPED) ...................................................................129 Automatic Transmission ........................................... 129
Extreme Cold Weather .............................................. 129Normal Starting ......................................................... 130
Starting Fluids............................................................ 130
23_JL_OM_EN_USC_t.book Page 3
Page 63 of 396
GETTING TO KNOW YOUR VEHICLE61
Rear Storage Compartment — If Equipped
The rear cargo area storage compartment is located
underneath the load floor.
To access the storage compartment, lift up on the cargo
strap/handle at the rear of the cargo area.
Rear Storage Cover (Four Door Models)
Rear Storage Cover (Two Door Models)
LIGHTED CUPHOLDERS — IF EQUIPPED
On some vehicles, the front cupholders are equipped with
a light ring that illuminates the cupholders for the front
passengers. The light ring is controlled by the Dimmer
Controls
Úpage 53.
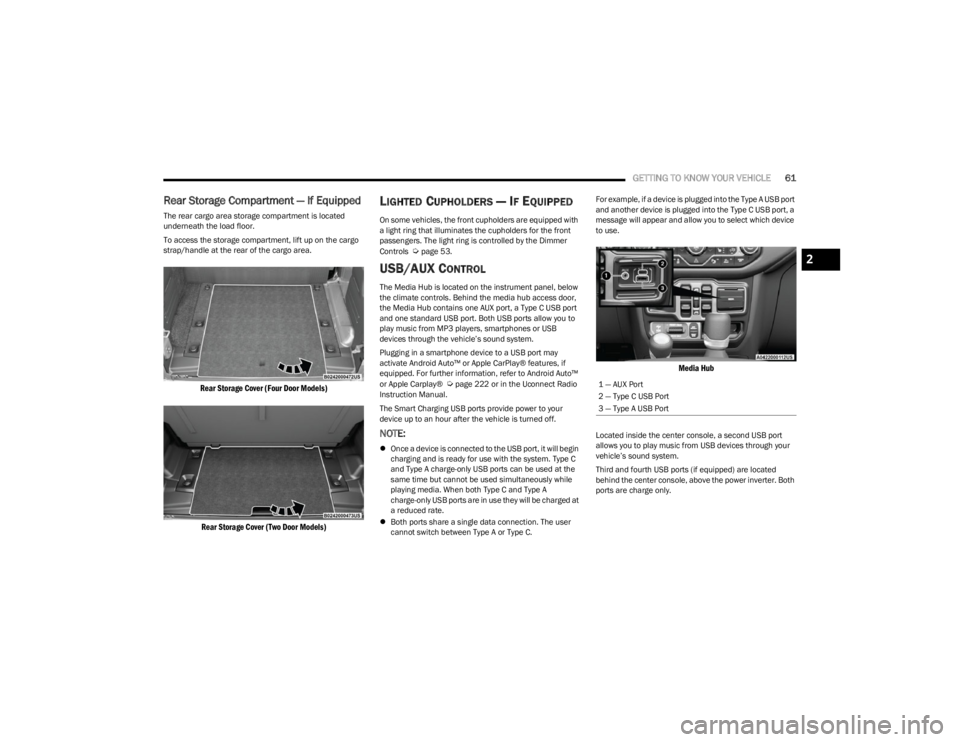
USB/AUX CONTROL
The Media Hub is located on the instrument panel, below
the climate controls. Behind the media hub access door,
the Media Hub contains one AUX port, a Type C USB port
and one standard USB port. Both USB ports allow you to
play music from MP3 players, smartphones or USB
devices through the vehicle’s sound system.
Plugging in a smartphone device to a USB port may
activate Android Auto™ or Apple CarPlay® features, if
equipped. For further information, refer to Android Auto™
or Apple Carplay®
Úpage 222 or in the Uconnect Radio
Instruction Manual.
The Smart Charging USB ports provide power to your
device up to an hour after the vehicle is turned off.
NOTE:
Once a device is connected to the USB port, it will begin
charging and is ready for use with the system. Type C
and Type A charge-only USB ports can be used at the
same time but cannot be used simultaneously while
playing media. When both Type C and Type A
charge-only USB ports are in use they will be charged at
a reduced rate.
Both ports share a single data connection. The user
cannot switch between Type A or Type C. For example, if a device is plugged into the Type A USB port
and another device is plugged into the Type C USB port, a
message will appear and allow you to select which device
to use.
Media Hub
Located inside the center console, a second USB port
allows you to play music from USB devices through your
vehicle’s sound system.
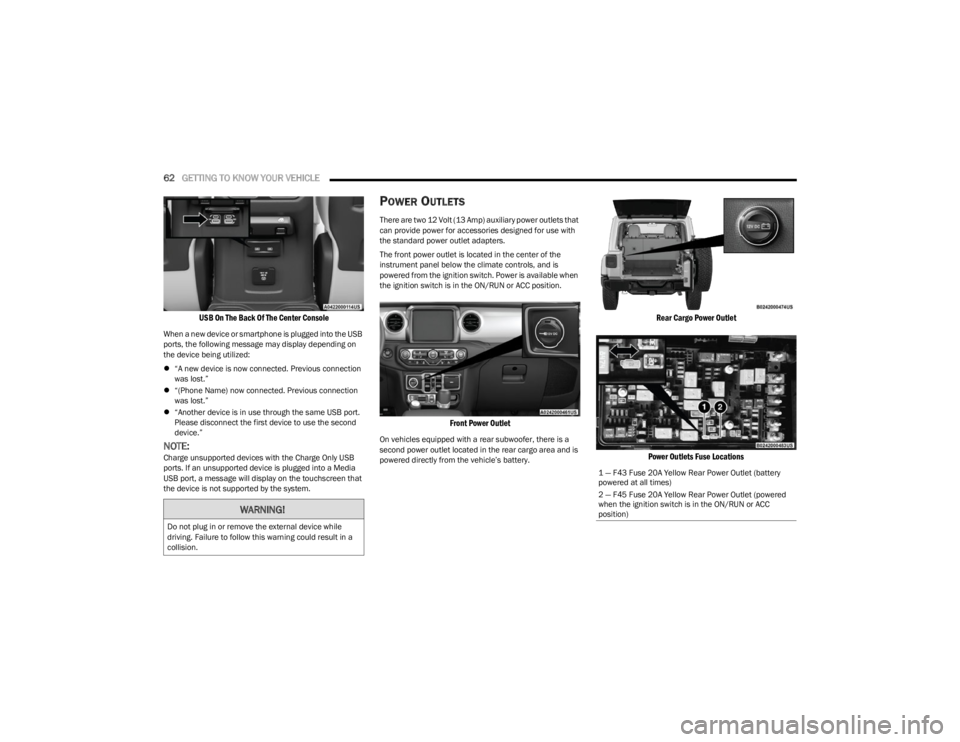
Third and fourth USB ports (if equipped) are located
behind the center console, above the power inverter. Both
ports are charge only.
1 — AUX Port
2 — Type C USB Port
3 — Type A USB Port
2
23_JL_OM_EN_USC_t.book Page 61
Page 64 of 396
62GETTING TO KNOW YOUR VEHICLE
USB On The Back Of The Center Console
When a new device or smartphone is plugged into the USB
ports, the following message may display depending on
the device being utilized:
“A new device is now connected. Previous connection
was lost.”
“(Phone Name) now connected. Previous connection
was lost.”
“Another device is in use through the same USB port.
Please disconnect the first device to use the second
device.”
NOTE:Charge unsupported devices with the Charge Only USB
ports. If an unsupported device is plugged into a Media
USB port, a message will display on the touchscreen that
the device is not supported by the system.
POWER OUTLETS
There are two 12 Volt (13 Amp) auxiliary power outlets that
can provide power for accessories designed for use with
the standard power outlet adapters.
The front power outlet is located in the center of the
instrument panel below the climate controls, and is
powered from the ignition switch. Power is available when
the ignition switch is in the ON/RUN or ACC position.
Front Power Outlet
On vehicles equipped with a rear subwoofer, there is a
second power outlet located in the rear cargo area and is
powered directly from the vehicle’s battery.
Rear Cargo Power Outlet
Power Outlets Fuse Locations
WARNING!
Do not plug in or remove the external device while
driving. Failure to follow this warning could result in a
collision.
1 — F43 Fuse 20A Yellow Rear Power Outlet (battery
powered at all times)
2 — F45 Fuse 20A Yellow Rear Power Outlet (powered
when the ignition switch is in the ON/RUN or ACC
position)
23_JL_OM_EN_USC_t.book Page 62
Page 117 of 396
GETTING TO KNOW YOUR INSTRUMENT PANEL115
When load reduction is activated, the message “Battery
Saver On” or “Battery Saver Mode” will appear in the
instrument cluster display.
These messages indicate the vehicle battery has a low
state of charge and continues to lose electrical charge at
a rate that the charging system cannot sustain.
NOTE:
The charging system is independent from load reduc -
tion. The charging system performs a diagnostic on the
charging system continuously.
If the Battery Charge Warning Light is on it may indicate
a problem with the charging system
Úpage 117.
The electrical loads that may be switched off (if equipped),
and vehicle functions which can be effected by load
reduction:
Heated Seat/Vented Seats/Heated Wheel
Rear Defroster And Heated Mirrors
HVAC System
150W Power Inverter System
Audio and Telematics System
Loss of the battery charge may indicate one or more of the
following conditions:
The charging system cannot deliver enough electrical
power to the vehicle system because the electrical
loads are larger than the capability of the charging
system. The charging system is still functioning prop -
erly.
Turning on all possible vehicle electrical loads (e.g.
HVAC to max settings, exterior and interior lights, over -
loaded power outlets +12 Volt, 150W, USB ports)
during certain driving conditions (city driving, towing,
frequent stopping).
Installing options like additional lights, upfitter elec -
trical accessories, audio systems, alarms and similar
devices.
Unusual driving cycles (short trips separated by long
parking periods).
The vehicle was parked for an extended period of time
(weeks, months).
The battery was recently replaced and was not charged
completely.
The battery was discharged by an electrical load left on
when the vehicle was parked.
The battery was used for an extended period with the
engine not running to supply radio, lights, chargers,
+12 Volt portable appliances like vacuum cleaner’s,
game consoles and similar devices.
What to do when an electrical load reduction action
message is present (“Battery Saver On” or “Battery Saver
Mode”)
During a trip:
Reduce power to unnecessary loads if possible:
Turn off redundant lights (interior or exterior)
Check what may be plugged in to power outlets
+12 Volt, 150W, USB ports
Check HVAC settings (blower, temperature)
Check the audio settings (volume)
After a trip:
Check if any aftermarket equipment was installed
(additional lights, upfitter electrical accessories, audio
systems, alarms) and review specifications if any (load
and Ignition Off Draw currents).
Evaluate the latest driving cycles (distance, driving
time and parking time).
The vehicle should have service performed if the
message is still present during consecutive trips and
the evaluation of the vehicle and driving pattern did not
help to identify the cause.
DIESEL DISPLAYS
When the appropriate conditions exist, the following
messages display in the instrument cluster display:
Exhaust Filter Nearing Full Safely Drive at Consistent
Speeds to Clear
Exhaust Filter Full – Power Reduced See Dealer
Exhaust System Service Required – See Dealer
Exhaust System – Filter XX% Full Service Required See
Dealer
Exhaust System Regeneration in Process Continue
Driving
Exhaust System – Regeneration Completed
DIESEL PARTICULATE FILTER (DPF)
M
ESSAGES
This engine meets all required diesel engine emissions
standards. To achieve these emissions standards, your
vehicle is equipped with a state-of-the-art engine and
exhaust system. These systems are seamlessly integrated
into your vehicle and managed by the Powertrain Control
Module (PCM). The PCM manages engine combustion to
allow the exhaust system’s catalyst to trap and burn
Particulate Matter (PM) pollutants, with no input or
interaction on your part.
3
23_JL_OM_EN_USC_t.book Page 115
Page 198 of 396
196MULTIMEDIA
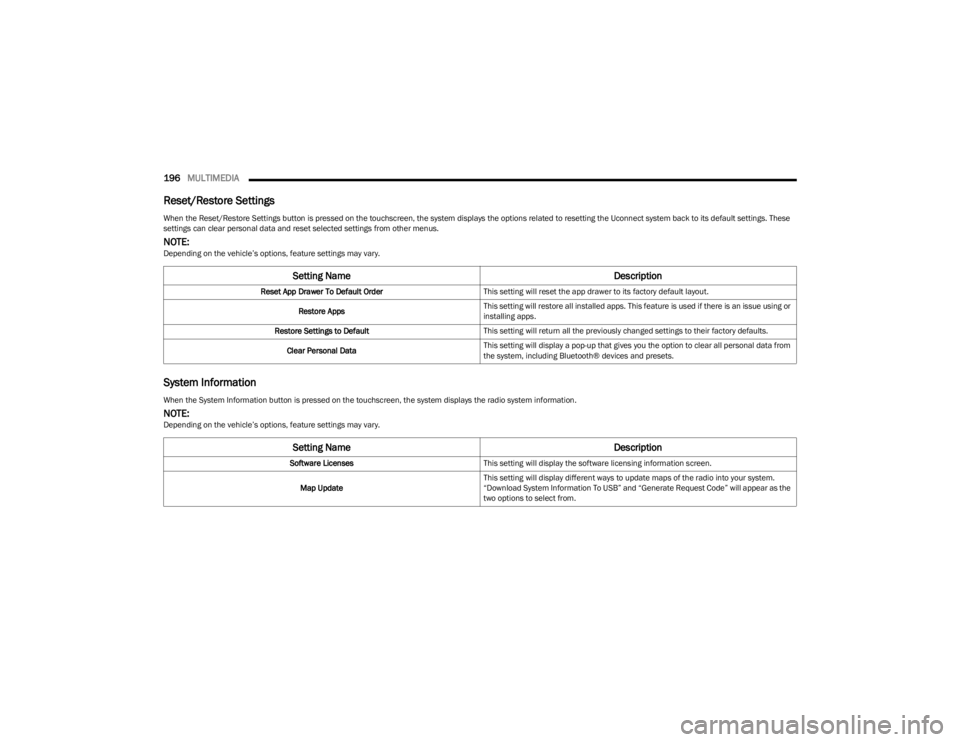
Reset/Restore Settings
System Information
When the Reset/Restore Settings button is pressed on the touchscreen, the system displays the options related to resetting the Uconnect system back to its default settings. These
settings can clear personal data and reset selected settings from other menus.
NOTE:Depending on the vehicle’s options, feature settings may vary.
Setting Name Description
Reset App Drawer To Default OrderThis setting will reset the app drawer to its factory default layout.
Restore Apps This setting will restore all installed apps. This feature is used if there is an issue using or
installing apps.
Restore Settings to Default This setting will return all the previously changed settings to their factory defaults.
Clear Personal Data This setting will display a pop-up that gives you the option to clear all personal data from
the system, including Bluetooth® devices and presets.
When the System Information button is pressed on the touchscreen, the system displays the radio system information.
NOTE:Depending on the vehicle’s options, feature settings may vary.
Setting Name
Description
Software LicensesThis setting will display the software licensing information screen.
Map Update This setting will display different ways to update maps of the radio into your system.
“Download System Information To USB” and “Generate Request Code” will appear as the
two options to select from.
23_JL_OM_EN_USC_t.book Page 196
Page 202 of 396
200MULTIMEDIA
DRAG & DROP MENU BAR
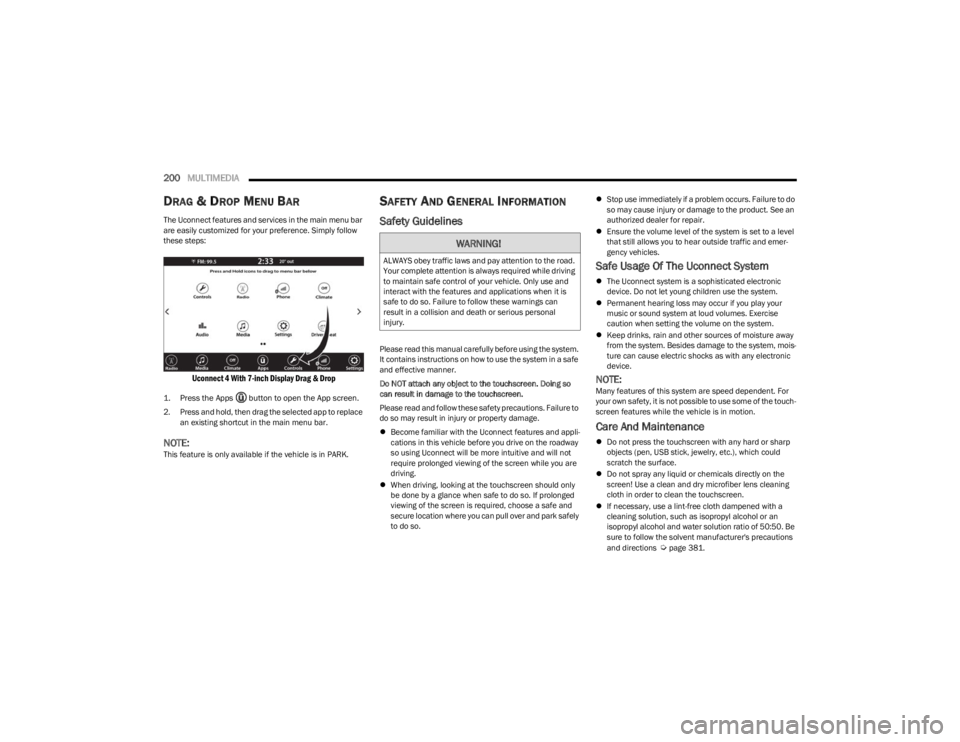
The Uconnect features and services in the main menu bar
are easily customized for your preference. Simply follow
these steps:
Uconnect 4 With 7-inch Display Drag & Drop
1. Press the Apps button to open the App screen.
2. Press and hold, then drag the selected app to replace
an existing shortcut in the main menu bar.
NOTE:This feature is only available if the vehicle is in PARK.
SAFETY AND GENERAL INFORMATION
Safety Guidelines
Please read this manual carefully before using the system.
It contains instructions on how to use the system in a safe
and effective manner.
Do NOT attach any object to the touchscreen. Doing so
can result in damage to the touchscreen.
Please read and follow these safety precautions. Failure to
do so may result in injury or property damage.
Become familiar with the Uconnect features and appli -
cations in this vehicle before you drive on the roadway
so using Uconnect will be more intuitive and will not
require prolonged viewing of the screen while you are
driving.
When driving, looking at the touchscreen should only
be done by a glance when safe to do so. If prolonged
viewing of the screen is required, choose a safe and
secure location where you can pull over and park safely
to do so.
Stop use immediately if a problem occurs. Failure to do
so may cause injury or damage to the product. See an
authorized dealer for repair.
Ensure the volume level of the system is set to a level
that still allows you to hear outside traffic and emer -
gency vehicles.
Safe Usage Of The Uconnect System
The Uconnect system is a sophisticated electronic
device. Do not let young children use the system.
Permanent hearing loss may occur if you play your
music or sound system at loud volumes. Exercise
caution when setting the volume on the system.
Keep drinks, rain and other sources of moisture away
from the system. Besides damage to the system, mois -
ture can cause electric shocks as with any electronic
device.
NOTE:Many features of this system are speed dependent. For
your own safety, it is not possible to use some of the touch -
screen features while the vehicle is in motion.
Care And Maintenance
Do not press the touchscreen with any hard or sharp
objects (pen, USB stick, jewelry, etc.), which could
scratch the surface.
Do not spray any liquid or chemicals directly on the
screen! Use a clean and dry microfiber lens cleaning
cloth in order to clean the touchscreen.
If necessary, use a lint-free cloth dampened with a
cleaning solution, such as isopropyl alcohol or an
isopropyl alcohol and water solution ratio of 50:50. Be
sure to follow the solvent manufacturer's precautions
and directions
Úpage 381.
WARNING!
ALWAYS obey traffic laws and pay attention to the road.
Your complete attention is always required while driving
to maintain safe control of your vehicle. Only use and
interact with the features and applications when it is
safe to do so. Failure to follow these warnings can
result in a collision and death or serious personal
injury.
23_JL_OM_EN_USC_t.book Page 200
Page 203 of 396
MULTIMEDIA201
UCONNECT MODES
STEERING WHEEL AUDIO CONTROLS
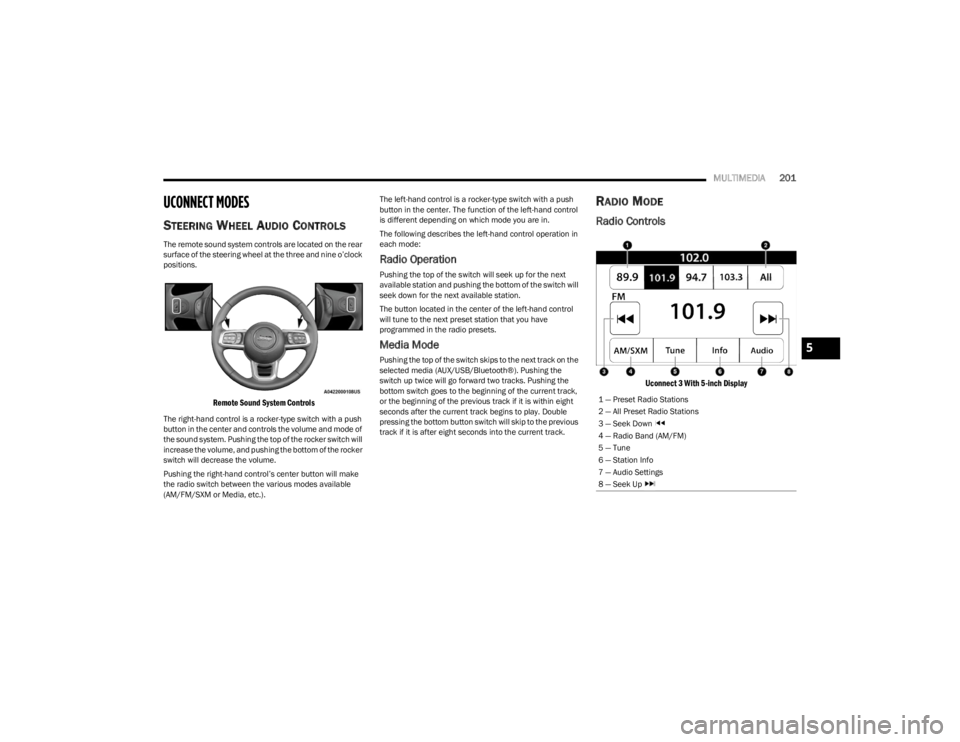
The remote sound system controls are located on the rear
surface of the steering wheel at the three and nine o’clock
positions.
Remote Sound System Controls
The right-hand control is a rocker-type switch with a push
button in the center and controls the volume and mode of
the sound system. Pushing the top of the rocker switch will
increase the volume, and pushing the bottom of the rocker
switch will decrease the volume.
Pushing the right-hand control’s center button will make
the radio switch between the various modes available
(AM/FM/SXM or Media, etc.). The left-hand control is a rocker-type switch with a push
button in the center. The function of the left-hand control
is different depending on which mode you are in.
The following describes the left-hand control operation in
each mode:
Radio Operation
Pushing the top of the switch will seek up for the next
available station and pushing the bottom of the switch will
seek down for the next available station.
The button located in the center of the left-hand control
will tune to the next preset station that you have
programmed in the radio presets.
Media Mode
Pushing the top of the switch skips to the next track on the
selected media (AUX/USB/Bluetooth®). Pushing the
switch up twice will go forward two tracks. Pushing the
bottom switch goes to the beginning of the current track,
or the beginning of the previous track if it is within eight
seconds after the current track begins to play. Double
pressing the bottom button switch will skip to the previous
track if it is after eight seconds into the current track.
RADIO MODE
Radio Controls
Uconnect 3 With 5-inch Display
1 — Preset Radio Stations
2 — All Preset Radio Stations
3 — Seek Down
4 — Radio Band (AM/FM)
5 — Tune
6 — Station Info
7 — Audio Settings
8 — Seek Up
5
23_JL_OM_EN_USC_t.book Page 201
Page 211 of 396
MULTIMEDIA209
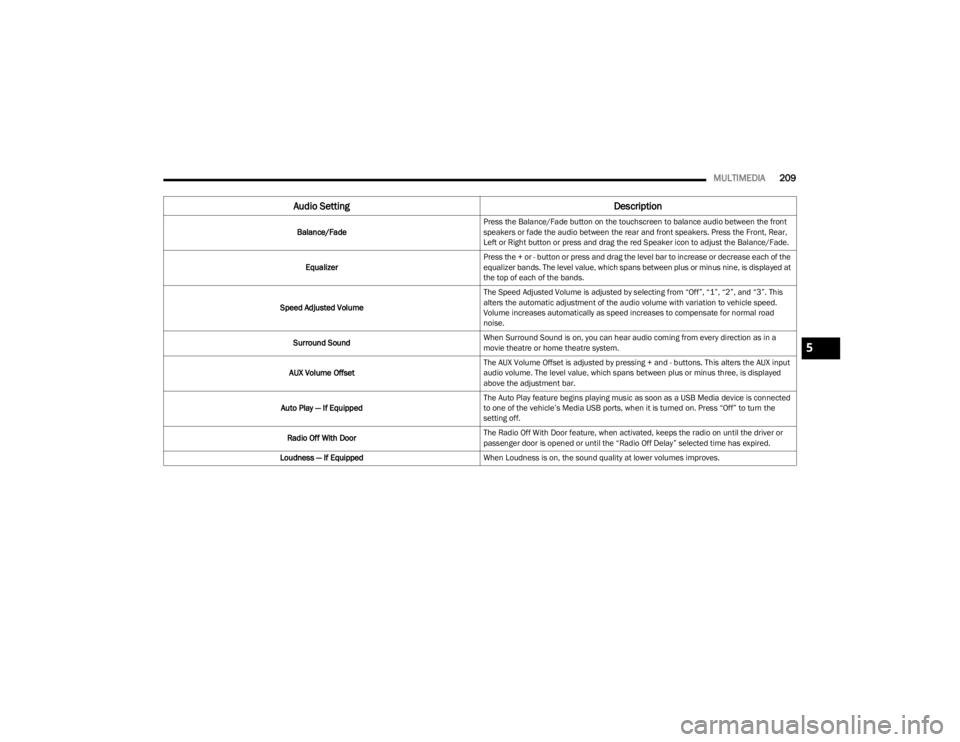
Audio Setting Description
Balance/FadePress the Balance/Fade button on the touchscreen to balance audio between the front
speakers or fade the audio between the rear and front speakers. Press the Front, Rear,
Left or Right button or press and drag the red Speaker icon to adjust the Balance/Fade.
Equalizer Press the + or - button or press and drag the level bar to increase or decrease each of the
equalizer bands. The level value, which spans between plus or minus nine, is displayed at
the top of each of the bands.
Speed Adjusted Volume The Speed Adjusted Volume is adjusted by selecting from “Off”, “1”, “2”, and “3”. This
alters the automatic adjustment of the audio volume with variation to vehicle speed.
Volume increases automatically as speed increases to compensate for normal road
noise.
Surround Sound When Surround Sound is on, you can hear audio coming from every direction as in a
movie theatre or home theatre system.
AUX Volume Offset The AUX Volume Offset is adjusted by pressing + and - buttons. This alters the AUX input
audio volume. The level value, which spans between plus or minus three, is displayed
above the adjustment bar.
Auto Play — If Equipped The Auto Play feature begins playing music as soon as a USB Media device is connected
to one of the vehicle’s Media USB ports, when it is turned on. Press “Off” to turn the
setting off.
Radio Off With Door The Radio Off With Door feature, when activated, keeps the radio on until the driver or
passenger door is opened or until the “Radio Off Delay” selected time has expired.
Loudness — If Equipped When Loudness is on, the sound quality at lower volumes improves.
5
23_JL_OM_EN_USC_t.book Page 209
Page 212 of 396
210MULTIMEDIA
MEDIA MODE
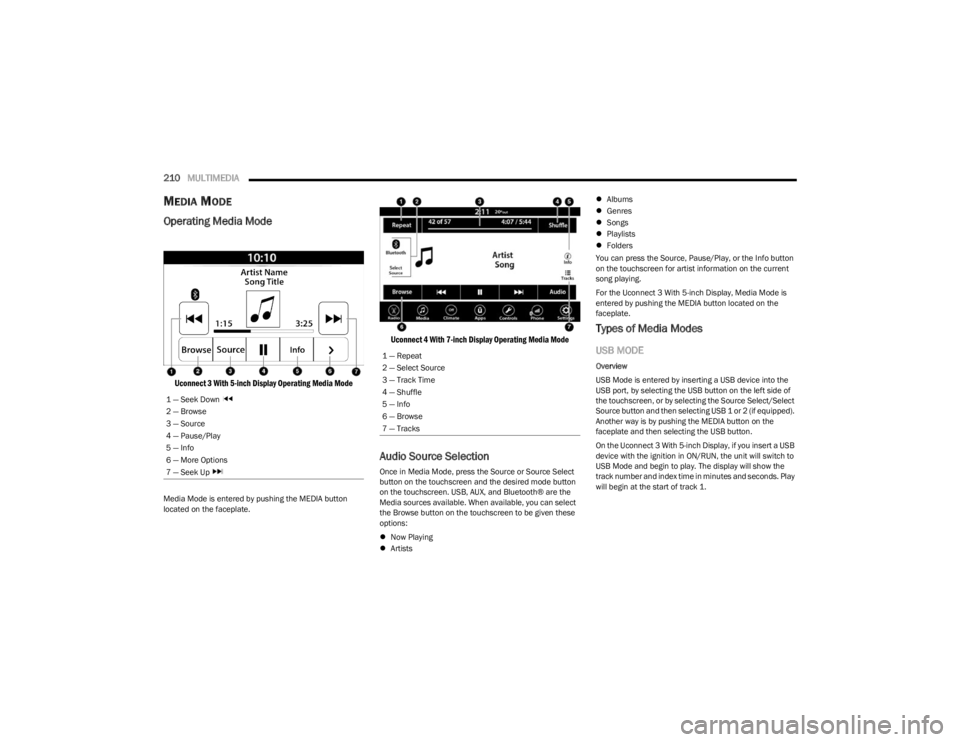
Operating Media Mode
Uconnect 3 With 5-inch Display Operating Media Mode
Media Mode is entered by pushing the MEDIA button
located on the faceplate.
Uconnect 4 With 7-inch Display Operating Media Mode
Audio Source Selection
Once in Media Mode, press the Source or Source Select
button on the touchscreen and the desired mode button
on the touchscreen. USB, AUX, and Bluetooth® are the
Media sources available. When available, you can select
the Browse button on the touchscreen to be given these
options:
Now Playing
Artists
Albums
Genres
Songs
Playlists
Folders
You can press the Source, Pause/Play, or the Info button
on the touchscreen for artist information on the current
song playing.
For the Uconnect 3 With 5-inch Display, Media Mode is
entered by pushing the MEDIA button located on the
faceplate.
Types of Media Modes
USB MODE
Overview
USB Mode is entered by inserting a USB device into the
USB port, by selecting the USB button on the left side of
the touchscreen, or by selecting the Source Select/Select
Source button and then selecting USB 1 or 2 (if equipped).
Another way is by pushing the MEDIA button on the
faceplate and then selecting the USB button.
On the Uconnect 3 With 5-inch Display, if you insert a USB
device with the ignition in ON/RUN, the unit will switch to
USB Mode and begin to play. The display will show the
track number and index time in minutes and seconds. Play
will begin at the start of track 1.
1 — Seek Down
2 — Browse
3 — Source
4 — Pause/Play
5 — Info
6 — More Options
7 — Seek Up 1 — Repeat
2 — Select Source
3 — Track Time
4 — Shuffle
5 — Info
6 — Browse
7 — Tracks
23_JL_OM_EN_USC_t.book Page 210
Page 213 of 396
MULTIMEDIA211
BLUETOOTH® MODE
Overview
Bluetooth® Streaming Audio or Bluetooth® Mode is
entered by pairing a Bluetooth® device, containing music,
to the Uconnect system.
Before proceeding, the Bluetooth® device must be paired
to the Uconnect Phone to communicate with the Uconnect
system.
On the Uconnect 3 With 5-inch Display, push the MEDIA
button located on the faceplate. Once in Media Mode,
press the Source button on the touchscreen and select
the Bluetooth® button
Úpage 212.
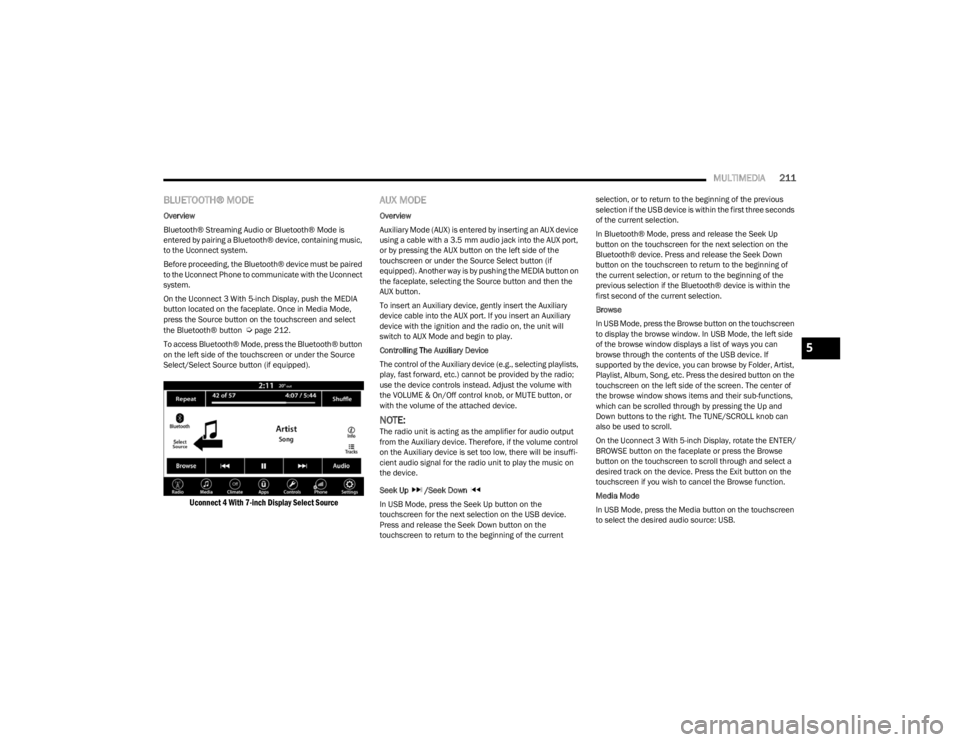
To access Bluetooth® Mode, press the Bluetooth® button
on the left side of the touchscreen or under the Source
Select/Select Source button (if equipped).
Uconnect 4 With 7-inch Display Select Source
AUX MODE
Overview
Auxiliary Mode (AUX) is entered by inserting an AUX device
using a cable with a 3.5 mm audio jack into the AUX port,
or by pressing the AUX button on the left side of the
touchscreen or under the Source Select button (if
equipped). Another way is by pushing the MEDIA button on
the faceplate, selecting the Source button and then the
AUX button.
To insert an Auxiliary device, gently insert the Auxiliary
device cable into the AUX port. If you insert an Auxiliary
device with the ignition and the radio on, the unit will
switch to AUX Mode and begin to play.
Controlling The Auxiliary Device
The control of the Auxiliary device (e.g., selecting playlists,
play, fast forward, etc.) cannot be provided by the radio;
use the device controls instead. Adjust the volume with
the VOLUME & On/Off control knob, or MUTE button, or
with the volume of the attached device.
NOTE:The radio unit is acting as the amplifier for audio output
from the Auxiliary device. Therefore, if the volume control
on the Auxiliary device is set too low, there will be insuffi -
cient audio signal for the radio unit to play the music on
the device.
Seek Up /Seek Down
In USB Mode, press the Seek Up button on the
touchscreen for the next selection on the USB device.
Press and release the Seek Down button on the
touchscreen to return to the beginning of the current selection, or to return to the beginning of the previous
selection if the USB device is within the first three seconds
of the current selection.
In Bluetooth® Mode, press and release the Seek Up
button on the touchscreen for the next selection on the
Bluetooth® device. Press and release the Seek Down
button on the touchscreen to return to the beginning of
the current selection, or return to the beginning of the
previous selection if the Bluetooth® device is within the
first second of the current selection.
Browse
In USB Mode, press the Browse button on the touchscreen
to display the browse window. In USB Mode, the left side
of the browse window displays a list of ways you can
browse through the contents of the USB device. If
supported by the device, you can browse by Folder, Artist,
Playlist, Album, Song, etc. Press the desired button on the
touchscreen on the left side of the screen. The center of
the browse window shows items and their sub-functions,
which can be scrolled through by pressing the Up and
Down buttons to the right. The TUNE/SCROLL knob can
also be used to scroll.
On the Uconnect 3 With 5-inch Display, rotate the ENTER/
BROWSE button on the faceplate or press the Browse
button on the touchscreen to scroll through and select a
desired track on the device. Press the Exit button on the
touchscreen if you wish to cancel the Browse function.
Media Mode
In USB Mode, press the Media button on the touchscreen
to select the desired audio source: USB.
5
23_JL_OM_EN_USC_t.book Page 211