brakes JEEP WRANGLER 2023 Owners Manual
[x] Cancel search | Manufacturer: JEEP, Model Year: 2023, Model line: WRANGLER, Model: JEEP WRANGLER 2023Pages: 396, PDF Size: 25.15 MB
Page 138 of 396

136STARTING AND OPERATING
(Continued)
DOWNSHIFTING
Moving from a high gear down to a lower gear is
recommended to preserve brakes when driving down
steep hills. In addition, downshifting at the right time
provides better acceleration when you desire to resume
speed. Downshift progressively. Do not skip gears to avoid
overspeeding the engine and clutch.
NOTE:The manual transmission shift system is equipped with
gear blockers, which will prevent downshifts into FIRST or
SECOND gear above certain vehicle speeds.
Maximum Recommended Downshift Speeds
NOTE:Vehicle speeds shown in the chart above are for 2H and 4H only, vehicle speeds in 4L would be significantly less.
WARNING!
Do not downshift for additional engine braking on a
slippery surface. The drive wheels could lose their grip,
and the vehicle could skid.
CAUTION!
Skipping gears and downshifting into lower gears at
higher vehicle speeds can damage the engine and
clutch systems. Any attempt to shift into lower gear
with clutch pedal pressed may result damage to the
clutch system. Shifting into lower gear and releasing
the clutch may result in engine damage.
When descending a hill, be very careful to downshift
one gear at a time to prevent overspeeding the
engine which can cause engine damage, and/or
clutch damage, even if the clutch pedal is pressed. If
transfer case is in low range the vehicle speeds to
cause engine and clutch damage are significantly
lower.Failure to follow the maximum recommended down-
shifting speeds may cause the engine damage and/
or damage the clutch, even if the clutch pedal is
pressed.
Descending a hill in low range with clutch pedal
pressed could result in clutch damage.
CAUTION!
CAUTION!
Failure to follow the maximum recommended downshifting speeds may cause the engine to overspeed and/or damage the clutch disc, even if the clutch pedal is pressed.
Manual Transmission Downshift Speeds in MPH (KM/H)
Gear Selection 6 to 55 to 44 to 33 to 22 to 1
Maximum Speed 80 (129)70 (113) 50 (81)30 (48)15 (24)
23_JL_OM_EN_USC_t.book Page 136
Page 140 of 396
138STARTING AND OPERATING
BRAKE/TRANSMISSION SHIFT
I
NTERLOCK (BTSI) SYSTEM
This vehicle is equipped with a BTSI system that holds the
transmission gear selector in PARK unless the brakes are
applied. To shift the transmission out of PARK, the engine
must be running and the brake pedal must be pressed.
The brake pedal must also be pressed to shift from
NEUTRAL into DRIVE or REVERSE when the vehicle is
stopped or moving at low speeds.
8–SPEED AUTOMATIC TRANSMISSION
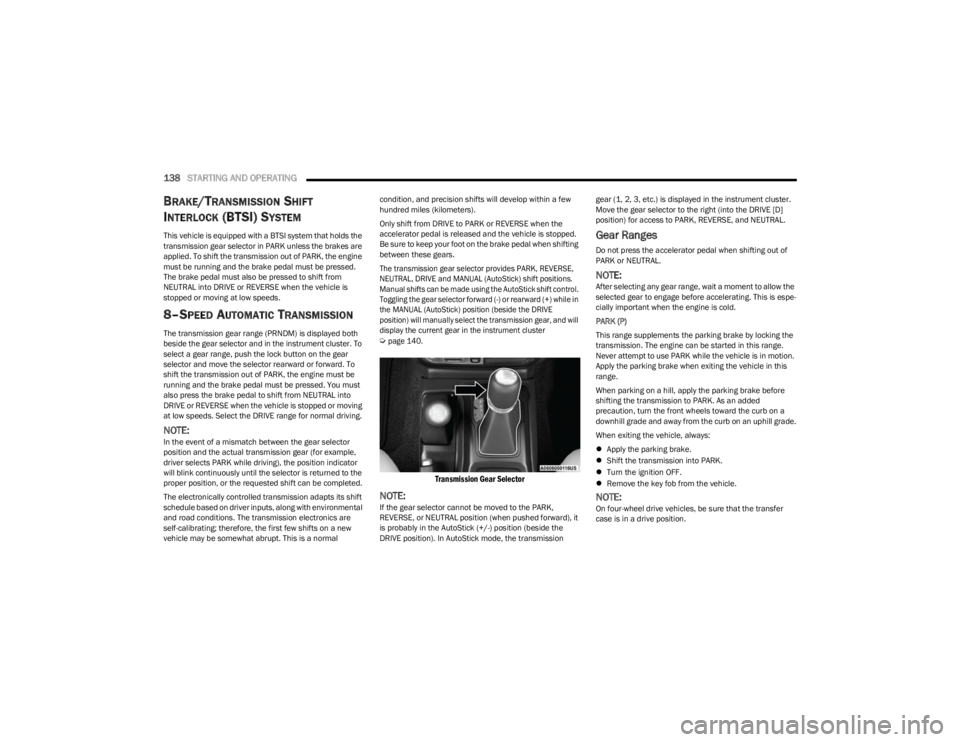
The transmission gear range (PRNDM) is displayed both
beside the gear selector and in the instrument cluster. To
select a gear range, push the lock button on the gear
selector and move the selector rearward or forward. To
shift the transmission out of PARK, the engine must be
running and the brake pedal must be pressed. You must
also press the brake pedal to shift from NEUTRAL into
DRIVE or REVERSE when the vehicle is stopped or moving
at low speeds. Select the DRIVE range for normal driving.
NOTE:In the event of a mismatch between the gear selector
position and the actual transmission gear (for example,
driver selects PARK while driving), the position indicator
will blink continuously until the selector is returned to the
proper position, or the requested shift can be completed.
The electronically controlled transmission adapts its shift
schedule based on driver inputs, along with environmental
and road conditions. The transmission electronics are
self-calibrating; therefore, the first few shifts on a new
vehicle may be somewhat abrupt. This is a normal condition, and precision shifts will develop within a few
hundred miles (kilometers).
Only shift from DRIVE to PARK or REVERSE when the
accelerator pedal is released and the vehicle is stopped.
Be sure to keep your foot on the brake pedal when shifting
between these gears.
The transmission gear selector provides PARK, REVERSE,
NEUTRAL, DRIVE and MANUAL (AutoStick) shift positions.
Manual shifts can be made using the AutoStick shift control.
Toggling the gear selector forward (-) or rearward (+) while in
the MANUAL (AutoStick) position (beside the DRIVE
position) will manually select the transmission gear, and will
display the current gear in the instrument cluster
Ú
page 140.
Transmission Gear Selector
NOTE:If the gear selector cannot be moved to the PARK,
REVERSE, or NEUTRAL position (when pushed forward), it
is probably in the AutoStick (+/-) position (beside the
DRIVE position). In AutoStick mode, the transmission gear (1, 2, 3, etc.) is displayed in the instrument cluster.
Move the gear selector to the right (into the DRIVE [D]
position) for access to PARK, REVERSE, and NEUTRAL.
Gear Ranges
Do not press the accelerator pedal when shifting out of
PARK or NEUTRAL.
NOTE:After selecting any gear range, wait a moment to allow the
selected gear to engage before accelerating. This is espe
-
cially important when the engine is cold.
PARK (P)
This range supplements the parking brake by locking the
transmission. The engine can be started in this range.
Never attempt to use PARK while the vehicle is in motion.
Apply the parking brake when exiting the vehicle in this
range.
When parking on a hill, apply the parking brake before
shifting the transmission to PARK. As an added
precaution, turn the front wheels toward the curb on a
downhill grade and away from the curb on an uphill grade.
When exiting the vehicle, always:
Apply the parking brake.
Shift the transmission into PARK.
Turn the ignition OFF.
Remove the key fob from the vehicle.
NOTE:On four-wheel drive vehicles, be sure that the transfer
case is in a drive position.
23_JL_OM_EN_USC_t.book Page 138
Page 155 of 396
STARTING AND OPERATING153
(Continued)
Adaptive Cruise Control (ACC) Operation
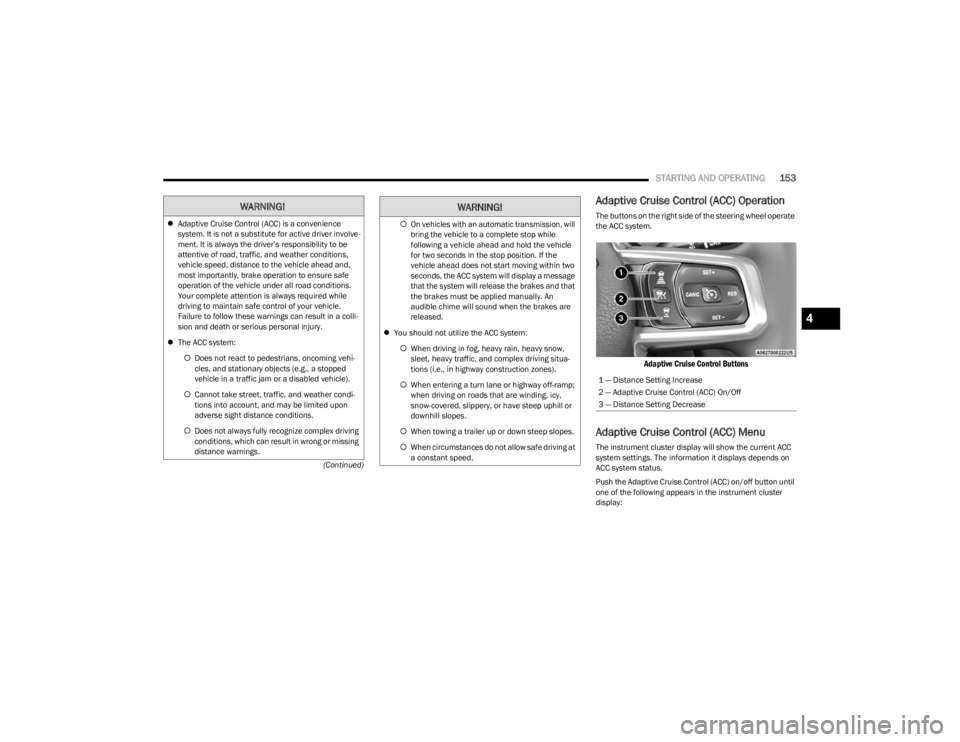
The buttons on the right side of the steering wheel operate
the ACC system.
Adaptive Cruise Control Buttons
Adaptive Cruise Control (ACC) Menu
The instrument cluster display will show the current ACC
system settings. The information it displays depends on
ACC system status.
Push the Adaptive Cruise Control (ACC) on/off button until
one of the following appears in the instrument cluster
display:
WARNING!
Adaptive Cruise Control (ACC) is a convenience
system. It is not a substitute for active driver involve -
ment. It is always the driver’s responsibility to be
attentive of road, traffic, and weather conditions,
vehicle speed, distance to the vehicle ahead and,
most importantly, brake operation to ensure safe
operation of the vehicle under all road conditions.
Your complete attention is always required while
driving to maintain safe control of your vehicle.
Failure to follow these warnings can result in a colli -
sion and death or serious personal injury.
The ACC system:
Does not react to pedestrians, oncoming vehi -
cles, and stationary objects (e.g., a stopped
vehicle in a traffic jam or a disabled vehicle).
Cannot take street, traffic, and weather condi -
tions into account, and may be limited upon
adverse sight distance conditions.
Does not always fully recognize complex driving
conditions, which can result in wrong or missing
distance warnings.On vehicles with an automatic transmission, will
bring the vehicle to a complete stop while
following a vehicle ahead and hold the vehicle
for two seconds in the stop position. If the
vehicle ahead does not start moving within two
seconds, the ACC system will display a message
that the system will release the brakes and that
the brakes must be applied manually. An
audible chime will sound when the brakes are
released.
You should not utilize the ACC system:
When driving in fog, heavy rain, heavy snow,
sleet, heavy traffic, and complex driving situa-
tions (i.e., in highway construction zones).
When entering a turn lane or highway off-ramp;
when driving on roads that are winding, icy,
snow-covered, slippery, or have steep uphill or
downhill slopes.
When towing a trailer up or down steep slopes.
When circumstances do not allow safe driving at
a constant speed.
WARNING!
1 — Distance Setting Increase
2 — Adaptive Cruise Control (ACC) On/Off
3 — Distance Setting Decrease
4
23_JL_OM_EN_USC_t.book Page 153
Page 156 of 396

154STARTING AND OPERATING
Adaptive Cruise Control Off
When ACC is deactivated, the display will read “Adaptive
Cruise Control Off.”
Adaptive Cruise Control Ready
When ACC is activated, but the vehicle speed setting has
not been selected, the display will read “Adaptive Cruise
Control Ready.”
Adaptive Cruise Control Set
When the SET (+) or the SET (-) button is pushed, the
display will read “ACC SET.”
When ACC is set, the set speed will show in the instrument
cluster display.
The ACC screen may display once again if any of the
following ACC activity occurs:
System Cancel
Driver Override
System Off
ACC Proximity Warning
ACC Unavailable Warning
The instrument cluster display will return to the last
display selected after five seconds of no ACC display
activity.
Activating Adaptive Cruise Control (ACC)
The minimum set speed for the ACC system is 20 mph
(32 km/h).
When the system is turned on and in the ready state, the
instrument cluster displays “ACC Ready.”
When the system is off, the instrument cluster displays
“Adaptive Cruise Control (ACC) Off.”
NOTE:You cannot engage ACC under the following conditions:
When in 4WD Low
When the brakes are applied
When the parking brake is applied
When the automatic transmission is in PARK, REVERSE
or NEUTRAL
When the manual transmission is in FIRST gear
When the vehicle speed is below 20 mph (32 km/h)
(manual transmission)
When the vehicle speed is below the minimum speed
range
When the brakes are overheated
When the driver’s door is open at low speeds
When the driver’s seat belt is unbuckled at low speeds
When ESC Full Off mode is active
When Off Road+ (if equipped) is active
To Activate/Deactivate
Push and release the Adaptive Cruise Control (ACC) on/off
button. The ACC menu in the instrument cluster display
will read “ACC Ready.”
To turn the system off, push and release the Adaptive
Cruise Control (ACC) on/off button again. At this time, the
system will turn off and the instrument cluster display will
read “Adaptive Cruise Control (ACC) Off.”
To Set A Desired Speed
When the vehicle reaches the speed desired, push the
SET (+) button or the SET (-) button and release. The
instrument cluster display will show the set speed.
NOTE:Fixed Speed Cruise Control can be used without ACC
enabled. To change between the different modes, push
the ACC on/off button which turns the ACC and the Fixed
Speed Cruise Control off. Pushing the Fixed Speed Cruise
Control on/off button will result in turning on (changing to)
Fixed Speed Cruise Control mode.
WARNING!
Leaving the Adaptive Cruise Control (ACC) system on
when not in use is dangerous. You could accidentally
set the system or cause it to go faster than you want.
You could lose control and have a collision. Always leave
the system off when you are not using it.
WARNING!
In Fixed Speed Cruise Control mode, the system will not
react to vehicles ahead. In addition, the proximity
warning does not activate and no alarm will sound even
if you are too close to the vehicle ahead since neither
the presence of the vehicle ahead nor the
vehicle-to-vehicle distance is detected. Be sure to
maintain a safe distance between your vehicle and the
vehicle ahead. Always be aware which mode is
selected.
23_JL_OM_EN_USC_t.book Page 154
Page 157 of 396

STARTING AND OPERATING155
If ACC is set when the vehicle speed is below 20 mph
(32 km/h), the set speed will default to 20 mph
(32 km/h).
NOTE:Fixed Speed Cruise Control cannot be set below 20 mph
(32 km/h).
If either system is set when the vehicle speed is above
20 mph (32 km/h), the set speed shall be the current speed of the vehicle.
On vehicles equipped with a manual transmission, the
ACC system cannot be set when the vehicle speed is below
20 mph (32 km/h) or when the vehicle is in FIRST gear.
NOTE:
Keeping your foot on the accelerator pedal can cause
the vehicle to continue to accelerate beyond the set
speed. If this occurs, the message “DRIVER OVERRIDE”
will display in the instrument cluster display.
If you continue to accelerate beyond the set speed
while ACC is enabled, the system will not be controlling
the distance between your vehicle and the vehicle
ahead. The vehicle speed will only be determined by
the position of the accelerator pedal.
To Cancel
The following conditions cancel the ACC or Fixed Speed
Cruise Control systems:
The brake pedal is applied
The CANC button is pushed
The Anti-Lock Brake System (ABS) activates
The gear selector is removed from the DRIVE position
The Electronic Stability Control/Traction Control
System (ESC/TCS) activates
The vehicle parking brake is applied
The braking temperature exceeds normal range (over -
heated)
The Trailer Sway Control (TSC) activates
The vehicle speed is less than 15 mph (24 km/h)
(manual transmission only)
The clutch is pressed for more than 10 seconds
(manual transmission only)
The vehicle is placed in NEUTRAL for more than
10 seconds (manual transmission only)
The driver shifts to FIRST gear (manual transmission
only)
The following conditions will only cancel the ACC system:
Driver seat belt is unbuckled at low speeds
Driver door is opened at low speeds
To Turn Off
The system will turn off and erase the set speed in
memory if:
The Adaptive Cruise Control (ACC) on/off button is
pushed
The Fixed Speed Cruise Control on/off button is pushed
The ignition is placed in the OFF position
4WD Low is engaged
To Resume
If there is a set speed in the memory, push the RES button
and then remove your foot from the accelerator pedal. The
instrument cluster display will show the last set speed. Resume can be used at any speed above 20 mph
(32 km/h) when only Fixed Speed Cruise Control is being
used.
Resume can be used at any speed above 0 mph (0 km/h)
when ACC is active.
NOTE:
While in ACC mode, when the vehicle comes to a
complete stop longer than two seconds, the system will
cancel. The driver will have to apply the brakes to keep
the vehicle at a standstill.
ACC cannot be resumed if there is a stationary vehicle
in front of your vehicle in close proximity.
To Vary The Speed Setting
To Increase Or Decrease The Set Speed
After setting a speed, you can increase the set speed by
pushing the SET (+) button, or decrease speed by pushing
the SET (-) button.
WARNING!
The Resume function should only be used if traffic and
road conditions permit. Resuming a set speed that is
too high or too low for prevailing traffic and road condi -
tions could cause the vehicle to accelerate or deceler -
ate too sharply for safe operation. Failure to follow
these warnings can result in a collision and death or
serious personal injury.
4
23_JL_OM_EN_USC_t.book Page 155
Page 158 of 396
156STARTING AND OPERATING
U.S. Speed (mph)
Pushing the SET (+), or SET (-) button once will result in
a 1 mph speed adjustment. Each subsequent tap of
the button results in an adjustment of 1 mph.
If the button is continually pushed, the set speed will
continue to adjust in 5 mph increments until the button
is released. The new set speed is reflected in the instru -
ment cluster display.
Metric Speed (km/h)
Pushing the SET (+), or SET (-) button once will result in
a 1 km/h speed adjustment. Each subsequent tap of
the button results in an adjustment of 1 km/h.
If the button is continually pushed, the set speed will
continue to adjust in 10 km/h increments until the
button is released. The new set speed is reflected in
the instrument cluster display.
NOTE:When you override and push the SET (+) button or SET (-)
buttons, the new set speed will be the current speed of the
vehicle.
When ACC Is Active
When you use the SET (-) button to decelerate, if the
engine’s braking power does not slow the vehicle suffi -
ciently to reach the set speed, the brake system will
automatically slow the vehicle.
The ACC system applies the brake down to a full stop
when following the vehicle in front. If your vehicle
follows the vehicle in front to a standstill, your vehicle
will release the brakes two seconds after coming to a
full stop.
The ACC system maintains set speed when driving
uphill and downhill. However, a slight speed change on moderate hills is normal. In addition, downshifting may
occur while climbing uphill or descending downhill. This
is normal operation and necessary to maintain set
speed. When driving uphill and downhill, the ACC
system will cancel if the braking temperature exceeds
normal range (overheated).
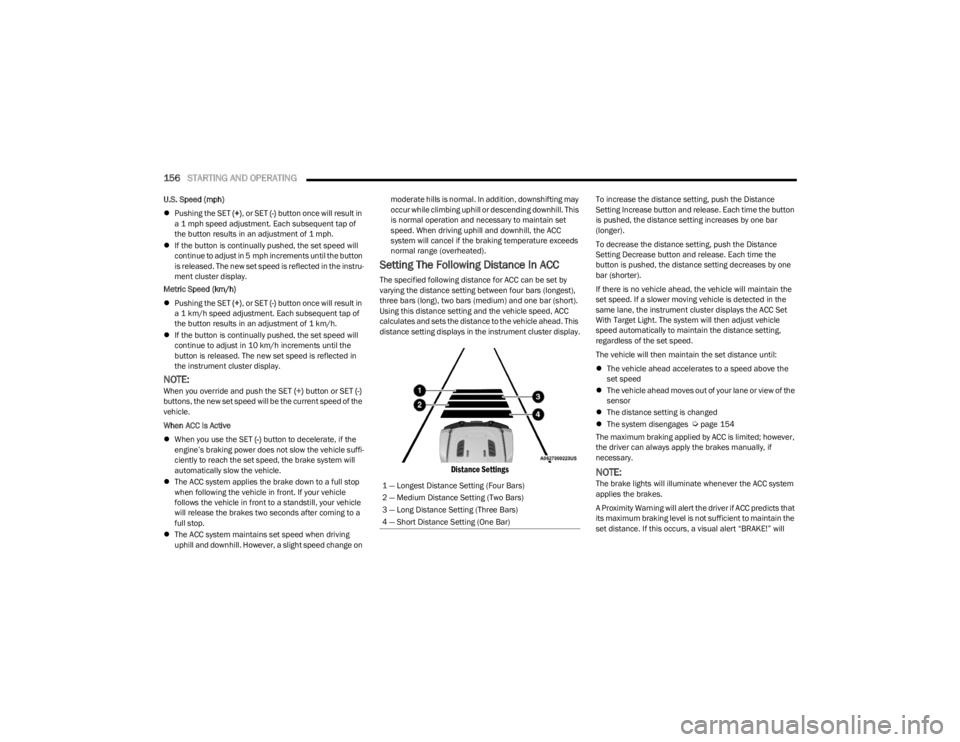
Setting The Following Distance In ACC
The specified following distance for ACC can be set by
varying the distance setting between four bars (longest),
three bars (long), two bars (medium) and one bar (short).
Using this distance setting and the vehicle speed, ACC
calculates and sets the distance to the vehicle ahead. This
distance setting displays in the instrument cluster display.
Distance Settings
To increase the distance setting, push the Distance
Setting Increase button and release. Each time the button
is pushed, the distance setting increases by one bar
(longer).
To decrease the distance setting, push the Distance
Setting Decrease button and release. Each time the
button is pushed, the distance setting decreases by one
bar (shorter).
If there is no vehicle ahead, the vehicle will maintain the
set speed. If a slower moving vehicle is detected in the
same lane, the instrument cluster displays the ACC Set
With Target Light. The system will then adjust vehicle
speed automatically to maintain the distance setting,
regardless of the set speed.
The vehicle will then maintain the set distance until:
The vehicle ahead accelerates to a speed above the
set speed
The vehicle ahead moves out of your lane or view of the
sensor
The distance setting is changed
The system disengages
Úpage 154
The maximum braking applied by ACC is limited; however,
the driver can always apply the brakes manually, if
necessary.
NOTE:The brake lights will illuminate whenever the ACC system
applies the brakes.
A Proximity Warning will alert the driver if ACC predicts that
its maximum braking level is not sufficient to maintain the
set distance. If this occurs, a visual alert “BRAKE!” will
1 — Longest Distance Setting (Four Bars)
2 — Medium Distance Setting (Two Bars)
3 — Long Distance Setting (Three Bars)
4 — Short Distance Setting (One Bar)
23_JL_OM_EN_USC_t.book Page 156
Page 159 of 396
STARTING AND OPERATING157
flash in the instrument cluster display and a chime will
sound while ACC continues to apply its maximum braking
capacity.
NOTE:The “BRAKE!” screen in the instrument cluster display is a
warning for the driver to take action and does not neces -
sarily mean that the Forward Collision Warning system is
applying the brakes autonomously.
Overtake Aid
When driving with ACC engaged and following a vehicle,
the system will provide an additional acceleration up to
the ACC set speed to assist in passing the vehicle. This
additional acceleration is triggered when the driver utilizes
the left turn signal and will only be active when passing on
the left hand side.
ACC Operation At A Stop (Automatic
Transmission Only)
In the event that the ACC system brings your vehicle to a
standstill while following a target vehicle, your vehicle will
resume motion without the need for any driver action if the
target vehicle starts moving within two seconds of your
vehicle coming to a standstill.
If the target vehicle does not start moving within two
seconds of your vehicle coming to a standstill, the ACC
with Stop system will cancel and the brakes will release. A
cancel message will display on the instrument cluster
display and produce a warning chime. Driver intervention
will be required at this moment.
While ACC with Stop is holding your vehicle at a standstill,
if the driver seatbelt is unbuckled or the driver door is
opened, the ACC with Stop system will cancel and the brakes will release. A cancel message will display on the
instrument cluster display and produce a warning chime.
Driver intervention will be required at this moment.
Display Warnings And Maintenance
“WIPE FRONT RADAR SENSOR IN FRONT OF
VEHICLE” WARNING
The “ACC/FCW Unavailable Wipe Front Radar Sensor”
warning will display and a chime will sound when
conditions temporarily limit system performance.
This most often occurs at times of poor visibility, such as
in snow or heavy rain. The ACC system may also become
temporarily blinded due to obstructions, such as mud, dirt
or ice. In these cases, the instrument cluster display will
display “ACC/FCW Unavailable Wipe Front Radar Sensor”
and the system will deactivate.
The “ACC/FCW Unavailable Wipe Front Radar Sensor”
message can sometimes be displayed while driving in
highly reflective areas (i.e. tunnels with reflective tiles, or
ice and snow). The ACC system will recover after the
vehicle has left these areas. Under rare conditions, when
the radar is not tracking any vehicles or objects in its path
this warning may temporarily occur.
NOTE:If the “ACC/FCW Unavailable Wipe Front Radar Sensor”
warning is active, Fixed Speed Cruise Control is still
available.
If weather conditions are not a factor, the driver should
examine the sensor. It may require cleaning or removal of
an obstruction. The sensor is located in the center of the
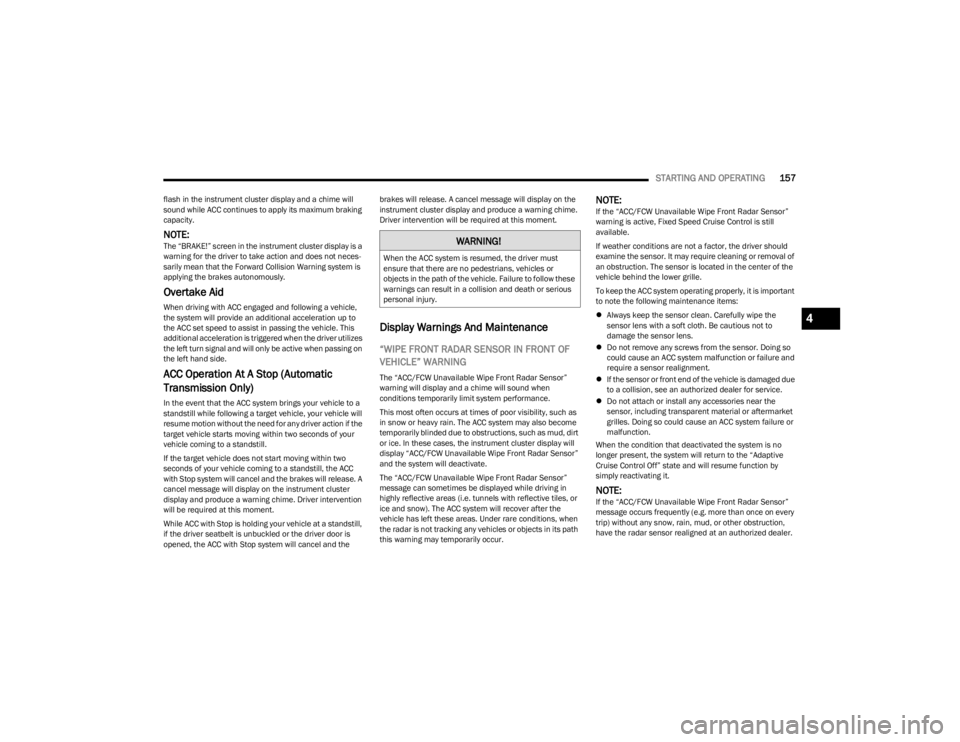
vehicle behind the lower grille.
To keep the ACC system operating properly, it is important
to note the following maintenance items:
Always keep the sensor clean. Carefully wipe the
sensor lens with a soft cloth. Be cautious not to
damage the sensor lens.
Do not remove any screws from the sensor. Doing so
could cause an ACC system malfunction or failure and
require a sensor realignment.
If the sensor or front end of the vehicle is damaged due
to a collision, see an authorized dealer for service.
Do not attach or install any accessories near the
sensor, including transparent material or aftermarket
grilles. Doing so could cause an ACC system failure or
malfunction.
When the condition that deactivated the system is no
longer present, the system will return to the “Adaptive
Cruise Control Off” state and will resume function by
simply reactivating it.
NOTE:If the “ACC/FCW Unavailable Wipe Front Radar Sensor”
message occurs frequently (e.g. more than once on every
trip) without any snow, rain, mud, or other obstruction,
have the radar sensor realigned at an authorized dealer.
WARNING!
When the ACC system is resumed, the driver must
ensure that there are no pedestrians, vehicles or
objects in the path of the vehicle. Failure to follow these
warnings can result in a collision and death or serious
personal injury.
4
23_JL_OM_EN_USC_t.book Page 157
Page 161 of 396
STARTING AND OPERATING159
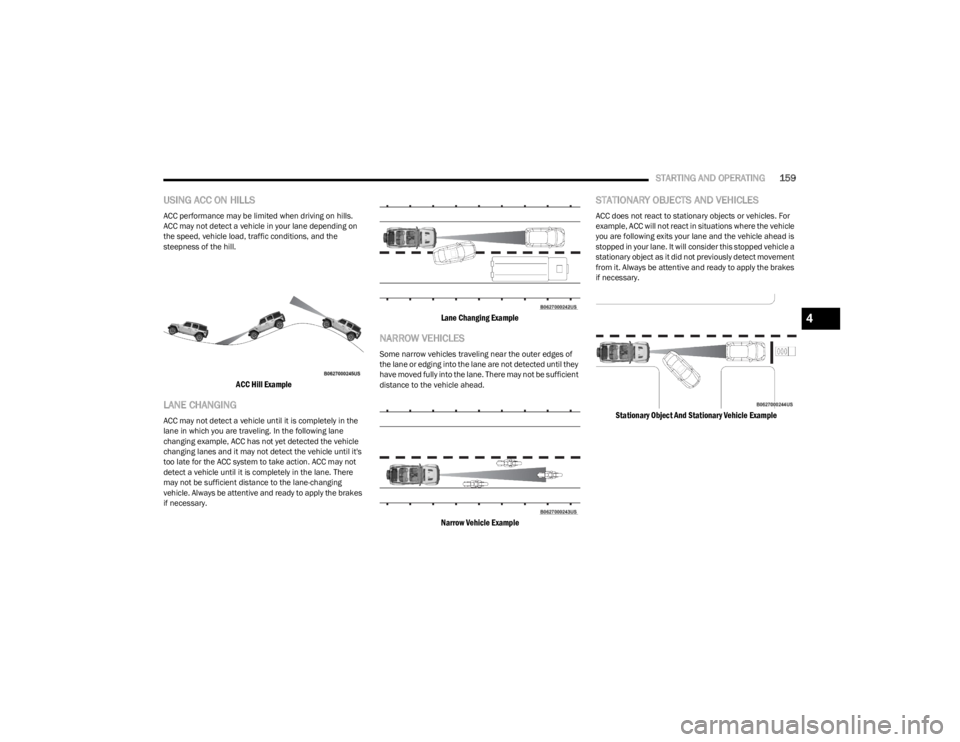
USING ACC ON HILLS
ACC performance may be limited when driving on hills.
ACC may not detect a vehicle in your lane depending on
the speed, vehicle load, traffic conditions, and the
steepness of the hill.
ACC Hill Example
LANE CHANGING
ACC may not detect a vehicle until it is completely in the
lane in which you are traveling. In the following lane
changing example, ACC has not yet detected the vehicle
changing lanes and it may not detect the vehicle until it's
too late for the ACC system to take action. ACC may not
detect a vehicle until it is completely in the lane. There
may not be sufficient distance to the lane-changing
vehicle. Always be attentive and ready to apply the brakes
if necessary.
Lane Changing Example
NARROW VEHICLES
Some narrow vehicles traveling near the outer edges of
the lane or edging into the lane are not detected until they
have moved fully into the lane. There may not be sufficient
distance to the vehicle ahead.
Narrow Vehicle Example
STATIONARY OBJECTS AND VEHICLES
ACC does not react to stationary objects or vehicles. For
example, ACC will not react in situations where the vehicle
you are following exits your lane and the vehicle ahead is
stopped in your lane. It will consider this stopped vehicle a
stationary object as it did not previously detect movement
from it. Always be attentive and ready to apply the brakes
if necessary.
Stationary Object And Stationary Vehicle Example
4
23_JL_OM_EN_USC_t.book Page 159
Page 172 of 396

170STARTING AND OPERATING
Payload
The payload of a vehicle is defined as the allowable load
weight a truck can carry, including the weight of the driver,
all passengers, options and cargo.
Gross Axle Weight Rating (GAWR)
The GAWR is the maximum permissible load on the front
and rear axles. The load must be distributed in the cargo
area so that the GAWR of each axle is not exceeded.
Each axle GAWR is determined by the components in the
system with the lowest load carrying capacity (axle,
springs, tires or wheels). Heavier axles or suspension
components sometimes specified by purchasers for
increased durability do not necessarily increase the
vehicle's GVWR.
Tire Size
The tire size on the Vehicle Certification Label represents
the actual tire size on your vehicle. Replacement tires
must be equal to the load capacity of this tire size.
Rim Size
This is the rim size that is appropriate for the tire size
listed.
Inflation Pressure
This is the cold tire inflation pressure for your vehicle for
all loading conditions up to full GAWR.
Curb Weight
The curb weight of a vehicle is defined as the total weight
of the vehicle with all fluids, including vehicle fuel, at full
capacity conditions, and with no occupants or cargo
loaded into the vehicle. The front and rear curb weight values are determined by weighing your vehicle on a
commercial scale before any occupants or cargo are
added.
Loading
The actual total weight and the weight of the front and rear
of your vehicle at the ground can best be determined by
weighing it when it is loaded and ready for operation.
The entire vehicle should first be weighed on a commercial
scale to ensure that the GVWR has not been exceeded.
The weight on the front and rear of the vehicle should then
be determined separately to be sure that the load is
properly distributed over the front and rear axle. Weighing
the vehicle may show that the GAWR of either the front or
rear axles has been exceeded but the total load is within
the specified GVWR. If so, weight must be shifted from
front to rear or rear to front as appropriate until the
specified weight limitations are met. Store the heavier
items down low and be sure that the weight is distributed
equally. Stow all loose items securely before driving.
Improper weight distributions can have an adverse effect
on the way your vehicle steers and handles and the way
the brakes operate.
TRAILER TOWING
In this section you will find safety tips and information on
limits to the type of towing you can reasonably do with your
vehicle. Before towing a trailer, carefully review this
information to tow your load as efficiently and safely as
possible.
To maintain the New Vehicle Limited Warranty coverage,
follow the requirements and recommendations in this
manual concerning vehicles used for trailer towing.
COMMON TOWING DEFINITIONS
The following trailer towing related definitions will assist
you in understanding the following information:
Gross Vehicle Weight Rating (GVWR)
The GVWR is the total allowable weight of your vehicle.
This includes driver, passengers, cargo and tongue
weight. The total load must be limited so that you do not
exceed the GVWR
Úpage 169.
Gross Trailer Weight (GTW)
The GTW is the weight of the trailer plus the weight of all
cargo, consumables and equipment (permanent or
temporary) loaded in or on the trailer in its "loaded and
ready for operation" condition.
The recommended way to measure GTW is to put your fully
loaded trailer on a vehicle scale. The entire weight of the
trailer must be supported by the scale.
WARNING!
Do not load your vehicle any heavier than the GVWR or
the maximum front and rear GAWR. If you do, parts on
your vehicle can break, or it can change the way your
vehicle handles. This could cause you to lose control.
Overloading can shorten the life of your vehicle.
23_JL_OM_EN_USC_t.book Page 170
Page 175 of 396
STARTING AND OPERATING173
(Continued)
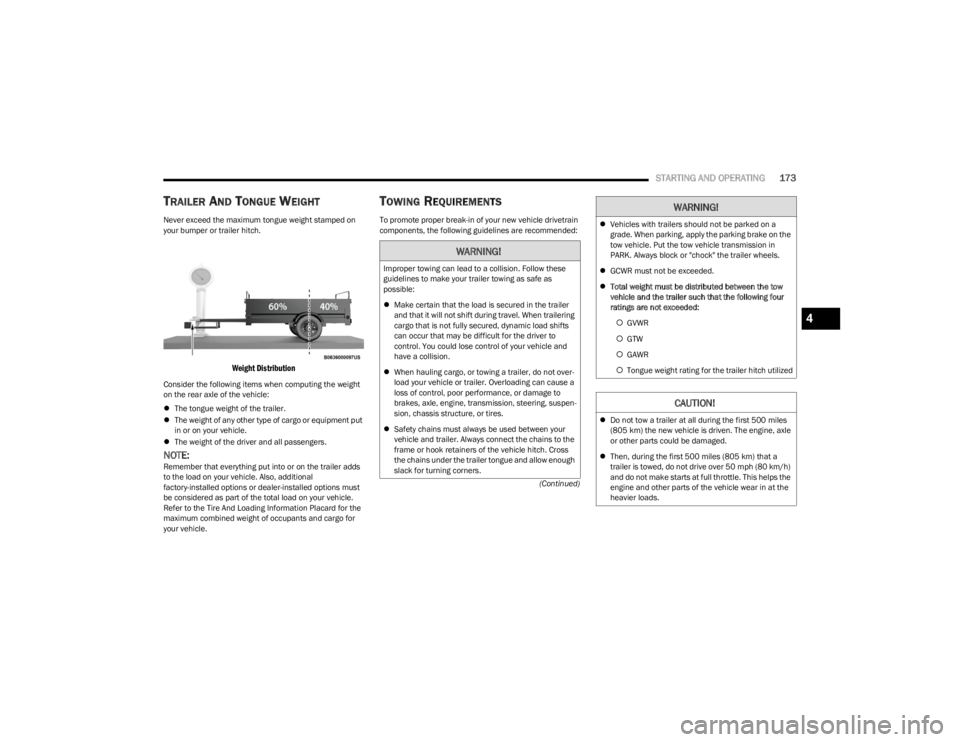
TRAILER AND TONGUE WEIGHT
Never exceed the maximum tongue weight stamped on
your bumper or trailer hitch.
Weight Distribution
Consider the following items when computing the weight
on the rear axle of the vehicle:
The tongue weight of the trailer.
The weight of any other type of cargo or equipment put
in or on your vehicle.
The weight of the driver and all passengers.
NOTE:Remember that everything put into or on the trailer adds
to the load on your vehicle. Also, additional
factory-installed options or dealer-installed options must
be considered as part of the total load on your vehicle.
Refer to the Tire And Loading Information Placard for the
maximum combined weight of occupants and cargo for
your vehicle.
TOWING REQUIREMENTS
To promote proper break-in of your new vehicle drivetrain
components, the following guidelines are recommended:
WARNING!
Improper towing can lead to a collision. Follow these
guidelines to make your trailer towing as safe as
possible:
Make certain that the load is secured in the trailer
and that it will not shift during travel. When trailering
cargo that is not fully secured, dynamic load shifts
can occur that may be difficult for the driver to
control. You could lose control of your vehicle and
have a collision.
When hauling cargo, or towing a trailer, do not over -
load your vehicle or trailer. Overloading can cause a
loss of control, poor performance, or damage to
brakes, axle, engine, transmission, steering, suspen -
sion, chassis structure, or tires.
Safety chains must always be used between your
vehicle and trailer. Always connect the chains to the
frame or hook retainers of the vehicle hitch. Cross
the chains under the trailer tongue and allow enough
slack for turning corners.
Vehicles with trailers should not be parked on a
grade. When parking, apply the parking brake on the
tow vehicle. Put the tow vehicle transmission in
PARK. Always block or "chock" the trailer wheels.
GCWR must not be exceeded.
Total weight must be distributed between the tow
vehicle and the trailer such that the following four
ratings are not exceeded:
GVWR
GTW
GAWR
Tongue weight rating for the trailer hitch utilized
CAUTION!
Do not tow a trailer at all during the first 500 miles
(805 km) the new vehicle is driven. The engine, axle
or other parts could be damaged.
Then, during the first 500 miles (805 km) that a
trailer is towed, do not drive over 50 mph (80 km/h)
and do not make starts at full throttle. This helps the
engine and other parts of the vehicle wear in at the
heavier loads.
WARNING!
4
23_JL_OM_EN_USC_t.book Page 173