flush and replace JEEP WRANGLER 2023 Owners Manual
[x] Cancel search | Manufacturer: JEEP, Model Year: 2023, Model line: WRANGLER, Model: JEEP WRANGLER 2023Pages: 396, PDF Size: 25.15 MB
Page 91 of 396
GETTING TO KNOW YOUR VEHICLE89
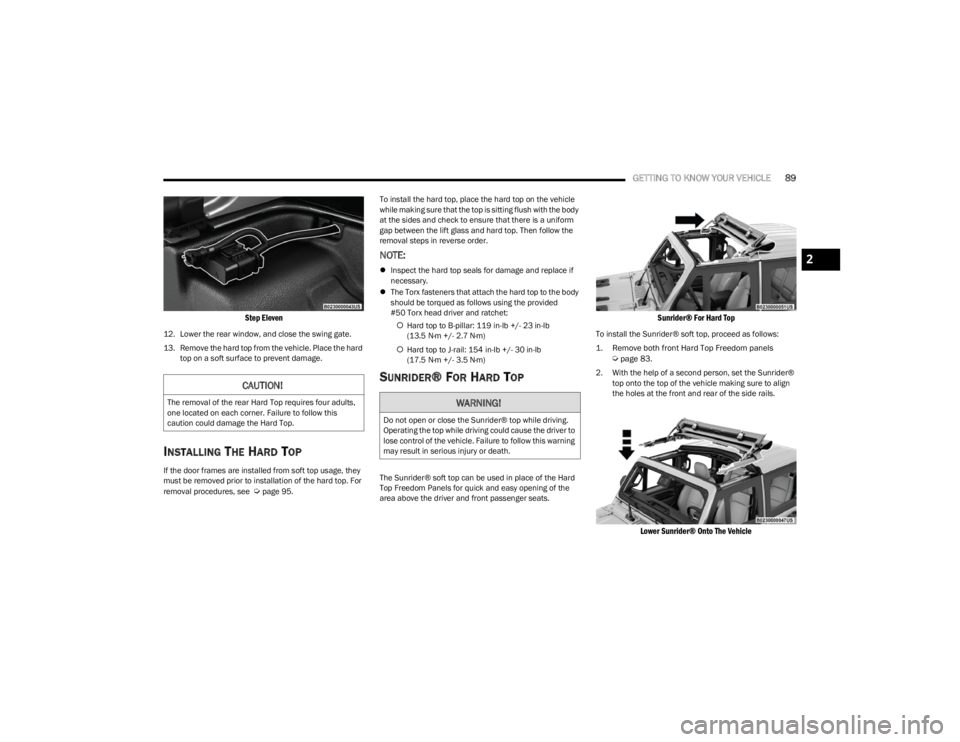
Step Eleven
12. Lower the rear window, and close the swing gate.
13. Remove the hard top from the vehicle. Place the hard
top on a soft surface to prevent damage.
INSTALLING THE HARD TOP
If the door frames are installed from soft top usage, they
must be removed prior to installation of the hard top. For
removal procedures, see
Úpage 95. To install the hard top, place the hard top on the vehicle
while making sure that the top is sitting flush with the body
at the sides and check to ensure that there is a uniform
gap between the lift glass and hard top. Then follow the
removal steps in reverse order.
NOTE:
Inspect the hard top seals for damage and replace if
necessary.
The Torx fasteners that attach the hard top to the body
should be torqued as follows using the provided
#50 Torx head driver and ratchet:
Hard top to B-pillar: 119 in-lb +/- 23 in-lb
(13.5 N·m +/- 2.7 N·m)
Hard top to J-rail: 154 in-lb +/- 30 in-lb
(17.5 N·m +/- 3.5 N·m)
SUNRIDER® FOR HARD TOP
The Sunrider® soft top can be used in place of the Hard
Top Freedom Panels for quick and easy opening of the
area above the driver and front passenger seats.
Sunrider® For Hard Top
To install the Sunrider® soft top, proceed as follows:
1. Remove both front Hard Top Freedom panels
Ú
page 83.
2. With the help of a second person, set the Sunrider® top onto the top of the vehicle making sure to align
the holes at the front and rear of the side rails.
Lower Sunrider® Onto The Vehicle
CAUTION!
The removal of the rear Hard Top requires four adults,
one located on each corner. Failure to follow this
caution could damage the Hard Top.WARNING!
Do not open or close the Sunrider® top while driving.
Operating the top while driving could cause the driver to
lose control of the vehicle. Failure to follow this warning
may result in serious injury or death.
2
23_JL_OM_EN_USC_t.book Page 89
Page 310 of 396
308SERVICING AND MAINTENANCE
Mileage Or Time Passed (Whichever Comes
First):
20,000
30,000
40,000
50,000
60,000
70,000
80,000
90,000
100,000
110,000
120,000
130,000
140,000
150,000
Or Years: 2 3 4 5 6 7 8 9 10 11 12 13 14 15
Or Kilometers:
32,000
48,000
64,000
80,000
96,000
112,000
128,000
144,000
160,000
176,000
192,000
208,000
224,000
240,000
Additional Inspections
Inspect the CV/Universal joints. X X X X X X X X X X X X X X
Inspect front suspension, tie rod ends, rear suspension,
and replace if necessary. X
XXXXXX
Inspect the front and rear axle fluid. XXXX
Inspect the brake linings, replace as necessary. XXXXXXX
Adjust parking brake on vehicles equipped with four
wheel disc brakes. X
XXXXXX
Inspect transfer case fluid. XXX
Additional Maintenance
Replace engine air cleaner filter. XXXXX
Replace cabin air filter. To be replaced every 12,000 miles (19,000 km).
Replace Spark Plugs – 2.0L Engine.
1X X
Replace spark plugs – 3.6L Engine.
1X
Flush and replace the engine, intercooler
(if equipped) coolant at 10 years or
150,000 miles (240,000 km) whichever comes first. X
X
23_JL_OM_EN_USC_t.book Page 308
Page 315 of 396
SERVICING AND MAINTENANCE313
ADDITIONAL MAINTENANCE — B6 TO B20 BIODIESEL
NOTE:
Under no circumstances should oil change intervals exceed 8,000 miles (12,875 km) or six months, whichever comes first when using biodiesel blends greater than 5% (B5).
The owner is required to monitor mileage for B6-B20 biodiesel, the automatic oil change indicator system does not reflect the use of biofuels.
Fuel filter change interval is maintained at every second oil change. This is especially important with biodiesel usage.
For more information on using biodiesel
Úpage 371.
Flush and replace the engine coolant at 10 years or 150,000 miles
(240,000 km) whichever comes first.
X
X
Replace accessory drive belt(s). X
Change transfer case fluid. X
Mileage Or Time Passed (Whichever Comes First)
10,000
20,000
30,000
40,000
50,000
60,000
70,000
80,000
90,000
100,000
110,000
120,000
130,000
140,000
150,000
Or Years: 1 2 3 4 5 6 7 8 9 10 11 12 13 14 15
Or Kilometers:
16,000
32,000
48,000
64,000
80,000
96,000
112,000
128,000
144,000
160,000
176,000
192,000
208,000
224,000
240,000
WARNING!
You can be badly injured working on or around a motor vehicle. Do only service work for which you have the knowledge and the right equipment. If you have any doubt about your
ability to perform a service job, take your vehicle to a competent mechanic.
Failure to properly inspect and maintain your vehicle could result in a component malfunction and affect vehicle handling and performance. This could cause an accident.
8
23_JL_OM_EN_USC_t.book Page 313
Page 326 of 396
324SERVICING AND MAINTENANCE
reacts with engine exhaust in the presence of a catalyst to
convert smog-forming Nitrogen Oxides (NOx) into
harmless nitrogen and water vapor.
For further information
Úpage 374.
ACCESSORY DRIVE BELT INSPECTION
When inspecting accessory drive belts, small cracks that
run across the ribbed surface of the belt, from rib to rib,
are considered normal. These are not a reason to replace
a belt. However, cracks running along a rib (not across) are
not normal. Any belt with cracks running along a rib must
be replaced. Also have the belt replaced if it has excessive
wear, frayed cords, or severe glazing.
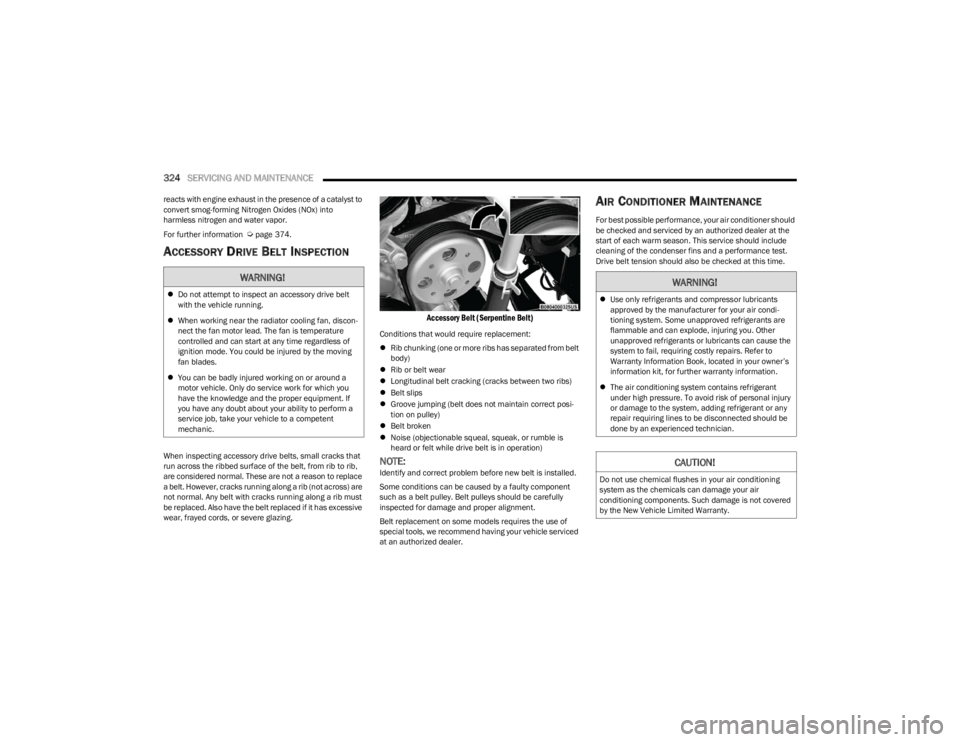
Accessory Belt (Serpentine Belt)
Conditions that would require replacement:
Rib chunking (one or more ribs has separated from belt
body)
Rib or belt wear
Longitudinal belt cracking (cracks between two ribs)
Belt slips
Groove jumping (belt does not maintain correct posi -
tion on pulley)
Belt broken
Noise (objectionable squeal, squeak, or rumble is
heard or felt while drive belt is in operation)
NOTE:Identify and correct problem before new belt is installed.
Some conditions can be caused by a faulty component
such as a belt pulley. Belt pulleys should be carefully
inspected for damage and proper alignment.
Belt replacement on some models requires the use of
special tools, we recommend having your vehicle serviced
at an authorized dealer.
AIR CONDITIONER MAINTENANCE
For best possible performance, your air conditioner should
be checked and serviced by an authorized dealer at the
start of each warm season. This service should include
cleaning of the condenser fins and a performance test.
Drive belt tension should also be checked at this time.
WARNING!
Do not attempt to inspect an accessory drive belt
with the vehicle running.
When working near the radiator cooling fan, discon -
nect the fan motor lead. The fan is temperature
controlled and can start at any time regardless of
ignition mode. You could be injured by the moving
fan blades.
You can be badly injured working on or around a
motor vehicle. Only do service work for which you
have the knowledge and the proper equipment. If
you have any doubt about your ability to perform a
service job, take your vehicle to a competent
mechanic.WARNING!
Use only refrigerants and compressor lubricants
approved by the manufacturer for your air condi -
tioning system. Some unapproved refrigerants are
flammable and can explode, injuring you. Other
unapproved refrigerants or lubricants can cause the
system to fail, requiring costly repairs. Refer to
Warranty Information Book, located in your owner’s
information kit, for further warranty information.
The air conditioning system contains refrigerant
under high pressure. To avoid risk of personal injury
or damage to the system, adding refrigerant or any
repair requiring lines to be disconnected should be
done by an experienced technician.
CAUTION!
Do not use chemical flushes in your air conditioning
system as the chemicals can damage your air
conditioning components. Such damage is not covered
by the New Vehicle Limited Warranty.
23_JL_OM_EN_USC_t.book Page 324
Page 331 of 396
SERVICING AND MAINTENANCE329
Coolant Checks
Check the engine, battery (if equipped), intercooler (if
equipped), and Motor Generator Unit (MGU) (if equipped)
coolant (antifreeze) protection every 12 months (before
the onset of freezing weather, where applicable). If the
engine, battery (if equipped), intercooler (if equipped), and
MGU (if equipped) coolant is dirty or rusty in appearance,
the system should be drained, flushed and refilled with
fresh OAT coolant (conforming to MS.90032) by an
authorized dealer. Check the front of the A/C condenser (if
equipped) or radiator for any accumulation of bugs,
leaves, etc. If dirty, clean by gently spraying water from a
garden hose vertically down the face of the A/C condenser
(if equipped) or the back of the radiator core.
Check the engine, battery (if equipped), intercooler (if
equipped), and MGU (if equipped) cooling system hoses
for brittle rubber, cracking, tears, cuts, and tightness of
the connection at the coolant recovery bottle and radiator.
Inspect the entire system for leaks. DO NOT REMOVE THE
COOLANT PRESSURE CAP WHEN THE COOLING SYSTEM IS
HOT.
Cooling System — Drain, Flush And Refill
NOTE:Some vehicles require special tools to add coolant
properly. Failure to fill these systems properly could lead to severe internal engine damage. If any coolant is needed
to be added to the system please contact an authorized
dealer.
If the engine coolant (antifreeze) is dirty or contains visible
sediment, have an authorized dealer clean and flush with
OAT coolant (conforming to MS.90032).
For the proper maintenance intervals, see
Úpage 307 for
gasoline engines or Úpage 311 for diesel engines.
Selection Of Coolant
For further information Úpage 374.
NOTE:
Mixing of engine coolant (antifreeze) other than speci-
fied Organic Additive Technology (OAT) engine coolant,
may result in engine damage and may decrease corro -
sion protection. OAT engine coolant is different and
should not be mixed with Hybrid Organic Additive Tech -
nology (HOAT) engine coolant or any “globally compat -
ible” coolant. If a non-OAT engine coolant is introduced
into the cooling system in an emergency, the cooling
system will need to be drained, flushed, and refilled
with fresh OAT coolant (conforming to MS.90032), by
an authorized dealer as soon as possible.
Do not use water alone or alcohol-based engine
coolant (antifreeze) products. Do not use additional
rust inhibitors or anti-rust products, as they may not be
compatible with the radiator engine coolant and may
plug the radiator.
This vehicle has not been designed for use with
propylene glycol-based engine coolant. Use of
propylene glycol-based engine coolant is not recom -
mended.
Some vehicles require special tools to add coolant
properly. Failure to fill these systems properly could
lead to severe internal engine damage. If any coolant is
needed to be added to the system please contact an
authorized dealer.
Adding Coolant
Your vehicle has been built with an improved engine coolant
(OAT coolant conforming to MS.90032) that allows
extended maintenance intervals. This engine coolant
(antifreeze) can be used up to 10 years or 150,000 miles
(240,000 km) before replacement. To prevent reducing this
extended maintenance period, it is important to use the
same engine coolant (OAT coolant conforming to
MS.90032) throughout the life of your vehicle.
Please review these recommendations for using Organic
Additive Technology (OAT) engine coolant that meets the
requirements of the manufacturer Material Standard
MS.90032. When adding engine coolant (antifreeze):
We recommend using Mopar® Antifreeze/Coolant
10 Year/150,000 Mile (240,000 km) Formula OAT
(Organic Additive Technology) that meets the require -
ments of the manufacturer Material Standard
MS.90032.
Mix a minimum solution of 50% OAT engine coolant
that meets the requirements of the manufacturer
Material Standard MS.90032 and distilled water. Use
higher concentrations (not to exceed 70%) if tempera -
tures below −34°F (−37°C) are anticipated. Please
contact an authorized dealer for assistance.
Use only high purity water such as distilled or deionized
water when mixing the water/engine coolant solution.
The use of lower quality water will reduce the amount
of corrosion protection in the engine cooling system.
When working near the radiator cooling fan, discon -
nect the fan motor lead or turn the ignition to the OFF
mode. The fan is temperature controlled and can
start at any time the ignition is in the ON mode.
WARNING!
8
23_JL_OM_EN_USC_t.book Page 329
Page 335 of 396
SERVICING AND MAINTENANCE333
(Continued)
AUTOMATIC TRANSMISSION —
I
F EQUIPPED
Special Additives
It is strongly recommended against using any special
additives in the transmission. Automatic Transmission
Fluid (ATF) is an engineered product and its performance
may be impaired by supplemental additives. Therefore, do
not add any fluid additives to the transmission. Avoid
using transmission sealers as they may adversely affect
seals.
Fluid Level Check
The fluid level is preset at the factory and does not require
adjustment under normal operating conditions. Routine
fluid level checks are not required; therefore the
transmission has no dipstick. An authorized dealer can
check your transmission fluid level using special service
tools. If you notice fluid leakage or transmission
malfunction, visit an authorized dealer immediately to
have the transmission fluid level checked. Operating the
vehicle with an improper fluid level can cause severe
transmission damage.
Fluid And Filter Changes
Under normal operating conditions, the fluid installed at
the factory will provide satisfactory lubrication for the life
of the vehicle.
Routine fluid and filter changes are not required. However,
change the fluid and filter if the fluid becomes
contaminated (with water, etc.), or if the transmission is
disassembled for any reason.
Selection Of Lubricant
It is important to use the proper transmission fluid to
ensure optimum transmission performance and life. Use
only the manufacturer specified transmission fluid
Úpage 376. It is important to maintain the transmission
fluid at the correct level using the recommended fluid.
NOTE:No chemical flushes should be used in any transmission;
only the approved lubricant should be used.
FUSES
General Information
CAUTION!
Do not use chemical flushes in your transmission as the
chemicals can damage your transmission components.
Such damage is not covered by the New Vehicle Limited
Warranty.
CAUTION!
If a transmission fluid leak occurs, visit an authorized
dealer immediately. Severe transmission damage may
occur. An authorized dealer has the proper tools to
adjust the fluid level accurately.
CAUTION!
Using a transmission fluid other than the manufacturer
recommended fluid may cause deterioration in
transmission shift quality and/or torque converter
shudder
Úpage 376.
WARNING!
When replacing a blown fuse, always use an appro -
priate replacement fuse with the same amp rating as
the original fuse. Never replace a fuse with another
fuse of higher amp rating. The use of a fuse with a
rating other than indicated may result in a dangerous
electrical system overload. If a properly rated fuse
continues to blow, it indicates a problem in the circuit
that must be corrected. Never replace a blown fuse
with metal wires or any other material. Failure to use
proper fuses may result in serious personal injury,
fire and/or property damage.
Before replacing a fuse, make sure that the ignition
is off and that all the other services are switched off
and/or disengaged.
If the replaced fuse blows again, contact an autho -
rized dealer.
8
23_JL_OM_EN_USC_t.book Page 333
Page 385 of 396
383
Bulb Replacement .............................................. 342, 343
Bulbs, Light.......................................................... 290, 342
Bumper End Cap Removal .......................................... 178
CCamera, Rear ............................................................... 163
Capacities, Fluid ........................................................... 373
Caps, Filler Fuel .......................................................................... 165
Oil (Engine) .............................................................. 314
Radiator (Coolant Pressure)................................... 330
Car Washes .................................................................. 361
Carbon Monoxide Warning .......................................... 290
Cargo Load Floor .......................................................... 102
Cargo Tie-Downs .......................................................... 102
Carpeting ...................................................................... 363
CD.................................................................................. 210
Cellular Phone .............................................................. 240
Center High Mounted Stop Light................................. 345
Certification Label ........................................................ 169
Chains, Tire................................................................... 357
Chart, Tire Sizing .......................................................... 346
Check Engine Light (Malfunction Indicator Light) ...... 125
Checking Your Vehicle For Safety ............................... 288
Checks, Safety.............................................................. 288
Child Restraint.............................................................. 277
Child Restraints Booster Seats.......................................................... 279
Child Seat Installation ............................................ 286
How To Stow An unused ALR Seat Belt ................. 284
Infant And Child Restraints .................................... 278Locating The LATCH Anchorages ........................... 282Lower Anchors And Tethers For Children .............. 280 Older Children And Child Restraints....................... 278
Seating Positions ..................................................... 280
Clean Air Gasoline ........................................................ 369
Cleaning Wheels .....................................................................356
Climate Control Automatic ................................................................... 54
Manual ....................................................................... 57
Cold Weather Operation ............................................... 128
Compact Spare Tire ...................................................... 355
Connected Services ................ 225
, 226, 227, 228, 237
Connector UCI .............................................................................. 61
Universal Consumer Interface (UCI) ......................... 61
Console............................................................................ 60 Floor ........................................................................... 60
Contract, Service .......................................................... 379
Controls ......................................................................... 201
Cooling Pressure Cap (Radiator Cap) ..........................330
Cooling System ............................................................. 328 Adding Coolant (Antifreeze) ....................................329
Coolant Level ...........................................................330
Cooling Capacity ...................................................... 373
Disposal Of Used Coolant ....................................... 330Drain, Flush, And Refill............................................329
Inspection ...................................................... 329
, 330
Points To Remember............................................... 331
Pressure Cap ...........................................................330
Radiator Cap ............................................................330 Selection Of Coolant (Antifreeze) ........ 329
, 373, 374
Corrosion Protection ..................................................... 360
Cruise Control (Speed Control) .......................... 151
, 152
Cruise Light ......................................................... 123, 124 Customer Assistance ................................................... 377
Customer Programmable Features ............................. 184
Cybersecurity ................................................................ 184
DDaytime Running Lights ................................................. 51
Dealer Service .............................................................. 318
Defroster, Windshield .................................................. 289
Delay (Intermittent) Wipers............................................ 53
Deleting A Phone .......................................................... 216
Diagnostic System, Onboard ....................................... 124
Diesel Display Messages ................................................... 115
Diesel Fuel .................................................................... 371
Diesel Fuel Requirements ........................................... 371 Bulk Storage Of ....................................................... 167
Diesel Fuel System, Re-Priming .................................. 323
Dimmer Switch Headlight ................................................................... 51
Dipsticks Oil (Engine) .............................................................. 317
Disable Vehicle Towing ................................................ 303
Disc Drive ...................................................................... 210
Disconnecting ............................................................... 216
Disposal Antifreeze (Engine Coolant) .................................... 330
Disturb........................................................................... 219
Door Ajar .............................................................. 117
, 119
Door Ajar Light ..................................................... 117, 119
Door Frame ..................................................................... 95 Installation ................................................................. 95
Removal..................................................................... 95
11
23_JL_OM_EN_USC_t.book Page 383