oil reset JEEP WRANGLER 2DOORS 2019 Owner handbook (in English)
[x] Cancel search | Manufacturer: JEEP, Model Year: 2019, Model line: WRANGLER 2DOORS, Model: JEEP WRANGLER 2DOORS 2019Pages: 348, PDF Size: 6.5 MB
Page 65 of 348

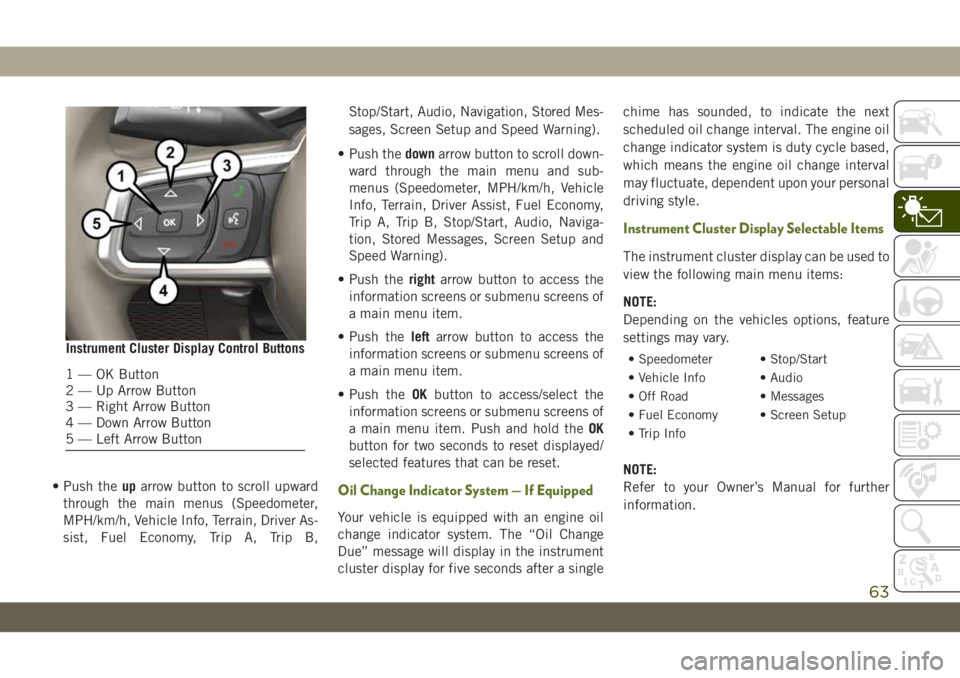
• Push theuparrow button to scroll upward
through the main menus (Speedometer,
MPH/km/h, Vehicle Info, Terrain, Driver As-
sist, Fuel Economy, Trip A, Trip B,Stop/Start, Audio, Navigation, Stored Mes-
sages, Screen Setup and Speed Warning).
• Push thedownarrow button to scroll down-
ward through the main menu and sub-
menus (Speedometer, MPH/km/h, Vehicle
Info, Terrain, Driver Assist, Fuel Economy,
Trip A, Trip B, Stop/Start, Audio, Naviga-
tion, Stored Messages, Screen Setup and
Speed Warning).
• Push therightarrow button to access the
information screens or submenu screens of
a main menu item.
• Push theleftarrow button to access the
information screens or submenu screens of
a main menu item.
• Push theOKbutton to access/select the
information screens or submenu screens of
a main menu item. Push and hold theOK
button for two seconds to reset displayed/
selected features that can be reset.Oil Change Indicator System — If Equipped
Your vehicle is equipped with an engine oil
change indicator system. The “Oil Change
Due” message will display in the instrument
cluster display for five seconds after a singlechime has sounded, to indicate the next
scheduled oil change interval. The engine oil
change indicator system is duty cycle based,
which means the engine oil change interval
may fluctuate, dependent upon your personal
driving style.
Instrument Cluster Display Selectable Items
The instrument cluster display can be used to
view the following main menu items:
NOTE:
Depending on the vehicles options, feature
settings may vary.
• Speedometer • Stop/Start
• Vehicle Info • Audio
• Off Road • Messages
• Fuel Economy • Screen Setup
• Trip Info
NOTE:
Refer to your Owner’s Manual for further
information.
Instrument Cluster Display Control Buttons
1 — OK Button
2 — Up Arrow Button
3 — Right Arrow Button
4 — Down Arrow Button
5 — Left Arrow Button
63
Page 211 of 348

Your authorized dealer will reset the oil
change indicator message after completing
the scheduled oil change.
Once A Month Or Before A Long Trip
• Check the engine oil level about five min-
utes after a fully warmed engine is shut off.
Checking the oil level while the vehicle is
on level ground will improve the accuracy of
the oil level reading. Add oil only when the
level is at or below the ADD or MIN mark.
• Check the windshield washer solvent and
add if required.
• Check tire pressure and look for unusual
wear or damage. Rotate tires at the first
sign of irregular wear, even if it occurs
before the oil indicator system turns on.• Inspect the battery and clean and tighten
the terminals as required.
• Check the fluid levels of coolant reservoir,
brake master cylinder and power steering
and fill as needed.
• Check all lights and other electrical items
for correct operation.
At Each Oil Change
• Change the engine oil filter.
• Inspect the brake hoses and lines.
CAUTION!
Failure to perform the required mainte-
nance items may result in damage to the
vehicle.Required Maintenance Intervals
Refer to the Maintenance Plan on the follow-
ing pages for the required maintenance inter-
vals.
Maintenance Plan
NOTE:
Once you have carried out the last interven-
tion in the table, continue with the scheduled
servicing, maintaining the frequency indi-
cated in the plan by marking each operation
with a dot or dedicated note. Simply restart-
ing the maintenance from the start of the
plan may cause the allowed interval to be
exceeded for some operations.
209
Page 227 of 348

light is on. If necessary, add fluid to bring
level within the designated marks on the side
of the reservoir of the brake master cylinder.
Be sure to clean the top of the master cylin-
der area before removing cap. With disc
brakes, fluid level can be expected to fall as
the brake pads wear. Brake fluid level should
be checked when pads are replaced. If the
brake fluid is abnormally low, check the sys-
tem for leaks.
Refer to “Fluids And Lubricants” in “Techni-
cal Specifications” for further information.
WARNING!
• Brake fluid is poisonous and highly cor-
rosive. In the event of accidental con-
tact, immediately wash the affected
parts with water and neutral soap. Then
rinse thoroughly. Call a doctor immedi-
ately if swallowed.
• Use only manufacturer's recommended
brake fluid. Refer to “Fluids And Lubri-
cants” in “Technical Specifications” for
further information. Using the wrong
type of brake fluid can severely damage
WARNING!
your brake system and/or impair its per-
formance. The proper type of brake fluid
for your vehicle is also identified on the
original factory installed hydraulic mas-
ter cylinder reservoir.
• To avoid contamination from foreign
matter or moisture, use only new brake
fluid or fluid that has been in a tightly
closed container. Keep the master cylin-
der reservoir cap secured at all times.
Brake fluid in a open container absorbs
moisture from the air resulting in a lower
boiling point. This may cause it to boil
unexpectedly during hard or prolonged
braking, resulting in sudden brake fail-
ure. This could result in a collision.
• Overfilling the brake fluid reservoir can
result in spilling brake fluid on hot en-
gine parts, causing the brake fluid to
catch fire. Brake fluid can also damage
painted and vinyl surfaces, care should
be taken to avoid its contact with these
surfaces.
• Do not allow petroleum based fluid to
contaminate the brake fluid. Brake seal
WARNING!
components could be damaged, causing
partial or complete brake failure. This
could result in a collision.
Automatic Transmission
Fluid Level Check
The fluid level is preset at the factory and
does not require adjustment under normal
operating conditions. Routine fluid level
checks are not required; therefore the trans-
mission has no dipstick. An authorized dealer
can check your transmission fluid level using
special service tools. If you notice fluid leak-
age or transmission malfunction, visit an au-
thorized dealer immediately to have the
transmission fluid level checked. Operating
the vehicle with an improper fluid level can
cause severe transmission damage.
CAUTION!
If a transmission fluid leak occurs, visit an
authorized dealer immediately. Severe
transmission damage may occur. An au-
225
Page 341 of 348

Low Tire Pressure System..........94
Lug Nuts...................246
Maintenance..................54
Maintenance Free Battery.........221
Maintenance Schedule.......208, 213
Malfunction Indicator Light (Check
Engine)...................71
Manual Park Release............200
Memory Feature (Memory Seats)......26
Memory Seat..................26
Memory Seats And Radio..........26
Mirrors.....................35
Heated...................35
Modifications/Alterations
Vehicle....................3
Monitor, Tire Pressure System.......94
Mopar Accessories.............262
Navigation..................292
New Vehicle Break-In Period.......146
Occupant Restraints.............99
Octane Rating, Gasoline (Fuel) . .252, 259
Oil, Engine..................259
Capacity.................257
Dipstick..................220Filter....................259
Pressure Warning Light.........69
Recommendation............257
Viscosity.................257
Oil Pressure Light...............69
Onboard Diagnostic System.........78
Operating Precautions............78
Operator Manual
Owner's Manual...............2
Overheating, Engine............199
Paddle Shifters...............149
ParkSense System, Rear..........163
Passenger Airbag Disable.........111
Passive Entry..................18
Personalized Main Menu......273, 279
Pets......................136
Phonebook..................304
Phone (Uconnect)..............297
Pairing
..................300
Placard, Tire And Loading Information .226
Power
Inverter...................59
Windows..................46
Power Sliding Top...............54
Operation..................54
Pinch Protect...............54Power Steering Fluid............261
Pregnant Women And Seat Belts.....106
Preparation For Jacking..........191
Pretensioners
Seat Belts................106
Radial Ply Tires...............232
Radio
Presets...........270, 274, 280
Radio Operation........268, 272, 278
Radio Screens.............272, 278
Raising.....................47
Raising The Soft Top.............47
Rear Camera.................165
Rear Cross Path................93
Rear ParkSense System..........163
Rear Swing Gate...............57
Rear Wiper/Washer..............38
Recreational Towing.............171
Shifting Into Transfer Case Neutral
(N) .....................172
Shifting Out Of Transfer Case Neutral
(N) .....................173
Release, Hood.................56
Reminder, Seat Belt............100
Remote Control
Starting System..............16
339