key JEEP WRANGLER UNLIMITED 2018 Owner handbook (in English)
[x] Cancel search | Manufacturer: JEEP, Model Year: 2018, Model line: WRANGLER UNLIMITED, Model: JEEP WRANGLER UNLIMITED 2018Pages: 348, PDF Size: 6.5 MB
Page 24 of 348
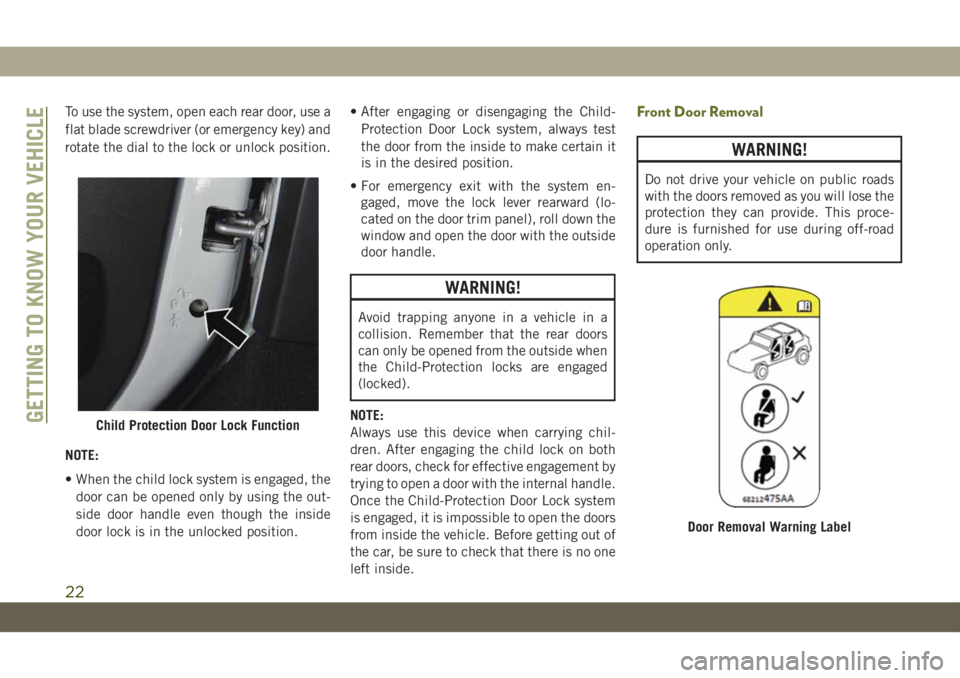
To use the system, open each rear door, use a
flat blade screwdriver (or emergency key) and
rotate the dial to the lock or unlock position.
NOTE:
• When the child lock system is engaged, the
door can be opened only by using the out-
side door handle even though the inside
door lock is in the unlocked position.• After engaging or disengaging the Child-
Protection Door Lock system, always test
the door from the inside to make certain it
is in the desired position.
• For emergency exit with the system en-
gaged, move the lock lever rearward (lo-
cated on the door trim panel), roll down the
window and open the door with the outside
door handle.
WARNING!
Avoid trapping anyone in a vehicle in a
collision. Remember that the rear doors
can only be opened from the outside when
the Child-Protection locks are engaged
(locked).
NOTE:
Always use this device when carrying chil-
dren. After engaging the child lock on both
rear doors, check for effective engagement by
trying to open a door with the internal handle.
Once the Child-Protection Door Lock system
is engaged, it is impossible to open the doors
from inside the vehicle. Before getting out of
the car, be sure to check that there is no one
left inside.
Front Door Removal
WARNING!
Do not drive your vehicle on public roads
with the doors removed as you will lose the
protection they can provide. This proce-
dure is furnished for use during off-road
operation only.
Child Protection Door Lock Function
Door Removal Warning Label
GETTING TO KNOW YOUR VEHICLE
22
Page 48 of 348
POWER WINDOWS — IF
EQUIPPED
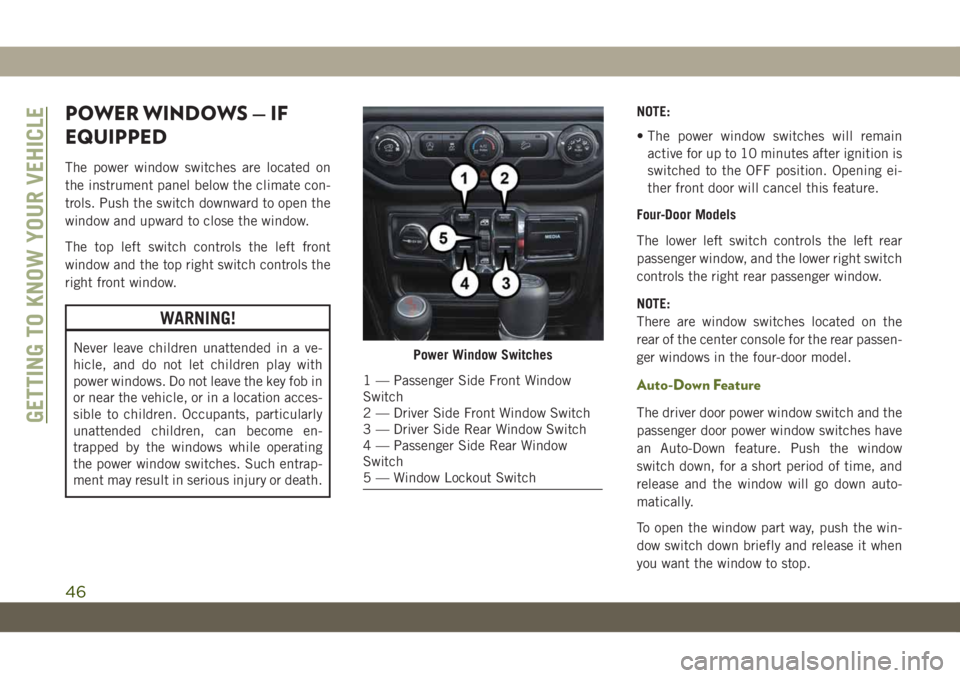
The power window switches are located on
the instrument panel below the climate con-
trols. Push the switch downward to open the
window and upward to close the window.
The top left switch controls the left front
window and the top right switch controls the
right front window.
WARNING!
Never leave children unattended in a ve-
hicle, and do not let children play with
power windows. Do not leave the key fob in
or near the vehicle, or in a location acces-
sible to children. Occupants, particularly
unattended children, can become en-
trapped by the windows while operating
the power window switches. Such entrap-
ment may result in serious injury or death.NOTE:
• The power window switches will remain
active for up to 10 minutes after ignition is
switched to the OFF position. Opening ei-
ther front door will cancel this feature.
Four-Door Models
The lower left switch controls the left rear
passenger window, and the lower right switch
controls the right rear passenger window.
NOTE:
There are window switches located on the
rear of the center console for the rear passen-
ger windows in the four-door model.
Auto-Down Feature
The driver door power window switch and the
passenger door power window switches have
an Auto-Down feature. Push the window
switch down, for a short period of time, and
release and the window will go down auto-
matically.
To open the window part way, push the win-
dow switch down briefly and release it when
you want the window to stop.
Power Window Switches
1 — Passenger Side Front Window
Switch
2 — Driver Side Front Window Switch
3 — Driver Side Rear Window Switch
4 — Passenger Side Rear Window
Switch
5 — Window Lockout Switch
GETTING TO KNOW YOUR VEHICLE
46
Page 57 of 348
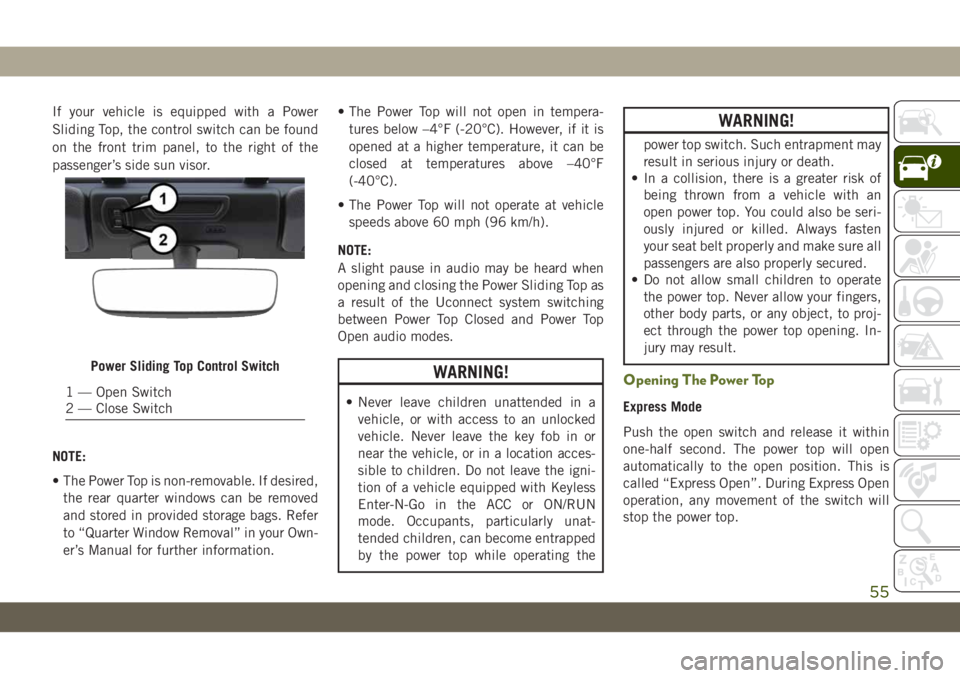
If your vehicle is equipped with a Power
Sliding Top, the control switch can be found
on the front trim panel, to the right of the
passenger’s side sun visor.
NOTE:
• The Power Top is non-removable. If desired,
the rear quarter windows can be removed
and stored in provided storage bags. Refer
to “Quarter Window Removal” in your Own-
er’s Manual for further information.• The Power Top will not open in tempera-
tures below –4°F (-20°C). However, if it is
opened at a higher temperature, it can be
closed at temperatures above –40°F
(-40°C).
• The Power Top will not operate at vehicle
speeds above 60 mph (96 km/h).
NOTE:
A slight pause in audio may be heard when
opening and closing the Power Sliding Top as
a result of the Uconnect system switching
between Power Top Closed and Power Top
Open audio modes.
WARNING!
• Never leave children unattended in a
vehicle, or with access to an unlocked
vehicle. Never leave the key fob in or
near the vehicle, or in a location acces-
sible to children. Do not leave the igni-
tion of a vehicle equipped with Keyless
Enter-N-Go in the ACC or ON/RUN
mode. Occupants, particularly unat-
tended children, can become entrapped
by the power top while operating the
WARNING!
power top switch. Such entrapment may
result in serious injury or death.
• In a collision, there is a greater risk of
being thrown from a vehicle with an
open power top. You could also be seri-
ously injured or killed. Always fasten
your seat belt properly and make sure all
passengers are also properly secured.
• Do not allow small children to operate
the power top. Never allow your fingers,
other body parts, or any object, to proj-
ect through the power top opening. In-
jury may result.
Opening The Power Top
Express Mode
Push the open switch and release it within
one-half second. The power top will open
automatically to the open position. This is
called “Express Open”. During Express Open
operation, any movement of the switch will
stop the power top.
Power Sliding Top Control Switch
1 — Open Switch
2 — Close Switch
55
Page 59 of 348
Closing The Hood
To close the hood, remove the support rod
from the hood panel and place it in the
retaining clip. Lower the hood slowly. Secure
both of the hood latches.
WARNING!
Be sure the hood is fully latched before
driving your vehicle. If the hood is not fully
latched, it could open when the vehicle is
in motion and block your vision. Failure to
follow this warning could result in serious
injury or death.
REAR SWING GATE
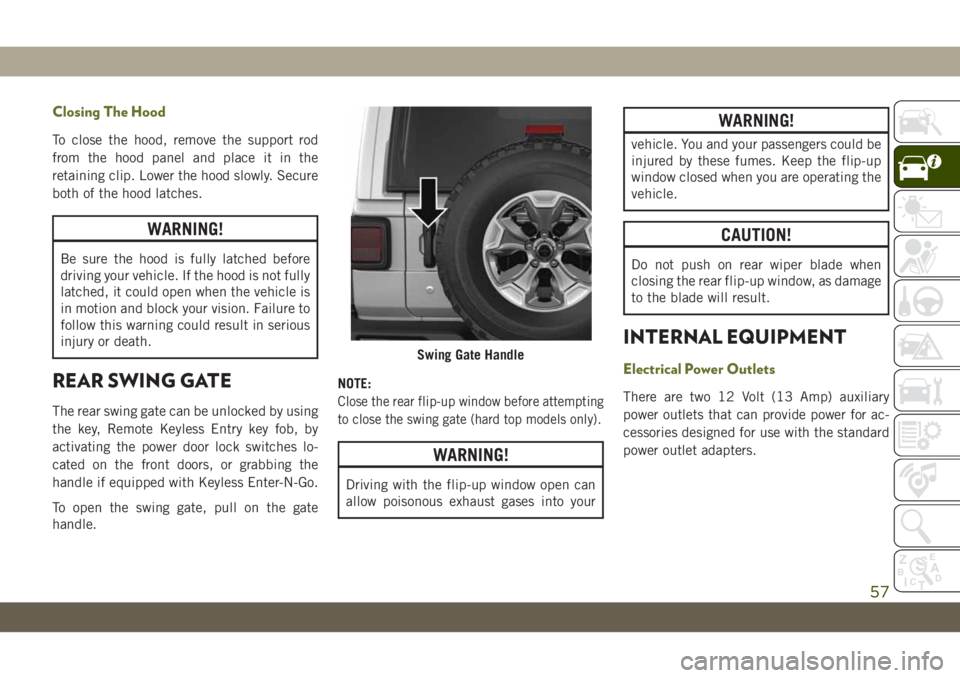
The rear swing gate can be unlocked by using
the key, Remote Keyless Entry key fob, by
activating the power door lock switches lo-
cated on the front doors, or grabbing the
handle if equipped with Keyless Enter-N-Go.
To open the swing gate, pull on the gate
handle.NOTE:Close the rear flip-up window before attempting
to close the swing gate (hard top models only).
WARNING!
Driving with the flip-up window open can
allow poisonous exhaust gases into your
WARNING!
vehicle. You and your passengers could be
injured by these fumes. Keep the flip-up
window closed when you are operating the
vehicle.
CAUTION!
Do not push on rear wiper blade when
closing the rear flip-up window, as damage
to the blade will result.
INTERNAL EQUIPMENT
Electrical Power Outlets
There are two 12 Volt (13 Amp) auxiliary
power outlets that can provide power for ac-
cessories designed for use with the standard
power outlet adapters.
Swing Gate Handle
57
Page 62 of 348
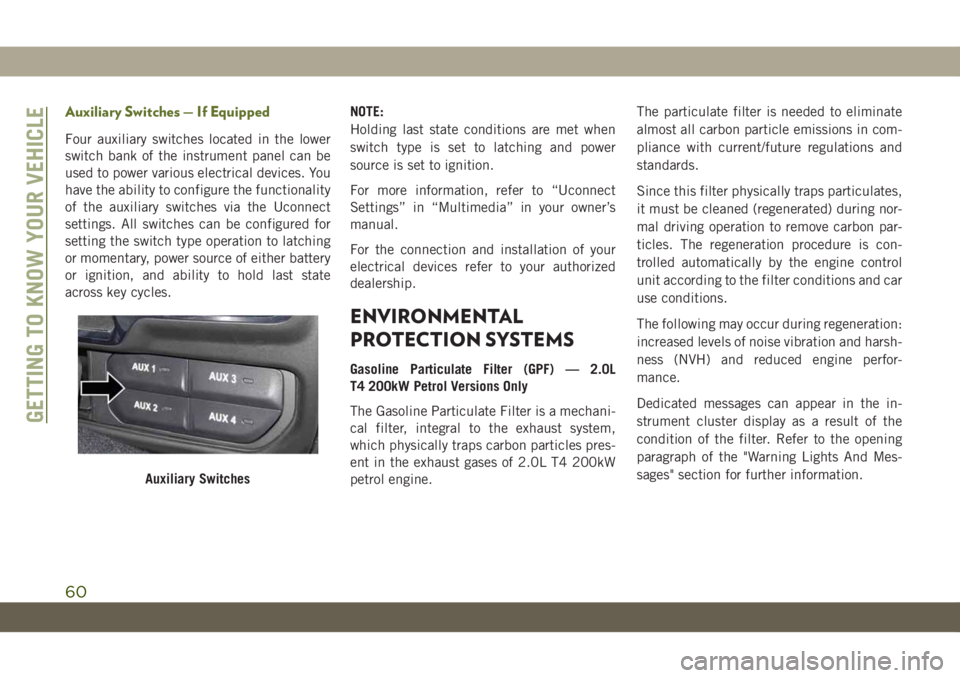
Auxiliary Switches — If Equipped
Four auxiliary switches located in the lower
switch bank of the instrument panel can be
used to power various electrical devices. You
have the ability to configure the functionality
of the auxiliary switches via the Uconnect
settings. All switches can be configured for
setting the switch type operation to latching
or momentary, power source of either battery
or ignition, and ability to hold last state
across key cycles.NOTE:
Holding last state conditions are met when
switch type is set to latching and power
source is set to ignition.
For more information, refer to “Uconnect
Settings” in “Multimedia” in your owner’s
manual.
For the connection and installation of your
electrical devices refer to your authorized
dealership.
ENVIRONMENTAL
PROTECTION SYSTEMS
Gasoline Particulate Filter (GPF) — 2.0L
T4 200kW Petrol Versions Only
The Gasoline Particulate Filter is a mechani-
cal filter, integral to the exhaust system,
which physically traps carbon particles pres-
ent in the exhaust gases of 2.0L T4 200kW
petrol engine.The particulate filter is needed to eliminate
almost all carbon particle emissions in com-
pliance with current/future regulations and
standards.
Since this filter physically traps particulates,
it must be cleaned (regenerated) during nor-
mal driving operation to remove carbon par-
ticles. The regeneration procedure is con-
trolled automatically by the engine control
unit according to the filter conditions and car
use conditions.
The following may occur during regeneration:
increased levels of noise vibration and harsh-
ness (NVH) and reduced engine perfor-
mance.
Dedicated messages can appear in the in-
strument cluster display as a result of the
condition of the filter. Refer to the opening
paragraph of the "Warning Lights And Mes-
sages" section for further information.
Auxiliary Switches
GETTING TO KNOW YOUR VEHICLE
60
Page 121 of 348
• As the air bags deflate, you may see some
smoke-like particles. The particles are a
normal by-product of the process that gen-
erates the non-toxic gas used for air bag
inflation. These airborne particles may irri-
tate the skin, eyes, nose, or throat. If you
have skin or eye irritation, rinse the area
with cool water. For nose or throat irritation,
move to fresh air. If the irritation continues,
see your doctor. If these particles settle on
your clothing, follow the garment manufac-
turer’s instructions for cleaning.
Do not drive your vehicle after the air bags
have deployed. If you are involved in another
collision, the air bags will not be in place to
protect you.
WARNING!
Deployed air bags and seat belt preten-
sioners cannot protect you in another col-
lision. Have the air bags, seat belt preten-
sioners, and the seat belt retractor
assemblies replaced by an authorized
dealer immediately. Also, have the Occu-
pant Restraint Controller System serviced
as well.NOTE:
• Air bag covers may not be obvious in the
interior trim, but they will open during air
bag deployment.
• After any collision, the vehicle should be
taken to an authorized dealer immediately.
Enhanced Accident Response System
In the event of an impact, if the communica-
tion network remains intact, and the power
remains intact, depending on the nature of
the event, the ORC will determine whether to
have the Enhanced Accident Response Sys-
tem perform the following functions:
• Cut off fuel to the engine (If Equipped)
• Cut off battery power to the electric motor
(If Equipped)
• Flash hazard lights as long as the battery
has power
• Turn on the interior lights, which remain on
as long as the battery has power or for 15
minutes from the intervention of the En-
hanced Accident Response System.
• Unlock the power door locks.Your vehicle may also be designed to perform
any of these other functions in response to
the Enhanced Accident Response System:
• Turn off the Fuel Filter Heater, Turn off the
HVAC Blower Motor, Close the HVAC Circu-
lation Door
• Cut off battery power to the:
– Engine
– Electric Motor (if equipped)
– Electric power steering
– Brake booster
– Electric park brake
– Automatic transmission gear selector
– Horn
– Front wiper
– Headlamp washer pump
NOTE:
After an accident, remember to cycle the
ignition to the STOP (OFF/LOCK) position
and remove the key from the ignition switch
to avoid draining the battery. Carefully check
the vehicle for fuel leaks in the engine com-
partment and on the ground near the engine
compartment and fuel tank before resetting
the system and starting the engine. If there
are no fuel leaks or damage to the vehicle
119
Page 128 of 348
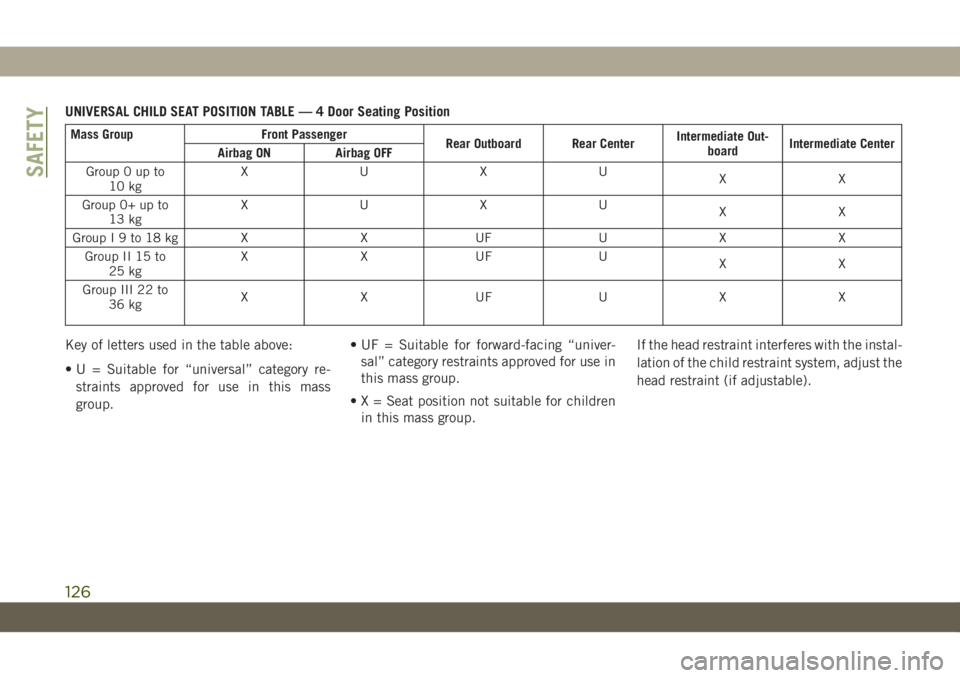
UNIVERSAL CHILD SEAT POSITION TABLE — 4 Door Seating Position
Mass Group Front Passenger
Rear Outboard Rear CenterIntermediate Out-
boardIntermediate Center
Airbag ON Airbag OFF
Group 0 up to
10 kgXUXU
XX
Group 0+ up to
13 kgXUXU
XX
GroupI9to18kg X X UF U X X
Group II 15 to
25 kgX X UF U
XX
Group III 22 to
36 kgX X UF U X X
Key of letters used in the table above:
• U = Suitable for “universal” category re-
straints approved for use in this mass
group.• UF = Suitable for forward-facing “univer-
sal” category restraints approved for use in
this mass group.
• X = Seat position not suitable for children
in this mass group.If the head restraint interferes with the instal-
lation of the child restraint system, adjust the
head restraint (if adjustable).
SAFETY
126
Page 134 of 348
Mass Group Size Class FixtureFront Passen-
gerRear Outboard Rear CenterIntermediate
OutboardIntermediate
CenterOther Sites
I-9to18kgD ISO/R2 X IUF X X X X
C ISO/R3 X IUF X X X X
B ISO/F2 X IUF X X X X
B1 ISO/F2X X IUF X X X X
A ISO/F3 X IUF X X X X
(1)XXXXXX
II-15to
25 kg(1)XXXXXX
III-22to
36 kg(1)XXXXXX
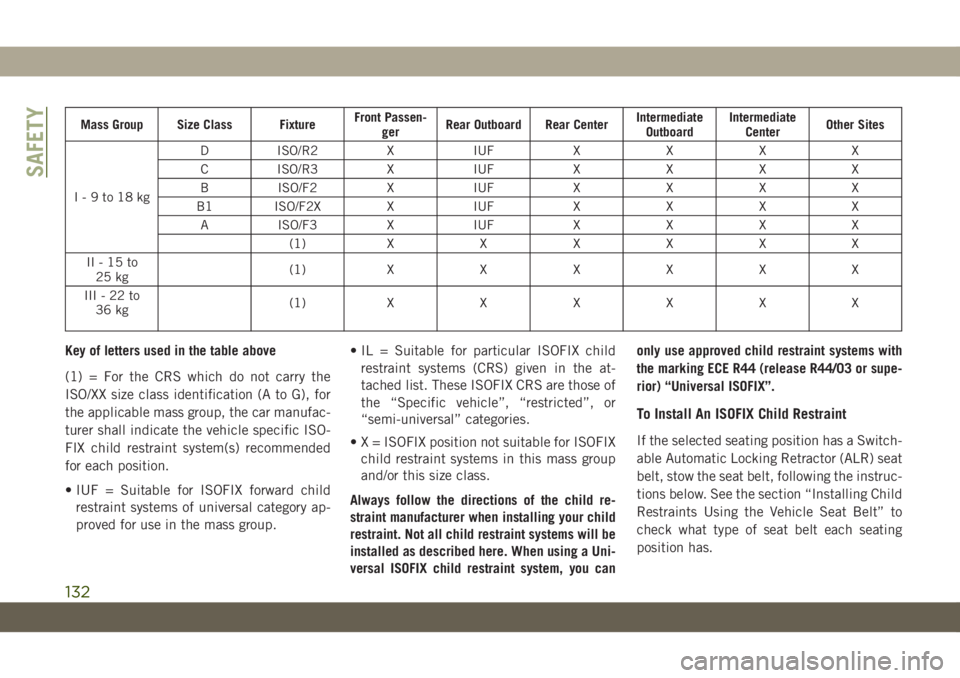
Key of letters used in the table above
(1) = For the CRS which do not carry the
ISO/XX size class identification (A to G), for
the applicable mass group, the car manufac-
turer shall indicate the vehicle specific ISO-
FIX child restraint system(s) recommended
for each position.
• IUF = Suitable for ISOFIX forward child
restraint systems of universal category ap-
proved for use in the mass group.• IL = Suitable for particular ISOFIX child
restraint systems (CRS) given in the at-
tached list. These ISOFIX CRS are those of
the “Specific vehicle”, “restricted”, or
“semi-universal” categories.
• X = ISOFIX position not suitable for ISOFIX
child restraint systems in this mass group
and/or this size class.
Always follow the directions of the child re-
straint manufacturer when installing your child
restraint. Not all child restraint systems will be
installed as described here. When using a Uni-
versal ISOFIX child restraint system, you canonly use approved child restraint systems with
the marking ECE R44 (release R44/03 or supe-
rior) “Universal ISOFIX”.
To Install An ISOFIX Child Restraint
If the selected seating position has a Switch-
able Automatic Locking Retractor (ALR) seat
belt, stow the seat belt, following the instruc-
tions below. See the section “Installing Child
Restraints Using the Vehicle Seat Belt” to
check what type of seat belt each seating
position has.
SAFETY
132
Page 138 of 348
These child restraint systems, built and type-
approved according to the i-Size (ECE R129)
standard, ensure better safety conditions to
carry children on board a vehicle:
• The child must be transported rearward
facing until 15 months;
• Child restraint system protection is in-
creased in the event of a side collision;
• The use of the ISOFIX system is promoted
to avoid faulty installation of the child re-
straint system;
• Efficiency in the choice of the child re-
straint system, which isn't made according
to weight anymore but according to the
child's height, is increased;
• Compatibility between the vehicle seats
and the child restraint systems is better:
the i-Size child restraint systems can be
considered as "Super ISOFIX"; this means
that they can be perfectly fitted in type-
approved i-Size seats, but can also be fitted
in ISOFIX (ECE R44) type-approved seats.NOTE:
The vehicle seats, i-Size type-approved, are
marked by the symbol shown in “Figure XX”.
The following table, according to
European standard ECE 129, in-
dicates the possibility of i-Size
child restraint system installa-
tion.
i-Size Child Seat Position Table
DeviceFront
Passen-
gerRear
Out-
boardRear
Center
i-Size
Child
Re-
straint
Sys-
temsISO/R2 X i-U X
ISO/F2 X i-U X
Key of letters used in the table above:
• i-U = Suitable for Universal i-Size child
restraint systems, both rearward facing and
forward facing.
• X = Seat not suitable for Universal i-Size
child restraint systems.
Transporting Pets
Air Bags deploying in the front seat could
harm your pet. An unrestrained pet will be
thrown about and possibly injured, or injure a
passenger during panic braking or in a colli-
sion.
Pets should be restrained in the rear seat (if
equipped) in pet harnesses or pet carriers
that are secured by seat belts.
SAFETY TIPS
Transporting Passengers
NEVER TRANSPORT PASSENGERS IN THE
CARGO AREA.
WARNING!
• Do not leave children or animals inside
parked vehicles in hot weather. Interior
heat build-up may cause serious injury
or death.
• It is extremely dangerous to ride in a
cargo area, inside or outside of a vehicle.
Figure XX
SAFETY
136
Page 141 of 348
WARNING!
• NEVER place any objects under the floor
mat (e.g., towels, keys, etc.). These ob-
jects could change the position of the
floor mat and may cause interference
with the accelerator, brake, or clutch
pedals.
• If the vehicle carpet has been removed
and re-installed, always properly attach
carpet to the floor and check the floor
mat fasteners are secure to the vehicle
carpet. Fully depress each pedal to
check for interference with the accelera-
tor, brake, or clutch pedals then re-
install the floor mats.
• It is recommended to only use mild soap
and water to clean your floor mats. After
cleaning, always check your floor mat
WARNING!
has been properly installed and is se-
cured to your vehicle using the floor mat
fasteners by lightly pulling mat.
Periodic Safety Checks You Should Make
Outside The Vehicle
Tires
Examine tires for excessive tread wear and
uneven wear patterns. Check for stones,
nails, glass, or other objects lodged in the
tread or sidewall. Inspect the tread for cuts
and cracks. Inspect sidewalls for cuts,
cracks, and bulges. Check the wheel nuts for
tightness. Check the tires (including spare)
for proper cold inflation pressure.
Lights
Have someone observe the operation of brake
lights and exterior lights while you work the
controls. Check turn signal and high beam
indicator lights on the instrument panel.
Door Latches
Check for proper closing, latching, and lock-
ing.
Fluid Leaks
Check area under the vehicle after overnight
parking for fuel, coolant, oil, or other fluid
leaks. Also, if gasoline fumes are detected or
if fuel, or brake fluid leaks are suspected. The
cause should be located and corrected imme-
diately.
139