tow JEEP WRANGLER UNLIMITED 2018 Owner handbook (in English)
[x] Cancel search | Manufacturer: JEEP, Model Year: 2018, Model line: WRANGLER UNLIMITED, Model: JEEP WRANGLER UNLIMITED 2018Pages: 348, PDF Size: 6.5 MB
Page 194 of 348
WARNING!
• If working on or near a roadway, be
extremely careful of motor traffic.
• To assure that spare tires, flat or in-
flated, are securely stowed, spares must
be stowed with the valve stem facing the
ground.
CAUTION!
Do not attempt to raise the vehicle by
jacking on locations other than those indi-
cated.
1. Remove the spare tire, jack and tools from
the stored location.
2. Loosen (but do not remove) the wheel lug
nuts by turning them to the left one turn
while the wheel is still on the ground.
3. Assemble the jack and jacking tools. Con-
nect the jack handle driver to the exten-
sion, then to the lug wrench.
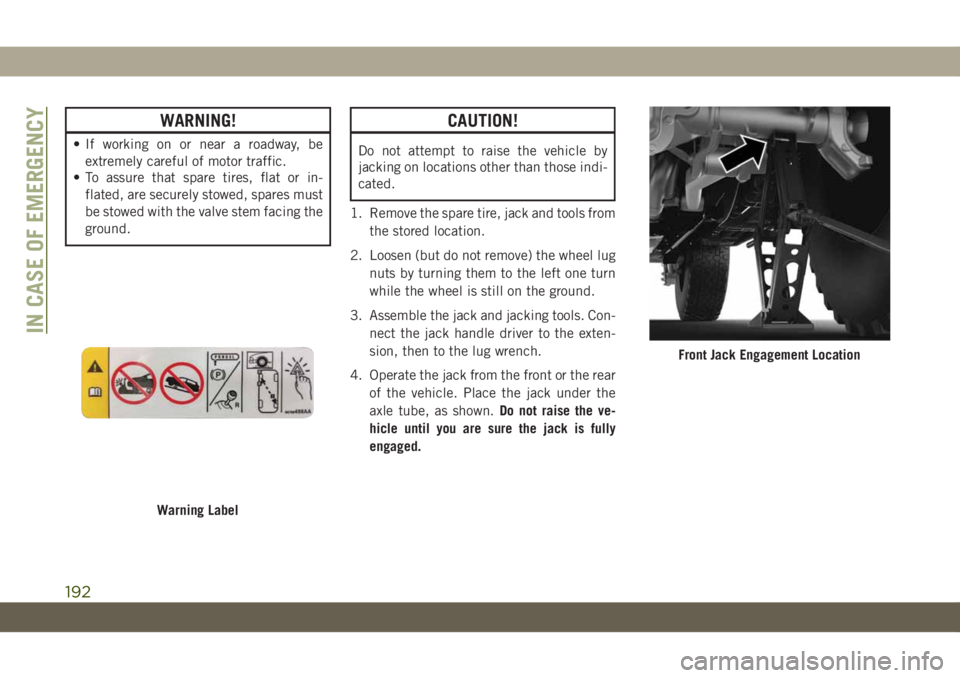
4. Operate the jack from the front or the rear
of the vehicle. Place the jack under the
axle tube, as shown.Do not raise the ve-
hicle until you are sure the jack is fully
engaged.
Warning Label
Front Jack Engagement Location
IN CASE OF EMERGENCY
192
Page 195 of 348
5. Raise the vehicle by turning the jack
screw clockwise. Raise the vehicle only
until the tire just clears the surface and
enough clearance is obtained to install
the spare tire. Minimum tire lift provides
maximum stability.
WARNING!
Raising the vehicle higher than necessary
can make the vehicle less stable. It could
WARNING!
slip off the jack and hurt someone near it.
Raise the vehicle only enough to remove
the tire.
6. Remove the lug nuts and wheel.
7. Position the spare wheel/tire on the ve-
hicle and install the lug nuts with the
cone-shaped end toward the wheel.
Lightly tighten the lug nuts clockwise.
WARNING!
To avoid the risk of forcing the vehicle off
the jack, do not tighten the wheel nuts
fully until the vehicle has been lowered.
Failure to follow this warning may result in
serious injury.
8. Lower the vehicle by turning the jack
screw to the left, and remove the jack.
9. Finish tightening the lug nuts. Push down
on the wrench while tightening for in-
creased leverage. Alternate nuts until
each nut has been tightened twice. Refer
to “Torque Specifications” in “Technical
Specifications” for correct lug nut torque.10. Remove the jack assembly and wheel
blocks.
11. Secure the jack and tools in their proper
locations.
12. Secure the damaged wheel/tire on the
spare tire carrier. Torque down lug nuts
and locking lug nut.
13. Return the lock bolt to the lock position
on the camera cover by turning the lock
to the right using the provided #40 Torx
head driver and ratchet. Then, reinstall
the camera cover by slipping it over the
camera/tire carrier until it snaps into
place.
WARNING!
A loose tire or jack thrown forward in a
collision or hard stop, could endanger the
occupants of the vehicle. Always stow the
jack parts and the spare tire in the places
provided.
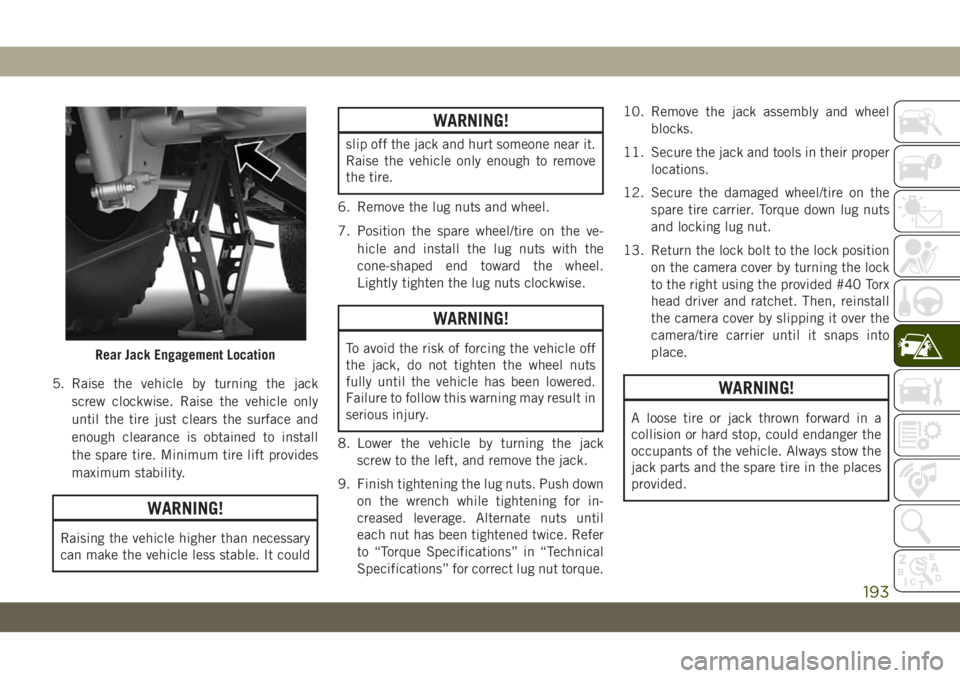
Rear Jack Engagement Location
193
Page 196 of 348
Road Tire Installation
1. Mount the road tire on the axle.
2. Install the remaining lug nuts with the
cone shaped end of the nut toward the
wheel. Lightly tighten the lug nuts.
WARNING!
To avoid the risk of forcing the vehicle off
the jack, do not tighten the wheel nuts
fully until the vehicle has been lowered.
Failure to follow this warning may result in
serious injury.
3. Lower the vehicle to the ground by turning
the jack handle counterclockwise.
4. Finish tightening the lug nuts. Push down
on the wrench while at the end of the
handle for increased leverage. Tighten the
lug nuts in a star pattern until each nut
has been tightened twice. For the correct
lug nut torque refer to “Torque Specifica-
tions” in “Technical Specifications”. If in
doubt about the correct tightness, have
them checked with a torque wrench by an
authorized dealer or service station.5. After 25 miles (40 km), check the lug nut
torque with a torque wrench to ensure that
all lug nuts are properly seated against the
wheel.
Declaration Of Conformance
1. The undersigned, FlexNGate, represent-
ing the manufacturer, herewith declares
that the machinery described below ful-
fills all relevant provisions of:
•The EC-directive 2006/42/EC on
Machinery
2. Description of machinery.
a) Generic Denomination: Vehicle Jack
b) Function: Lifting Vehicle
d) Ve-
hicle
Modelc) Model
Codef) Work-
ing Loade) Jack
Type
Jeep
WranglerJL 1000 kg
MaxFGLF2
3. Manufacturers (1):
FlexNGate Seeburn, a division of Ventra
Group Co
P.O. Box 1170, 65 Industrial Road, Totten-
ham, ON CANADA L0G 1W04. Manufacturers (2):
FlexNGate Querétaro Ventramex, S.A. de
C.V
Av. Manantiales No. 3
Parque Industrial Bernardo Quintana, El
Marqués Querétaro C.P. 76249 – Mexico
5. Legal Person authorized to compile the
technical file:
FlexNGate – Barcelona
Avda de la Riera, 7-9
Sant Just Desvern, Barcelona, SPAIN 08960
6. References to harmonized standards:
PF-90065
7. Done at: Bradford, ON CANADA
8. Date: 10/02/2017FlexNGate Representative
IN CASE OF EMERGENCY
194
Page 202 of 348
MANUAL PARK RELEASE
WARNING!
Always secure your vehicle by fully apply-
ing the parking brake before activating the
Manual Park Release. In addition, you
should be seated in the driver’s seat with
your foot firmly on the brake pedal when
activating the Manual Park Release. Acti-
vating the Manual Park Release will allow
your vehicle to roll away if it is not secured
by the parking brake, or by proper connec-
tion to a tow vehicle. Activating the
Manual Park Release on an unsecured
vehicle could lead to serious injury or
death for those in or around the vehicle.
In order to push or tow the vehicle in cases
where the transmission will not shift out of
PARK (such as a dead battery), a Manual
Park Release is available.
Follow these steps to use the Manual Park
Release:
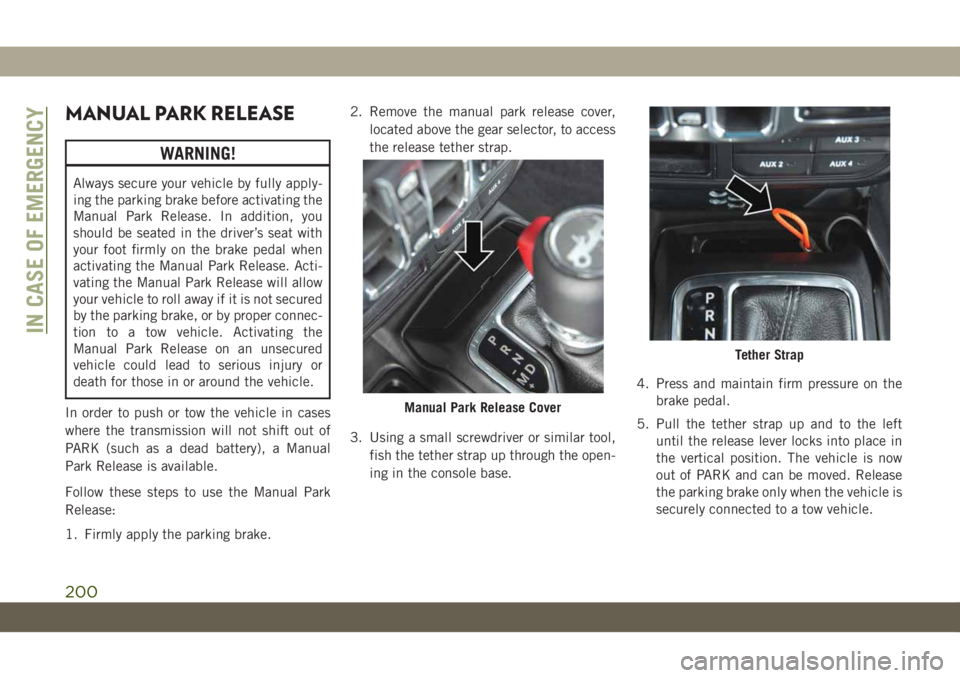
1. Firmly apply the parking brake.2. Remove the manual park release cover,
located above the gear selector, to access
the release tether strap.
3. Using a small screwdriver or similar tool,
fish the tether strap up through the open-
ing in the console base.4. Press and maintain firm pressure on the
brake pedal.
5. Pull the tether strap up and to the left
until the release lever locks into place in
the vertical position. The vehicle is now
out of PARK and can be moved. Release
the parking brake only when the vehicle is
securely connected to a tow vehicle.
Manual Park Release Cover
Tether Strap
IN CASE OF EMERGENCY
200
Page 204 of 348
TOWING A DISABLED
VEHICLE
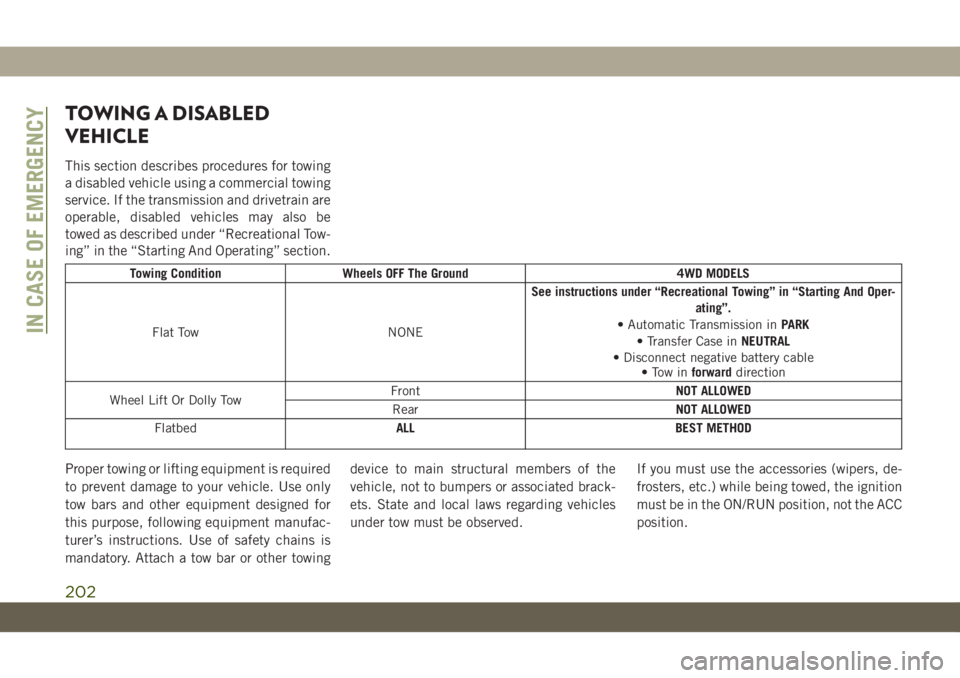
This section describes procedures for towing
a disabled vehicle using a commercial towing
service. If the transmission and drivetrain are
operable, disabled vehicles may also be
towed as described under “Recreational Tow-
ing” in the “Starting And Operating” section.
Towing Condition Wheels OFF The Ground 4WD MODELS
Flat Tow NONESee instructions under “Recreational Towing” in “Starting And Oper-
ating”.
• Automatic Transmission inPARK
• Transfer Case inNEUTRAL
• Disconnect negative battery cable
• Tow inforwarddirection
Wheel Lift Or Dolly TowFrontNOT ALLOWED
RearNOT ALLOWED
FlatbedALL BEST METHOD
Proper towing or lifting equipment is required
to prevent damage to your vehicle. Use only
tow bars and other equipment designed for
this purpose, following equipment manufac-
turer’s instructions. Use of safety chains is
mandatory. Attach a tow bar or other towingdevice to main structural members of the
vehicle, not to bumpers or associated brack-
ets. State and local laws regarding vehicles
under tow must be observed.If you must use the accessories (wipers, de-
frosters, etc.) while being towed, the ignition
must be in the ON/RUN position, not the ACC
position.
IN CASE OF EMERGENCY
202
Page 205 of 348
If the vehicle's battery is discharged, refer to
"Manual Park Release" in this section for
instructions on shifting the automatic trans-
mission out of PARK in order to move the
vehicle.
CAUTION!
• Do not use sling type equipment when
towing. Vehicle damage may occur.
• When securing the vehicle to a flatbed
truck, do not attach to front or rear
suspension components. Damage to
your vehicle may result from improper
towing.
• If the vehicle being towed requires steer-
ing, the ignition switch must be in the
ACC or ON/RUN mode, not in the OFF
mode.
Without The Key Fob
Special care must be taken when the vehicle
is towed with the ignition in the OFF mode.
The only approved method of towing without
the key fob is with a flatbed truck. Proper
towing equipment is necessary to prevent
damage to the vehicle.
Four–Wheel Drive Models
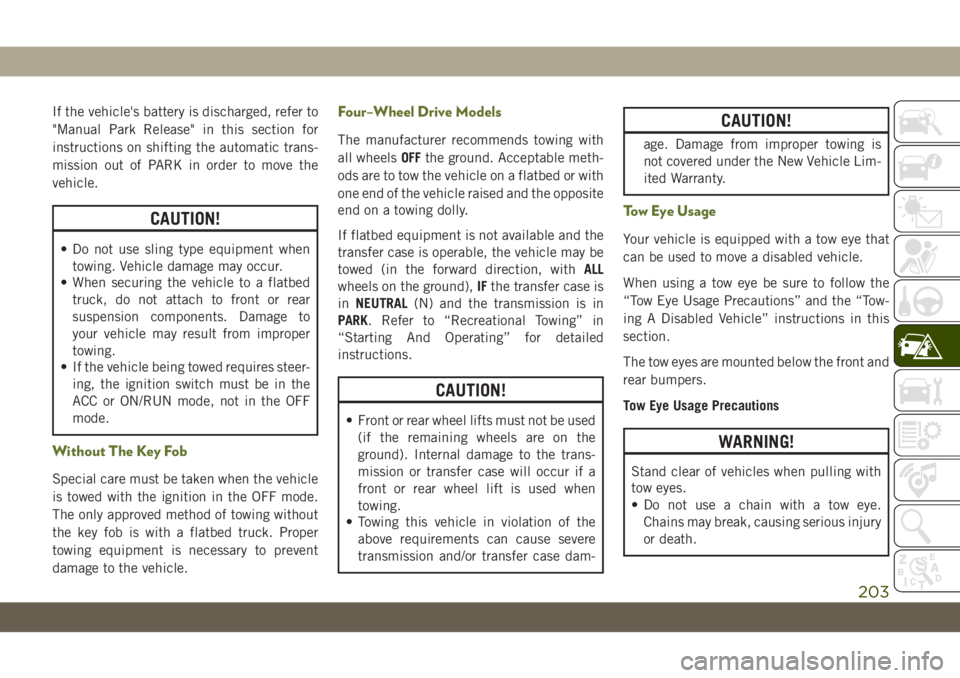
The manufacturer recommends towing with
all wheelsOFFthe ground. Acceptable meth-
ods are to tow the vehicle on a flatbed or with
one end of the vehicle raised and the opposite
end on a towing dolly.
If flatbed equipment is not available and the
transfer case is operable, the vehicle may be
towed (in the forward direction, withALL
wheels on the ground),IFthe transfer case is
inNEUTRAL(N) and the transmission is in
PARK. Refer to “Recreational Towing” in
“Starting And Operating” for detailed
instructions.
CAUTION!
• Front or rear wheel lifts must not be used
(if the remaining wheels are on the
ground). Internal damage to the trans-
mission or transfer case will occur if a
front or rear wheel lift is used when
towing.
• Towing this vehicle in violation of the
above requirements can cause severe
transmission and/or transfer case dam-
CAUTION!
age. Damage from improper towing is
not covered under the New Vehicle Lim-
ited Warranty.
Tow Eye Usage
Your vehicle is equipped with a tow eye that
can be used to move a disabled vehicle.
When using a tow eye be sure to follow the
“Tow Eye Usage Precautions” and the “Tow-
ing A Disabled Vehicle” instructions in this
section.
The tow eyes are mounted below the front and
rear bumpers.
Tow Eye Usage Precautions
WARNING!
Stand clear of vehicles when pulling with
tow eyes.
• Do not use a chain with a tow eye.
Chains may break, causing serious injury
or death.
203
Page 206 of 348
WARNING!
• Do not use a tow strap with a tow eye.
Tow straps may break or become disen-
gaged, causing serious injury or death.
• Failure to follow proper tow eye usage
may cause components to break result-
ing in serious injury or death.
• The brake and steering power assist sys-
tems will not function while the vehicle
is being towed. You will, therefore, need
to apply more force on the brake pedal
and steering wheel. Do not use flexible
ropes when towing, and avoid jerky
movements. Do not start the engine
while towing the car. Before tightening
the ring, clean the threaded housing
thoroughly. Make sure that the ring is
fully screwed into the housing before
towing the car.
CAUTION!
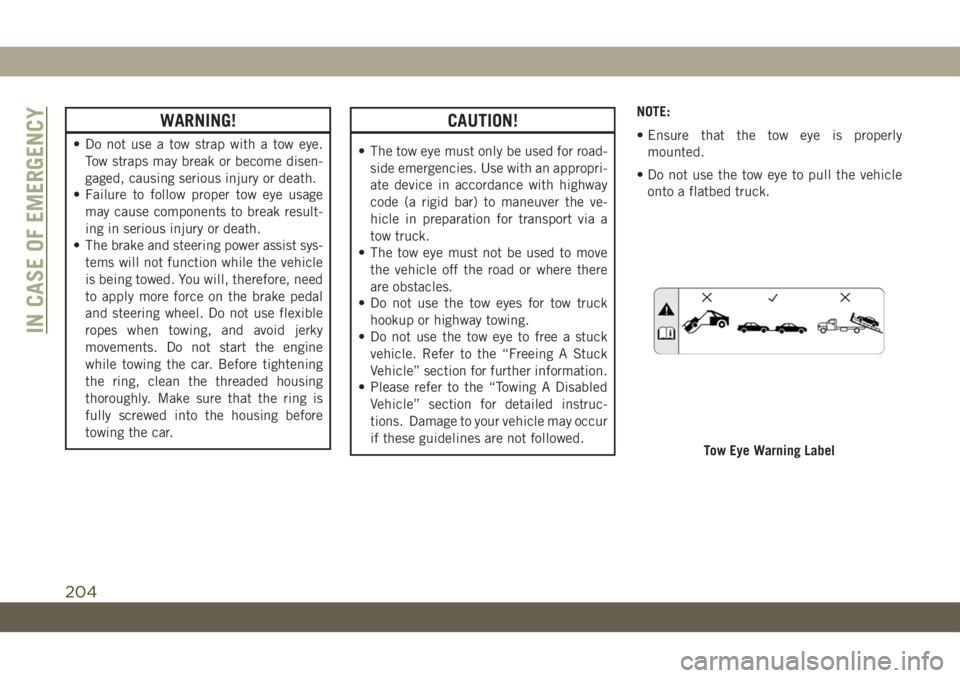
• The tow eye must only be used for road-
side emergencies. Use with an appropri-
ate device in accordance with highway
code (a rigid bar) to maneuver the ve-
hicle in preparation for transport via a
tow truck.
• The tow eye must not be used to move
the vehicle off the road or where there
are obstacles.
• Do not use the tow eyes for tow truck
hookup or highway towing.
• Do not use the tow eye to free a stuck
vehicle. Refer to the “Freeing A Stuck
Vehicle” section for further information.
• Please refer to the “Towing A Disabled
Vehicle” section for detailed instruc-
tions. Damage to your vehicle may occur
if these guidelines are not followed.NOTE:
• Ensure that the tow eye is properly
mounted.
• Do not use the tow eye to pull the vehicle
onto a flatbed truck.
Tow Eye Warning Label
IN CASE OF EMERGENCY
204
Page 210 of 348
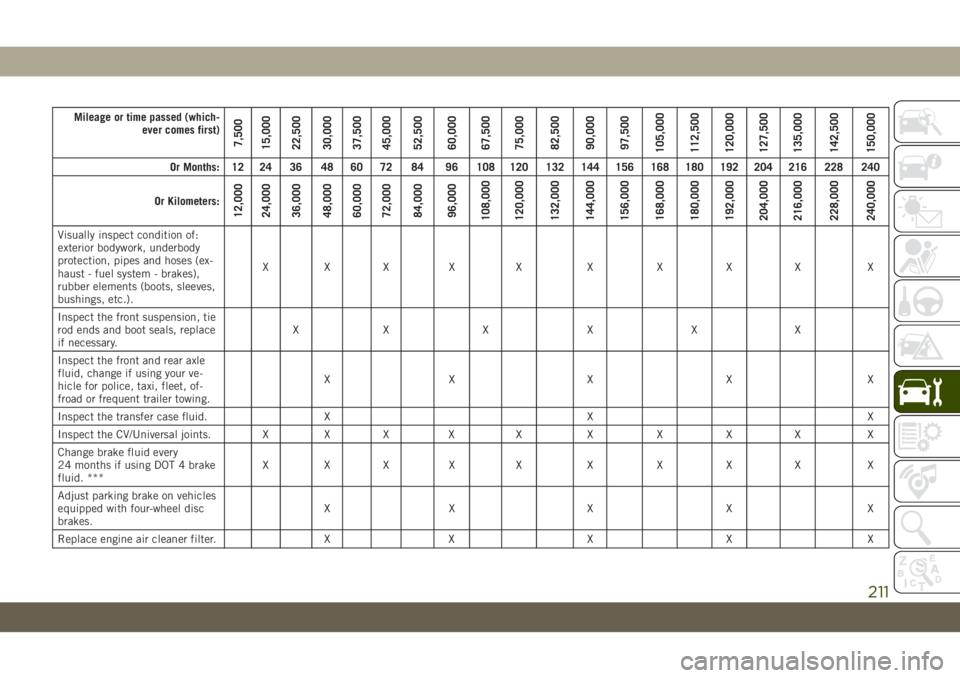
SCHEDULED SERVICING
Correct servicing is crucial for guaranteeing a
long life for the car under the best conditions.
For this reason, Jeep has planned a series of
checks and services at fixed distance inter-
vals and, where provided, at fixed time inter-
vals, as described in the Scheduled Servicing
plan. To keep the car’s efficiency in tip-top
condition, in the following Scheduled Service
plan pages a few additional checks are listed
that should be carried out more frequently
with respect to the normal coupon redemp-
tion schedule. Scheduled Servicing is offered
by all authorized dealerships according to
fixed time or mileage intervals. If, during
each operation, in addition to the ones
scheduled, the need arises for further re-
placements or repairs, these may be carried
out with the owner's explicit agreement only.
The technicians at your dealership know your
vehicle best, and have access to factory
trained information, genuine Mopar parts,
and specially designed electronic and me-
chanical tools that can help prevent future
costly repairs. If your car is used frequently
for towing, the interval between one sched-uled servicing operation and the next should
be reduced. More frequent maintenance may
be needed for vehicles in severe operating
conditions, such as dusty areas and very
short trip driving.
NOTE:
Scheduled Servicing interventions are set out
by the Manufacturer. Failure to have them
carried out may invalidate the warranty. It is
advised to inform an authorized dealership of
any small operating irregularities without
waiting for the next service.
Scheduled Servicing — Gasoline Engine
The oil change indicator system will remind
you that it is time to take your vehicle in for
engine oil replacement.
On vehicles equipped with instrument cluster
display, “Oil Change Required” will be dis-
played and a single chime will sound, indi-
cating that an oil change is necessary.
On non-instrument cluster display equipped
vehicles, “Change Oil” will flash in the in-
strument cluster odometer and a single
chime will sound, indicating that an oil
change is necessary.The oil change indicator message will illumi-
nate approximately 7,000 miles
(11,200 km) after the most recent oil change
was performed. Have your vehicle serviced as
soon as possible, within 500 miles (800 km)
(except for 2.0L gasoline engine with GPF -
Gasoline Particulate Filter). However, an ear-
lier oil change at 4,500 miles (7,500 km)
may be required if the vehicle is operated
under “Severe Duty Conditions” later in this
section.
NOTE:
• The oil change indicator message will not
monitor the time since the last oil change.
Change your vehicle's oil if it has been
12 months since your last oil change even
if the oil change indicator message is NOT
illuminated.
• Change your engine oil more often if you
drive your vehicle off-road for an extended
period of time.
• Under no circumstances should oil change
intervals exceed 7,500 miles (12,000 km)
or 12 months, whichever comes first (ex-
cept for 2.0L gasoline engine with GPF -
Gasoline Particulate Filter).
SERVICING AND MAINTENANCE
208
Page 213 of 348
Mileage or time passed (which-
ever comes first)
7,500
15,000
22,500
30,000
37,500
45,000
52,500
60,000
67,500
75,000
82,500
90,000
97,500
105,000
112,500
120,000
127,500
135,000
142,500
150,000
Or Months: 12 24 36 48 60 72 84 96 108 120 132 144 156 168 180 192 204 216 228 240
Or Kilometers:
12,000
24,000
36,000
48,000
60,000
72,000
84,000
96,000
108,000
120,000
132,000
144,000
156,000
168,000
180,000
192,000
204,000
216,000
228,000
240,000
Visually inspect condition of:
exterior bodywork, underbody
protection, pipes and hoses (ex-
haust - fuel system - brakes),
rubber elements (boots, sleeves,
bushings, etc.).XXX X X X X X X X
Inspect the front suspension, tie
rod ends and boot seals, replace
if necessary.XX X X X X
Inspect the front and rear axle
fluid, change if using your ve-
hicle for police, taxi, fleet, of-
froad or frequent trailer towing.XX X X X
Inspect the transfer case fluid. X X X
Inspect the CV/Universal joints. X X X X X X X X X X
Change brake fluid every
24 months if using DOT 4 brake
fluid. ***XXX X X X X X X X
Adjust parking brake on vehicles
equipped with four-wheel disc
brakes.XX X X X
Replace engine air cleaner filter. X X X X X
211
Page 214 of 348
Mileage or time passed (which-
ever comes first)
7,500
15,000
22,500
30,000
37,500
45,000
52,500
60,000
67,500
75,000
82,500
90,000
97,500
105,000
112,500
120,000
127,500
135,000
142,500
150,000
Or Months: 12 24 36 48 60 72 84 96 108 120 132 144 156 168 180 192 204 216 228 240
Or Kilometers:
12,000
24,000
36,000
48,000
60,000
72,000
84,000
96,000
108,000
120,000
132,000
144,000
156,000
168,000
180,000
192,000
204,000
216,000
228,000
240,000
Replace air conditioning/cabin
air filter.XX X X X X
Replace spark plugs (2.0L En-
gine) ****XX X X X X
Replace spark plugs (3.6L En-
gine) ****XX
Replace accessory drive belt(s).X
Flush and replace the engine
coolant at 10 years or
150,000 miles (240,000 km)
whichever comes first.XX
Change transfer case fluid if us-
ing your vehicle for any of the
following: police, taxi, fleet, or
frequent trailer towing.XX
Inspect and replace PCV valve if
necessary. *****X
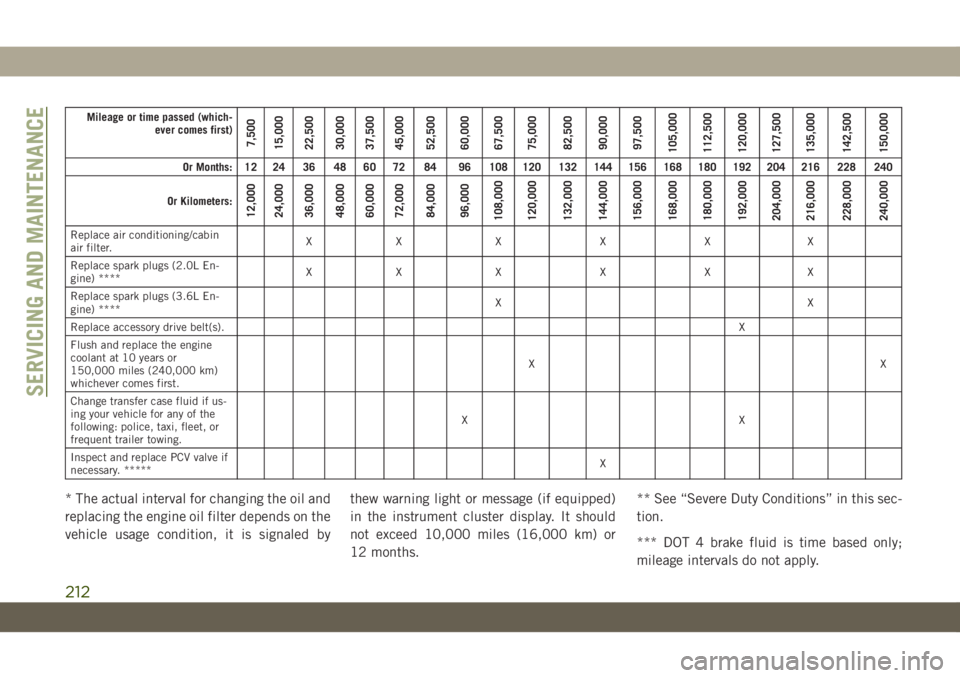
* The actual interval for changing the oil and
replacing the engine oil filter depends on the
vehicle usage condition, it is signaled bythew warning light or message (if equipped)
in the instrument cluster display. It should
not exceed 10,000 miles (16,000 km) or
12 months.** See “Severe Duty Conditions” in this sec-
tion.
*** DOT 4 brake fluid is time based only;
mileage intervals do not apply.
SERVICING AND MAINTENANCE
212