Multimedia JEEP WRANGLER UNLIMITED 2019 Owner handbook (in English)
[x] Cancel search | Manufacturer: JEEP, Model Year: 2019, Model line: WRANGLER UNLIMITED, Model: JEEP WRANGLER UNLIMITED 2019Pages: 348, PDF Size: 6.5 MB
Page 292 of 348
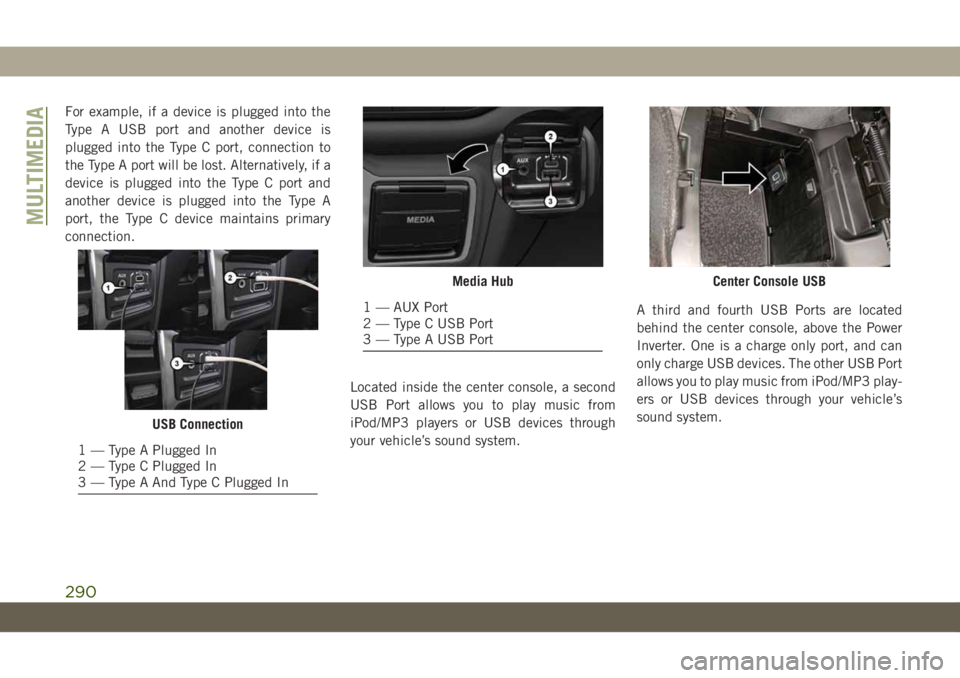
For example, if a device is plugged into the
Type A USB port and another device is
plugged into the Type C port, connection to
the Type A port will be lost. Alternatively, if a
device is plugged into the Type C port and
another device is plugged into the Type A
port, the Type C device maintains primary
connection.
Located inside the center console, a second
USB Port allows you to play music from
iPod/MP3 players or USB devices through
your vehicle’s sound system.A third and fourth USB Ports are located
behind the center console, above the Power
Inverter. One is a charge only port, and can
only charge USB devices. The other USB Port
allows you to play music from iPod/MP3 play-
ers or USB devices through your vehicle’s
sound system.
USB Connection
1 — Type A Plugged In
2 — Type C Plugged In
3 — Type A And Type C Plugged In
Media Hub
1 — AUX Port
2 — Type C USB Port
3 — Type A USB Port
Center Console USB
MULTIMEDIA
290
Page 294 of 348
NAVIGATION — IF
EQUIPPED
• The information in the section below is only
applicable if you have the 4C NAV system.
Press the “Nav” button on the touchscreen in
the menu bar to access the Navigation sys-
tem.
Changing The Navigation Voice Prompt
Volume
1. Press the “Settings” button on the touch-
screen in the lower right area of the
screen.
2. In the Settings menu, press the “Guid-
ance” button on the touchscreen.
3. In the Guidance menu, adjust the Nav
Volume by pressing the “+” or “–” buttons
on the touchscreen.
MULTIMEDIA
292
Page 296 of 348
Finding Points Of Interest
1. From the main Navigation menu, press
the “Where To?” button on the touch-
screen, then press the “Points of Interest”
button on the touchscreen.
2. Select a category and then a subcategory,
if necessary.
3. Select your destination and then select
“Route To” and then press the “GO!”
button on the touchscreen.
Finding A Place By Spelling The Name
• From the Main Navigation Menu press the
“Where to?” button on the touchscreen,
press the “POI” button on the touchscreen,
then press the “Spell Name” button on the
touchscreen.
• Enter the name of your destination.
• Press the “List” button on the touchscreen.
• Select your destination and then select
“Route To” and then press the “GO!” but-
ton on the touchscreen.
One-Step Voice Destination Entry
• Enter a navigation destination without tak-
ing your hands off the wheel.
• Just push the Uconnect Voice Command
button on the steering wheel, wait for
the beep and say something like, "Find
Address," followed by the address.
NOTE:
Destination entry is not available while your
vehicle is in motion. However, you can also
use Voice Commands to enter an address
while moving. Refer to “Uconnect Voice Rec-
ognition Quick Tips” in this section for fur-
ther information.
Setting Your Home Location
• To add a Home location, press the “Nav”
button on the touchscreen in the menu bar
to access the Navigation system and the
Main Navigation menu.
• Press the “Home” button on the touch-
screen. You can add a Home location by
either selecting “Spell City,” “Spell
Street,” or “Select Country.” Select County
is automatically filled out based on your
state.• Once you have entered your Home location,
select the “Save Home” button located on
the lower left-hand side of your touch-
screen.
• To delete a saved Home location (or other
saved locations), so you can save a new
Home location, press the “Nav” button on
the touchscreen, and in the “Where To”
screen, press “Edit Where To” and then
press the “Home” button on the touch-
screen. Under the Manage screen press the
“Reset Location” button. A confirmation
screen will appear asking if you “Are you
sure you want to reset this location?” Press
“Reset” to confirm the deletion. Set a new
Home location by following the previous
instructions.Home
• A Home location must be saved in the
system. From the Main Navigation menu,
press the “Home” button on the
touchscreen.
MULTIMEDIA
294
Page 298 of 348
Adding A Stop
• To add a stop you must be navigating a
route.
• Press the “Menu” button on the touch-
screen to return to the Main Navigation
menu.• Press the “Where To?” button on the touch-
screen, then search for the extra stop.
When another location has been selected,
you can choose to cancel your previous
route, add as the first destination or add as
the last destination.
• Press the desired selection and press the
“GO!” button on the touchscreen.
Taking A Detour
• To take a detour you must be navigating a
route.• Press the “Detour” button on the
touchscreen.
NOTE:
If the route you are currently taking is the
only reasonable option, the device may not
calculate a detour. For more information, see
your Uconnect Owner's Manual Supplement.
Map Update
To update your map, please refer to
www.maps.mopar.eu, or contact an autho-
rized dealer.
MULTIMEDIA
296
Page 300 of 348
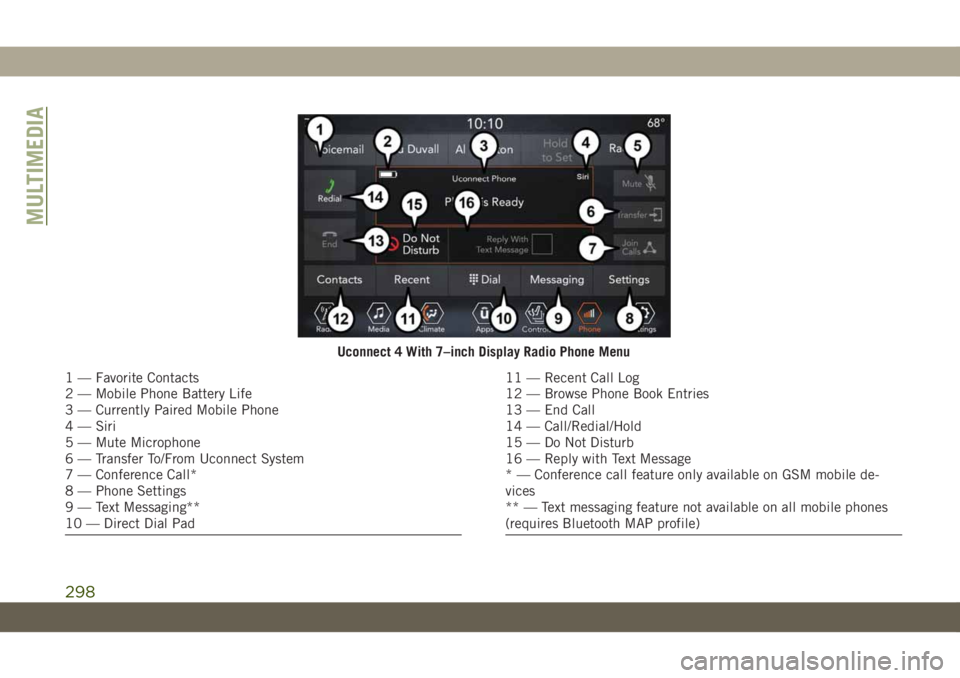
Uconnect 4 With 7–inch Display Radio Phone Menu
1 — Favorite Contacts
2 — Mobile Phone Battery Life
3 — Currently Paired Mobile Phone
4 — Siri
5 — Mute Microphone
6 — Transfer To/From Uconnect System
7 — Conference Call*
8 — Phone Settings
9 — Text Messaging**
10 — Direct Dial Pad11 — Recent Call Log
12 — Browse Phone Book Entries
13 — End Call
14 — Call/Redial/Hold
15 — Do Not Disturb
16 — Reply with Text Message
* — Conference call feature only available on GSM mobile de-
vices
** — Text messaging feature not available on all mobile phones
(requires Bluetooth MAP profile)
MULTIMEDIA
298
Page 302 of 348
The Uconnect Phone feature enables you to
place and receive hands-free mobile phone
calls. Drivers can also place mobile phone
calls using their voice or by using the buttons
on the touchscreen (see Voice Command sec-
tion).
The hands-free calling feature is made pos-
sible through Bluetooth technology — the
global standard that enables different elec-
tronic devices to connect to each other wire-
lessly.
If the Uconnect Phone Button
exists on
your steering wheel, you then have the
Uconnect Phone features.
NOTE:
• The Uconnect Phone requires a mobile
phone equipped with the Bluetooth Hands-
Free Profile, Version 1.0 or higher.
• Most mobile phones/devices are compat-
ible with the Uconnect system, however
some mobile phones/devices may not be
equipped with all of the required features
to utilize all of the Uconnect system fea-
tures.• For Uconnect Customer Care:
• Visit: DriveUconnect.eu
• Or visit an authorized dealer
Pairing (Wirelessly Connecting) Your
Mobile Phone To The Uconnect System
Mobile phone pairing is the process of estab-
lishing a wireless connection between a cel-
lular phone and the Uconnect system.
NOTE:
• To use the Uconnect Phone feature, you
first must determine if your mobile phone
and software are compatible with the
Uconnect system. Please visit
www.DriveUconnect.eu or an authorized
dealer for complete mobile phone compat-
ibility information.
• Mobile phone pairing is not available while
the vehicle is in motion.
• A maximum of ten mobile phones can be
paired to the Uconnect system.Start Pairing Procedure On The Radio
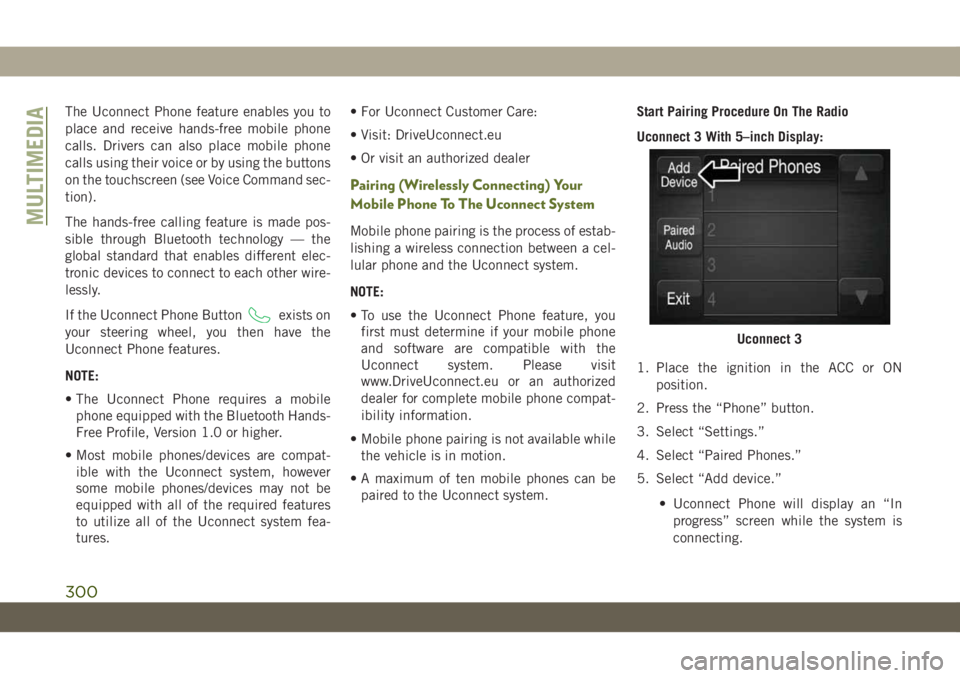
Uconnect 3 With 5–inch Display:
1. Place the ignition in the ACC or ON
position.
2. Press the “Phone” button.
3. Select “Settings.”
4. Select “Paired Phones.”
5. Select “Add device.”
• Uconnect Phone will display an “In
progress” screen while the system is
connecting.
Uconnect 3
MULTIMEDIA
300
Page 304 of 348
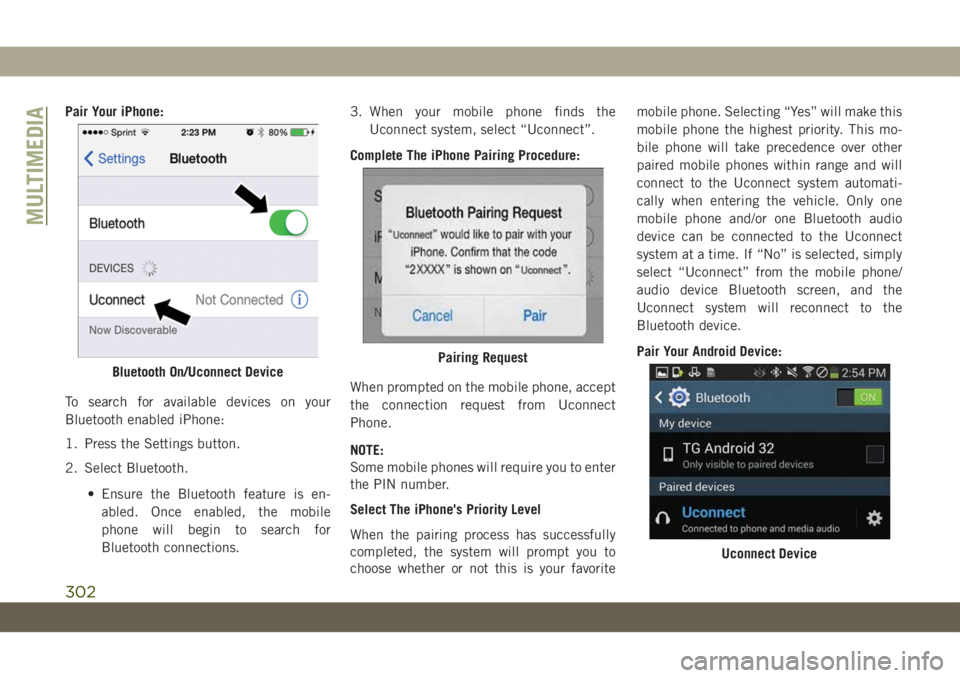
Pair Your iPhone:
To search for available devices on your
Bluetooth enabled iPhone:
1. Press the Settings button.
2. Select Bluetooth.
• Ensure the Bluetooth feature is en-
abled. Once enabled, the mobile
phone will begin to search for
Bluetooth connections.3. When your mobile phone finds the
Uconnect system, select “Uconnect”.
Complete The iPhone Pairing Procedure:
When prompted on the mobile phone, accept
the connection request from Uconnect
Phone.
NOTE:
Some mobile phones will require you to enter
the PIN number.
Select The iPhone's Priority Level
When the pairing process has successfully
completed, the system will prompt you to
choose whether or not this is your favoritemobile phone. Selecting “Yes” will make this
mobile phone the highest priority. This mo-
bile phone will take precedence over other
paired mobile phones within range and will
connect to the Uconnect system automati-
cally when entering the vehicle. Only one
mobile phone and/or one Bluetooth audio
device can be connected to the Uconnect
system at a time. If “No” is selected, simply
select “Uconnect” from the mobile phone/
audio device Bluetooth screen, and the
Uconnect system will reconnect to the
Bluetooth device.
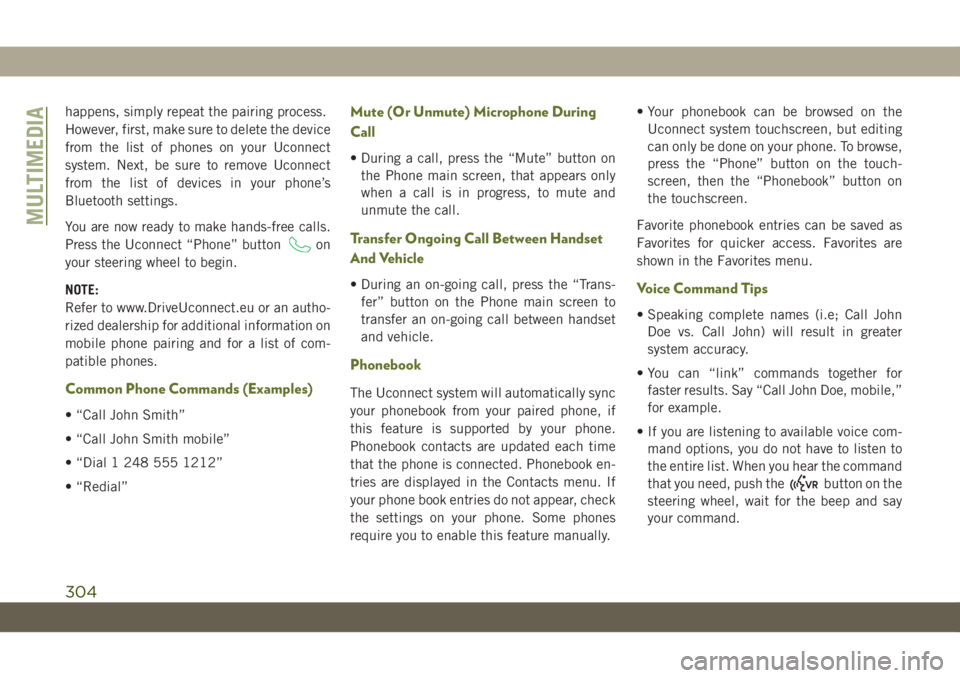
Pair Your Android Device:
Bluetooth On/Uconnect DevicePairing Request
Uconnect Device
MULTIMEDIA
302
Page 306 of 348
happens, simply repeat the pairing process.
However, first, make sure to delete the device
from the list of phones on your Uconnect
system. Next, be sure to remove Uconnect
from the list of devices in your phone’s
Bluetooth settings.
You are now ready to make hands-free calls.
Press the Uconnect “Phone” button
on
your steering wheel to begin.
NOTE:
Refer to www.DriveUconnect.eu or an autho-
rized dealership for additional information on
mobile phone pairing and for a list of com-
patible phones.
Common Phone Commands (Examples)
• “Call John Smith”
• “Call John Smith mobile”
• “Dial 1 248 555 1212”
• “Redial”
Mute (Or Unmute) Microphone During
Call
• During a call, press the “Mute” button on
the Phone main screen, that appears only
when a call is in progress, to mute and
unmute the call.
Transfer Ongoing Call Between Handset
And Vehicle
• During an on-going call, press the “Trans-
fer” button on the Phone main screen to
transfer an on-going call between handset
and vehicle.
Phonebook
The Uconnect system will automatically sync
your phonebook from your paired phone, if
this feature is supported by your phone.
Phonebook contacts are updated each time
that the phone is connected. Phonebook en-
tries are displayed in the Contacts menu. If
your phone book entries do not appear, check
the settings on your phone. Some phones
require you to enable this feature manually.• Your phonebook can be browsed on the
Uconnect system touchscreen, but editing
can only be done on your phone. To browse,
press the “Phone” button on the touch-
screen, then the “Phonebook” button on
the touchscreen.
Favorite phonebook entries can be saved as
Favorites for quicker access. Favorites are
shown in the Favorites menu.
Voice Command Tips
• Speaking complete names (i.e; Call John
Doe vs. Call John) will result in greater
system accuracy.
• You can “link” commands together for
faster results. Say “Call John Doe, mobile,”
for example.
• If you are listening to available voice com-
mand options, you do not have to listen to
the entire list. When you hear the command
that you need, push the
button on the
steering wheel, wait for the beep and say
your command.
MULTIMEDIA
304
Page 308 of 348
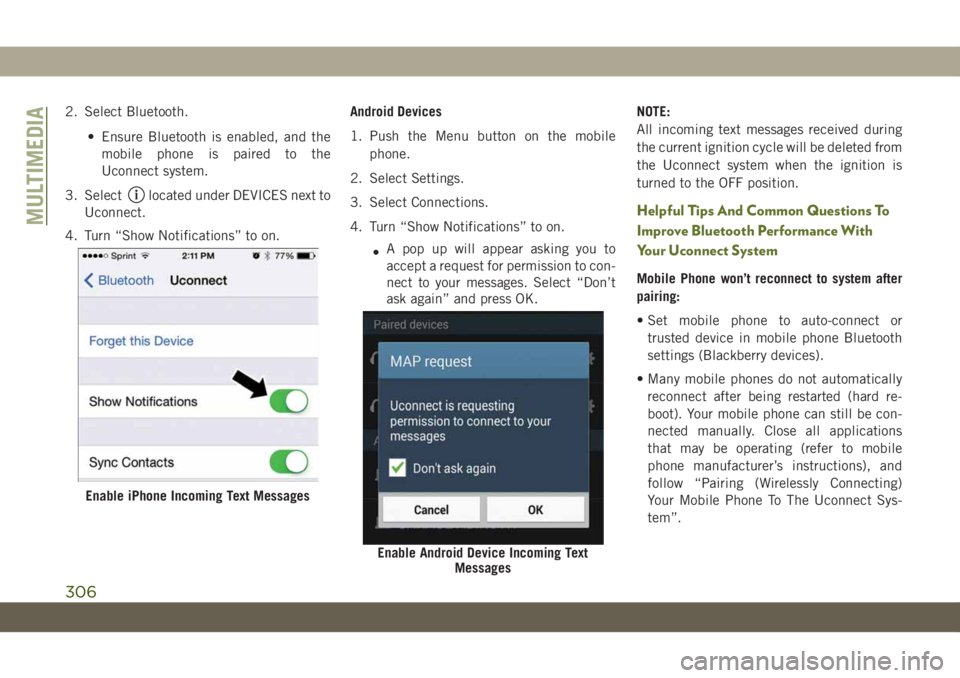
2. Select Bluetooth.
• Ensure Bluetooth is enabled, and the
mobile phone is paired to the
Uconnect system.
3. Select
located under DEVICES next to
Uconnect.
4. Turn “Show Notifications” to on.Android Devices
1. Push the Menu button on the mobile
phone.
2. Select Settings.
3. Select Connections.
4. Turn “Show Notifications” to on.
•A pop up will appear asking you to
accept a request for permission to con-
nect to your messages. Select “Don’t
ask again” and press OK.NOTE:
All incoming text messages received during
the current ignition cycle will be deleted from
the Uconnect system when the ignition is
turned to the OFF position.Helpful Tips And Common Questions To
Improve Bluetooth Performance With
Your Uconnect System
Mobile Phone won’t reconnect to system after
pairing:
• Set mobile phone to auto-connect or
trusted device in mobile phone Bluetooth
settings (Blackberry devices).
• Many mobile phones do not automatically
reconnect after being restarted (hard re-
boot). Your mobile phone can still be con-
nected manually. Close all applications
that may be operating (refer to mobile
phone manufacturer’s instructions), and
follow “Pairing (Wirelessly Connecting)
Your Mobile Phone To The Uconnect Sys-
tem”.
Enable iPhone Incoming Text Messages
Enable Android Device Incoming Text
Messages
MULTIMEDIA
306
Page 310 of 348
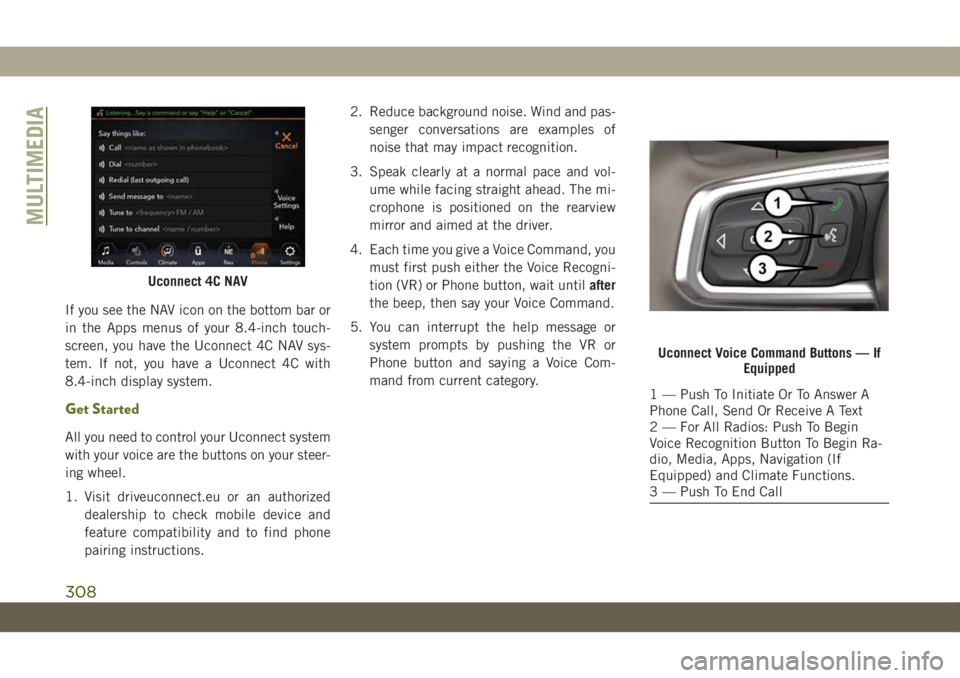
If you see the NAV icon on the bottom bar or
in the Apps menus of your 8.4-inch touch-
screen, you have the Uconnect 4C NAV sys-
tem. If not, you have a Uconnect 4C with
8.4-inch display system.
Get Started
All you need to control your Uconnect system
with your voice are the buttons on your steer-
ing wheel.
1. Visit driveuconnect.eu or an authorized
dealership to check mobile device and
feature compatibility and to find phone
pairing instructions.2. Reduce background noise. Wind and pas-
senger conversations are examples of
noise that may impact recognition.
3. Speak clearly at a normal pace and vol-
ume while facing straight ahead. The mi-
crophone is positioned on the rearview
mirror and aimed at the driver.
4. Each time you give a Voice Command, you
must first push either the Voice Recogni-
tion (VR) or Phone button, wait untilafter
the beep, then say your Voice Command.
5. You can interrupt the help message or
system prompts by pushing the VR or
Phone button and saying a Voice Com-
mand from current category.
Uconnect 4C NAV
Uconnect Voice Command Buttons — If
Equipped
1 — Push To Initiate Or To Answer A
Phone Call, Send Or Receive A Text
2 — For All Radios: Push To Begin
Voice Recognition Button To Begin Ra-
dio, Media, Apps, Navigation (If
Equipped) and Climate Functions.
3 — Push To End Call
MULTIMEDIA
308