display JEEP WRANGLER UNLIMITED 2019 Owner handbook (in English)
[x] Cancel search | Manufacturer: JEEP, Model Year: 2019, Model line: WRANGLER UNLIMITED, Model: JEEP WRANGLER UNLIMITED 2019Pages: 348, PDF Size: 6.5 MB
Page 98 of 348
using an accurate tire pressure gauge, even
if underinflation has not reached the level
to trigger illumination of the TPMS Warning
Light.
• Seasonal temperature changes will affect
tire pressure, and the TPMS will monitor
the actual tire pressure in the tire.
System Operation
The Tire Pressure Monitor System (TPMS)
uses wireless technology with wheel rim
mounted electronic sensors to monitor tire
pressure levels. Sensors, mounted to each
wheel as part of the valve stem, transmit tire
pressure readings to the receiver module.
NOTE:
It is particularly important for you to check
the tire pressure in all of the tires on your
vehicle monthly and to maintain the proper
pressure.The TPMS consists of the following compo-
nents:
• Receiver module
• Four tire pressure monitoring sensors
• Various tire pressure monitoring system
messages, which display in the instrument
cluster
• Tire pressure monitoring telltale light
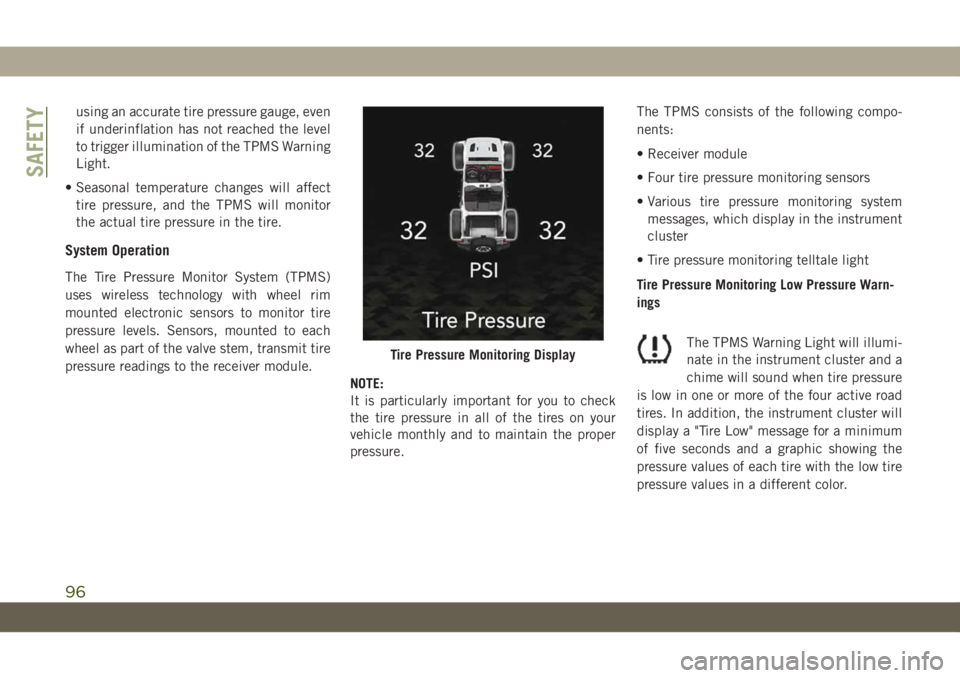
Tire Pressure Monitoring Low Pressure Warn-
ings
The TPMS Warning Light will illumi-
nate in the instrument cluster and a
chime will sound when tire pressure
is low in one or more of the four active road
tires. In addition, the instrument cluster will
display a "Tire Low" message for a minimum
of five seconds and a graphic showing the
pressure values of each tire with the low tire
pressure values in a different color.
Tire Pressure Monitoring Display
SAFETY
96
Page 99 of 348
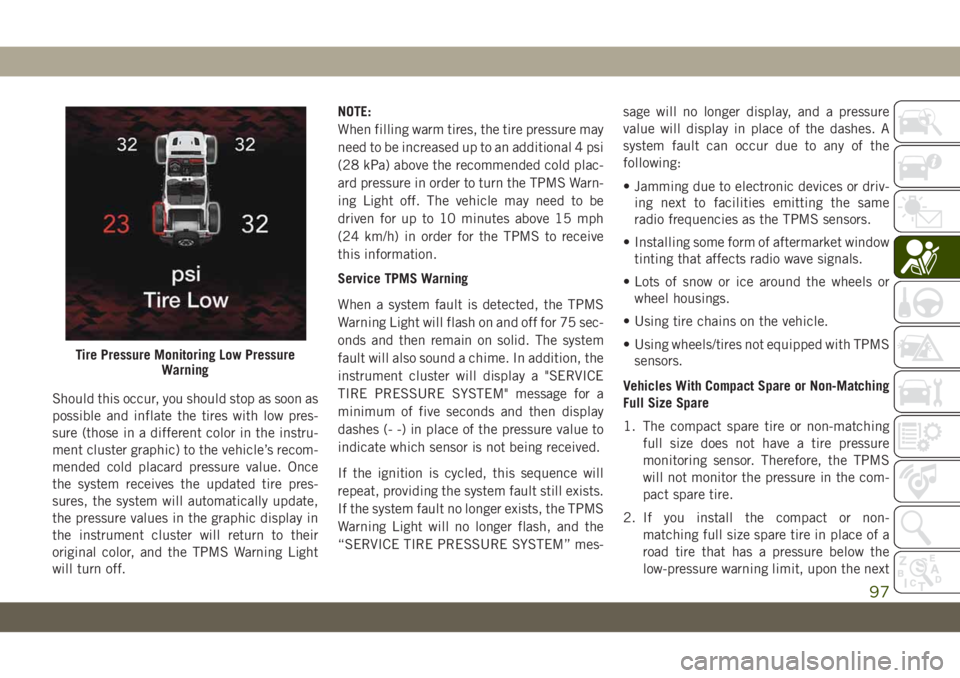
Should this occur, you should stop as soon as
possible and inflate the tires with low pres-
sure (those in a different color in the instru-
ment cluster graphic) to the vehicle’s recom-
mended cold placard pressure value. Once
the system receives the updated tire pres-
sures, the system will automatically update,
the pressure values in the graphic display in
the instrument cluster will return to their
original color, and the TPMS Warning Light
will turn off.NOTE:
When filling warm tires, the tire pressure may
need to be increased up to an additional 4 psi
(28 kPa) above the recommended cold plac-
ard pressure in order to turn the TPMS Warn-
ing Light off. The vehicle may need to be
driven for up to 10 minutes above 15 mph
(24 km/h) in order for the TPMS to receive
this information.
Service TPMS Warning
When a system fault is detected, the TPMS
Warning Light will flash on and off for 75 sec-
onds and then remain on solid. The system
fault will also sound a chime. In addition, the
instrument cluster will display a "SERVICE
TIRE PRESSURE SYSTEM" message for a
minimum of five seconds and then display
dashes (- -) in place of the pressure value to
indicate which sensor is not being received.
If the ignition is cycled, this sequence will
repeat, providing the system fault still exists.
If the system fault no longer exists, the TPMS
Warning Light will no longer flash, and the
“SERVICE TIRE PRESSURE SYSTEM” mes-sage will no longer display, and a pressure
value will display in place of the dashes. A
system fault can occur due to any of the
following:
• Jamming due to electronic devices or driv-
ing next to facilities emitting the same
radio frequencies as the TPMS sensors.
• Installing some form of aftermarket window
tinting that affects radio wave signals.
• Lots of snow or ice around the wheels or
wheel housings.
• Using tire chains on the vehicle.
• Using wheels/tires not equipped with TPMS
sensors.
Vehicles With Compact Spare or Non-Matching
Full Size Spare
1. The compact spare tire or non-matching
full size does not have a tire pressure
monitoring sensor. Therefore, the TPMS
will not monitor the pressure in the com-
pact spare tire.
2. If you install the compact or non-
matching full size spare tire in place of a
road tire that has a pressure below the
low-pressure warning limit, upon the next
Tire Pressure Monitoring Low Pressure
Warning
97
Page 100 of 348
ignition cycle, the TPMS Warning Light
will remain on and a chime will sound. In
addition, the graphic in the instrument
cluster will still display a different color
pressure value.
3. After driving the vehicle for up to 10 min-
utes above 15 mph (24 km/h), the TPMS
Warning Light will flash on and off for
75 seconds and then remain on solid. In
addition, the instrument cluster will dis-
play a “Service Tire Pressure System”
message for five seconds and then display
dashes (- -) in place of the pressure value.
4. For each subsequent ignition cycle, a
chime will sound, the TPMS Warning
Light will flash on and off for 75 seconds
and then remain on solid, and the instru-
ment cluster will display a “SERVICE
TIRE PRESSURE SYSTEM” message for
five seconds and then display dashes (- -)
in place of the pressure value.
5. Once you repair or replace the original
road tire and reinstall it on the vehicle in
place of the compact spare or non-
matching full size, the TPMS will update
automatically. In addition, the TPMSWarning Light will turn off and the graphic
in the instrument cluster will display a
new pressure value instead of dashes (- -),
as long as no tire pressure is below the
low-pressure warning limit in any of the
four active road tires. The vehicle may
need to be driven for up to 10 minutes
above 15 mph (24 km/h) in order for the
TPMS to receive this information.
Vehicles With a Full Size Matching Spare
1. If your vehicle is equipped with a match-
ing full-size spare wheel and tire assem-
bly, it has a tire pressure monitoring sen-
sor, and can be monitored by the Tire
Pressure Monitoring System (TPMS)
when swapped with a low pressure road
tire.
2. In the event that the matching full-size
spare tire is swapped with a low pressure
road tire, the next ignition switch cycle
will still show the TPMS Warning Light to
be on, a chime to sound, and the graphic
display will still show the low tire pressure
value in a different color.3. Driving the vehicle for up to 10 minutes
above 15 mph (24 km/h) will turn off the
TPMS Warning Light as long as none of
road tires are below the low pressure
warning threshold.
TPMS Deactivation — If Equipped
The TPMS can be deactivated if replacing all
four wheel and tire assemblies (road tires)
with wheel and tire assemblies that do not
have TPMS sensors, such as when installing
winter wheel and tire assemblies on your
vehicle.
To deactivate the TPMS, first replace all four
wheel and tire assemblies (road tires) with
tires not equipped with Tire Pressure Moni-
toring (TPM) Sensors. Then, drive the vehicle
for 10 minutes above 15 mph (24 km/h). The
TPMS will chime, the TPMS Warning Light
will flash on and off for 75 seconds and then
remain on. The instrument cluster will dis-
play the “SERVICE TIRE PRESSURE SYS-
TEM” message and then display dashes (--)
in place of the pressure values.
SAFETY
98
Page 101 of 348
Beginning with the next ignition cycle, the
TPMS will no longer chime or display the
“SERVICE TIRE PRESSURE SYSTEM” mes-
sage in the instrument cluster but dashes (--)
will remain in place of the pressure values.
To reactivate the TPMS, replace all four
wheel and tire assemblies (road tires) with
tires equipped with TPMS sensors. Then,
drive the vehicle for up to 10 minutes above
15 mph (24 km/h). The TPMS will chime, the
TPMS Warning Light will flash on and off for
75 seconds and then turn off. The instrument
cluster will display the “SERVICE TIRE
PRESSURE SYSTEM” message and then dis-
play pressure values in place of the dashes.
On the next ignition cycle the "SERVICE TIRE
PRESSURE SYSTEM" message will no longer
be displayed as long as no system fault exists.
OCCUPANT RESTRAINT
SYSTEMS
Some of the most important safety features in
your vehicle are the restraint systems:
Occupant Restraint Systems Features
• Seat Belt Systems
• Supplemental Restraint Systems (SRS) Air
Bags
• Child Restraints
Some of the safety features described in this
section may be standard equipment on some
models, or may be optional equipment on
others. If you are not sure, ask an authorized
dealer.
Important Safety Precautions
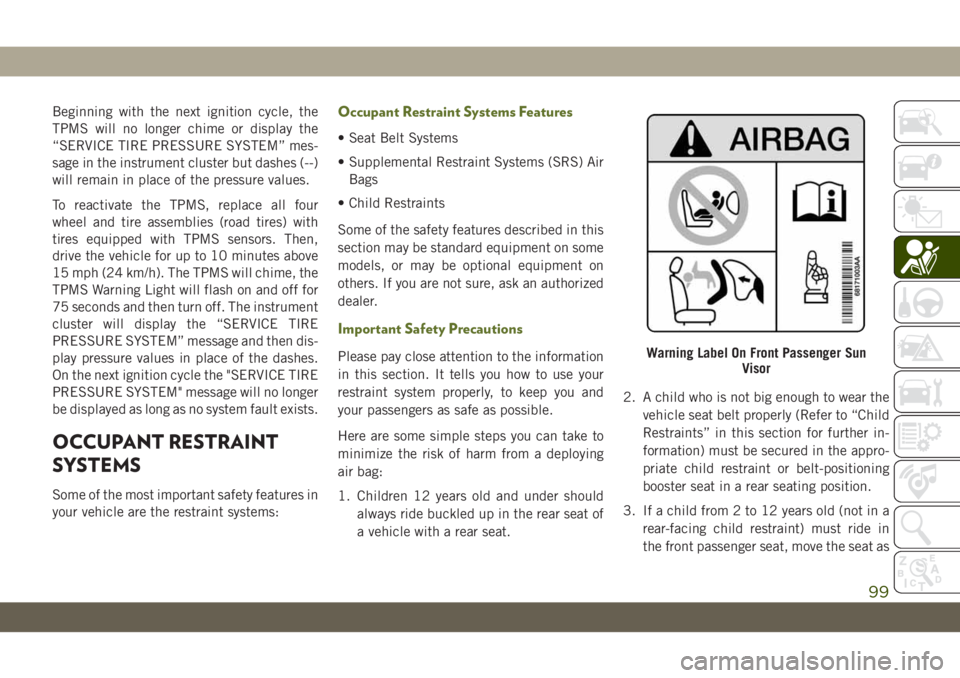
Please pay close attention to the information
in this section. It tells you how to use your
restraint system properly, to keep you and
your passengers as safe as possible.
Here are some simple steps you can take to
minimize the risk of harm from a deploying
air bag:
1. Children 12 years old and under should
always ride buckled up in the rear seat of
a vehicle with a rear seat.2. A child who is not big enough to wear the
vehicle seat belt properly (Refer to “Child
Restraints” in this section for further in-
formation) must be secured in the appro-
priate child restraint or belt-positioning
booster seat in a rear seating position.
3. If a child from 2 to 12 years old (not in a
rear-facing child restraint) must ride in
the front passenger seat, move the seat asWarning Label On Front Passenger Sun
Visor
99
Page 114 of 348
children are safer when properly restrained in
the rear seats rather than in the front. (Refer
to “Child Restraints” in this section for fur-
ther information.)
WARNING!
• A DISABLED (OFF) Passenger Advanced
Front Air Bag is deactivated and will not
deploy in a collision.
• A DISABLED (OFF) Passenger Advanced
Front Air Bag will not provide a front
passenger additional protection by
supplementing the seat belts.
• Do not install a child restraint in the
front seat unless the Passenger Air Bag
DISABLE (OFF) Indicator light
on
the overhead sports bar is illuminated to
show that the Passenger Advanced Front
Air Bag is DISABLED (OFF).
• In a collision, you and your passengers
can suffer much greater injuries if you
are not properly buckled up. You can
strike the interior of your vehicle or other
passengers, or you can be thrown out of
the vehicle. Always be sure you and
WARNING!
others in your vehicle are buckled up
properly.
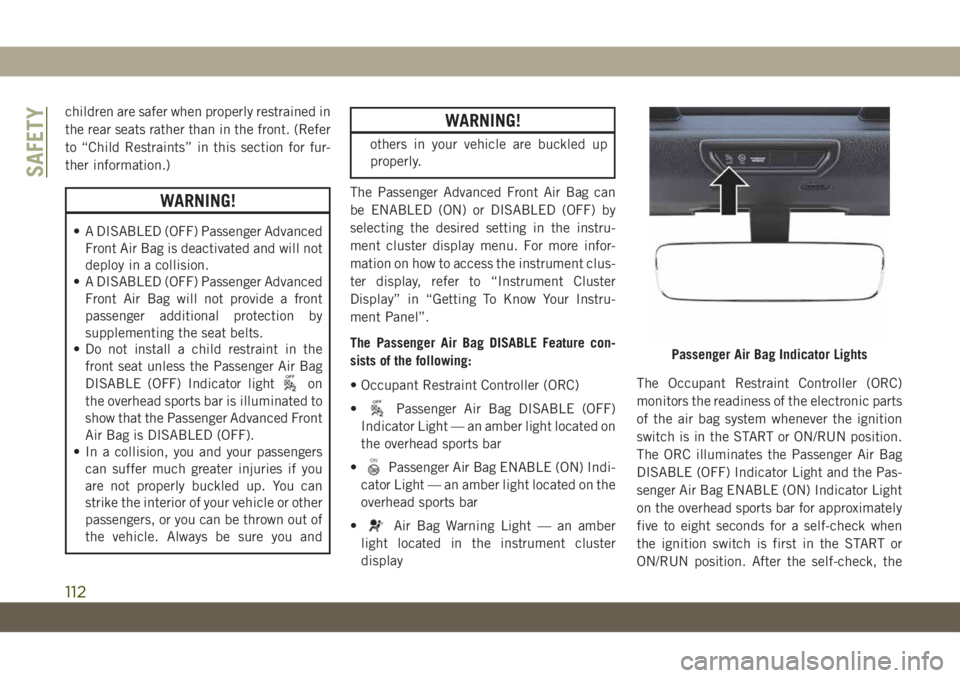
The Passenger Advanced Front Air Bag can
be ENABLED (ON) or DISABLED (OFF) by
selecting the desired setting in the instru-
ment cluster display menu. For more infor-
mation on how to access the instrument clus-
ter display, refer to “Instrument Cluster
Display” in “Getting To Know Your Instru-
ment Panel”.
The Passenger Air Bag DISABLE Feature con-
sists of the following:
• Occupant Restraint Controller (ORC)
•
Passenger Air Bag DISABLE (OFF)
Indicator Light — an amber light located on
the overhead sports bar
•
Passenger Air Bag ENABLE (ON) Indi-
cator Light — an amber light located on the
overhead sports bar
•
Air Bag Warning Light — an amber
light located in the instrument cluster
displayThe Occupant Restraint Controller (ORC)
monitors the readiness of the electronic parts
of the air bag system whenever the ignition
switch is in the START or ON/RUN position.
The ORC illuminates the Passenger Air Bag
DISABLE (OFF) Indicator Light and the Pas-
senger Air Bag ENABLE (ON) Indicator Light
on the overhead sports bar for approximately
five to eight seconds for a self-check when
the ignition switch is first in the START or
ON/RUN position. After the self-check, the
Passenger Air Bag Indicator Lights
SAFETY
112
Page 116 of 348

WARNING!
• Children 12 years or younger should al-
ways ride buckled up in the rear seat of a
vehicle with a rear seat.
DISABLING (OFF) The Passenger Advanced Front
Air Bag
To DISABLE (OFF) the Passenger Advanced
Front Air Bag, access the instrument cluster
display main menu located in the instrument
cluster by pushing the Up or Down arrow
button located on the steering wheel, then
complete the following actions:
Action Information
Scroll Up or Down to
“Vehicle Set-Up”
Press the “OK” on
the vehicle steering
wheel to enter “Ve-
hicle Settings”
Scroll Up or Down
using the arrow but-
tons on the steering
wheel to select “Se-
curity”
Action Information
Press the “OK” but-
ton on the steering
wheel to select “Se-
curity”
Press the “OK” but-
ton on the steering
wheel to select “Pas-
senger AIRBAG”
Scroll Up or Down to
Passenger AIRBAG
OFF “
OFF”NOTE:
If the Passenger Ad-
vanced Front Air Bag
was previously EN-
ABLED (ON) it will
default to ON and
user will have to
scroll down to select
OFF.
Press the “OK” but-
ton on the steering
wheel to select Pas-
senger AIRBAG OFF
“
OFF”
Scroll Up or Down to
select “YES” to con-
firm
Action Information
Press the “OK” but-
ton on the steering
wheel to select
“YES”NOTE:
If this step is not
completed within
1 minute this option
will timeout and this
process will have to
be repeated.
A single chime will
sound with the Pas-
senger AIRBAG OFF
indicator light
illuminated for 4 to
5 seconds confirming
the disabling of the
Passenger Advanced
Front Air Bag.
The Passenger AIR-
BAG OFF
indi-
cator light will re-
main continuously
illuminated telling
the driver and front
passenger that the
Passenger Advanced
Front Air Bag is DIS-
ABLED (OFF).
SAFETY
114
Page 117 of 348

Following the actions listed in the table above
will DISABLE (OFF) the Passenger Advanced
Front Air Bag. The Passenger Air Bag DIS-
ABLE (OFF) Indicator light on the overhead
sports bar will illuminate
to show that the
Passenger Advanced Front Air Bag will not
deploy during a collision.
ENABLING (ON) The Passenger Advanced Front
Air Bag
Access the instrument cluster display main
menu located in the instrument cluster by
pushing the Up or Down arrow button located
on the steering wheel, then complete the
following actions:
Action Information
Scroll Up or Down to
“Vehicle Set-Up”
Press the “OK” on
the vehicle steering
wheel to enter “Ve-
hicle Settings”
Scroll Up or Down
using the arrow but-
tons on the steering
wheel to select “Se-
curity”
Action Information
Press the “OK” but-
ton on the steering
wheel to select “Se-
curity”
Press the “OK” but-
ton on the steering
wheel to select “Pas-
senger AIRBAG”
Scroll Up or Down to
Passenger AIRBAG
ON “
ON”NOTE:
If the Passenger Ad-
vanced Front Air Bag
was previously DIS-
ABLED (OFF) it will
default to OFF and
user will have to
scroll down to select
ON.
Press the “OK” but-
ton on the steering
wheel to select Pas-
senger AIRBAG ON “
ON”
Action Information
Press the “OK” but-
ton on the steering
wheel to select “Yes”NOTE:
If this step is not
completed within
1 minute this option
will timeout and this
process will have to
be repeated.
A single chime will
sound with the Pas-
senger AIRBAG ON
indicator light
illuminated for 4 to
5 seconds confirming
the enabling of the
Passenger Advanced
Front Air Bag.
The Passenger AIR-
BAG ON
indica-
tor light will remain
continuously illumi-
nated telling the
driver and front pas-
senger that the Pas-
senger Advanced
Front Air Bag is EN-
ABLED (ON).
115
Page 145 of 348
5. If the vehicle speed is above 5 mph
(8 km/h), the ENGINE START/STOP but-
ton must be held for two seconds (or three
short pushes in a row) to turn the engine
off. The ignition will remain in the ACC
mode (NOT the OFF mode) if the engine is
turned off when the transmission is not in
PARK.
NOTE:
The system will automatically time out and
the ignition will cycle to the OFF mode after
30 minutes of inactivity if the ignition is left
in the ACC or RUN (engine not running) mode
and the transmission is in PARK.
ENGINE START/STOP Button Functions — With
Driver’s Foot OFF The Brake Pedal (In PARK Or
NEUTRAL Position)
The ENGINE START/STOP button operates
similar to an ignition switch. It has three
modes: OFF, ACC, and RUN. To change the
ignition modes without starting the vehicle
and use the accessories, follow these steps:
1. Starting with the ignition in the OFF
mode,2. Push the ENGINE START/STOP button
once to place the ignition to the ACC
mode (instrument cluster will display
“ACC”),
3. Push the ENGINE START/STOP button a
second time to place the ignition to the
RUN mode (instrument cluster will dis-
play “ON/RUN”),
4. Push the ENGINE START/STOP button a
third time to return the ignition to the OFF
mode (instrument cluster will display
“OFF”).
AutoPark
AutoPark is a supplemental feature to assist
in placing the vehicle in PARK should the
situations on the following pages occur. It is a
back up system and should not be relied upon
as the primary method by which the driver
shifts the vehicle into PARK.
The conditions under which AutoPark will
engage are outlined on the following pages.
WARNING!
• Driver inattention could lead to failure to
place the vehicle in PARK. ALWAYS DO
A VISUAL CHECK that your vehicle is in
PARK by verifying that a solid (not blink-
ing) “P” is indicated in the instrument
cluster display and on the gear selector.
If the "P" indicator is blinking, your ve-
hicle is not in PARK. As an added pre-
caution, always apply the parking brake
when exiting the vehicle.
• AutoPark is a supplemental feature. It is
not designed to replace the need to shift
your vehicle into PARK. It is a back up
system and should not be relied upon as
the primary method by which the driver
shifts the vehicle into PARK.
If the vehicle is not in PARK and the driver turns
off the engine, the vehicle may AutoPark.
AutoPark will engage when all of these con-
ditions are met:
• Vehicle is equipped with an 8-speed trans-
mission
143
Page 146 of 348

• Drivers door is ajar or in conditions where
driver door is removed an additional trigger
would be if the driver is off the seat (seat
pad sensor detects driver missing).
• Vehicle is not in PARK
• Vehicle Speed is 0 mph (0 km/h)
• Ignition switched from RUN to OFF
NOTE:
For Keyless Go equipped vehicles, The en-
gine will turn off and the ignition switch will
change to ACC mode. After 30 minutes the
ignition switches to OFF automatically, un-
less the driver turns the ignition switch OFF.
If the vehicle is not in PARK and the driver exits
the vehicle with the engine running, the vehicle
may AutoPark.
AutoPark will engage when all of these con-
ditions are met:
• Vehicle is equipped with an 8-speed trans-
mission
• Drivers door is ajar or in conditions where
driver door is removed an aditional trigger
would be if the driver is off the seat (seat
pad sensor detects driver missing).• Vehicle is not in PARK
• Driver’s door is removed
• Vehicle speed is 1.2 mph (2.0 km/h) or less
• Driver’s seat belt is unbuckled
• Driver’s door is ajar
• Brake Pedal is not depressed
The MESSAGE “AutoPark Engaged Shift to P
then Shift to Gear” will display in the instru-
ment cluster.
NOTE:
In some cases the ParkSense graphic will be
displayed in the instrument cluster. In these
cases, the shifter must be returned to “P” to
select desired gear.
If the driver shifts into PARK while moving, the
vehicle may AutoPark.
AutoPark will engageONLYwhen vehicle
speed is 1.2 mph (2.0 km/h) or less.
The MESSAGE “Vehicle Speed is Too High to
Shift to P” will be displayed in the instrument
cluster if vehicle speed is above 1.2 mph
(2.0 km/h).WARNING!
If vehicle speed is above 1.2 mph
(2.0 km/h), the transmission will default
to NEUTRAL until the vehicle speed drops
below 1.2 mph (1.9 km/h). A vehicle left
in the NEUTRAL position can roll. As an
added precaution, always apply the park-
ing brake when exiting the vehicle.
4WD LOW
AutoPark will be disabled when operating the
vehicle in 4WD LOW.
The MESSAGE “AutoPark Disabled” will be
displayed in the instrument cluster.
Additional customer warnings will be given
when both of these conditions are met:
• Vehicle is not in PARK
• Driver’s Door is ajar
The MESSAGE “AutoPark Not Engaged” will
be displayed in the instrument cluster. A
warning chime will continue until you shift
the vehicle into PARK or the Driver’s Door is
closed.
STARTING AND OPERATING
144
Page 147 of 348
ALWAYS DO A VISUAL CHECKthat your vehicle
is in PARK by looking for the "P" in the
instrument cluster display and on the shifter.
As an added precaution, always apply the
parking brake when exiting the vehicle.
Normal Starting — Diesel Engine
1. The gear selector must be in the NEU-
TRAL or PARK position before you can
start the engine.
2. Place the ignition in the ON position.
3. Watch for the “Wait To Start Light” in the
instrument cluster. Refer to “Instrument
Cluster” in “Getting To Know Your Instru-
ment Panel” for further review. It will glow
for two to ten seconds or more, depending
on engine temperature. When the “Wait
To Start Light” goes out, the engine is
ready to start.
4. Tip Start Feature
Do notpress the accelerator. Cycle the
ignition to the START position and then
release it. The starter motor will continue
to run, and it will automatically disengage
when the engine is running. If the engine
fails to start, the starter will disengageautomatically in 25 seconds. If this oc-
curs, cycle the ignition to the LOCK posi-
tion, wait 25 to 30 seconds, then repeat
the “Normal Starting” procedure.
NOTE:
The starter motor may run up to 30 sec-
onds in very cold conditions until the
engine is started. The starter can be dis-
engaged by cycling the ignition to the
OFF position, if required.
5. After the engine starts, allow it to idle for
approximately 30 seconds before driving.
This allows oil to circulate and lubricate
the turbocharger.
Diesel Engine Warm-Up
Avoid full throttle operation when the engine
is cold. When starting a cold engine, bring the
engine up to operating speed slowly to allow
the oil pressure to stabilize as the engine
warms up.NOTE:
High-speed, no-load running of a cold engine
can result in excessive white smoke and poor
engine performance. No-load engine speeds
should be kept under 1,200 rpm during the
warm-up period, especially in cold, ambient
temperature conditions.
If temperatures are below 32°F (0°C), oper-
ate the engine at moderate speeds for five
minutes before full loads are applied.
Diesel Engine Idling — In Cold Weather
Avoid prolonged idling in ambient tempera-
tures below 0°F (-18°C). Long periods of
idling may be harmful to your engine because
combustion chamber temperatures can drop
so low that the fuel may not burn completely.
Incomplete combustion allows carbon and
varnish to form on piston rings and injector
nozzles. Also, the unburned fuel can enter
the crankcase, diluting the oil and causing
rapid wear to the engine.
145