display JEEP WRANGLER UNLIMITED 2019 Owner handbook (in English)
[x] Cancel search | Manufacturer: JEEP, Model Year: 2019, Model line: WRANGLER UNLIMITED, Model: JEEP WRANGLER UNLIMITED 2019Pages: 348, PDF Size: 6.5 MB
Page 171 of 348
“Fluids and lubricants” in the “Technical
specifications” section. The vehicle is
equipped with an automatic AdBlue heating
system when the engine starts allowing the
system to work correctly at temperatures
lower than 12 °F (-11 °C).
NOTE:
AdBlue freezes at temperatures lower than
12 °F (-11 °C).
AdBlue (UREA) Storage
AdBlue (UREA) is considered a very stable
product with a long shelf life. If AdBlue
(UREA) is kept in temperatures between
10° and 90°F (-12° and 32°C), it will last a
minimum of one year.
AdBlue (UREA) is subject to freezing at the
lowest temperatures. For example, AdBlue
(UREA) may freeze at temperatures at or
below 12° F (-11° C). The system has been
designed to operate in this environment.NOTE:
When working with AdBlue (UREA), it is
important to know that:
• Any containers or parts that come into con-
tact with AdBlue (UREA) must be AdBlue
(UREA) compatible (plastic or stainless
steel). Copper, brass, aluminum, iron or
non-stainless steel should be avoided as
they are subject to corrosion by AdBlue
(UREA).
• If AdBlue (UREA) is spilled, it should be
wiped up completely.
Adding AdBlue (UREA)
Preliminary Conditions
AdBlue (UREA) freezes at temperatures
lower than 12° F (-11° C). If the car stands for
a long time at this temperature refilling could
be difficult. For this reason, it is advised to
park the vehicle in a garage and/or heated
environment and wait for the urea to return to
liquid state before topping up.
Proceed as follows:
• Park the car on flat ground and stop the
engine by cycling the ignition to the OFF
position.• Open the fuel door, undo and remove the
cap (blue) from the AdBlue (UREA) filler.
Refilling With Nozzles
You can fill up at any AdBlue (UREA) dis-
tributor.
Proceed as follows:
• Insert the AdBlue (UREA) nozzle in the
filler, start refilling and stop refilling at the
first shut-off (the shut-off indicates that the
AdBlue (UREA) tank is full). Do not pro-
ceed with the refilling, to prevent spillage
of AdBlue (UREA).
• Extract the nozzle.
Refilling With Containers
Proceed as follows:
• Check the expiration date.
• Read the advice for use on the label before
pouring the content of the bottle into the
AdBlue (UREA) tank.
• If systems which cannot be screwed in (e.g.
tanks) are used for refilling, after the indi-
cation appears on the instrument panel
display refer to “Warning lights And Mes-
sages" in the “Getting To Know Your Instru-
169
Page 172 of 348
ment Panel” for further information, fill the
AdBlue (UREA) tank with no more than
2 Gallons (8 liters).
• If containers which can be screwed to the
filler are used, the reservoir is full when the
AdBlue (UREA) level in the container stops
pouring out. Do not proceed further.
Operations After Refilling
Proceed as follows:
• Fit the cap back on the AdBlue (UREA)
filler by turning it clockwise and screwing it
completely.
• Cycle the ignition to RUN (it is not neces-
sary to start the engine).
• Wait for the indication on the instrument
panel to switch off before moving the car.
The indication may stay on for a few sec-
onds to approximately half a minute. If the
engine is started and the car is moved, the
indication will remain on for longer. This
will not compromise engine operation.• If the AdBlue (UREA) was topped up when
the tank was empty, wait for 2 minutes
before starting the engine.
NOTE:
• If AdBlue (UREA) is spilled out of the filler
neck, clean up well the area and proceed to
filling up again. If the liquid crystallizes,
eliminate it with a sponge and warm water.
• DO NOT EXCEED THE MAXIMUM LEVEL:
this could cause damage to the reservoir.
AdBlue (UREA) freezes at under 12° F
(-11° C). Although the system is designed
to operate below the freezing point of the
UREA, it is advisable not to fill the tank
beyond the maximum level because if the
UREA freezes the system can be damaged.
Follow the instructions in this section.
• If the AdBlue (UREA) is spilled on painted
surfaces or aluminium, immediately clean
the area with water and use absorbent ma-
terial to collect the fluid that has been
spilled on the ground.• Do not try to start the engine if AdBlue
(UREA) was accidentally added to the die-
sel fuel tank, this can result in serious
engine damage, contact an authorized
dealer.
• Do not add additives or other fluids to
AdBlue (UREA), doing so could damage the
system.
• The use of non-conforming or degraded
AdBlue (UREA) may lead to indications
appearing on the instrument panel display
refer to “Warning Lights And Messages" in
the “Getting To Know Your Instrument
Panel” for further information.
• Never pour AdBlue (UREA) into another
container: it could be contaminated.
• If the AdBlue (UREA) runs out, see refer to
“Warning Lights And Messages" in the
“Getting To Know Your Instrument Panel”
for further information to continue using
the car normally.
STARTING AND OPERATING
170
Page 210 of 348
SCHEDULED SERVICING
Correct servicing is crucial for guaranteeing a
long life for the car under the best conditions.
For this reason, Jeep has planned a series of
checks and services at fixed distance inter-
vals and, where provided, at fixed time inter-
vals, as described in the Scheduled Servicing
plan. To keep the car’s efficiency in tip-top
condition, in the following Scheduled Service
plan pages a few additional checks are listed
that should be carried out more frequently
with respect to the normal coupon redemp-
tion schedule. Scheduled Servicing is offered
by all authorized dealerships according to
fixed time or mileage intervals. If, during
each operation, in addition to the ones
scheduled, the need arises for further re-
placements or repairs, these may be carried
out with the owner's explicit agreement only.
The technicians at your dealership know your
vehicle best, and have access to factory
trained information, genuine Mopar parts,
and specially designed electronic and me-
chanical tools that can help prevent future
costly repairs. If your car is used frequently
for towing, the interval between one sched-uled servicing operation and the next should
be reduced. More frequent maintenance may
be needed for vehicles in severe operating
conditions, such as dusty areas and very
short trip driving.
NOTE:
Scheduled Servicing interventions are set out
by the Manufacturer. Failure to have them
carried out may invalidate the warranty. It is
advised to inform an authorized dealership of
any small operating irregularities without
waiting for the next service.
Scheduled Servicing — Gasoline Engine
The oil change indicator system will remind
you that it is time to take your vehicle in for
engine oil replacement.
On vehicles equipped with instrument cluster
display, “Oil Change Required” will be dis-
played and a single chime will sound, indi-
cating that an oil change is necessary.
On non-instrument cluster display equipped
vehicles, “Change Oil” will flash in the in-
strument cluster odometer and a single
chime will sound, indicating that an oil
change is necessary.The oil change indicator message will illumi-
nate approximately 7,000 miles
(11,200 km) after the most recent oil change
was performed. Have your vehicle serviced as
soon as possible, within 500 miles (800 km)
(except for 2.0L gasoline engine with GPF -
Gasoline Particulate Filter). However, an ear-
lier oil change at 4,500 miles (7,500 km)
may be required if the vehicle is operated
under “Severe Duty Conditions” later in this
section.
NOTE:
• The oil change indicator message will not
monitor the time since the last oil change.
Change your vehicle's oil if it has been
12 months since your last oil change even
if the oil change indicator message is NOT
illuminated.
• Change your engine oil more often if you
drive your vehicle off-road for an extended
period of time.
• Under no circumstances should oil change
intervals exceed 7,500 miles (12,000 km)
or 12 months, whichever comes first (ex-
cept for 2.0L gasoline engine with GPF -
Gasoline Particulate Filter).
SERVICING AND MAINTENANCE
208
Page 214 of 348
Mileage or time passed (which-
ever comes first)
7,500
15,000
22,500
30,000
37,500
45,000
52,500
60,000
67,500
75,000
82,500
90,000
97,500
105,000
112,500
120,000
127,500
135,000
142,500
150,000
Or Months: 12 24 36 48 60 72 84 96 108 120 132 144 156 168 180 192 204 216 228 240
Or Kilometers:
12,000
24,000
36,000
48,000
60,000
72,000
84,000
96,000
108,000
120,000
132,000
144,000
156,000
168,000
180,000
192,000
204,000
216,000
228,000
240,000
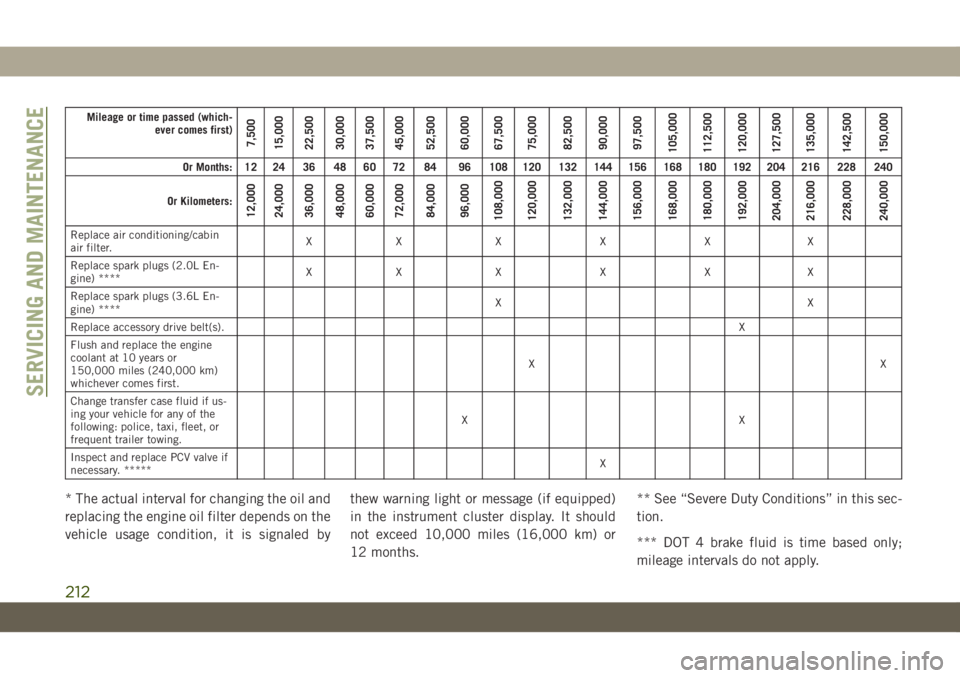
Replace air conditioning/cabin
air filter.XX X X X X
Replace spark plugs (2.0L En-
gine) ****XX X X X X
Replace spark plugs (3.6L En-
gine) ****XX
Replace accessory drive belt(s).X
Flush and replace the engine
coolant at 10 years or
150,000 miles (240,000 km)
whichever comes first.XX
Change transfer case fluid if us-
ing your vehicle for any of the
following: police, taxi, fleet, or
frequent trailer towing.XX
Inspect and replace PCV valve if
necessary. *****X
* The actual interval for changing the oil and
replacing the engine oil filter depends on the
vehicle usage condition, it is signaled bythew warning light or message (if equipped)
in the instrument cluster display. It should
not exceed 10,000 miles (16,000 km) or
12 months.** See “Severe Duty Conditions” in this sec-
tion.
*** DOT 4 brake fluid is time based only;
mileage intervals do not apply.
SERVICING AND MAINTENANCE
212
Page 215 of 348
**** The spark plug change interval is mile-
age based only, yearly intervals do not apply.
***** This maintenance is recommended by
the manufacturer to the owner, but is not
required to maintain emissions warranty.
WARNING!
• You can be badly injured working on or
around a motor vehicle. Do only service
work for which you have the knowledge
and the right equipment. If you have any
doubt about your ability to perform a
service job, take your vehicle to a com-
petent mechanic.
• Failure to properly inspect and maintain
your vehicle could result in a component
malfunction and effect vehicle handling
and performance. This could cause an
accident.
Severe Duty Conditions
Change the engine oil and engine oil filter at
every 4500 miles (7,500 km) or 6 months if
using your vehicle under any of the following
severe duty conditions:• Stop and go driving.
• Driving in dusty conditions.
• Short trips of less than 10 miles (16 km).
• Trailer towing.
• Taxi, police, or delivery service (commercial
service).
• Off-road or desert operation.
Scheduled Servicing — Diesel Engine
Your vehicle is equipped with an automatic
oil change indicator system. The oil change
indicator system will remind you that it is
time to take your vehicle in for engine oil
replacement.
On vehicles equipped with instrument cluster
display, “Oil Change Required” will be dis-
played and a single chime will sound, indi-
cating that an oil change is necessary.
On non-instrument cluster display equipped
vehicles, “Change Oil” will flash in the instru-
ment cluster odometer and a single chime
will sound, indicating that an oil change is
necessary.Based on engine operation conditions, the oil
change indicator message will illuminate.
This means that service is required for your
vehicle. Operating conditions such as fre-
quent short-trips, trailer tow, extremely hot or
cold ambient temperatures will influence
when the “Oil Change Required” message is
displayed. Severe Operating Conditions can
cause the change oil message to illuminate
as earlier than specified. Have your vehicle
serviced as soon as possible, within the next
500 miles (805 km).
NOTE:
•The actual interval for changing engine oil
and replacing the engine oil filter depends on
the vehicle usage conditions, and is signaled
by the warning light or message in the instru-
ment cluster. In any case, it must never ex-
ceed two years. If the vehicle is used mainly
for city driving, change the engine oil and
filter every year.
•Flush and replace the engine coolant at
120 months or 150,000 miles (240,000 km)
whichever comes first.
213
Page 267 of 348
MULTIMEDIA
CYBERSECURITY...........267
UCONNECT 3 WITH 5–INCH DIS-
PLAY — IF EQUIPPED........268
Uconnect 3 With 5–inch Display At A
Glance.....................268
Clock Setting................269
Audio Setting................269
Radio Operation..............270
Voice Text Reply (Not Compatible With
iPhone)....................270
Apps — If Equipped............271
UCONNECT 4 WITH 7-INCH DIS-
PLAY.....................272
Uconnect 4 At A Glance.........272
Drag & Drop Menu Bar...........273
Radio.....................274
Android Auto — If Equipped.......275
Apple CarPlay Integration — If
Equipped...................276
Apps — If Equipped............277
UCONNECT 4C/4C NAV WITH
8.4-INCH DISPLAY..........278
Uconnect 4C/4C NAV At A Glance . . .278
Drag & Drop Menu Bar...........279
Radio.....................280
Android Auto — If Equipped.......281
Apple CarPlay Integration — If
Equipped...................285
Apps — If Equipped............287
UCONNECT SETTINGS.......288
TIPS CONTROLS AND GENERAL
INFORMATION.............288
Steering Wheel Audio Controls......288
Reception Conditions............289
Care And Maintenance...........289
Anti-Theft Protection............289
AUX/USB/MP3 CONTROL — IF
EQUIPPED.................289
NAVIGATION — IF EQUIPPED. . .292
Changing The Navigation Voice Prompt
Volume....................292
Finding Points Of Interest........294
Finding A Place By Spelling The
Name.....................294One-Step Voice Destination Entry. . . .294
Setting Your Home Location.......294
Home.....................294
Adding A Stop................296
Taking A Detour...............296
Map Update.................296
UCONNECT PHONE.........297
Uconnect Phone (Bluetooth Hands Free
Calling)....................297
Pairing (Wirelessly Connecting) Your Mobile
Phone To The Uconnect System.....300
Common Phone Commands
(Examples)..................304
Mute (Or Unmute) Microphone During
Call......................304
Transfer Ongoing Call Between Handset And
Vehicle....................304
Phonebook..................304
Voice Command Tips............304
Changing The Volume...........305
Using Do Not Disturb...........305
Incoming Text Messages.........305
MULTIMEDIA
265
Page 270 of 348
UCONNECT 3 WITH 5–INCH DISPLAY — IF EQUIPPED
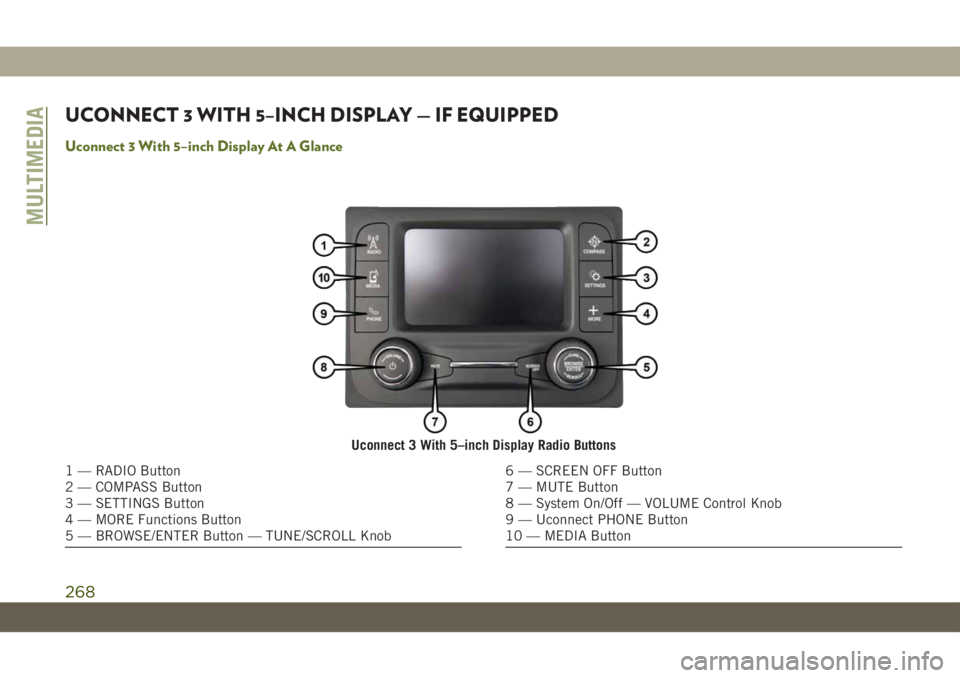
Uconnect 3 With 5–inch Display At A Glance
Uconnect 3 With 5–inch Display Radio Buttons
1 — RADIO Button
2 — COMPASS Button
3 — SETTINGS Button
4 — MORE Functions Button
5 — BROWSE/ENTER Button — TUNE/SCROLL Knob6 — SCREEN OFF Button
7 — MUTE Button
8 — System On/Off — VOLUME Control Knob
9 — Uconnect PHONE Button
10 — MEDIA Button
MULTIMEDIA
268
Page 271 of 348
CAUTION!
Do NOT attach any object to the touchscreen,
doing so can result in damage to the touch-
screen.
Clock Setting
To start the clock setting procedure:
1. Press the “Settings” button on the face-
plate, then press the “Clock and Date”
button.
2. Press the “Set Time” button on the
touchscreen.
3. Press the “Up” or “Down” arrows to adjust
the hours or minutes, then select the
“AM” or “PM” button on the touchscreen.
You can also select 12hr or 24hr format by
pressing the desired button on the
touchscreen.
4. Once the time is set, press the “Done”
button on the touchscreen to exit the time
screen.NOTE:
In the Clock Setting Menu you can also select
“Display Clock”. Display Clock turns the
clock display in the status bar on or off.
Audio Setting
1. Press the “Settings” button on the
faceplate.
2. Scroll down and press the “Audio” button
on the touchscreen to open the Audio
menu.
3. The Audio Menu shows the following op-
tions for you to customize your audio
settings.
Equalizer
Press the “Equalizer” button on the touch-
screen to adjust the Bass, Mid and Treble.
Use the “+” or “-” button on the touchscreen
to adjust the equalizer to your desired set-
tings.
Balance/Fade
Press the “Balance/Fade” button on the
touchscreen to adjust the sound from thespeakers. Use the arrow buttons on the
touchscreen to adjust the sound level from
the front and rear or right and left side speak-
ers. Press the center “C” button on the touch-
screen to reset the balance and fade to the
factory setting.
Speed Adjusted Volume — If Equipped
Press the “Speed Adjusted Volume” button
on the touchscreen to select between OFF, 1,
2 or 3. This will decrease the radio volume
relative to a decrease in vehicle speed.
Loudness — If Equipped
Press the “Loudness” button on the touch-
screen to select the Loudness feature. When
this feature is activated it improves sound
quality at lower volumes.
Surround Sound — If Equipped
Press the “Surround Sound” button on the
touchscreen, select On or Off followed by
pressing the back arrow button on the touch-
screen. When this feature is activated, it
provides simulated surround sound mode.
269
Page 272 of 348
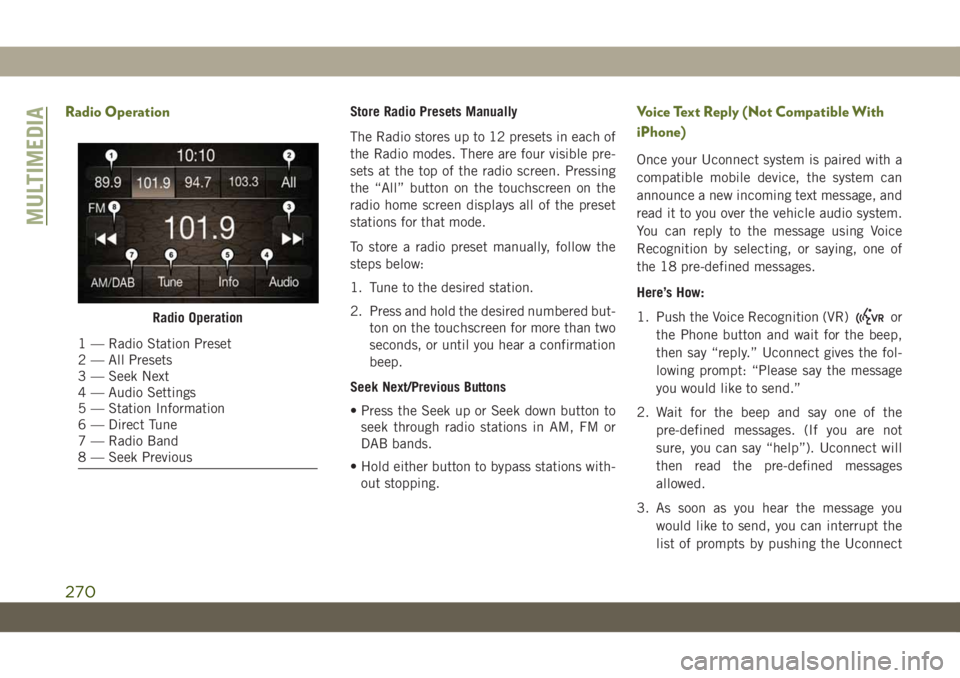
Radio OperationStore Radio Presets Manually
The Radio stores up to 12 presets in each of
the Radio modes. There are four visible pre-
sets at the top of the radio screen. Pressing
the “All” button on the touchscreen on the
radio home screen displays all of the preset
stations for that mode.
To store a radio preset manually, follow the
steps below:
1. Tune to the desired station.
2. Press and hold the desired numbered but-
ton on the touchscreen for more than two
seconds, or until you hear a confirmation
beep.
Seek Next/Previous Buttons
• Press the Seek up or Seek down button to
seek through radio stations in AM, FM or
DAB bands.
• Hold either button to bypass stations with-
out stopping.Voice Text Reply (Not Compatible With
iPhone)
Once your Uconnect system is paired with a
compatible mobile device, the system can
announce a new incoming text message, and
read it to you over the vehicle audio system.
You can reply to the message using Voice
Recognition by selecting, or saying, one of
the 18 pre-defined messages.
Here’s How:
1. Push the Voice Recognition (VR)
or
the Phone button and wait for the beep,
then say “reply.” Uconnect gives the fol-
lowing prompt: “Please say the message
you would like to send.”
2. Wait for the beep and say one of the
pre-defined messages. (If you are not
sure, you can say “help”). Uconnect will
then read the pre-defined messages
allowed.
3. As soon as you hear the message you
would like to send, you can interrupt the
list of prompts by pushing the UconnectRadio Operation
1 — Radio Station Preset
2 — All Presets
3 — Seek Next
4 — Audio Settings
5 — Station Information
6 — Direct Tune
7 — Radio Band
8 — Seek Previous
MULTIMEDIA
270
Page 274 of 348
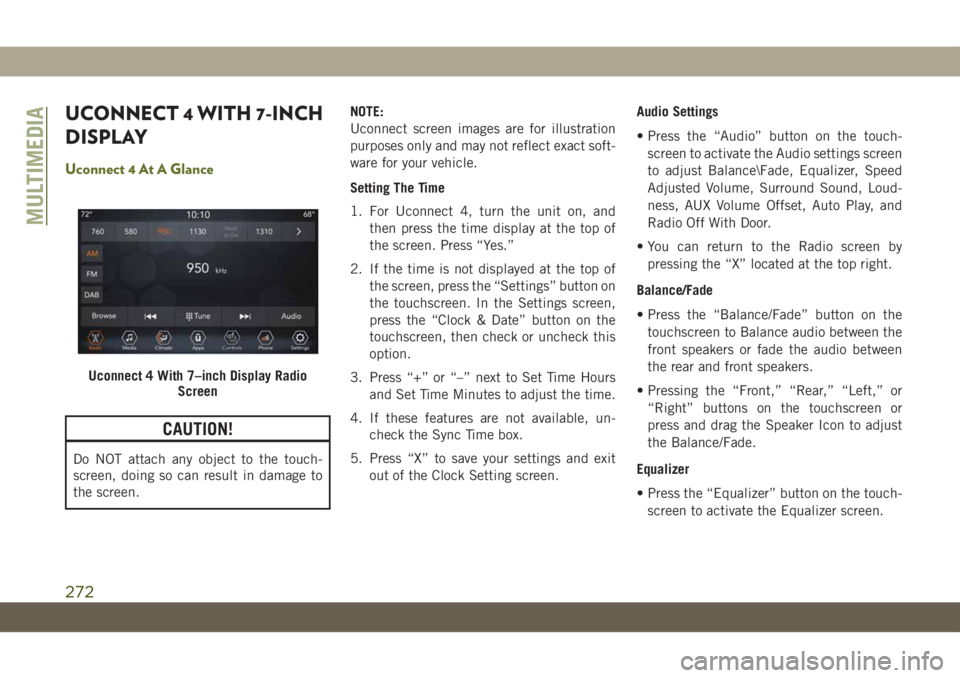
UCONNECT 4 WITH 7-INCH
DISPLAY
Uconnect 4 At A Glance
CAUTION!
Do NOT attach any object to the touch-
screen, doing so can result in damage to
the screen.NOTE:
Uconnect screen images are for illustration
purposes only and may not reflect exact soft-
ware for your vehicle.
Setting The Time
1. For Uconnect 4, turn the unit on, and
then press the time display at the top of
the screen. Press “Yes.”
2. If the time is not displayed at the top of
the screen, press the “Settings” button on
the touchscreen. In the Settings screen,
press the “Clock & Date” button on the
touchscreen, then check or uncheck this
option.
3. Press “+” or “–” next to Set Time Hours
and Set Time Minutes to adjust the time.
4. If these features are not available, un-
check the Sync Time box.
5. Press “X” to save your settings and exit
out of the Clock Setting screen.Audio Settings
• Press the “Audio” button on the touch-
screen to activate the Audio settings screen
to adjust Balance\Fade, Equalizer, Speed
Adjusted Volume, Surround Sound, Loud-
ness, AUX Volume Offset, Auto Play, and
Radio Off With Door.
• You can return to the Radio screen by
pressing the “X” located at the top right.
Balance/Fade
• Press the “Balance/Fade” button on the
touchscreen to Balance audio between the
front speakers or fade the audio between
the rear and front speakers.
• Pressing the “Front,” “Rear,” “Left,” or
“Right” buttons on the touchscreen or
press and drag the Speaker Icon to adjust
the Balance/Fade.
Equalizer
• Press the “Equalizer” button on the touch-
screen to activate the Equalizer screen.
Uconnect 4 With 7–inch Display Radio
Screen
MULTIMEDIA
272