ECO mode JEEP WRANGLER UNLIMITED 2020 Owner handbook (in English)
[x] Cancel search | Manufacturer: JEEP, Model Year: 2020, Model line: WRANGLER UNLIMITED, Model: JEEP WRANGLER UNLIMITED 2020Pages: 330, PDF Size: 9.16 MB
Page 8 of 330
6
STARTING AND OPERATING
STARTING THE ENGINE ........................ 138
Normal Starting ŌĆö
Gasoline Engine ........................... 138
Normal Starting ŌĆö Diesel Engine ......... 141
Diesel Engine Warm-Up ................ 141
Diesel Engine Idling ŌĆö
In Cold Weather ........................... 142 Stopping the Engine ..................... 142
ENGINE BREAK-IN RECOMMENDATIONS .... 143
AUTOMATIC TRANSMISSION................. 143
Ignition Park Interlock................... 144
Brake/Transmission Shift Interlock
System ....................................... 144 EightŌĆōSpeed Automatic
Transmission................................ 145
FOURŌĆōWHEEL DRIVE OPERATION .......... 146
Four-Position Transfer Case ........... 146
Five-Position Transfer Case ........... 148
Trac-Lok Rear Axle ŌĆö
If Equipped ................................. 151 Axle Lock (Tru-Lok) ŌĆö
Rubicon Models ........................... 151 Electronic Sway Bar Disconnect ŌĆö
If Equipped ................................. 152
STOP/START SYSTEM ŌĆö AUTOMATIC
TRANSMISSION (IF EQUIPPED) .............153
Automatic Mode ........................... 154
Possible Reasons The Engine Does
Not Autostop ............................... 154 To Start The Engine While In
Autostop Mode ............................. 155 To Manually Turn Off The
Stop/Start System ........................ 155 To Manually Turn On The
Stop/Start System ........................ 155 System Malfunction...................... 155
ACTIVE SPEED LIMITER ŌĆö
IF EQUIPPED .......................................156
Activation .................................... 156
Exceeding The Set Speed.............. 156
Deactivation ................................ 156
SPEED CONTROL ..................................157
To Activate .................................. 157
To Set A Desired Speed ................ 158
To Resume Speed ....................... 158
To Deactivate .............................. 158
ADAPTIVE CRUISE CONTROL (ACC) ŌĆö
IF EQUIPPED .......................................158
To Activate/Deactivate .................. 158
To Set A Desired ACC Speed ......... 159
To Resume .................................. 159
To Vary The Speed Setting ........... 159
Setting The Following Distance
In ACC ........................................ 160
PARKSENSE REAR PARK ASSIST ŌĆö
IF EQUIPPED ........................................161
ParkSense Sensors ........................161
Enabling And Disabling
ParkSense ....................................161 ParkSense System Usage
Precautions ..................................162
PARKSENSE FRONT AND
REAR PARK ASSIST ŌĆö IF EQUIPPED ......163
ParkSense Sensors ........................163
ParkSense Warning Display ............163
ParkSense Display ........................163
Enabling And Disabling
ParkSense ....................................165 Service The ParkSense Park Assist
System ........................................166 Cleaning The ParkSense System .....166
ParkSense System Usage
Precautions ..................................166
PARKVIEW REAR BACK UP CAMERA ŌĆö
IF EQUIPPED ........................................167
REFUELING THE VEHICLE .....................169
Fuel Filler Cap ..............................169
Loose Fuel Filler Cap Message ......170
REFUELING THE VEHICLE ŌĆö DIESEL ......170
AdBlue┬« (UREA) ŌĆö If Equipped ....171
VEHICLE LOADING ...............................174
Weights Label...............................174
2020_JEEP_JL_WRANGLER_UG_RHD_UK.book Page 6
Page 9 of 330
7
TRAILER TOWING ................................ 175
Trailer Towing Weights
(Maximum Trailer Weight Ratings)..... 175
RECREATIONAL TOWING (BEHIND
MOTORHOME, ETC.) ............................. 176
Towing This Vehicle Behind
Another Vehicle ............................ 176 Recreational Towing ŌĆö Four-Wheel
Drive Models ................................ 176
IN CASE OF EMERGENCY
HAZARD WARNING FLASHERS............... 179
BULB REPLACEMENT............................ 179
Replacement Bulbs ...................... 179
Bulb Replacement ........................ 181
FUSES ............................................... 183
General Information ...................... 183
Power Distribution Center (PDC) .... 184
JACKING AND TIRE CHANGING .............. 192
Jack Location .............................. 193
Spare Tire Removal ...................... 193
Preparations For Jacking .............. 194
Jacking Instructions ...................... 195
Road Tire Installation.................... 197
Declaration Of Conformance .......... 198
Jack Usage Precautions................. 200
JUMP STARTING .................................. 201
Preparations For Jump Start .......... 201
Jump Starting Procedure ............... 202
IF YOUR ENGINE OVERHEATS ...............204
MANUAL PARK RELEASE .....................204
FREEING A STUCK VEHICLE ..................206
TOWING A DISABLED VEHICLE ..............207
FourŌĆōWheel Drive Models .............. 208
Without The Key Fob .................... 208
Tow Eye Usage............................. 208
ENHANCED ACCIDENT RESPONSE
SYSTEM (EARS) ..................................209
EVENT DATA RECORDER (EDR) ..............209
SERVICING AND MAINTENANCE
SCHEDULED SERVICING .......................210
Scheduled Servicing ŌĆö
Gasoline Engine ........................... 210 Scheduled Servicing ŌĆö
Diesel Engine............................... 216
ENGINE COMPARTMENT .......................221
2.0L Gasoline Engine .................. 221
3.6L Gasoline Engine .................. 222
2.2L Diesel Engine ....................... 223
Checking Oil Level ŌĆö
Gasoline Engine .......................... 224 Adding Washer Fluid .................... 224
Maintenance-Free Battery ............ 225
Pressure Washing ......................... 225
DEALER SERVICE .................................226
Windshield Wiper Blades ...............226
Exhaust System ...........................228
Cooling System .............................229
Brake System ..............................230
Automatic Transmission ................231
RAISING THE VEHICLE ..........................232 TIRES .................................................232
Tires ŌĆö General Information .........232
Tire Types ....................................237
Spare Tires ŌĆö If Equipped ............237
Wheel And Wheel Trim Care ..........239
Tire Chains And Traction Devices ..... 240
Tire Rotation Recommendations ....241
STORING THE VEHICLE .........................241
BODYWORK .........................................242
Body And Underbody
Maintenance ................................242 Preserving The Bodywork ...............243
INTERIORS ..........................................245
Seats And Fabric Parts ..................245
Plastic And Coated Parts ...............246
Leather Parts ................................246
Glass Surfaces .............................246
2020_JEEP_JL_WRANGLER_UG_RHD_UK.book Page 7
Page 17 of 330
15
To Enter Remote Start Mode
Push and release the Remote Start button on
the key fob twice within five seconds. The
vehicle doors will lock, the turn signals will
flash twice, and the horn will chirp twice.
Then the engine will start, and the vehicle
will remain in the Remote Start mode for a
15 minute cycle.
NOTE:
’ü»If an engine fault is present or fuel level is
low, the vehicle will start and then shut
down in 10 seconds.
’ü»The park lamps will turn on and remain on
during Remote Start mode.
’ü»For security, power window operation is
disabled when the vehicle is in the
Remote Start mode.
’ü»The engine can be started two consecutive
times (two 15 minute cycles) with the key
fob. However, the ignition must be placed
in the ON/RUN position before you can
repeat the start sequence for a third cycle.
VEHICLE SECURITY ALARM ŌĆö
IF EQUIPPED
The vehicle security alarm monitors the
vehicle doors for unauthorized entry and the
ignition switch for unauthorized operation.
When the alarm is activated, the interior
switches for door locks are disabled. The
vehicle security alarm provides both audible
and visible signals. If something triggers the
alarm, the vehicle security alarm will provide
the following audible and visible signals: the
horn will pulse, the park lamps and/or turn
signals will flash, and the vehicle security
light in the instrument cluster will flash.
To Arm The System
Follow these steps to arm the vehicle secu-
rity alarm:
1. Make sure the vehicleŌĆÖs ignition is placed in the OFF position. Refer to "Starting
The Engine" in "Starting And Operating"
for further information. 2. Perform one of the following methods to
lock the vehicle:
’ü»Push lock on the interior power doorlock switch with the driver and/or
passenger door open.
’ü»Push the lock button on the exterior Passive Entry Door Handle with a valid
key fob available in the same exterior
zone. Refer to "Keyless Enter-N-Go ŌĆö
Passive Entry" in ŌĆ£DoorsŌĆØ in this
chapter for further information.
’ü»Push the lock button on the key fob.
3. If any doors are open, close them.
To Disarm The System
The vehicle security alarm can be disarmed
using any of the following methods:
’ü»Push the unlock button on the key fob.
’ü»Grasp the Passive Entry Unlock Door
Handle (if equipped). Refer to "Keyless
Enter-N-Go ŌĆö Passive Entry" in ŌĆ£DoorsŌĆØ in
this chapter for further information.
’ü»Cycle the vehicle ignition system out of
the OFF position.
2020_JEEP_JL_WRANGLER_UG_RHD_UK.book Page 15
Page 27 of 330
25
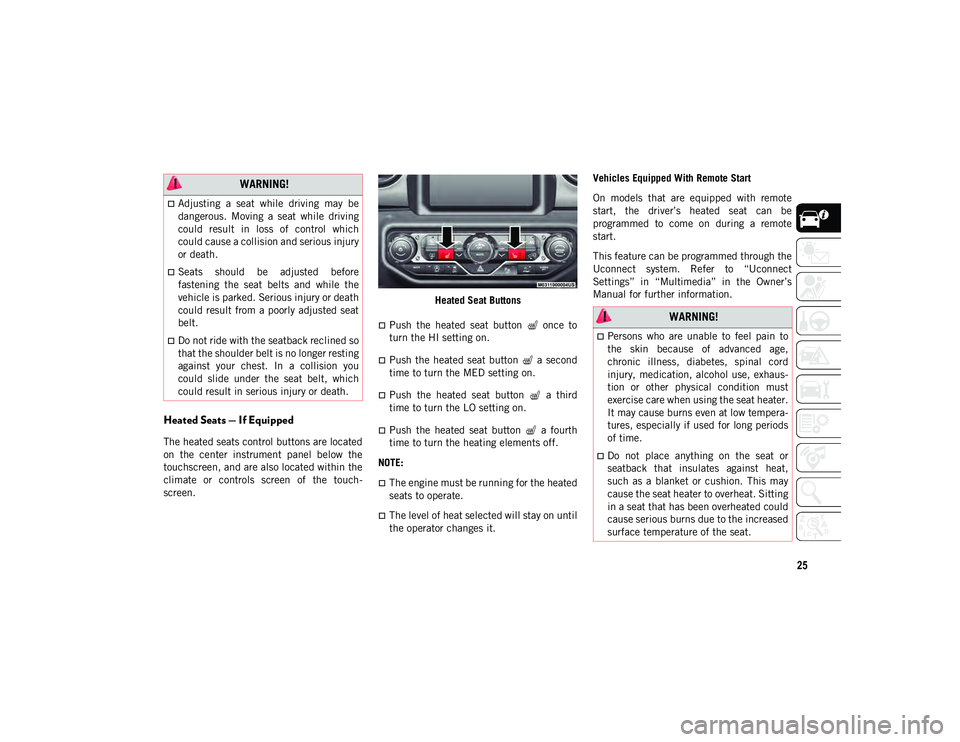
Heated Seats ŌĆö If Equipped
The heated seats control buttons are located
on the center instrument panel below the
touchscreen, and are also located within the
climate or controls screen of the touch-
screen. Heated Seat Buttons
’ü»Push the heated seat button once to
turn the HI setting on.
’ü»Push the heated seat button a second
time to turn the MED setting on.
’ü»Push the heated seat button a third
time to turn the LO setting on.
’ü»Push the heated seat button a fourth
time to turn the heating elements off.
NOTE:
’ü»The engine must be running for the heated
seats to operate.
’ü»The level of heat selected will stay on until
the operator changes it. Vehicles Equipped With Remote Start
On models that are equipped with remote
start, the driverŌĆÖs heated seat can be
programmed to come on during a remote
start.
This feature can be programmed through the
Uconnect system. Refer to ŌĆ£Uconnect
SettingsŌĆØ in ŌĆ£MultimediaŌĆØ in the OwnerŌĆÖs
Manual for further information.
WARNING!
’ü»Adjusting a seat while driving may be
dangerous. Moving a seat while driving
could result in loss of control which
could cause a collision and serious injury
or death.
’ü»Seats should be adjusted before
fastening the seat belts and while the
vehicle is parked. Serious injury or death
could result from a poorly adjusted seat
belt.
’ü»Do not ride with the seatback reclined so
that the shoulder belt is no longer resting
against your chest. In a collision you
could slide under the seat belt, which
could result in serious injury or death.
WARNING!
’ü»Persons who are unable to feel pain to
the skin because of advanced age,
chronic illness, diabetes, spinal cord
injury, medication, alcohol use, exhaus-
tion or other physical condition must
exercise care when using the seat heater.
It may cause burns even at low tempera-
tures, especially if used for long periods
of time.
’ü»Do not place anything on the seat or
seatback that insulates against heat,
such as a blanket or cushion. This may
cause the seat heater to overheat. Sitting
in a seat that has been overheated could
cause serious burns due to the increased
surface temperature of the seat.
2020_JEEP_JL_WRANGLER_UG_RHD_UK.book Page 25
Page 33 of 330
31
STEERING WHEEL
Tilt/Telescoping Steering Column
This feature allows you to tilt the steering
column upward or downward. It also allows
you to lengthen or shorten the steering
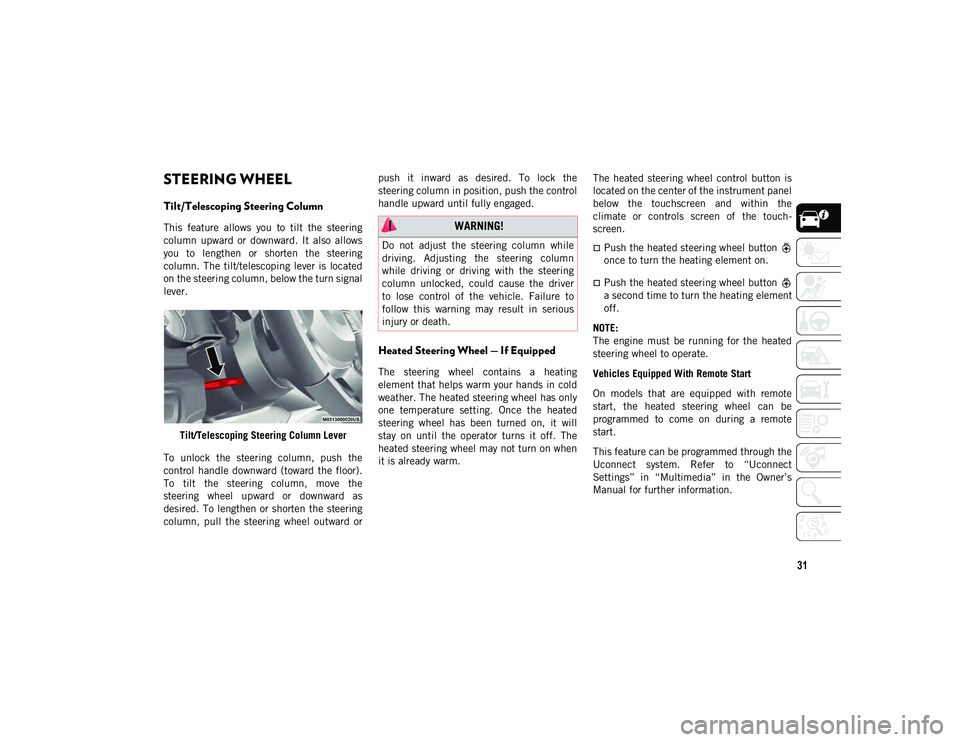
column. The tilt/telescoping lever is located
on the steering column, below the turn signal
lever.Tilt/Telescoping Steering Column Lever
To unlock the steering column, push the
control handle downward (toward the floor).
To tilt the steering column, move the
steering wheel upward or downward as
desired. To lengthen or shorten the steering
column, pull the steering wheel outward or push it inward as desired. To lock the
steering column in position, push the control
handle upward until fully engaged.
Heated Steering Wheel ŌĆö If Equipped
The steering wheel contains a heating
element that helps warm your hands in cold
weather. The heated steering wheel has only
one temperature setting. Once the heated
steering wheel has been turned on, it will
stay on until the operator turns it off. The
heated steering wheel may not turn on when
it is already warm.
The heated steering wheel control button is
located on the center of the instrument panel
below the touchscreen and within the
climate or controls screen of the touch
-
screen.
’ü»Push the heated steering wheel button
once to turn the heating element on.
’ü»Push the heated steering wheel button
a second time to turn the heating element
off.
NOTE:
The engine must be running for the heated
steering wheel to operate.
Vehicles Equipped With Remote Start
On models that are equipped with remote
start, the heated steering wheel can be
programmed to come on during a remote
start.
This feature can be programmed through the
Uconnect system. Refer to ŌĆ£Uconnect
SettingsŌĆØ in ŌĆ£MultimediaŌĆØ in the OwnerŌĆÖs
Manual for further information.
WARNING!
Do not adjust the steering column while
driving. Adjusting the steering column
while driving or driving with the steering
column unlocked, could cause the driver
to lose control of the vehicle. Failure to
follow this warning may result in serious
injury or death.
2020_JEEP_JL_WRANGLER_UG_RHD_UK.book Page 31
Page 35 of 330
33
Automatic High Beam ŌĆö If Equipped
The Automatic High Beam Headlamp Control
system provides increased forward lighting at
night by automating high beam control
through the use of a digital camera mounted
on the vehicleŌĆÖs header. This camera detects
vehicle specific light and automatically
switches from high beams to low beams until
the approaching vehicle is out of view.
NOTE:
’ü»The Automatic High Beam Headlamp
Control can be turned on or off by selecting
ŌĆ£ONŌĆØ under ŌĆ£Auto High BeamŌĆØ within your
Uconnect settings, as well as turning the
headlight switch to the AUTO position and
placing the multifunction lever in the high
beam position. Refer to ŌĆ£Uconnect SettingsŌĆØ
in ŌĆ£MultimediaŌĆØ in the OwnerŌĆÖs Manual for
further information.
’ü»Broken, muddy, or obstructed headlights
and taillights of vehicles in the field of
view will cause headlights to remain on
longer (closer to the vehicle). Also, dirt,
film, and other obstructions on the wind-
shield or camera lens will cause the
system to function improperly.
Flash-To-Pass
You can signal another vehicle with your
headlights by lightly pulling the multifunc -
tion lever toward you. This will cause the
high beam headlights to turn on, and remain
on, until the lever is released.
Automatic Headlights ŌĆö If Equipped
This system automatically turns the head -
lights on or off according to ambient light
levels. To turn the system on, rotate the
headlight switch clockwise to the last detent
for automatic headlight operation. When the
system is on, the headlight time delay
feature is also on. This means the headlights
will stay on for up to 90 seconds after you
place the ignition into the OFF position. To
turn the automatic system off, move the
headlight switch out of the AUTO position.
NOTE:
The engine must be running before the head -
lights will come on in the automatic mode.
Front And Rear Fog Lights ŌĆö If Equipped
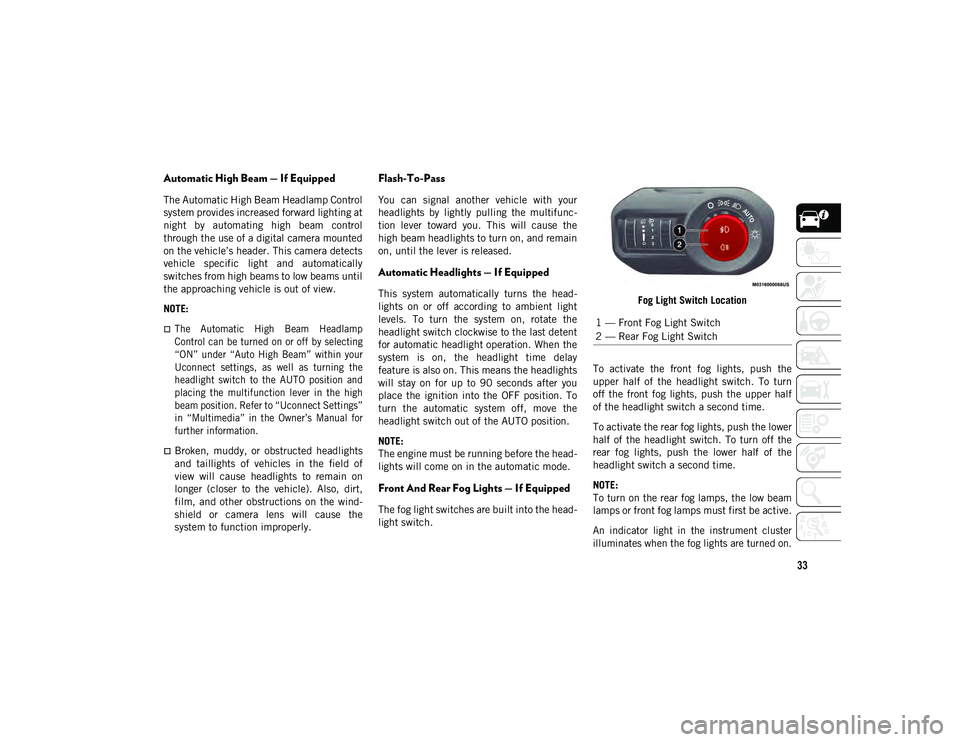
The fog light switches are built into the head -
light switch. Fog Light Switch Location
To activate the front fog lights, push the
upper half of the headlight switch. To turn
off the front fog lights, push the upper half
of the headlight switch a second time.
To activate the rear fog lights, push the lower
half of the headlight switch. To turn off the
rear fog lights, push the lower half of the
headlight switch a second time.
NOTE:
To turn on the rear fog lamps, the low beam
lamps or front fog lamps must first be active.
An indicator light in the instrument cluster
illuminates when the fog lights are turned on.
1 ŌĆö Front Fog Light Switch
2 ŌĆö Rear Fog Light Switch
2020_JEEP_JL_WRANGLER_UG_RHD_UK.book Page 33
Page 41 of 330
39
Automatic Control Descriptions
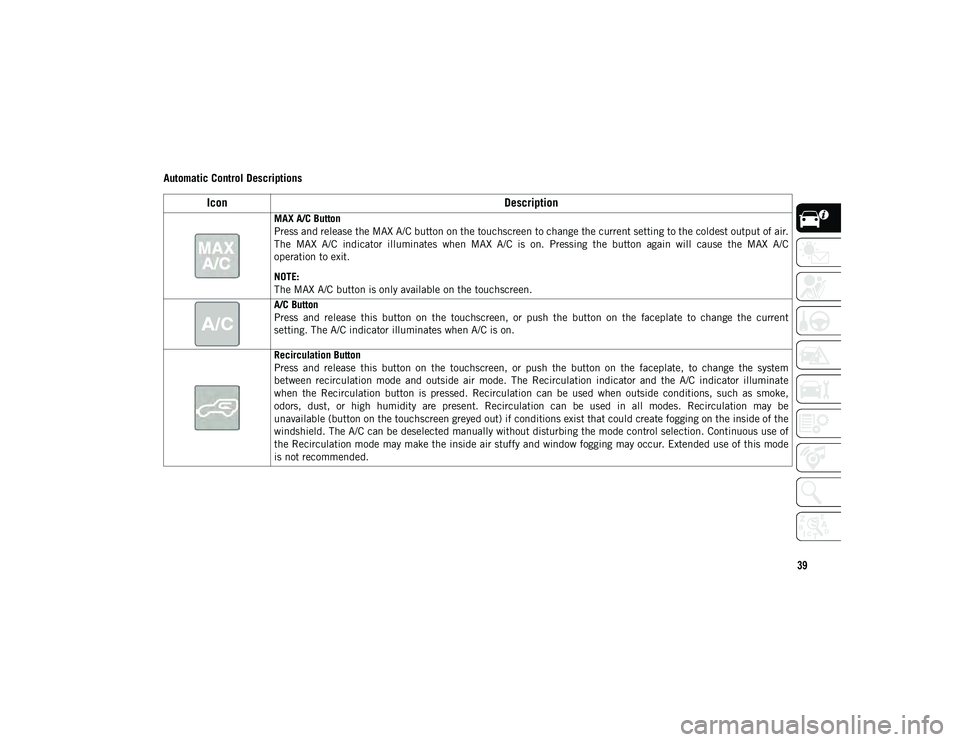
IconDescription
MAX A/C Button
Press and release the MAX A/C button on the touchscreen to change the current setting to the coldest output of air.
The MAX A/C indicator illuminates when MAX A/C is on. Pressing the button again will cause the MAX A/C
operation to exit.
NOTE:
The MAX A/C button is only available on the touchscreen.
A/C Button
Press and release this button on the touchscreen, or push the button on the faceplate to change the current
setting. The A/C indicator illuminates when A/C is on.
Recirculation Button
Press and release this button on the touchscreen, or push the button on the faceplate, to change the system
between recirculation mode and outside air mode. The Recirculation indicator and the A/C indicator illuminate
when the Recirculation button is pressed. Recirculation can be used when outside conditions, such as smoke,
odors, dust, or high humidity are present. Recirculation can be used in all modes. Recirculation may be
unavailable (button on the touchscreen greyed out) if conditions exist that could create fogging on the inside of the
windshield. The A/C can be deselected manually without disturbing the mode control selection. Continuous use of
the Recirculation mode may make the inside air stuffy and window fogging may occur. Extended use of this mode
is not recommended.
2020_JEEP_JL_WRANGLER_UG_RHD_UK.book Page 39
Page 42 of 330
GETTING TO KNOW YOUR VEHICLE
40
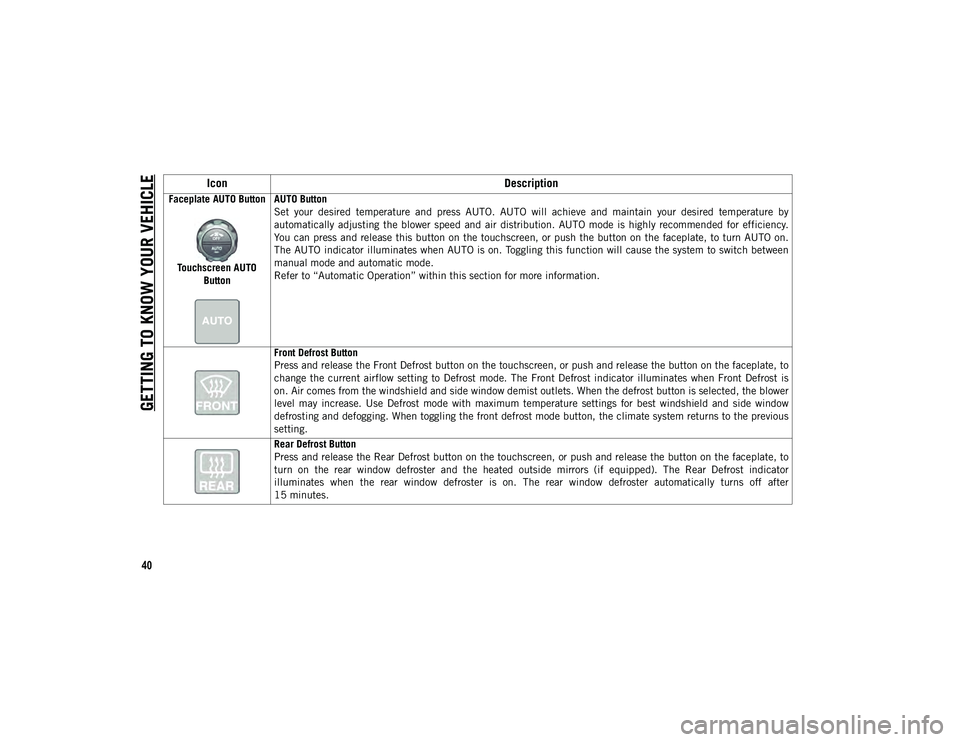
Faceplate AUTO ButtonTouchscreen AUTO Button AUTO Button
Set your desired temperature and press AUTO. AUTO will achieve and maintain your desired temperature by
automatically adjusting the blower speed and air distribution. AUTO mode is highly recommended for efficiency.
You can press and release this button on the touchscreen, or push the button on the faceplate, to turn AUTO on.
The AUTO indicator illuminates when AUTO is on. Toggling this function will cause the system to switch between
manual mode and automatic mode.
Refer to ŌĆ£Automatic OperationŌĆØ within this section for more information.
Front Defrost Button
Press and release the Front Defrost button on the touchscreen, or push and release the button on the faceplate, to
change the current airflow setting to Defrost mode. The Front Defrost indicator illuminates when Front Defrost is
on. Air comes from the windshield and side window demist outlets. When the defrost button is selected, the blower
level may increase. Use Defrost mode with maximum temperature settings for best windshield and side window
defrosting and defogging. When toggling the front defrost mode button, the climate system returns to the previous
setting.
Rear Defrost Button
Press and release the Rear Defrost button on the touchscreen, or push and release the button on the faceplate, to
turn on the rear window defroster and the heated outside mirrors (if equipped). The Rear Defrost indicator
illuminates when the rear window defroster is on. The rear window defroster automatically turns off after
15 minutes.
Icon
Description
2020_JEEP_JL_WRANGLER_UG_RHD_UK.book Page 40
Page 46 of 330
GETTING TO KNOW YOUR VEHICLE
44
Climate Control Functions
A/C (Air Conditioning)
The Air Conditioning (A/C) button allows the
operator to manually activate or deactivate
the air conditioning system. When the air
conditioning system is turned on, cool dehu-
midified air will flow through the outlets into
the cabin. For improved fuel economy, press
the A/C button to turn off the air conditioning
and manually adjust the blower and airflow
mode settings. Also, make sure to select only
Panel, Bi-Level, or Floor modes.
NOTE:
’ü»For Manual Climate Controls, if the system
is in Mix, Floor or Defrost Mode, the A/C
can be turned off, but the A/C system shall
remain active to prevent fogging of the
windows.
’ü»If fog or mist appears on the windshield or
side glass, select Defrost mode, and
increase blower speed if needed.
’ü»If your air conditioning performance
seems lower than expected, check the
front of the A/C condenser (located in front
of the radiator), for an accumulation of dirt or insects. Clean with a gentle water spray
from the front of the radiator and through
the condenser.
MAX A/C
MAX A/C sets the control for maximum
cooling performance.
Press and release to toggle between MAX A/C
and the prior settings. The button illuminates
when MAX A/C is on.
In MAX A/C, the blower level and mode position
can be adjusted to desired user settings.
Pressing other settings will cause the MAX A/C
operation to switch to the selected setting and
MAX A/C to exit.
Recirculation
In cold weather, use of Recirculation mode
may lead to excessive window fogging. The
Recirculation feature may be unavailable
(button on the touchscreen greyed out) if
conditions exist that could create fogging on
the inside of the windshield.
Automatic Temperature Control (ATC) ŌĆö
If Equipped
Automatic Operation
1. Push the AUTO button on the faceplate, or the AUTO button on the touchscreen
on the Automatic Temperature Control
(ATC) Panel.
2. Next, adjust the temperature that you would like the system to maintain by
adjusting the driver and passenger
temperature control buttons. Once the
desired temperature is displayed, the
system will achieve and automatically
maintain that comfort level.
3. When the system is set up for your comfort level, it is not necessary to
change the settings. You will experience
the greatest efficiency by simply allowing
the system to function automatically.
NOTE:
’ü»It is not necessary to move the tempera-
ture settings for cold or hot vehicles. The
system automatically adjusts the tempera-
ture, mode, and blower speed to provide
comfort as quickly as possible.
2020_JEEP_JL_WRANGLER_UG_RHD_UK.book Page 44
Page 47 of 330
45
’ü»The temperature can be displayed in U.S.
or Metric units by selecting the U.S./
Metric customer-programmable feature.
Refer to the ŌĆ£Uconnect SettingsŌĆØ in
ŌĆ£MultimediaŌĆØ in the OwnerŌĆÖs Manual for
further information.
To provide you with maximum comfort in the
Automatic mode during cold start-ups, the
blower fan will remain on low until the
engine warms up. The blower will increase in
speed and transition into Auto mode.
Manual Operation Override
This system offers a full complement of
manual override features. The AUTO symbol
in the front ATC display will be turned off
when the system is being used in the manual
mode.
Operating Tips
Summer Operation
The engine cooling system must be
protected with a high-quality antifreeze
coolant to provide proper corrosion protec -
tion and to protect against engine over -
heating. OAT coolant (conforming to
MS.90032) is recommended.
Winter Operation
To ensure the best possible heater and
defroster performance, make sure the engine
cooling system is functioning properly and
the proper amount, type, and concentration
of coolant is used. Use of the Air Recircula -
tion mode during Winter months is not
recommended, because it may cause window
fogging.
Vacation/Storage
Before you store your vehicle, or keep it out
of service (i.e., vacation) for two weeks or
more, run the air conditioning system at idle
for about five minutes, in fresh air with the
blower setting on high. This will ensure
adequate system lubrication to minimize the
possibility of compressor damage when the
system is started again.
Window Fogging
Vehicle windows tend to fog on the inside in
mild, rainy, and/or humid weather. To clear
the windows, select Defrost or Mix mode and
increase the front blower speed. Do not use
the Recirculation mode without A/C for long
periods, as fogging may occur.
Outside Air Intake
Make sure the air intake, located directly in
front of the windshield, is free of obstruc -
tions, such as leaves. Leaves collected in the
air intake may reduce airflow, and if they
enter the plenum, they could plug the water
drains. In Winter months, make sure the air
intake is clear of ice, slush, and snow.
CAUTION!
Failure to follow these cautions can cause
damage to the heating elements:
’ü»Use care when washing the inside of the
rear window. Do not use abrasive window
cleaners on the interior surface of the
window. Use a soft cloth and a mild
washing solution, wiping parallel to the
heating elements. Labels can be peeled
off after soaking with warm water.
’ü»Do not use scrapers, sharp instruments,
or abrasive window cleaners on the inte-
rior surface of the window.
’ü»Keep all objects a safe distance from the
window.
2020_JEEP_JL_WRANGLER_UG_RHD_UK.book Page 45