spare tire JEEP WRANGLER UNLIMITED 2020 Owner handbook (in English)
[x] Cancel search | Manufacturer: JEEP, Model Year: 2020, Model line: WRANGLER UNLIMITED, Model: JEEP WRANGLER UNLIMITED 2020Pages: 330, PDF Size: 9.16 MB
Page 9 of 330
7
TRAILER TOWING ................................ 175
Trailer Towing Weights
(Maximum Trailer Weight Ratings)..... 175
RECREATIONAL TOWING (BEHIND
MOTORHOME, ETC.) ............................. 176
Towing This Vehicle Behind
Another Vehicle ............................ 176 Recreational Towing — Four-Wheel
Drive Models ................................ 176
IN CASE OF EMERGENCY
HAZARD WARNING FLASHERS............... 179
BULB REPLACEMENT............................ 179
Replacement Bulbs ...................... 179
Bulb Replacement ........................ 181
FUSES ............................................... 183
General Information ...................... 183
Power Distribution Center (PDC) .... 184
JACKING AND TIRE CHANGING .............. 192
Jack Location .............................. 193
Spare Tire Removal ...................... 193
Preparations For Jacking .............. 194
Jacking Instructions ...................... 195
Road Tire Installation.................... 197
Declaration Of Conformance .......... 198
Jack Usage Precautions................. 200
JUMP STARTING .................................. 201
Preparations For Jump Start .......... 201
Jump Starting Procedure ............... 202
IF YOUR ENGINE OVERHEATS ...............204
MANUAL PARK RELEASE .....................204
FREEING A STUCK VEHICLE ..................206
TOWING A DISABLED VEHICLE ..............207
Four–Wheel Drive Models .............. 208
Without The Key Fob .................... 208
Tow Eye Usage............................. 208
ENHANCED ACCIDENT RESPONSE
SYSTEM (EARS) ..................................209
EVENT DATA RECORDER (EDR) ..............209
SERVICING AND MAINTENANCE
SCHEDULED SERVICING .......................210
Scheduled Servicing —
Gasoline Engine ........................... 210 Scheduled Servicing —
Diesel Engine............................... 216
ENGINE COMPARTMENT .......................221
2.0L Gasoline Engine .................. 221
3.6L Gasoline Engine .................. 222
2.2L Diesel Engine ....................... 223
Checking Oil Level —
Gasoline Engine .......................... 224 Adding Washer Fluid .................... 224
Maintenance-Free Battery ............ 225
Pressure Washing ......................... 225
DEALER SERVICE .................................226
Windshield Wiper Blades ...............226
Exhaust System ...........................228
Cooling System .............................229
Brake System ..............................230
Automatic Transmission ................231
RAISING THE VEHICLE ..........................232 TIRES .................................................232
Tires — General Information .........232
Tire Types ....................................237
Spare Tires — If Equipped ............237
Wheel And Wheel Trim Care ..........239
Tire Chains And Traction Devices ..... 240
Tire Rotation Recommendations ....241
STORING THE VEHICLE .........................241
BODYWORK .........................................242
Body And Underbody
Maintenance ................................242 Preserving The Bodywork ...............243
INTERIORS ..........................................245
Seats And Fabric Parts ..................245
Plastic And Coated Parts ...............246
Leather Parts ................................246
Glass Surfaces .............................246
2020_JEEP_JL_WRANGLER_UG_RHD_UK.book Page 7
Page 54 of 330
GETTING TO KNOW YOUR VEHICLE
52
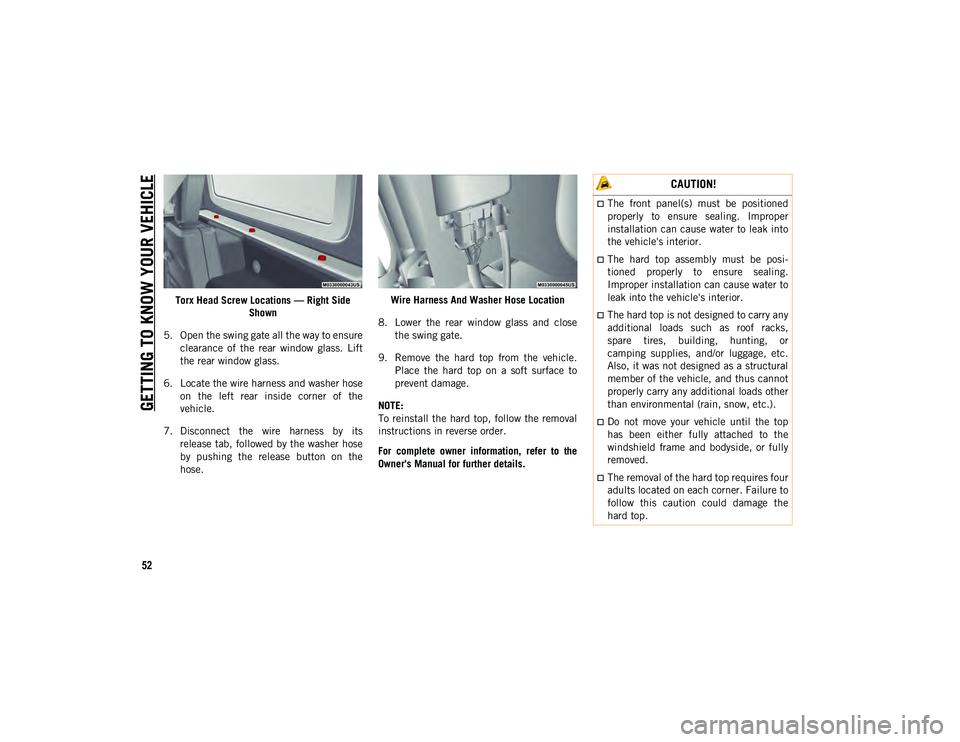
Torx Head Screw Locations — Right Side Shown
5. Open the swing gate all the way to ensure clearance of the rear window glass. Lift
the rear window glass.
6. Locate the wire harness and washer hose on the left rear inside corner of the
vehicle.
7. Disconnect the wire harness by its release tab, followed by the washer hose
by pushing the release button on the
hose. Wire Harness And Washer Hose Location
8. Lower the rear window glass and close the swing gate.
9. Remove the hard top from the vehicle. Place the hard top on a soft surface to
prevent damage.
NOTE:
To reinstall the hard top, follow the removal
instructions in reverse order.
For complete owner information, refer to the
Owner's Manual for further details.
CAUTION!
The front panel(s) must be positioned
properly to ensure sealing. Improper
installation can cause water to leak into
the vehicle's interior.
The hard top assembly must be posi -
tioned properly to ensure sealing.
Improper installation can cause water to
leak into the vehicle's interior.
The hard top is not designed to carry any
additional loads such as roof racks,
spare tires, building, hunting, or
camping supplies, and/or luggage, etc.
Also, it was not designed as a structural
member of the vehicle, and thus cannot
properly carry any additional loads other
than environmental (rain, snow, etc.).
Do not move your vehicle until the top
has been either fully attached to the
windshield frame and bodyside, or fully
removed.
The removal of the hard top requires four
adults located on each corner. Failure to
follow this caution could damage the
hard top.
2020_JEEP_JL_WRANGLER_UG_RHD_UK.book Page 52
Page 73 of 330
71
Should one or more tires be in the condition
mentioned above, the display will show the
indications corresponding to each tire.
Each tire, including the spare (if provided),
should be checked monthly when cold and
inflated to the inflation pressure recom-
mended by the vehicle manufacturer on the
vehicle placard or tire inflation pressure
label. If your vehicle has tires of a different
size than the size indicated on the vehicle
placard or tire inflation pressure label, you
should determine the proper tire inflation
pressure for those tires.
As an added safety feature, your vehicle has
been equipped with a Tire Pressure Moni -
toring System (TPMS) that illuminates a low
tire pressure telltale when one or more of
your tires is significantly under-inflated.
Accordingly, when the low tire pressure tell -tale illuminates, you should stop and check
your tires as soon as possible, and inflate
them to the proper pressure. Driving on a
significantly under-inflated tire causes the
tire to overheat and can lead to tire failure.
Under-inflation also reduces fuel efficiency
and tire tread life, and may affect the
vehicle’s handling and stopping ability.
Please note that the TPMS is not a substitute
for proper tire maintenance, and it is the
driver’s responsibility to maintain correct tire
pressure, even if under-inflation has not
reached the level to trigger illumination of
the TPMS low tire pressure telltale.
Your vehicle has also been equipped with a
TPMS malfunction indicator to indicate
when the system is not operating properly.
The TPMS malfunction indicator is
combined with the low tire pressure telltale.
When the system detects a malfunction, the
telltale will flash for approximately one
minute and then remain continuously illumi
-
nated. This sequence will continue upon
subsequent vehicle start-ups as long as the
malfunction exists. When the malfunction
indicator is illuminated, the system may not
be able to detect or signal low tire pressure
as intended. TPMS malfunctions may occur
for a variety of reasons, including the instal -lation of replacement or alternate tires or
wheels on the vehicle that prevent the TPMS
from functioning properly. Always check the
TPMS malfunction telltale after replacing
one or more tires or wheels on your vehicle to
ensure that the replacement or alternate
tires and wheels allow the TPMS to continue
to function properly.
CAUTION!
Do not continue driving with one or more
flat tires as handling may be
compromised. Stop the vehicle, avoiding
sharp braking and steering. If a tire
puncture occurs, repair immediately using
the dedicated tire repair kit and contact an
authorized dealer as soon as possible.
CAUTION!
The TPMS has been optimized for the
original equipment tires and wheels.
TPMS pressures and warning have been
established for the tire size equipped on
your vehicle. Undesirable system operation
or sensor damage may result when using
replacement equipment that is not of the
same size, type, and/or style. Aftermarket
wheels can cause sensor damage. Using
aftermarket tire sealants may cause the
Tire Pressure Monitoring System (TPMS)
sensor to become inoperable. After using
an aftermarket tire sealant it is
recommended that you take your vehicle to
an authorized dealer to have your sensor
function checked.
2020_JEEP_JL_WRANGLER_UG_RHD_UK.book Page 71
Page 98 of 330
SAFETY
96
Vehicles With Compact Spare or Non-Matching
Full Size Spare
1. The compact spare tire or non-matching full size does not have a tire pressure
monitoring sensor. Therefore, the TPMS
will not monitor the pressure in the
compact spare tire.
2. If you install the compact or non-matching full size spare tire in place
of a road tire that has a pressure below
the low-pressure warning limit, upon the
next ignition cycle, the TPMS Warning
Light will remain on and a chime will
sound. In addition, the graphic in the
instrument cluster will still display a
different color pressure value.
3. After driving the vehicle for up to 10 minutes above 15 mph (24 km/h),
the TPMS Warning Light will flash on and
off for 75 seconds and then remain on
solid. In addition, the instrument cluster
will display a “Service Tire Pressure
System” message for five seconds and
then display dashes (--) in place of the
pressure value. 4. For each subsequent ignition cycle, a
chime will sound, the TPMS Warning
Light will flash on and off for 75 seconds
and then remain on solid, and the instru -
ment cluster will display a “SERVICE
TIRE PRESSURE SYSTEM” message for
five seconds and then display dashes (--)
in place of the pressure value.
5. Once you repair or replace the original road tire and reinstall it on the vehicle in
place of the compact spare or
non-matching full size, the TPMS will
update automatically. In addition, the
TPMS Warning Light will turn off and the
graphic in the instrument cluster will
display a new pressure value instead of
dashes (--), as long as no tire pressure is
below the low-pressure warning limit in
any of the four active road tires. The
vehicle may need to be driven for up to
10 minutes above 15 mph (24 km/h) in
order for the TPMS to receive this
information. Vehicles With a Full Size Matching Spare
1. If your vehicle is equipped with a
matching full-size spare wheel and tire
assembly, it has a tire pressure moni -
toring sensor, and can be monitored by
the Tire Pressure Monitoring System
(TPMS) when swapped with a low pres -
sure road tire.
2. In the event that the matching full-size spare tire is swapped with a low pressure
road tire, the next ignition switch cycle
will still show the TPMS Warning Light to
be on, a chime to sound, and the graphic
display will still show the low tire pres -
sure value in a different color.
3. Driving the vehicle for up to 10 minutes above 15 mph (24 km/h) will turn off theTPMS Warning Light as long as none of
road tires are below the low pressure
warning threshold.
TPMS Deactivation — If Equipped
The TPMS can be deactivated if replacing all
four wheel and tire assemblies (road tires)
with wheel and tire assemblies that do not
have TPMS sensors, such as when installing
winter wheel and tire assemblies on your
vehicle.
2020_JEEP_JL_WRANGLER_UG_RHD_UK.book Page 96
Page 139 of 330
137
(Continued)
Periodic Safety Checks You Should Make
Outside The Vehicle
Tires
Examine tires for excessive tread wear and uneven
wear patterns. Check for stones, nails, glass, or
other objects lodged in the tread or sidewall.
Inspect the tread for cuts and cracks. Inspect side-
walls for cuts, cracks, and bulges. Check the wheel
nuts for tightness. Check the tires (including spare)
for proper cold inflation pressure.
Lights
Have someone observe the operation of brake
lights and exterior lights while you work the
controls. Check turn signal and high beam indi -
cator lights on the instrument panel.
Door Latches
Check for proper closing, latching, and
locking.
Fluid Leaks
Check area under vehicle after overnight
parking for fuel, coolant, oil, or other fluid
leaks. Also, if gasoline fumes are detected or
if fuel, or brake fluid leaks are suspected, the
cause should be located and corrected
immediately.
ALWAYS REMOVE THE EXISTING
FLOOR MAT FROM THE VEHICLE
before installing any other floor mat.
NEVER install or stack an additional
floor mat on top of an existing floor mat.
ONLY install floor mats designed to fit
your vehicle. NEVER install a floor mat
that cannot be properly attached and
secured to your vehicle. If a floor mat
needs to be replaced, only use a FCA
approved floor mat for the specific make,
model, and year of your vehicle.
ONLY use the driver’s side floor mat on
the driver’s side floor area. To check for
interference, with the vehicle properly
parked with the engine off, fully depress
the accelerator, the brake, and the
clutch pedal (if present) to check for
interference. If your floor mat interferes
with the operation of any pedal, or is not
secure to the floor, remove the floor mat
from the vehicle and place the floor mat
in your trunk.
ONLY use the passenger’s side floor mat
on the passenger’s side floor area.
WARNING! (Continued)
ALWAYS make sure objects cannot fall
or slide into the driver’s side floor area
when the vehicle is moving. Objects can
become trapped under accelerator,
brake, or clutch pedals and could cause
a loss of vehicle control.
NEVER place any objects under the floor
mat (e.g., towels, keys, etc.). These
objects could change the position of the
floor mat and may cause interference
with the accelerator, brake, or clutch
pedals.
If the vehicle carpet has been removed
and re-installed, always properly attach
carpet to the floor and check the floor
mat fasteners are secure to the vehicle
carpet. Fully depress each pedal to
check for interference with the acceler -
ator, brake, or clutch pedals then
re-install the floor mats.
It is recommended to only use mild soap
and water to clean your floor mats. After
cleaning, always check your floor mat
has been properly installed and is
secured to your vehicle using the floor
mat fasteners by lightly pulling mat.
WARNING! (Continued)
2020_JEEP_JL_WRANGLER_UG_RHD_UK.book Page 137
Page 169 of 330
167
(Continued)
(Continued)
placed within 30 cm from the rear fascia/
bumper. Failure to do so can result in the
system misinterpreting a close obstacle as
a sensor problem, causing the “PARK
-
SENSE UNAVAILABLE SERVICE
REQUIRED” message to appear in the
instrument cluster display.
ParkSense should be disabled when the
swing gate is in the open position. An open
swing gate could provide a false indication
that an obstacle is behind the vehicle.
PARKVIEW REAR BACK UP
CAMERA — IF EQUIPPED
The ParkView Rear Back Up Camera allows
you to see an on-screen image of the rear
surroundings of your vehicle whenever the
gear selector is put into REVERSE. The
image will be displayed in the touchscreen
display along with a caution note to “check
entire surroundings” across the top of the
screen. After five seconds this note will
disappear. The ParkView camera is located
on the rear of the vehicle in the center of the
spare tire. WARNING!
Drivers must be careful when backing up
even when using ParkSense. Always
check carefully behind your vehicle, look
behind you, and be sure to check for
pedestrians, animals, other vehicles,
obstructions, and blind spots before
backing up. You are responsible for
safety and must continue to pay atten -
tion to your surroundings. Failure to do
so can result in serious injury or death.
Before using ParkSense, it is strongly
recommended that the ball mount and
hitch ball assembly is disconnected from
the vehicle when the vehicle is not used
for towing. Failure to do so can result in
injury or damage to vehicles or obstacles
because the hitch ball will be much
closer to the obstacle than the rear fascia
when the loudspeaker sounds the contin -
uous tone. Also, the sensors could detect
the ball mount and hitch ball assembly,
depending on its size and shape, giving
a false indication that an obstacle is
behind the vehicle.
CAUTION!
ParkSense is only a parking aid and it is
unable to recognize every obstacle,
including small obstacles. Parking curbs
might be temporarily detected or not
detected at all. Obstacles located above
or below the sensors will not be detected
when they are in close proximity.
WARNING! (Continued)
The vehicle must be driven slowly when
using ParkSense in order to be able to
stop in time when an obstacle is
detected. It is recommended that the
driver looks over his/her shoulder when
using ParkSense.
CAUTION! (Continued)
2020_JEEP_JL_WRANGLER_UG_RHD_UK.book Page 167
Page 192 of 330
IN CASE OF EMERGENCY
190
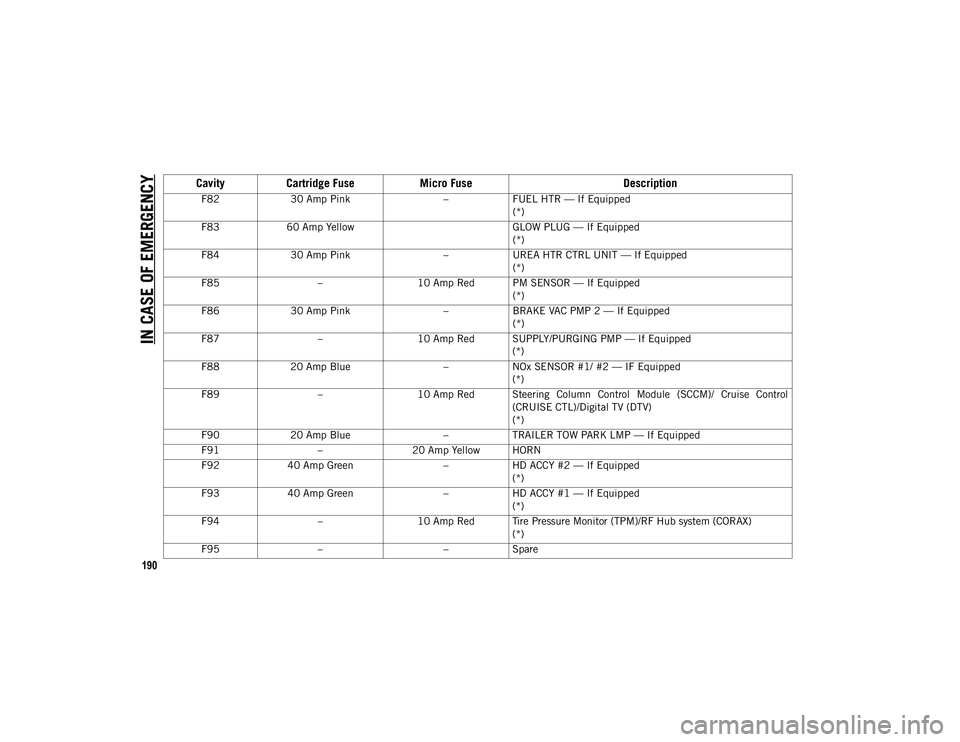
F8230 Amp Pink –FUEL HTR — If Equipped
(*)
F83 60 Amp Yellow GLOW PLUG — If Equipped
(*)
F84 30 Amp Pink –UREA HTR CTRL UNIT — If Equipped
(*)
F85 –10 Amp Red PM SENSOR — If Equipped
(*)
F86 30 Amp Pink –BRAKE VAC PMP 2 — If Equipped
(*)
F87 –10 Amp Red SUPPLY/PURGING PMP — If Equipped
(*)
F88 20 Amp Blue –NOx SENSOR #1/ #2 — IF Equipped
(*)
F89 –10 Amp Red Steering Column Control Module (SCCM)/ Cruise Control
(CRUISE CTL)/Digital TV (DTV)
(*)
F90 20 Amp Blue –TRAILER TOW PARK LMP — If Equipped
F91 –20 Amp Yellow HORN
F92 40 Amp Green –HD ACCY #2 — If Equipped
(*)
F93 40 Amp Green –HD ACCY #1 — If Equipped
(*)
F94 –10 Amp Red Tire Pressure Monitor (TPM)/RF Hub system (CORAX)
(*)
F95 – –Spare
Cavity Cartridge Fuse Micro Fuse Description
2020_JEEP_JL_WRANGLER_UG_RHD_UK.book Page 190
Page 195 of 330
193
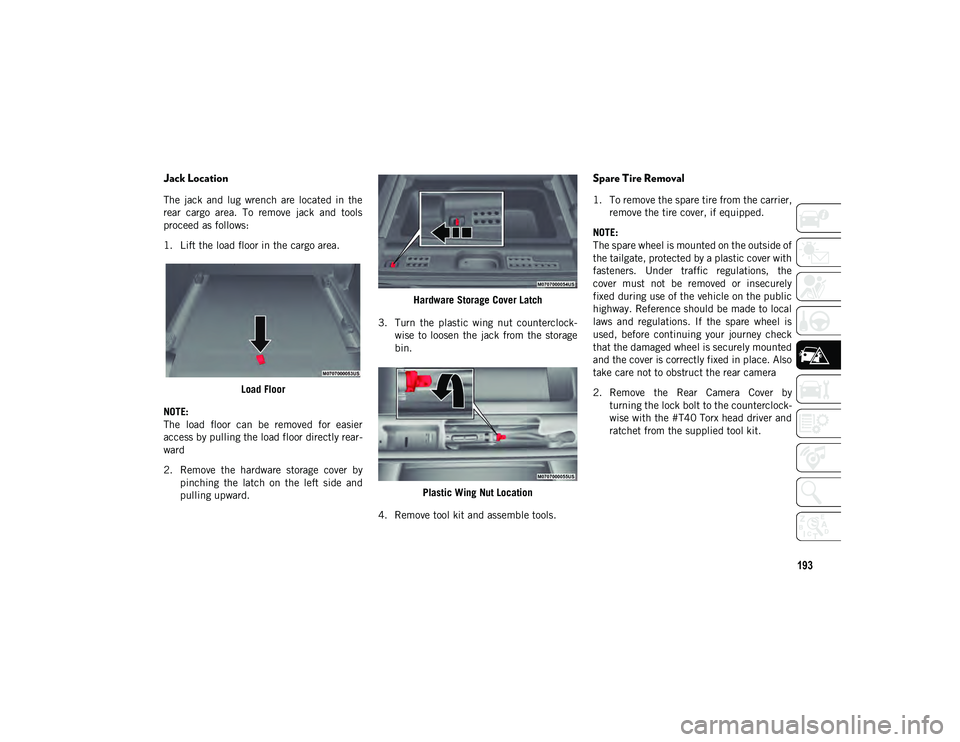
Jack Location
The jack and lug wrench are located in the
rear cargo area. To remove jack and tools
proceed as follows:
1. Lift the load floor in the cargo area.Load Floor
NOTE:
The load floor can be removed for easier
access by pulling the load floor directly rear -
ward
2. Remove the hardware storage cover by pinching the latch on the left side and
pulling upward. Hardware Storage Cover Latch
3. Turn the plastic wing nut counterclock -
wise to loosen the jack from the storage
bin.
Plastic Wing Nut Location
4. Remove tool kit and assemble tools.
Spare Tire Removal
1. To remove the spare tire from the carrier, remove the tire cover, if equipped.
NOTE:
The spare wheel is mounted on the outside of
the tailgate, protected by a plastic cover with
fasteners. Under traffic regulations, the
cover must not be removed or insecurely
fixed during use of the vehicle on the public
highway. Reference should be made to local
laws and regulations. If the spare wheel is
used, before continuing your journey check
that the damaged wheel is securely mounted
and the cover is correctly fixed in place. Also
take care not to obstruct the rear camera
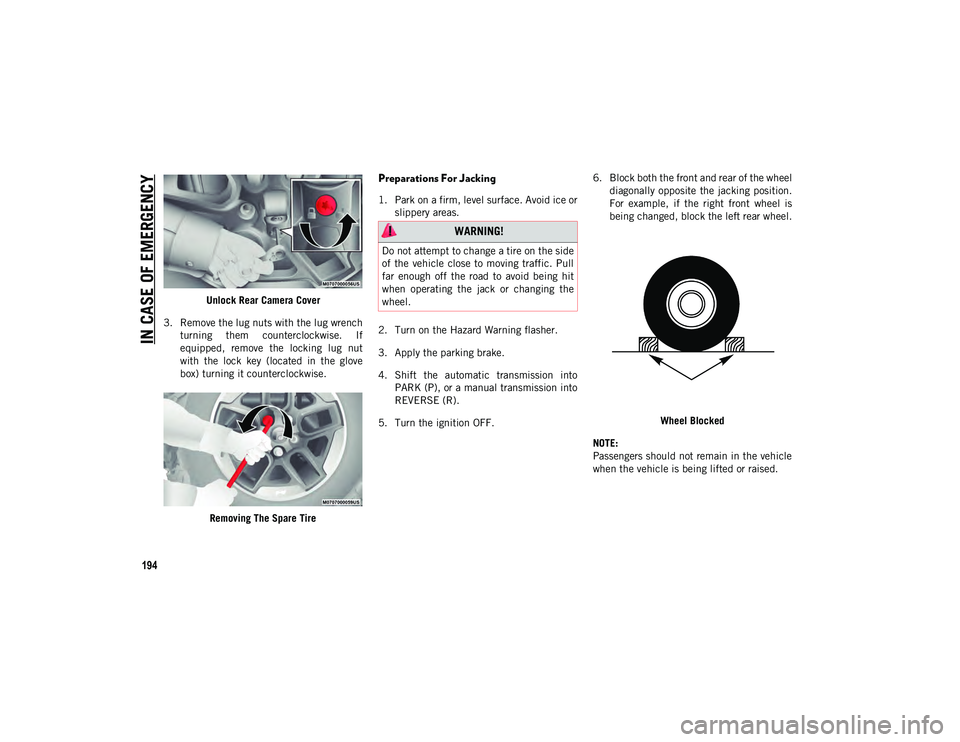
2. Remove the Rear Camera Cover by turning the lock bolt to the counterclock -
wise with the #T40 Torx head driver and
ratchet from the supplied tool kit.
2020_JEEP_JL_WRANGLER_UG_RHD_UK.book Page 193
Page 196 of 330
IN CASE OF EMERGENCY
194
Unlock Rear Camera Cover
3. Remove the lug nuts with the lug wrench turning them counterclockwise. If
equipped, remove the locking lug nut
with the lock key (located in the glove
box) turning it counterclockwise.
Removing The Spare Tire
Preparations For Jacking
1. Park on a firm, level surface. Avoid ice orslippery areas.
2. Turn on the Hazard Warning flasher.
3. Apply the parking brake.
4. Shift the automatic transmission into PARK (P), or a manual transmission into
REVERSE (R).
5. Turn the ignition OFF. 6. Block both the front and rear of the wheel
diagonally opposite the jacking position.
For example, if the right front wheel is
being changed, block the left rear wheel.
Wheel Blocked
NOTE:
Passengers should not remain in the vehicle
when the vehicle is being lifted or raised.
WARNING!
Do not attempt to change a tire on the side
of the vehicle close to moving traffic. Pull
far enough off the road to avoid being hit
when operating the jack or changing the
wheel.
2020_JEEP_JL_WRANGLER_UG_RHD_UK.book Page 194
Page 197 of 330
195
(Continued)
Jacking Instructions
Jack Warning Label1. Remove the spare tire, jack and tools
from the stored location.
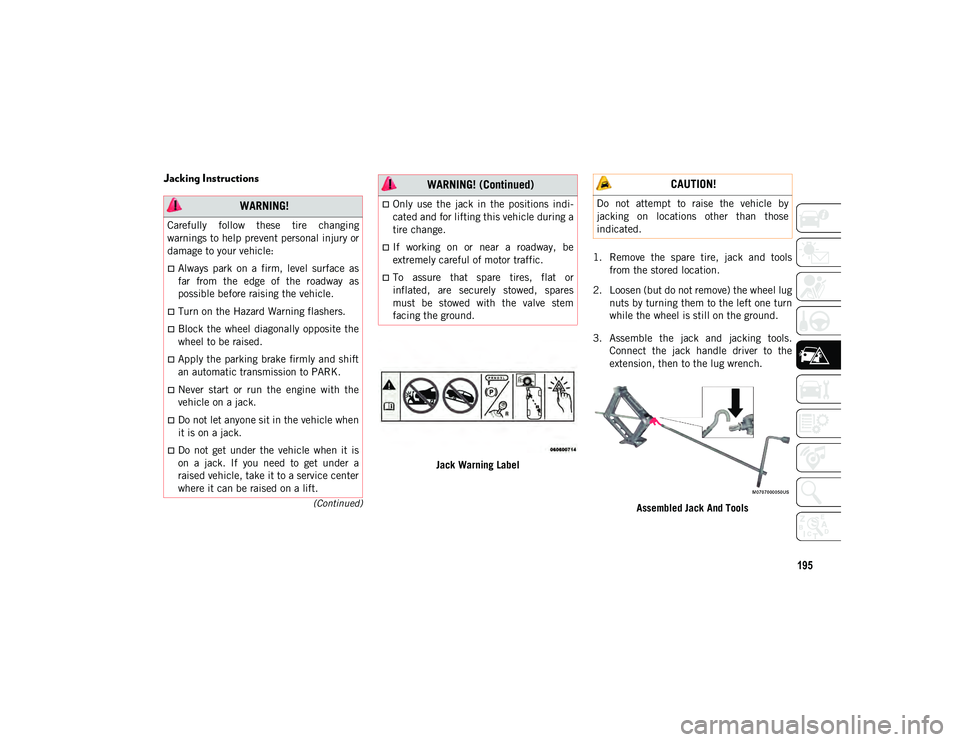
2. Loosen (but do not remove) the wheel lug nuts by turning them to the left one turn
while the wheel is still on the ground.
3. Assemble the jack and jacking tools. Connect the jack handle driver to the
extension, then to the lug wrench.
Assembled Jack And Tools
WARNING!
Carefully follow these tire changing
warnings to help prevent personal injury or
damage to your vehicle:
Always park on a firm, level surface as
far from the edge of the roadway as
possible before raising the vehicle.
Turn on the Hazard Warning flashers.
Block the wheel diagonally opposite the
wheel to be raised.
Apply the parking brake firmly and shift
an automatic transmission to PARK.
Never start or run the engine with the
vehicle on a jack.
Do not let anyone sit in the vehicle when
it is on a jack.
Do not get under the vehicle when it is
on a jack. If you need to get under a
raised vehicle, take it to a service center
where it can be raised on a lift.
Only use the jack in the positions indi -
cated and for lifting this vehicle during a
tire change.
If working on or near a roadway, be
extremely careful of motor traffic.
To assure that spare tires, flat or
inflated, are securely stowed, spares
must be stowed with the valve stem
facing the ground.
WARNING! (Continued) CAUTION!
Do not attempt to raise the vehicle by
jacking on locations other than those
indicated.
2020_JEEP_JL_WRANGLER_UG_RHD_UK.book Page 195