lock JEEP WRANGLER UNLIMITED 2021 Owner handbook (in English)
[x] Cancel search | Manufacturer: JEEP, Model Year: 2021, Model line: WRANGLER UNLIMITED, Model: JEEP WRANGLER UNLIMITED 2021Pages: 330, PDF Size: 9.16 MB
Page 32 of 330
GETTING TO KNOW YOUR VEHICLE
30
Rear Head Restraints — Four Door Models
The rear seat is equipped with nonadjust-
able, but foldable, outboard head restraints,
as well as an adjustable, removable center
head restraint.
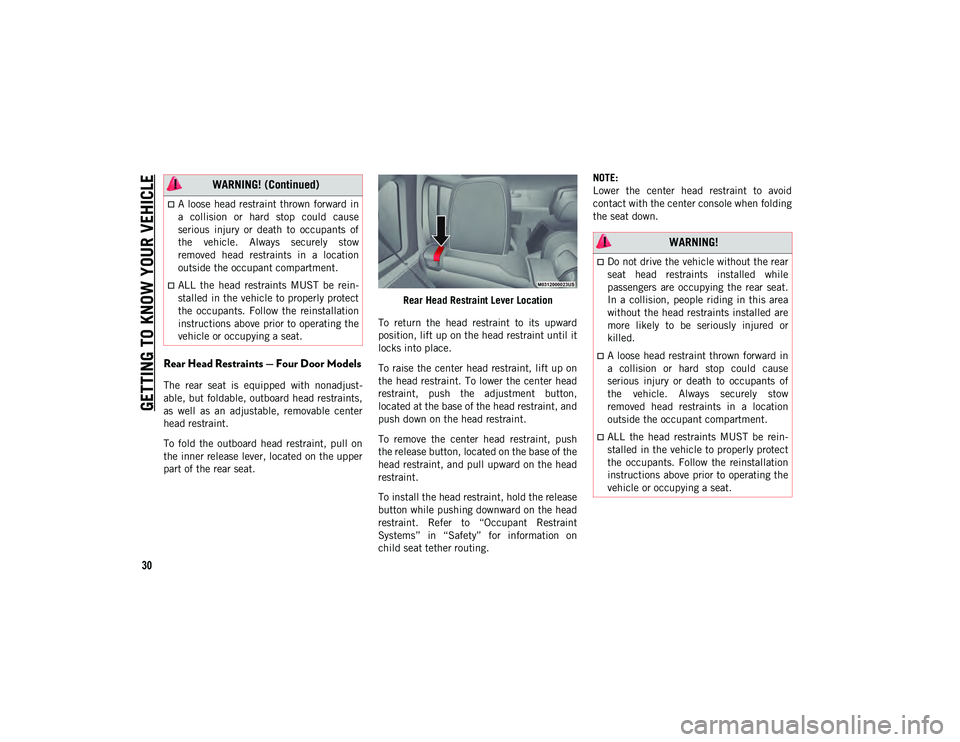
To fold the outboard head restraint, pull on
the inner release lever, located on the upper
part of the rear seat. Rear Head Restraint Lever Location
To return the head restraint to its upward
position, lift up on the head restraint until it
locks into place.
To raise the center head restraint, lift up on
the head restraint. To lower the center head
restraint, push the adjustment button,
located at the base of the head restraint, and
push down on the head restraint.
To remove the center head restraint, push
the release button, located on the base of the
head restraint, and pull upward on the head
restraint.
To install the head restraint, hold the release
button while pushing downward on the head
restraint. Refer to “Occupant Restraint
Systems” in “Safety” for information on
child seat tether routing. NOTE:
Lower the center head restraint to avoid
contact with the center console when folding
the seat down.
A loose head restraint thrown forward in
a collision or hard stop could cause
serious injury or death to occupants of
the vehicle. Always securely stow
removed head restraints in a location
outside the occupant compartment.
ALL the head restraints MUST be rein
-
stalled in the vehicle to properly protect
the occupants. Follow the reinstallation
instructions above prior to operating the
vehicle or occupying a seat.
WARNING! (Continued)
WARNING!
Do not drive the vehicle without the rear
seat head restraints installed while
passengers are occupying the rear seat.
In a collision, people riding in this area
without the head restraints installed are
more likely to be seriously injured or
killed.
A loose head restraint thrown forward in
a collision or hard stop could cause
serious injury or death to occupants of
the vehicle. Always securely stow
removed head restraints in a location
outside the occupant compartment.
ALL the head restraints MUST be rein -
stalled in the vehicle to properly protect
the occupants. Follow the reinstallation
instructions above prior to operating the
vehicle or occupying a seat.
2020_JEEP_JL_WRANGLER_UG_RHD_UK.book Page 30
Page 33 of 330
31
STEERING WHEEL
Tilt/Telescoping Steering Column
This feature allows you to tilt the steering
column upward or downward. It also allows
you to lengthen or shorten the steering
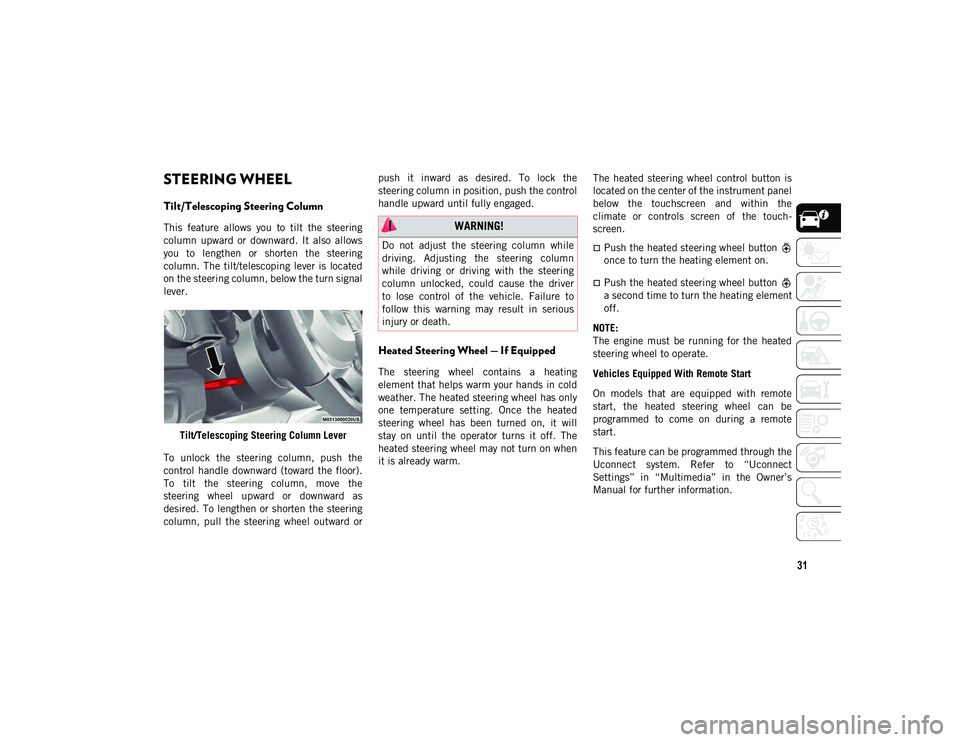
column. The tilt/telescoping lever is located
on the steering column, below the turn signal
lever.Tilt/Telescoping Steering Column Lever
To unlock the steering column, push the
control handle downward (toward the floor).
To tilt the steering column, move the
steering wheel upward or downward as
desired. To lengthen or shorten the steering
column, pull the steering wheel outward or push it inward as desired. To lock the
steering column in position, push the control
handle upward until fully engaged.
Heated Steering Wheel — If Equipped
The steering wheel contains a heating
element that helps warm your hands in cold
weather. The heated steering wheel has only
one temperature setting. Once the heated
steering wheel has been turned on, it will
stay on until the operator turns it off. The
heated steering wheel may not turn on when
it is already warm.
The heated steering wheel control button is
located on the center of the instrument panel
below the touchscreen and within the
climate or controls screen of the touch
-
screen.
Push the heated steering wheel button
once to turn the heating element on.
Push the heated steering wheel button
a second time to turn the heating element
off.
NOTE:
The engine must be running for the heated
steering wheel to operate.
Vehicles Equipped With Remote Start
On models that are equipped with remote
start, the heated steering wheel can be
programmed to come on during a remote
start.
This feature can be programmed through the
Uconnect system. Refer to “Uconnect
Settings” in “Multimedia” in the Owner’s
Manual for further information.
WARNING!
Do not adjust the steering column while
driving. Adjusting the steering column
while driving or driving with the steering
column unlocked, could cause the driver
to lose control of the vehicle. Failure to
follow this warning may result in serious
injury or death.
2020_JEEP_JL_WRANGLER_UG_RHD_UK.book Page 31
Page 34 of 330
GETTING TO KNOW YOUR VEHICLE
32
EXTERIOR LIGHTS
Headlight Switch
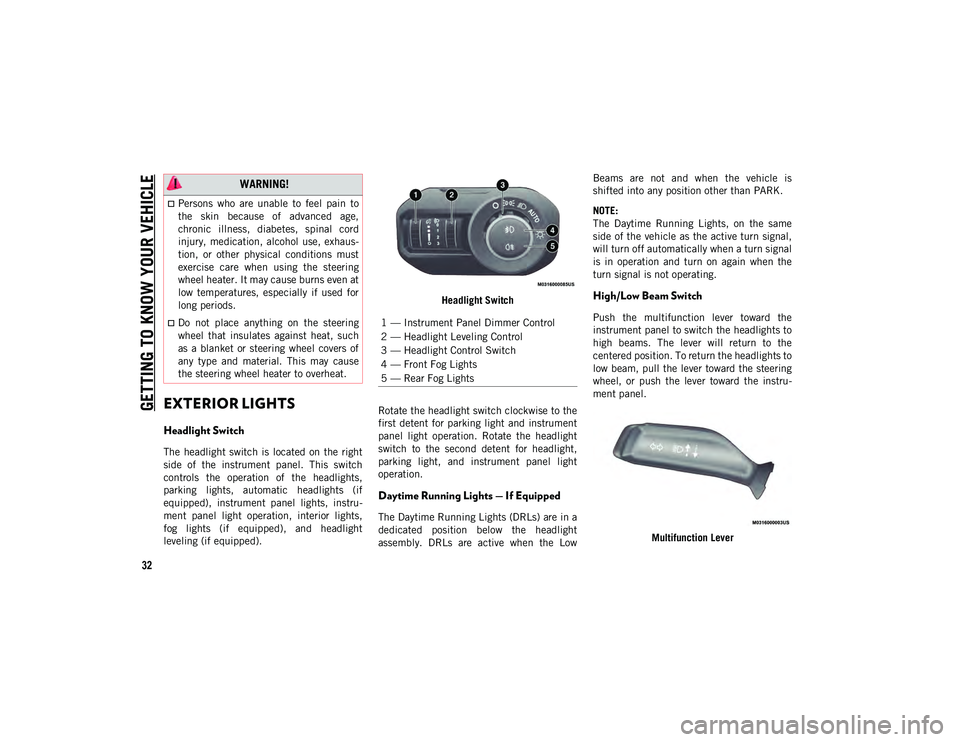
The headlight switch is located on the right
side of the instrument panel. This switch
controls the operation of the headlights,
parking lights, automatic headlights (if
equipped), instrument panel lights, instru-
ment panel light operation, interior lights,
fog lights (if equipped), and headlight
leveling (if equipped). Headlight Switch
Rotate the headlight switch clockwise to the
first detent for parking light and instrument
panel light operation. Rotate the headlight
switch to the second detent for headlight,
parking light, and instrument panel light
operation.
Daytime Running Lights — If Equipped
The Daytime Running Lights (DRLs) are in a
dedicated position below the headlight
assembly. DRLs are active when the Low Beams are not and when the vehicle is
shifted into any position other than PARK.
NOTE:
The Daytime Running Lights, on the same
side of the vehicle as the active turn signal,
will turn off automatically when a turn signal
is in operation and turn on again when the
turn signal is not operating.
High/Low Beam Switch
Push the multifunction lever toward the
instrument panel to switch the headlights to
high beams. The lever will return to the
centered position. To return the headlights to
low beam, pull the lever toward the steering
wheel, or push the lever toward the instru
-
ment panel.
Multifunction Lever
WARNING!
Persons who are unable to feel pain to
the skin because of advanced age,
chronic illness, diabetes, spinal cord
injury, medication, alcohol use, exhaus-
tion, or other physical conditions must
exercise care when using the steering
wheel heater. It may cause burns even at
low temperatures, especially if used for
long periods.
Do not place anything on the steering
wheel that insulates against heat, such
as a blanket or steering wheel covers of
any type and material. This may cause
the steering wheel heater to overheat.1 — Instrument Panel Dimmer Control
2 — Headlight Leveling Control
3 — Headlight Control Switch
4 — Front Fog Lights
5 — Rear Fog Lights
2020_JEEP_JL_WRANGLER_UG_RHD_UK.book Page 32
Page 35 of 330
33
Automatic High Beam — If Equipped
The Automatic High Beam Headlamp Control
system provides increased forward lighting at
night by automating high beam control
through the use of a digital camera mounted
on the vehicle’s header. This camera detects
vehicle specific light and automatically
switches from high beams to low beams until
the approaching vehicle is out of view.
NOTE:
The Automatic High Beam Headlamp
Control can be turned on or off by selecting
“ON” under “Auto High Beam” within your
Uconnect settings, as well as turning the
headlight switch to the AUTO position and
placing the multifunction lever in the high
beam position. Refer to “Uconnect Settings”
in “Multimedia” in the Owner’s Manual for
further information.
Broken, muddy, or obstructed headlights
and taillights of vehicles in the field of
view will cause headlights to remain on
longer (closer to the vehicle). Also, dirt,
film, and other obstructions on the wind-
shield or camera lens will cause the
system to function improperly.
Flash-To-Pass
You can signal another vehicle with your
headlights by lightly pulling the multifunc -
tion lever toward you. This will cause the
high beam headlights to turn on, and remain
on, until the lever is released.
Automatic Headlights — If Equipped
This system automatically turns the head -
lights on or off according to ambient light
levels. To turn the system on, rotate the
headlight switch clockwise to the last detent
for automatic headlight operation. When the
system is on, the headlight time delay
feature is also on. This means the headlights
will stay on for up to 90 seconds after you
place the ignition into the OFF position. To
turn the automatic system off, move the
headlight switch out of the AUTO position.
NOTE:
The engine must be running before the head -
lights will come on in the automatic mode.
Front And Rear Fog Lights — If Equipped
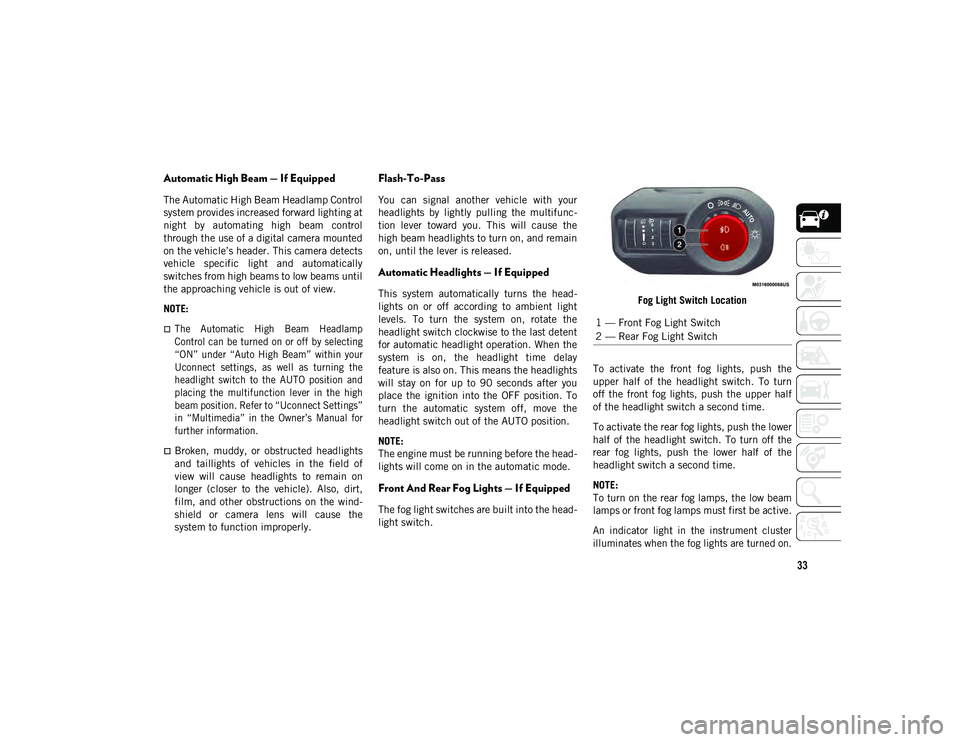
The fog light switches are built into the head -
light switch. Fog Light Switch Location
To activate the front fog lights, push the
upper half of the headlight switch. To turn
off the front fog lights, push the upper half
of the headlight switch a second time.
To activate the rear fog lights, push the lower
half of the headlight switch. To turn off the
rear fog lights, push the lower half of the
headlight switch a second time.
NOTE:
To turn on the rear fog lamps, the low beam
lamps or front fog lamps must first be active.
An indicator light in the instrument cluster
illuminates when the fog lights are turned on.
1 — Front Fog Light Switch
2 — Rear Fog Light Switch
2020_JEEP_JL_WRANGLER_UG_RHD_UK.book Page 33
Page 43 of 330
41
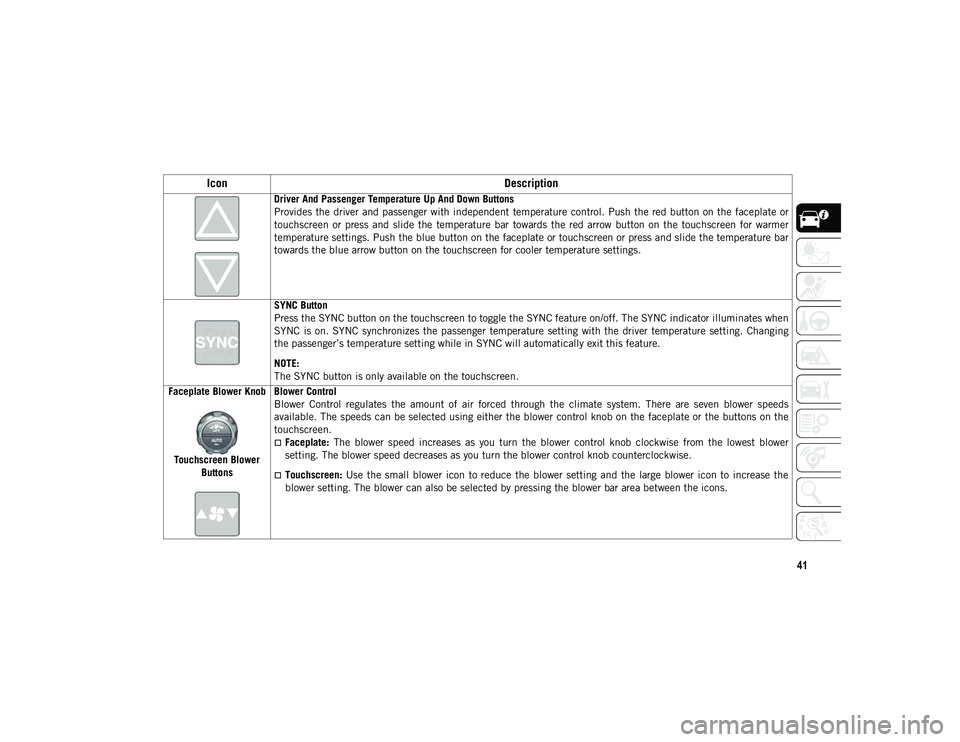
Driver And Passenger Temperature Up And Down Buttons
Provides the driver and passenger with independent temperature control. Push the red button on the faceplate or
touchscreen or press and slide the temperature bar towards the red arrow button on the touchscreen for warmer
temperature settings. Push the blue button on the faceplate or touchscreen or press and slide the temperature bar
towards the blue arrow button on the touchscreen for cooler temperature settings.
SYNC Button
Press the SYNC button on the touchscreen to toggle the SYNC feature on/off. The SYNC indicator illuminates when
SYNC is on. SYNC synchronizes the passenger temperature setting with the driver temperature setting. Changing
the passenger’s temperature setting while in SYNC will automatically exit this feature.
NOTE:
The SYNC button is only available on the touchscreen.
Faceplate Blower Knob
Touchscreen Blower Buttons Blower Control
Blower Control regulates the amount of air forced through the climate system. There are seven blower speeds
available. The speeds can be selected using either the blower control knob on the faceplate or the buttons on the
touchscreen.
Faceplate:
The blower speed increases as you turn the blower control knob clockwise from the lowest blower
setting. The blower speed decreases as you turn the blower control knob counterclockwise.
Touchscreen: Use the small blower icon to reduce the blower setting and the large blower icon to increase the
blower setting. The blower can also be selected by pressing the blower bar area between the icons.
Icon Description
2020_JEEP_JL_WRANGLER_UG_RHD_UK.book Page 41
Page 48 of 330
GETTING TO KNOW YOUR VEHICLE
46
Cabin Air Filter
The climate control system filters out dust
and pollen from the air. Contact an autho-
rized dealer to service your cabin air filter,
and to have it replaced when needed.
POWER WINDOWS — IF
EQUIPPED
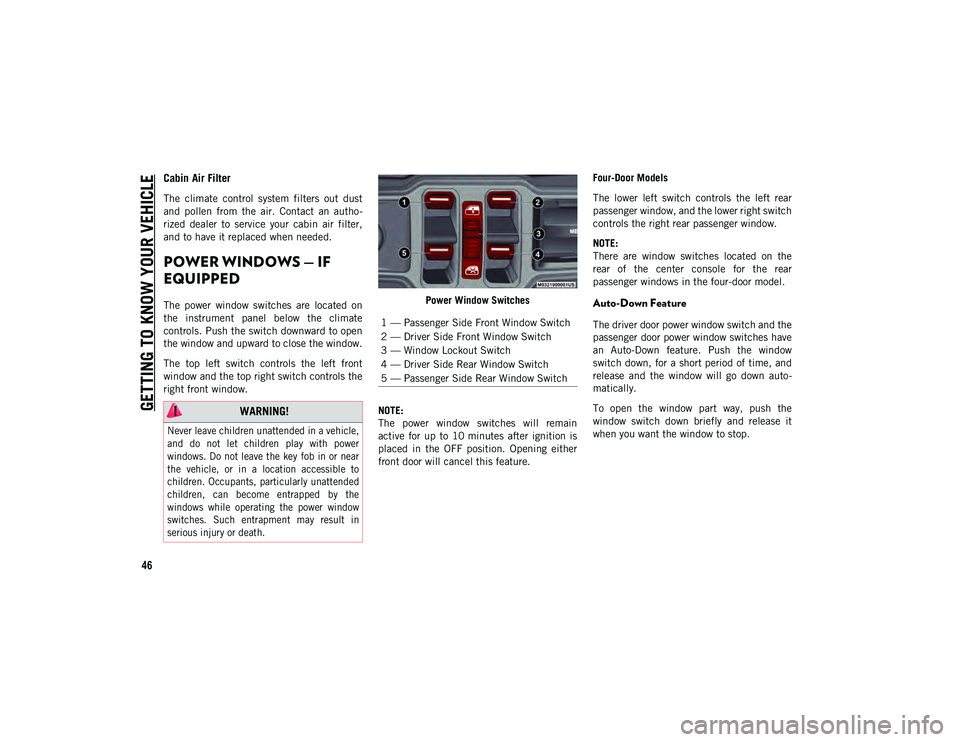
The power window switches are located on
the instrument panel below the climate
controls. Push the switch downward to open
the window and upward to close the window.
The top left switch controls the left front
window and the top right switch controls the
right front window. Power Window Switches
NOTE:
The power window switches will remain
active for up to 10 minutes after ignition is
placed in the OFF position. Opening either
front door will cancel this feature. Four-Door Models
The lower left switch controls the left rear
passenger window, and the lower right switch
controls the right rear passenger window.
NOTE:
There are window switches located on the
rear of the center console for the rear
passenger windows in the four-door model.Auto-Down Feature
The driver door power window switch and the
passenger door power window switches have
an Auto-Down feature. Push the window
switch down, for a short period of time, and
release and the window will go down auto
-
matically.
To open the window part way, push the
window switch down briefly and release it
when you want the window to stop.
WARNING!
Never leave children unattended in a vehicle,
and do not let children play with power
windows. Do not leave the key fob in or near
the vehicle, or in a location accessible to
children. Occupants, particularly unattended
children, can become entrapped by the
windows while operating the power window
switches. Such entrapment may result in
serious injury or death.
1 — Passenger Side Front Window Switch
2 — Driver Side Front Window Switch
3 — Window Lockout Switch
4 — Driver Side Rear Window Switch
5 — Passenger Side Rear Window Switch
2020_JEEP_JL_WRANGLER_UG_RHD_UK.book Page 46
Page 51 of 330
49
8. Allow the soft top to slide rearward freely inthe guide tracks to the stowed position.
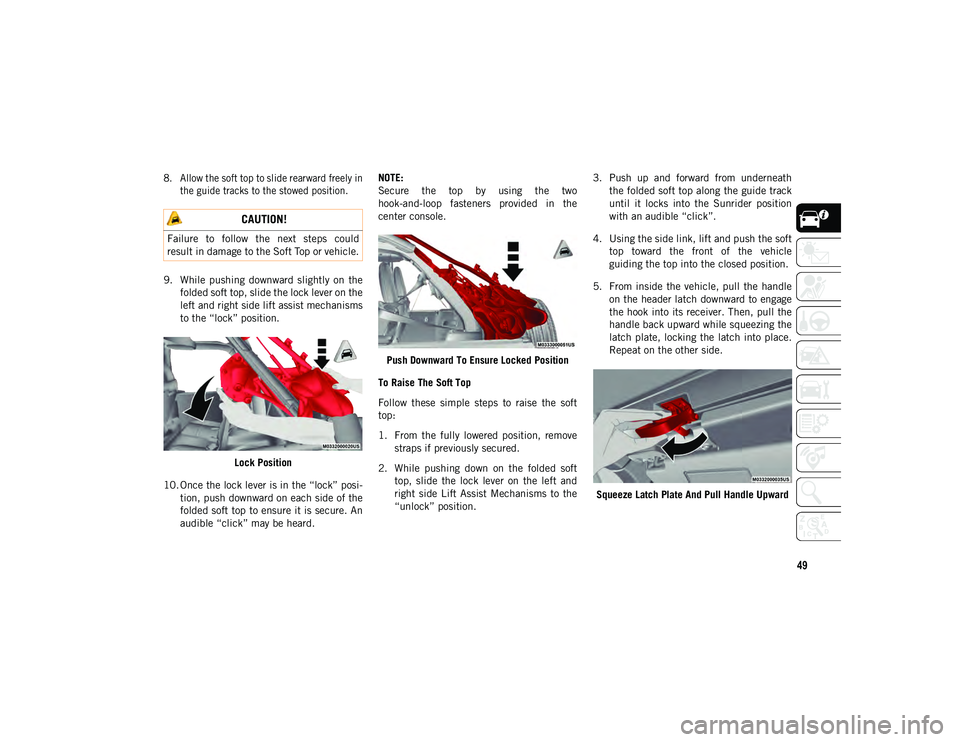
9. While pushing downward slightly on the folded soft top, slide the lock lever on the
left and right side lift assist mechanisms
to the “lock” position.
Lock Position
10. Once the lock lever is in the “lock” posi -
tion, push downward on each side of the
folded soft top to ensure it is secure. An
audible “click” may be heard. NOTE:
Secure the top by using the two
hook-and-loop fasteners provided in the
center console.
Push Downward To Ensure Locked Position
To Raise The Soft Top
Follow these simple steps to raise the soft
top:
1. From the fully lowered position, remove straps if previously secured.
2. While pushing down on the folded soft top, slide the lock lever on the left and
right side Lift Assist Mechanisms to the
“unlock” position. 3. Push up and forward from underneath
the folded soft top along the guide track
until it locks into the Sunrider position
with an audible “click”.
4. Using the side link, lift and push the soft top toward the front of the vehicle
guiding the top into the closed position.
5. From inside the vehicle, pull the handle on the header latch downward to engage
the hook into its receiver. Then, pull the
handle back upward while squeezing the
latch plate, locking the latch into place.
Repeat on the other side.
Squeeze Latch Plate And Pull Handle Upward
CAUTION!
Failure to follow the next steps could
result in damage to the Soft Top or vehicle.
2020_JEEP_JL_WRANGLER_UG_RHD_UK.book Page 49
Page 53 of 330
51
Freedom Top And Hard Top
To Remove Freedom Top Panels
NOTE:
The left side panel must be removed before
removing the right side panel.
1. Fold down the sun visor against the wind-
shield.
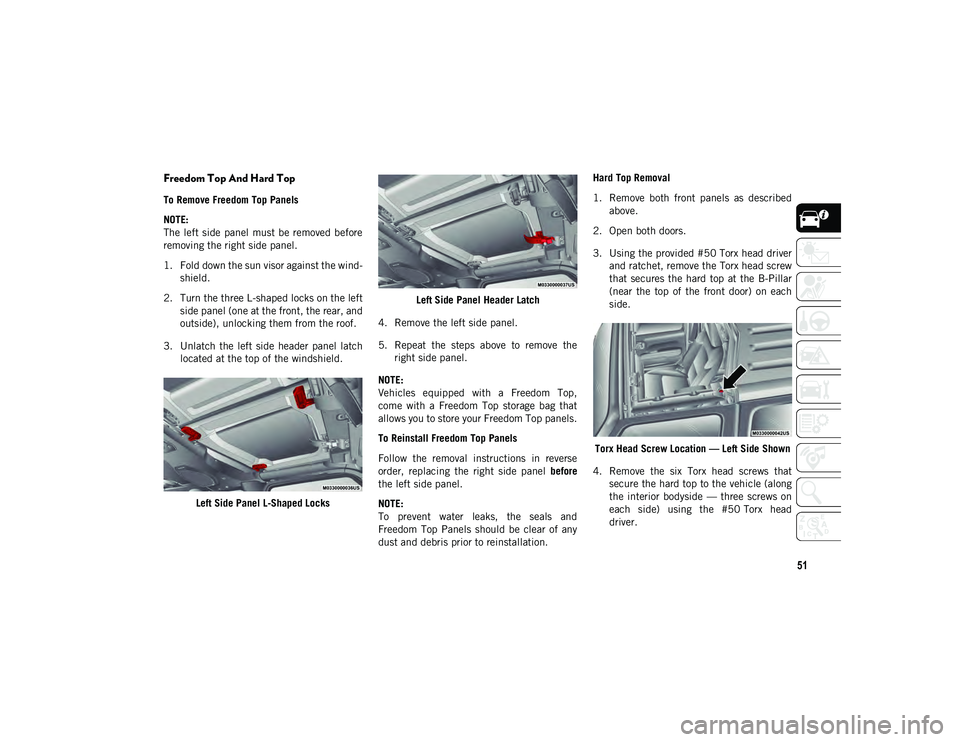
2. Turn the three L-shaped locks on the left side panel (one at the front, the rear, and
outside), unlocking them from the roof.
3. Unlatch the left side header panel latch located at the top of the windshield.
Left Side Panel L-Shaped Locks Left Side Panel Header Latch
4. Remove the left side panel.
5. Repeat the steps above to remove the right side panel.
NOTE:
Vehicles equipped with a Freedom Top,
come with a Freedom Top storage bag that
allows you to store your Freedom Top panels.
To Reinstall Freedom Top Panels
Follow the removal instructions in reverse
order, replacing the right side panel before
the left side panel.
NOTE:
To prevent water leaks, the seals and
Freedom Top Panels should be clear of any
dust and debris prior to reinstallation. Hard Top Removal
1. Remove both front panels as described
above.
2. Open both doors.
3. Using the provided #50 Torx head driver and ratchet, remove the Torx head screw
that secures the hard top at the B-Pillar
(near the top of the front door) on each
side.
Torx Head Screw Location — Left Side Shown
4. Remove the six Torx head screws that secure the hard top to the vehicle (along
the interior bodyside — three screws on
each side) using the #50 Torx head
driver.
2020_JEEP_JL_WRANGLER_UG_RHD_UK.book Page 51
Page 55 of 330
53
Dual Top — If Equipped
If your vehicle is equipped with a Dual Top,
the soft top system will be provided in a
separate box located in the rear of the
vehicle for shipping purposes only.
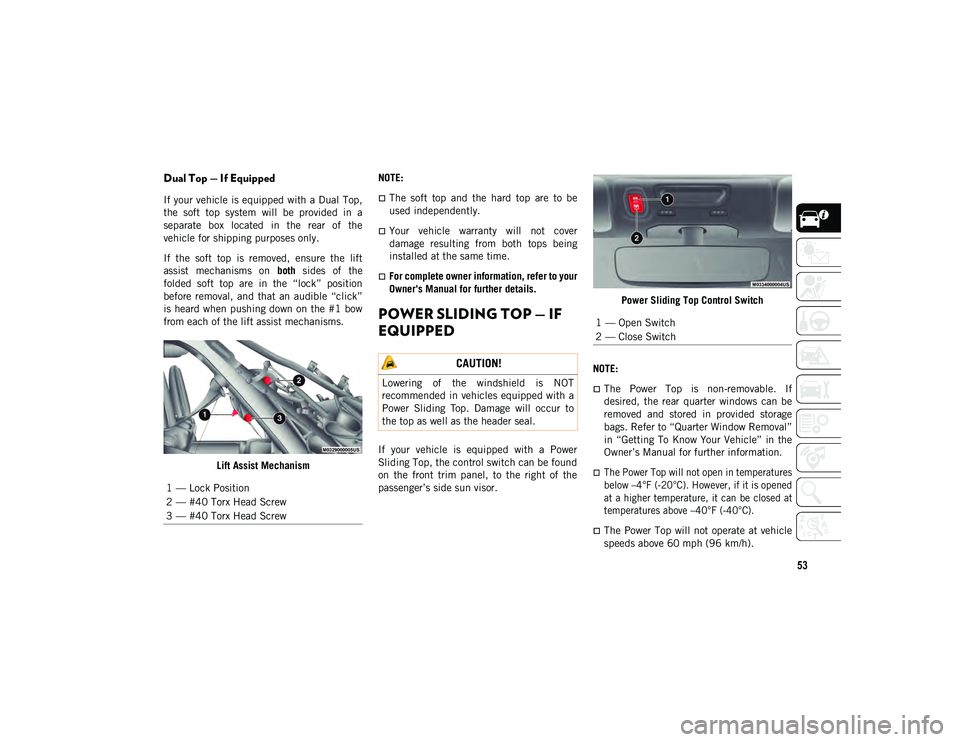
If the soft top is removed, ensure the lift
assist mechanisms on both sides of the
folded soft top are in the “lock” position
before removal, and that an audible “click”
is heard when pushing down on the #1 bow
from each of the lift assist mechanisms.
Lift Assist Mechanism NOTE:The soft top and the hard top are to be
used independently.
Your vehicle warranty will not cover
damage resulting from both tops being
installed at the same time.
For complete owner information, refer to your
Owner's Manual for further details.
POWER SLIDING TOP — IF
EQUIPPED
If your vehicle is equipped with a Power
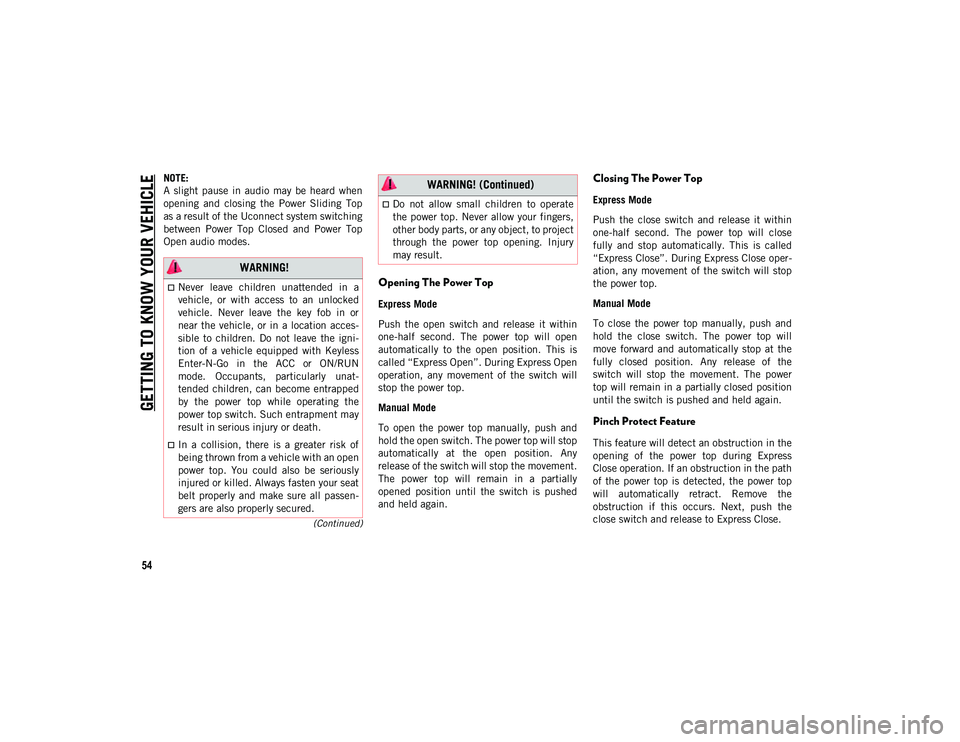
Sliding Top, the control switch can be found
on the front trim panel, to the right of the
passenger’s side sun visor.
Power Sliding Top Control Switch
NOTE:
The Power Top is non-removable. If
desired, the rear quarter windows can be
removed and stored in provided storage
bags. Refer to “Quarter Window Removal”
in “Getting To Know Your Vehicle” in the
Owner’s Manual for further information.
The Power Top will not open in temperatures
below –4°F (-20°C). However, if it is opened
at a higher temperature, it can be closed at
temperatures above –40°F (-40°C).
The Power Top will not operate at vehicle
speeds above 60 mph (96 km/h).
1 — Lock Position
2 — #40 Torx Head Screw
3 — #40 Torx Head Screw
CAUTION!
Lowering of the windshield is NOT
recommended in vehicles equipped with a
Power Sliding Top. Damage will occur to
the top as well as the header seal.
1 — Open Switch
2 — Close Switch
2020_JEEP_JL_WRANGLER_UG_RHD_UK.book Page 53
Page 56 of 330
GETTING TO KNOW YOUR VEHICLE
54
(Continued)
NOTE:
A slight pause in audio may be heard when
opening and closing the Power Sliding Top
as a result of the Uconnect system switching
between Power Top Closed and Power Top
Open audio modes.
Opening The Power Top
Express Mode
Push the open switch and release it within
one-half second. The power top will open
automatically to the open position. This is
called “Express Open”. During Express Open
operation, any movement of the switch will
stop the power top.
Manual Mode
To open the power top manually, push and
hold the open switch. The power top will stop
automatically at the open position. Any
release of the switch will stop the movement.
The power top will remain in a partially
opened position until the switch is pushed
and held again.
Closing The Power Top
Express Mode
Push the close switch and release it within
one-half second. The power top will close
fully and stop automatically. This is called
“Express Close”. During Express Close oper-
ation, any movement of the switch will stop
the power top.
Manual Mode
To close the power top manually, push and
hold the close switch. The power top will
move forward and automatically stop at the
fully closed position. Any release of the
switch will stop the movement. The power
top will remain in a partially closed position
until the switch is pushed and held again.
Pinch Protect Feature
This feature will detect an obstruction in the
opening of the power top during Express
Close operation. If an obstruction in the path
of the power top is detected, the power top
will automatically retract. Remove the
obstruction if this occurs. Next, push the
close switch and release to Express Close.
WARNING!
Never leave children unattended in a
vehicle, or with access to an unlocked
vehicle. Never leave the key fob in or
near the vehicle, or in a location acces-
sible to children. Do not leave the igni -
tion of a vehicle equipped with Keyless
Enter-N-Go in the ACC or ON/RUN
mode. Occupants, particularly unat -
tended children, can become entrapped
by the power top while operating the
power top switch. Such entrapment may
result in serious injury or death.
In a collision, there is a greater risk of
being thrown from a vehicle with an open
power top. You could also be seriously
injured or killed. Always fasten your seat
belt properly and make sure all passen -
gers are also properly secured.
Do not allow small children to operate
the power top. Never allow your fingers,
other body parts, or any object, to project
through the power top opening. Injury
may result.
WARNING! (Continued)
2020_JEEP_JL_WRANGLER_UG_RHD_UK.book Page 54