lock JEEP WRANGLER UNLIMITED 2021 Owner handbook (in English)
[x] Cancel search | Manufacturer: JEEP, Model Year: 2021, Model line: WRANGLER UNLIMITED, Model: JEEP WRANGLER UNLIMITED 2021Pages: 330, PDF Size: 9.16 MB
Page 189 of 330
187
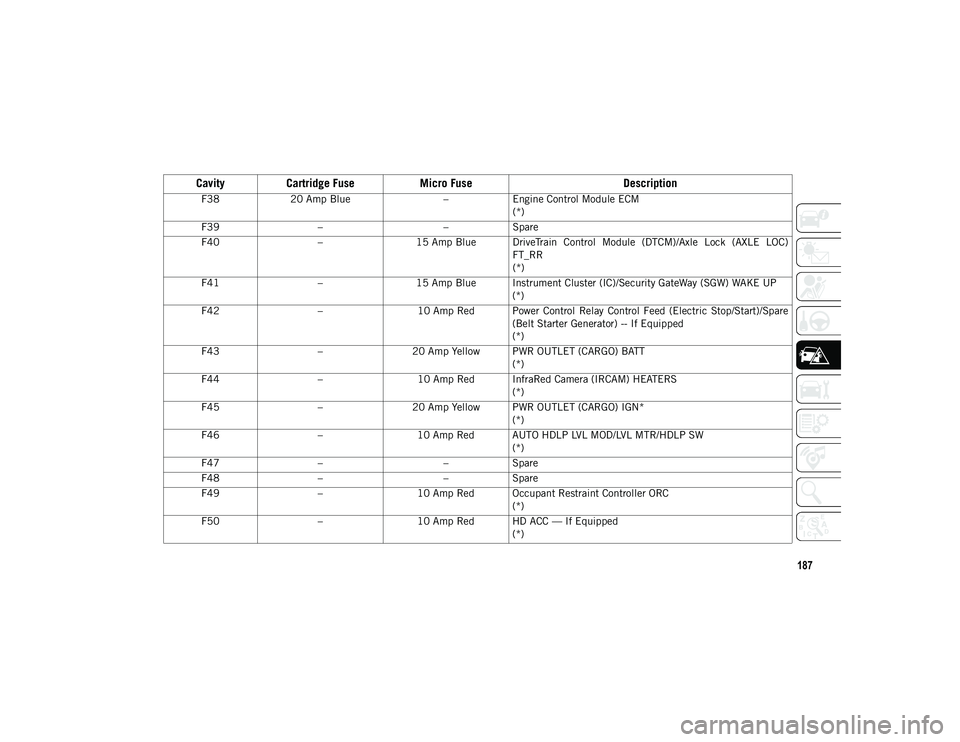
F38 20 Amp Blue
–Engine Control Module ECM
(*)
F39 – –Spare
F40 –15 Amp Blue DriveTrain Control Module (DTCM)/Axle Lock (AXLE LOC)
FT_RR
(*)
F41 –15 Amp Blue Instrument Cluster (IC)/Security GateWay (SGW) WAKE UP
(*)
F42 –10 Amp Red Power Control Relay Control Feed (Electric Stop/Start)/Spare
(Belt Starter Generator) -- If Equipped
(*)
F43 –20 Amp Yellow PWR OUTLET (CARGO) BATT
(*)
F44 –10 Amp Red InfraRed Camera (IRCAM) HEATERS
(*)
F45 –20 Amp Yellow PWR OUTLET (CARGO) IGN*
(*)
F46 –10 Amp Red AUTO HDLP LVL MOD/LVL MTR/HDLP SW
(*)
F47 – –Spare
F48 – –Spare
F49 –10 Amp Red Occupant Restraint Controller ORC
(*)
F50 –10 Amp Red HD ACC — If Equipped
(*)
CavityCartridge Fuse Micro Fuse Description
2020_JEEP_JL_WRANGLER_UG_RHD_UK.book Page 187
Page 195 of 330
193
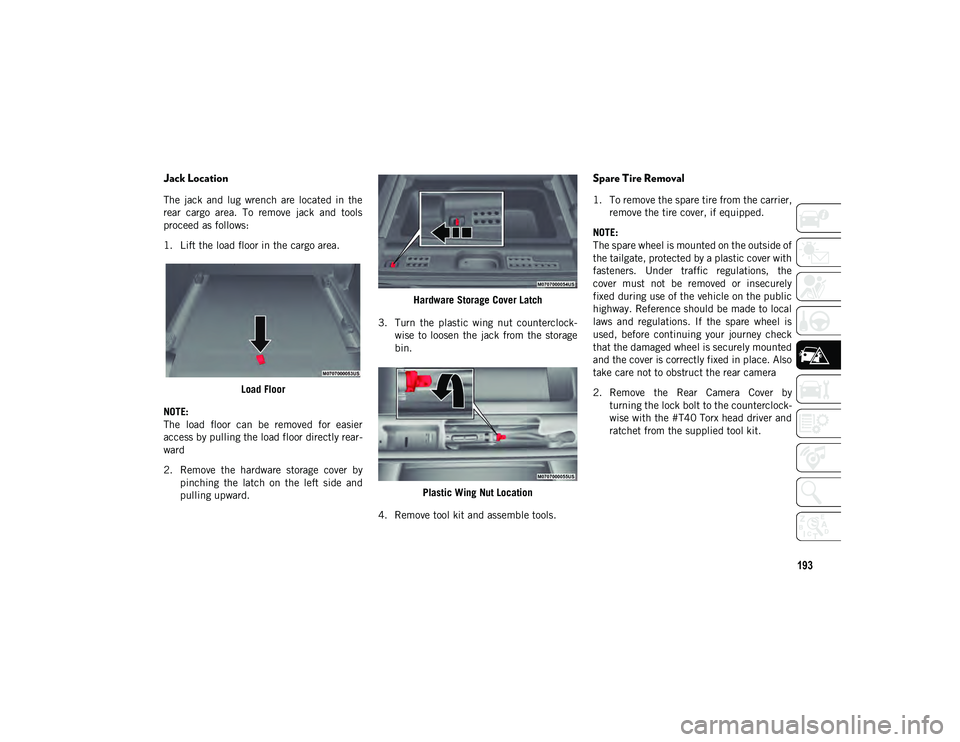
Jack Location
The jack and lug wrench are located in the
rear cargo area. To remove jack and tools
proceed as follows:
1. Lift the load floor in the cargo area.Load Floor
NOTE:
The load floor can be removed for easier
access by pulling the load floor directly rear -
ward
2. Remove the hardware storage cover by pinching the latch on the left side and
pulling upward. Hardware Storage Cover Latch
3. Turn the plastic wing nut counterclock -
wise to loosen the jack from the storage
bin.
Plastic Wing Nut Location
4. Remove tool kit and assemble tools.
Spare Tire Removal
1. To remove the spare tire from the carrier, remove the tire cover, if equipped.
NOTE:
The spare wheel is mounted on the outside of
the tailgate, protected by a plastic cover with
fasteners. Under traffic regulations, the
cover must not be removed or insecurely
fixed during use of the vehicle on the public
highway. Reference should be made to local
laws and regulations. If the spare wheel is
used, before continuing your journey check
that the damaged wheel is securely mounted
and the cover is correctly fixed in place. Also
take care not to obstruct the rear camera
2. Remove the Rear Camera Cover by turning the lock bolt to the counterclock -
wise with the #T40 Torx head driver and
ratchet from the supplied tool kit.
2020_JEEP_JL_WRANGLER_UG_RHD_UK.book Page 193
Page 196 of 330
IN CASE OF EMERGENCY
194
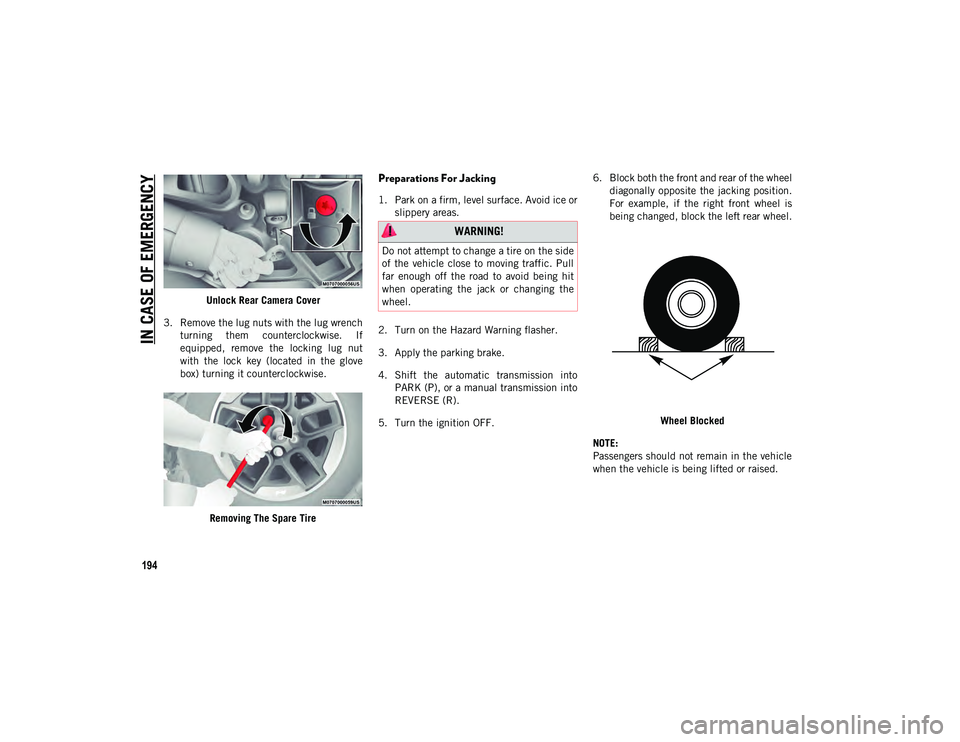
Unlock Rear Camera Cover
3. Remove the lug nuts with the lug wrench turning them counterclockwise. If
equipped, remove the locking lug nut
with the lock key (located in the glove
box) turning it counterclockwise.
Removing The Spare Tire
Preparations For Jacking
1. Park on a firm, level surface. Avoid ice orslippery areas.
2. Turn on the Hazard Warning flasher.
3. Apply the parking brake.
4. Shift the automatic transmission into PARK (P), or a manual transmission into
REVERSE (R).
5. Turn the ignition OFF. 6. Block both the front and rear of the wheel
diagonally opposite the jacking position.
For example, if the right front wheel is
being changed, block the left rear wheel.
Wheel Blocked
NOTE:
Passengers should not remain in the vehicle
when the vehicle is being lifted or raised.
WARNING!
Do not attempt to change a tire on the side
of the vehicle close to moving traffic. Pull
far enough off the road to avoid being hit
when operating the jack or changing the
wheel.
2020_JEEP_JL_WRANGLER_UG_RHD_UK.book Page 194
Page 197 of 330
195
(Continued)
Jacking Instructions
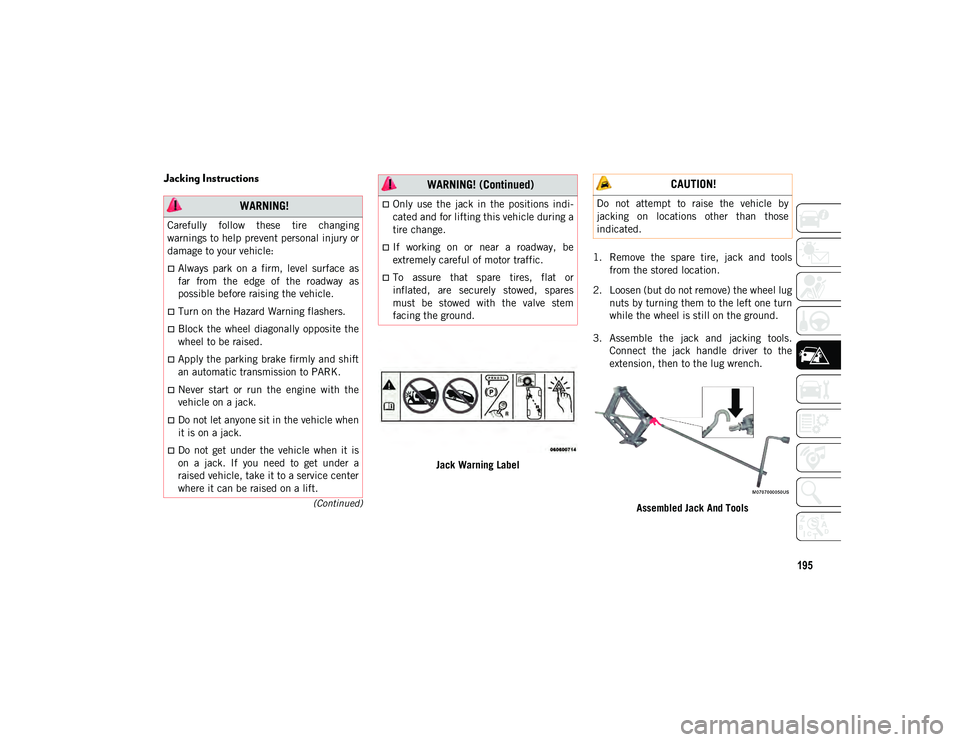
Jack Warning Label1. Remove the spare tire, jack and tools
from the stored location.
2. Loosen (but do not remove) the wheel lug nuts by turning them to the left one turn
while the wheel is still on the ground.
3. Assemble the jack and jacking tools. Connect the jack handle driver to the
extension, then to the lug wrench.
Assembled Jack And Tools
WARNING!
Carefully follow these tire changing
warnings to help prevent personal injury or
damage to your vehicle:
Always park on a firm, level surface as
far from the edge of the roadway as
possible before raising the vehicle.
Turn on the Hazard Warning flashers.
Block the wheel diagonally opposite the
wheel to be raised.
Apply the parking brake firmly and shift
an automatic transmission to PARK.
Never start or run the engine with the
vehicle on a jack.
Do not let anyone sit in the vehicle when
it is on a jack.
Do not get under the vehicle when it is
on a jack. If you need to get under a
raised vehicle, take it to a service center
where it can be raised on a lift.
Only use the jack in the positions indi -
cated and for lifting this vehicle during a
tire change.
If working on or near a roadway, be
extremely careful of motor traffic.
To assure that spare tires, flat or
inflated, are securely stowed, spares
must be stowed with the valve stem
facing the ground.
WARNING! (Continued) CAUTION!
Do not attempt to raise the vehicle by
jacking on locations other than those
indicated.
2020_JEEP_JL_WRANGLER_UG_RHD_UK.book Page 195
Page 198 of 330
IN CASE OF EMERGENCY
196
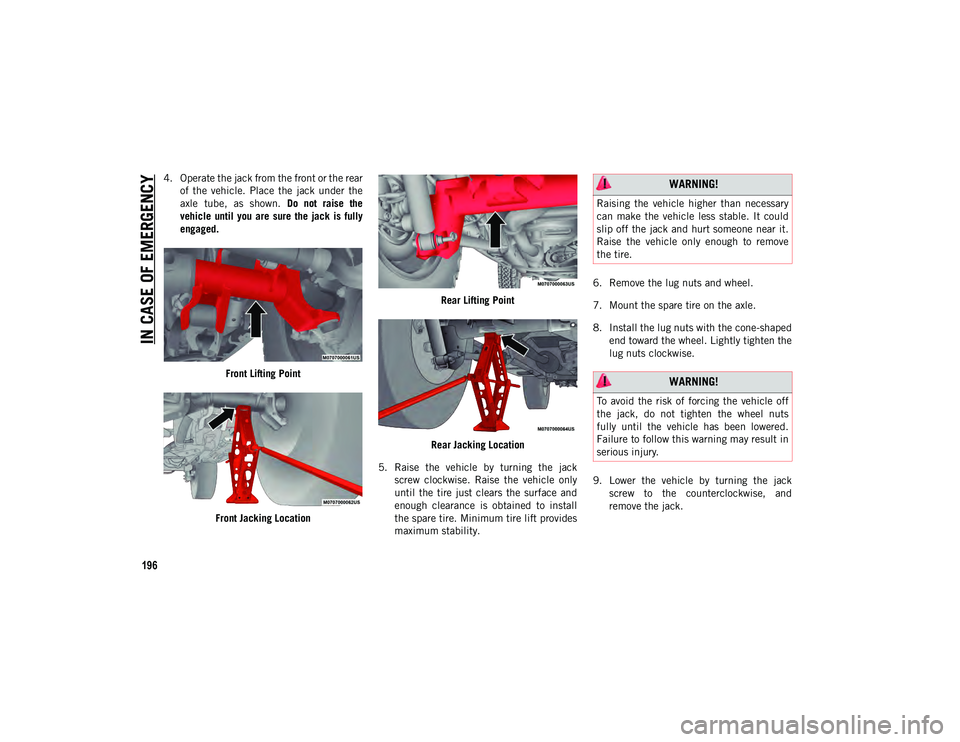
4. Operate the jack from the front or the rearof the vehicle. Place the jack under the
axle tube, as shown. Do not raise the
vehicle until you are sure the jack is fully
engaged.
Front Lifting Point
Front Jacking Location Rear Lifting Point
Rear Jacking Location
5. Raise the vehicle by turning the jack screw clockwise. Raise the vehicle only
until the tire just clears the surface and
enough clearance is obtained to install
the spare tire. Minimum tire lift provides
maximum stability. 6. Remove the lug nuts and wheel.
7. Mount the spare tire on the axle.
8. Install the lug nuts with the cone-shaped
end toward the wheel. Lightly tighten the
lug nuts clockwise.
9. Lower the vehicle by turning the jack screw to the counterclockwise, and
remove the jack. WARNING!
Raising the vehicle higher than necessary
can make the vehicle less stable. It could
slip off the jack and hurt someone near it.
Raise the vehicle only enough to remove
the tire.
WARNING!
To avoid the risk of forcing the vehicle off
the jack, do not tighten the wheel nuts
fully until the vehicle has been lowered.
Failure to follow this warning may result in
serious injury.
2020_JEEP_JL_WRANGLER_UG_RHD_UK.book Page 196
Page 199 of 330
197
10. Finish tightening the lug nuts. Pushdown on the wrench while tightening for
increased leverage. Alternate nuts until
each nut has been tightened twice. Refer
to “Wheel And Tire Torque Specifica -
tions” in “Technical Specifications” for
correct lug nut torque.
11. After 25 miles (40 km), check the lug nut torque with a torque wrench to
ensure that all lug nuts are properly
seated against the wheel.
12. Remove the jack assembly and wheel blocks.
13. Secure the jack and tools in their proper locations.
14. Secure the damaged wheel/tire on the spare tire carrier. Torque down lug nuts
and locking lug nut.
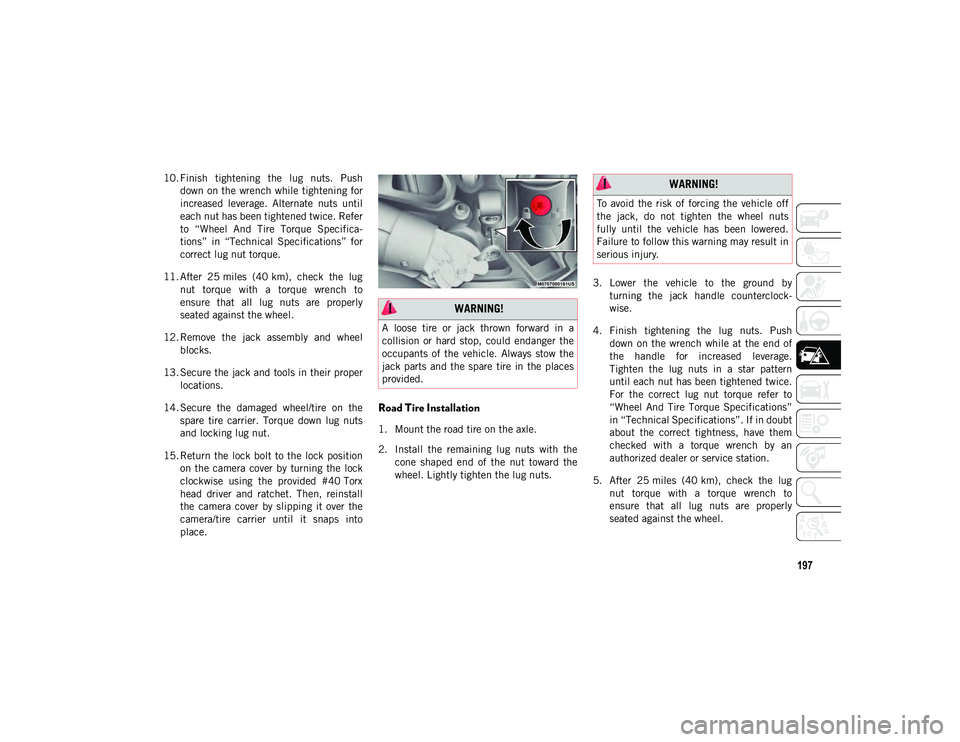
15. Return the lock bolt to the lock position on the camera cover by turning the lock
clockwise using the provided #40 Torx
head driver and ratchet. Then, reinstall
the camera cover by slipping it over the
camera/tire carrier until it snaps into
place.
Road Tire Installation
1. Mount the road tire on the axle.
2. Install the remaining lug nuts with thecone shaped end of the nut toward the
wheel. Lightly tighten the lug nuts. 3. Lower the vehicle to the ground by
turning the jack handle counterclock -
wise.
4. Finish tightening the lug nuts. Push down on the wrench while at the end of
the handle for increased leverage.
Tighten the lug nuts in a star pattern
until each nut has been tightened twice.
For the correct lug nut torque refer to
“Wheel And Tire Torque Specifications”
in “Technical Specifications”. If in doubt
about the correct tightness, have them
checked with a torque wrench by an
authorized dealer or service station.
5. After 25 miles (40 km), check the lug nut torque with a torque wrench to
ensure that all lug nuts are properly
seated against the wheel.
WARNING!
A loose tire or jack thrown forward in a
collision or hard stop, could endanger the
occupants of the vehicle. Always stow the
jack parts and the spare tire in the places
provided.
WARNING!
To avoid the risk of forcing the vehicle off
the jack, do not tighten the wheel nuts
fully until the vehicle has been lowered.
Failure to follow this warning may result in
serious injury.
2020_JEEP_JL_WRANGLER_UG_RHD_UK.book Page 197
Page 207 of 330
205
To push or tow the vehicle in cases where the
transmission will not shift out of PARK (P)
(such as a depleted battery), a Manual Park
Release is available.
Follow these steps to use the Manual Park
Release:
1. Firmly apply the parking brake.
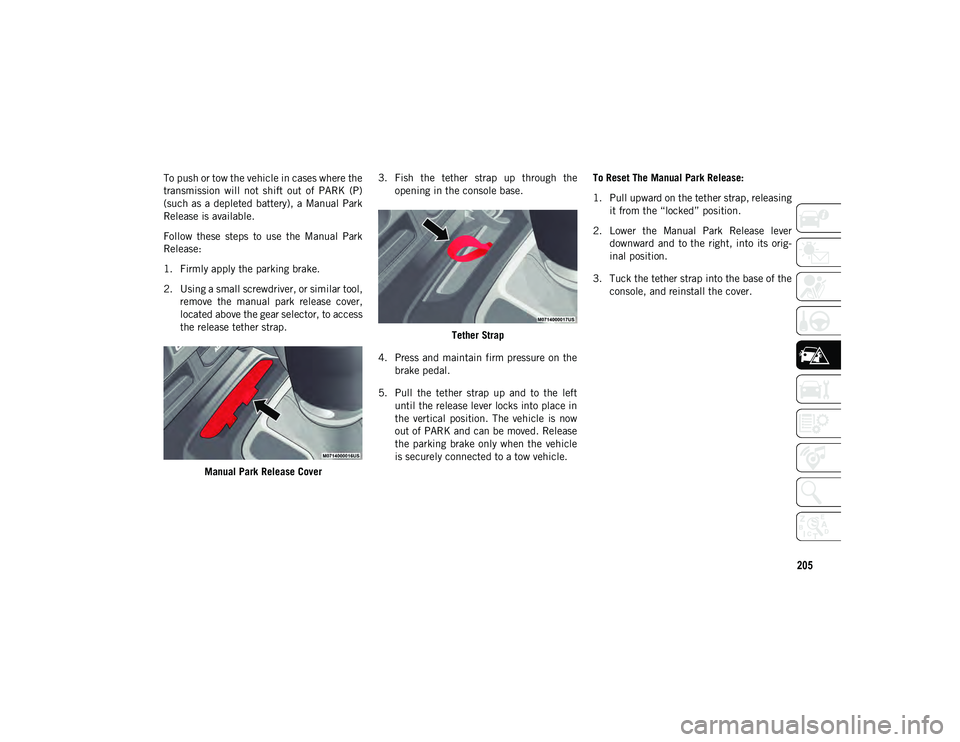
2. Using a small screwdriver, or similar tool,remove the manual park release cover,
located above the gear selector, to access
the release tether strap.
Manual Park Release Cover 3. Fish the tether strap up through the
opening in the console base.
Tether Strap
4. Press and maintain firm pressure on the brake pedal.
5. Pull the tether strap up and to the left until the release lever locks into place in
the vertical position. The vehicle is now
out of PARK and can be moved. Release
the parking brake only when the vehicle
is securely connected to a tow vehicle. To Reset The Manual Park Release:
1. Pull upward on the tether strap, releasing
it from the “locked” position.
2. Lower the Manual Park Release lever downward and to the right, into its orig -
inal position.
3. Tuck the tether strap into the base of the console, and reinstall the cover.
2020_JEEP_JL_WRANGLER_UG_RHD_UK.book Page 205
Page 208 of 330
IN CASE OF EMERGENCY
206
(Continued)
FREEING A STUCK VEHICLE
If your vehicle becomes stuck in mud, sand
or snow, it can often be moved using a
rocking motion. Turn the steering wheel right
and left to clear the area around the front
wheels. For vehicles with automatic trans-
mission, push and hold the lock button on
the gear selector. Then, shift back and forth
between DRIVE (D) and REVERSE (R), while
gently pressing the accelerator. Use the least
amount of accelerator pedal pressure that
will maintain the rocking motion, without
spinning the wheels or racing the engine.
NOTE:
For vehicles with automatic transmission:
Shifts between DRIVE and REVERSE can
only be achieved at wheel speeds of
5 mph (8 km/h) or less. Whenever the
transmission remains in NEUTRAL (N) for
more than two seconds, you must press
the brake pedal to engage DRIVE or
REVERSE.
Push the “ESC OFF” switch, to place the
Electronic Stability Control (ESC) system
in “Partial Off” mode, before rocking the
vehicle. Refer to “Electronic Brake Control
System” in “Safety” in your Owner’s Manual for further details. Once the
vehicle has been freed, push the “ESC
OFF” switch again to restore “ESC On”
mode.
WARNING!
Fast spinning tires can be dangerous.
Forces generated by excessive wheel
speeds may cause damage, or even failure,
of the axle and tires. A tire could explode
and injure someone. Do not spin your
vehicle's wheels faster than 30 mph
(48 km/h) or for longer than 30 seconds
continuously without stopping when you
are stuck and do not let anyone near a
spinning wheel, no matter what the speed.
CAUTION!
Racing the engine or spinning the wheels
may lead to transmission overheating
and failure. Allow the engine to idle with
the transmission in NEUTRAL for at
least one minute after every five
rocking-motion cycles. This will mini
-
mize overheating and reduce the risk of
clutch or transmission failure during
prolonged efforts to free a stuck vehicle.
When “rocking” a stuck vehicle by
shifting between DRIVE/SECOND GEAR
and REVERSE, do not spin the wheels
faster than 15 mph (24 km/h), or drive -
train damage may result.
Revving the engine or spinning the
wheels too fast may lead to transmission
overheating and failure. It can also
damage the tires. Do not spin the wheels
above 30 mph (48 km/h) while in gear
(no transmission shifting occurring).
CAUTION! (Continued)
2020_JEEP_JL_WRANGLER_UG_RHD_UK.book Page 206
Page 229 of 330
227
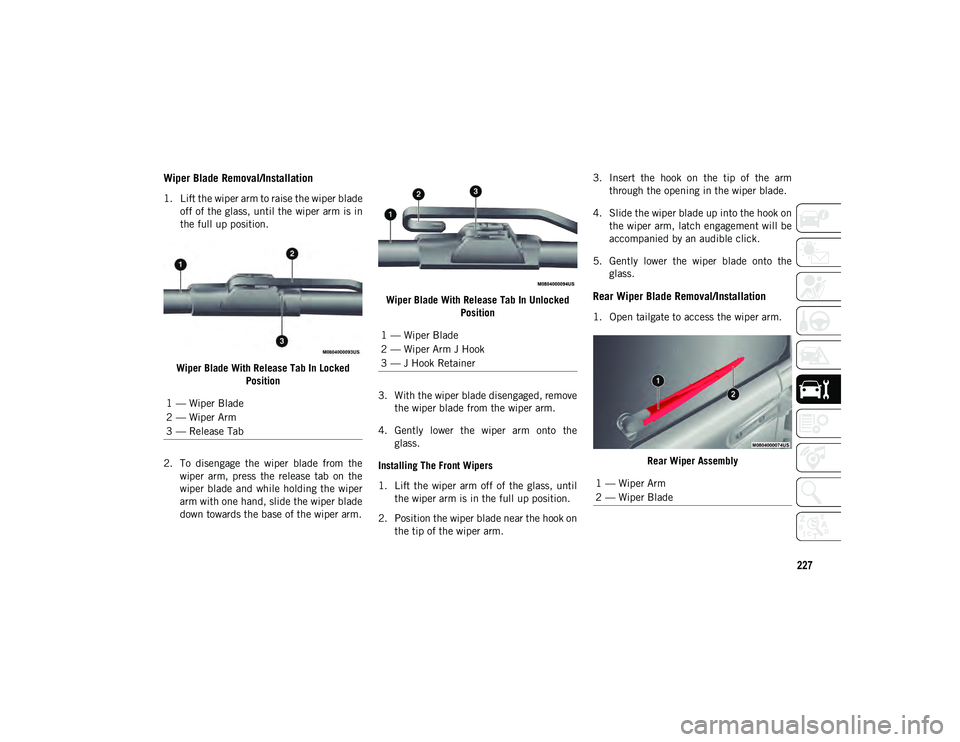
Wiper Blade Removal/Installation
1. Lift the wiper arm to raise the wiper bladeoff of the glass, until the wiper arm is in
the full up position.
Wiper Blade With Release Tab In Locked Position
2. To disengage the wiper blade from the wiper arm, press the release tab on the
wiper blade and while holding the wiper
arm with one hand, slide the wiper blade
down towards the base of the wiper arm. Wiper Blade With Release Tab In Unlocked
Position
3. With the wiper blade disengaged, remove the wiper blade from the wiper arm.
4. Gently lower the wiper arm onto the glass.
Installing The Front Wipers
1. Lift the wiper arm off of the glass, until the wiper arm is in the full up position.
2. Position the wiper blade near the hook on the tip of the wiper arm. 3. Insert the hook on the tip of the arm
through the opening in the wiper blade.
4. Slide the wiper blade up into the hook on the wiper arm, latch engagement will be
accompanied by an audible click.
5. Gently lower the wiper blade onto the glass.
Rear Wiper Blade Removal/Installation
1. Open tailgate to access the wiper arm.
Rear Wiper Assembly
1 — Wiper Blade
2 — Wiper Arm
3 — Release Tab
1 — Wiper Blade
2 — Wiper Arm J Hook
3 — J Hook Retainer
1 — Wiper Arm
2 — Wiper Blade
2020_JEEP_JL_WRANGLER_UG_RHD_UK.book Page 227
Page 249 of 330
247
TECHNICAL SPECIFICATIONS
VEHICLE IDENTIFICATION
NUMBER
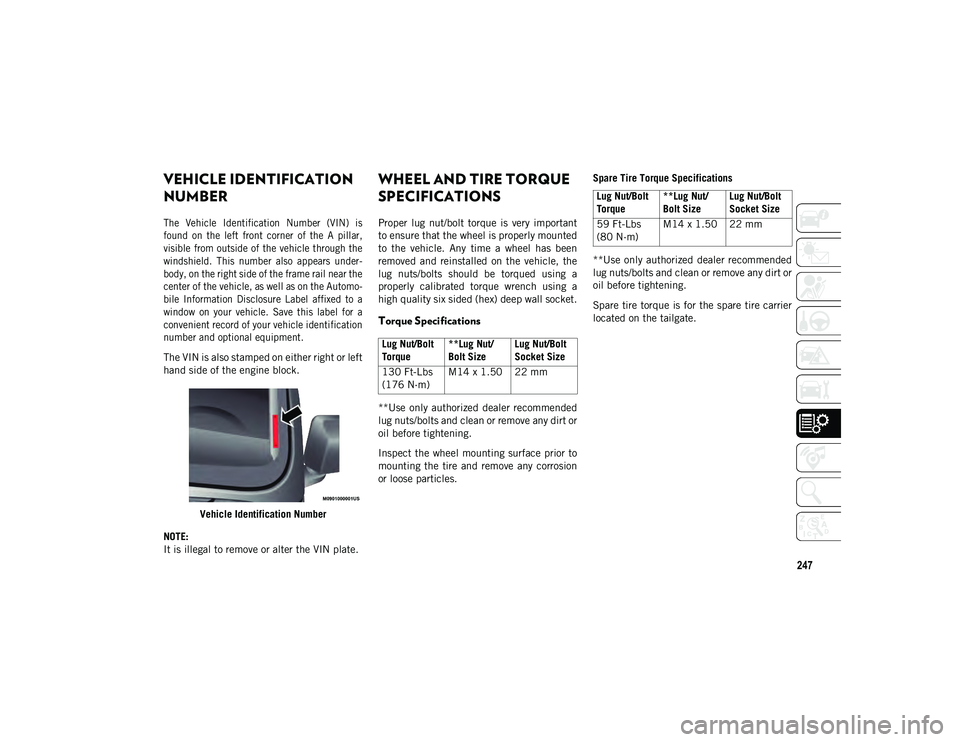
The Vehicle Identification Number (VIN) is
found on the left front corner of the A pillar,
visible from outside of the vehicle through the
windshield. This number also appears under-
body, on the right side of the frame rail near the
center of the vehicle, as well as on the Automo-
bile Information Disclosure Label affixed to a
window on your vehicle. Save this label for a
convenient record of your vehicle identification
number and optional equipment.
The VIN is also stamped on either right or left
hand side of the engine block.
Vehicle Identification Number
NOTE:
It is illegal to remove or alter the VIN plate.
WHEEL AND TIRE TORQUE
SPECIFICATIONS
Proper lug nut/bolt torque is very important
to ensure that the wheel is properly mounted
to the vehicle. Any time a wheel has been
removed and reinstalled on the vehicle, the
lug nuts/bolts should be torqued using a
properly calibrated torque wrench using a
high quality six sided (hex) deep wall socket.
Torque Specifications
**Use only authorized dealer recommended
lug nuts/bolts and clean or remove any dirt or
oil before tightening.
Inspect the wheel mounting surface prior to
mounting the tire and remove any corrosion
or loose particles. Spare Tire Torque Specifications
**Use only authorized dealer recommended
lug nuts/bolts and clean or remove any dirt or
oil before tightening.
Spare tire torque is for the spare tire carrier
located on the tailgate.
Lug Nut/Bolt
Torque
**Lug Nut/
Bolt SizeLug Nut/Bolt
Socket Size
130 Ft-Lbs
(176 N·m) M14 x 1.50 22 mm
Lug Nut/Bolt
Torque**Lug Nut/
Bolt SizeLug Nut/Bolt
Socket Size
59 Ft-Lbs
(80 N·m) M14 x 1.50 22 mm
2020_JEEP_JL_WRANGLER_UG_RHD_UK.book Page 247