spare tire location JEEP WRANGLER UNLIMITED 2021 Owner handbook (in English)
[x] Cancel search | Manufacturer: JEEP, Model Year: 2021, Model line: WRANGLER UNLIMITED, Model: JEEP WRANGLER UNLIMITED 2021Pages: 330, PDF Size: 9.16 MB
Page 9 of 330
7
TRAILER TOWING ................................ 175
Trailer Towing Weights
(Maximum Trailer Weight Ratings)..... 175
RECREATIONAL TOWING (BEHIND
MOTORHOME, ETC.) ............................. 176
Towing This Vehicle Behind
Another Vehicle ............................ 176 Recreational Towing — Four-Wheel
Drive Models ................................ 176
IN CASE OF EMERGENCY
HAZARD WARNING FLASHERS............... 179
BULB REPLACEMENT............................ 179
Replacement Bulbs ...................... 179
Bulb Replacement ........................ 181
FUSES ............................................... 183
General Information ...................... 183
Power Distribution Center (PDC) .... 184
JACKING AND TIRE CHANGING .............. 192
Jack Location .............................. 193
Spare Tire Removal ...................... 193
Preparations For Jacking .............. 194
Jacking Instructions ...................... 195
Road Tire Installation.................... 197
Declaration Of Conformance .......... 198
Jack Usage Precautions................. 200
JUMP STARTING .................................. 201
Preparations For Jump Start .......... 201
Jump Starting Procedure ............... 202
IF YOUR ENGINE OVERHEATS ...............204
MANUAL PARK RELEASE .....................204
FREEING A STUCK VEHICLE ..................206
TOWING A DISABLED VEHICLE ..............207
Four–Wheel Drive Models .............. 208
Without The Key Fob .................... 208
Tow Eye Usage............................. 208
ENHANCED ACCIDENT RESPONSE
SYSTEM (EARS) ..................................209
EVENT DATA RECORDER (EDR) ..............209
SERVICING AND MAINTENANCE
SCHEDULED SERVICING .......................210
Scheduled Servicing —
Gasoline Engine ........................... 210 Scheduled Servicing —
Diesel Engine............................... 216
ENGINE COMPARTMENT .......................221
2.0L Gasoline Engine .................. 221
3.6L Gasoline Engine .................. 222
2.2L Diesel Engine ....................... 223
Checking Oil Level —
Gasoline Engine .......................... 224 Adding Washer Fluid .................... 224
Maintenance-Free Battery ............ 225
Pressure Washing ......................... 225
DEALER SERVICE .................................226
Windshield Wiper Blades ...............226
Exhaust System ...........................228
Cooling System .............................229
Brake System ..............................230
Automatic Transmission ................231
RAISING THE VEHICLE ..........................232 TIRES .................................................232
Tires — General Information .........232
Tire Types ....................................237
Spare Tires — If Equipped ............237
Wheel And Wheel Trim Care ..........239
Tire Chains And Traction Devices ..... 240
Tire Rotation Recommendations ....241
STORING THE VEHICLE .........................241
BODYWORK .........................................242
Body And Underbody
Maintenance ................................242 Preserving The Bodywork ...............243
INTERIORS ..........................................245
Seats And Fabric Parts ..................245
Plastic And Coated Parts ...............246
Leather Parts ................................246
Glass Surfaces .............................246
2020_JEEP_JL_WRANGLER_UG_RHD_UK.book Page 7
Page 54 of 330
GETTING TO KNOW YOUR VEHICLE
52
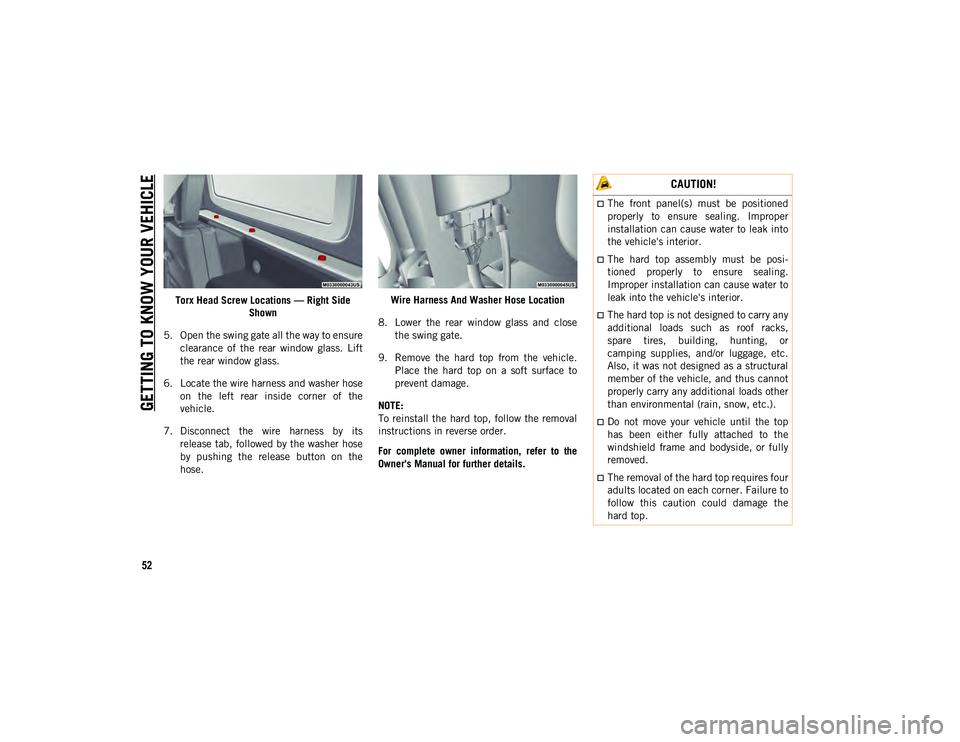
Torx Head Screw Locations — Right Side Shown
5. Open the swing gate all the way to ensure clearance of the rear window glass. Lift
the rear window glass.
6. Locate the wire harness and washer hose on the left rear inside corner of the
vehicle.
7. Disconnect the wire harness by its release tab, followed by the washer hose
by pushing the release button on the
hose. Wire Harness And Washer Hose Location
8. Lower the rear window glass and close the swing gate.
9. Remove the hard top from the vehicle. Place the hard top on a soft surface to
prevent damage.
NOTE:
To reinstall the hard top, follow the removal
instructions in reverse order.
For complete owner information, refer to the
Owner's Manual for further details.
CAUTION!
The front panel(s) must be positioned
properly to ensure sealing. Improper
installation can cause water to leak into
the vehicle's interior.
The hard top assembly must be posi -
tioned properly to ensure sealing.
Improper installation can cause water to
leak into the vehicle's interior.
The hard top is not designed to carry any
additional loads such as roof racks,
spare tires, building, hunting, or
camping supplies, and/or luggage, etc.
Also, it was not designed as a structural
member of the vehicle, and thus cannot
properly carry any additional loads other
than environmental (rain, snow, etc.).
Do not move your vehicle until the top
has been either fully attached to the
windshield frame and bodyside, or fully
removed.
The removal of the hard top requires four
adults located on each corner. Failure to
follow this caution could damage the
hard top.
2020_JEEP_JL_WRANGLER_UG_RHD_UK.book Page 52
Page 195 of 330
193
Jack Location
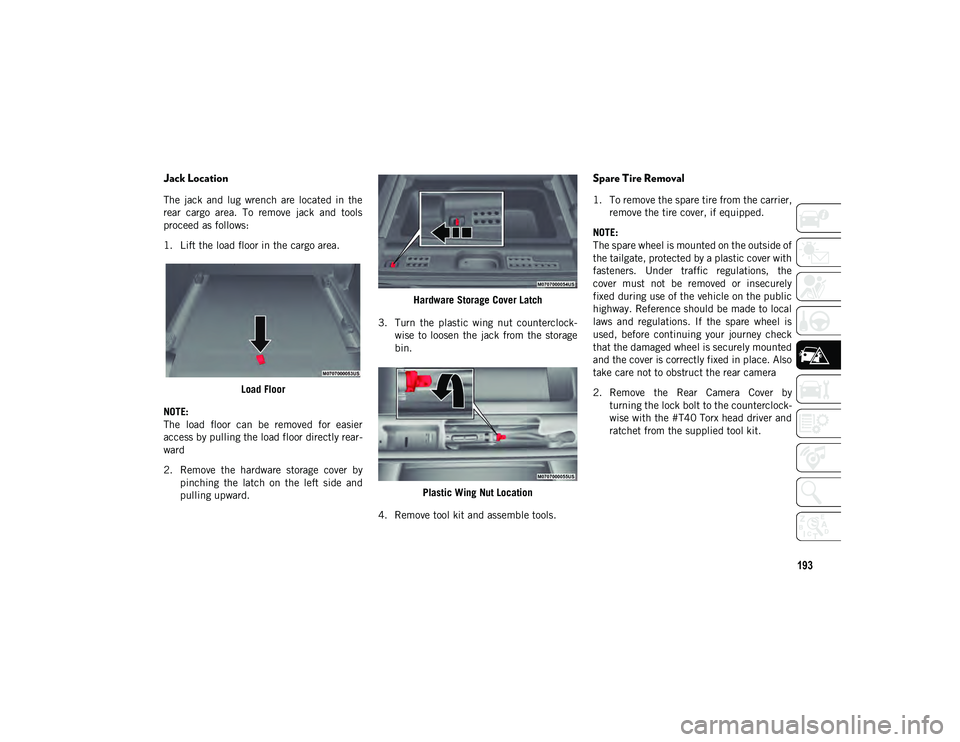
The jack and lug wrench are located in the
rear cargo area. To remove jack and tools
proceed as follows:
1. Lift the load floor in the cargo area.Load Floor
NOTE:
The load floor can be removed for easier
access by pulling the load floor directly rear -
ward
2. Remove the hardware storage cover by pinching the latch on the left side and
pulling upward. Hardware Storage Cover Latch
3. Turn the plastic wing nut counterclock -
wise to loosen the jack from the storage
bin.
Plastic Wing Nut Location
4. Remove tool kit and assemble tools.
Spare Tire Removal
1. To remove the spare tire from the carrier, remove the tire cover, if equipped.
NOTE:
The spare wheel is mounted on the outside of
the tailgate, protected by a plastic cover with
fasteners. Under traffic regulations, the
cover must not be removed or insecurely
fixed during use of the vehicle on the public
highway. Reference should be made to local
laws and regulations. If the spare wheel is
used, before continuing your journey check
that the damaged wheel is securely mounted
and the cover is correctly fixed in place. Also
take care not to obstruct the rear camera
2. Remove the Rear Camera Cover by turning the lock bolt to the counterclock -
wise with the #T40 Torx head driver and
ratchet from the supplied tool kit.
2020_JEEP_JL_WRANGLER_UG_RHD_UK.book Page 193
Page 197 of 330
195
(Continued)
Jacking Instructions
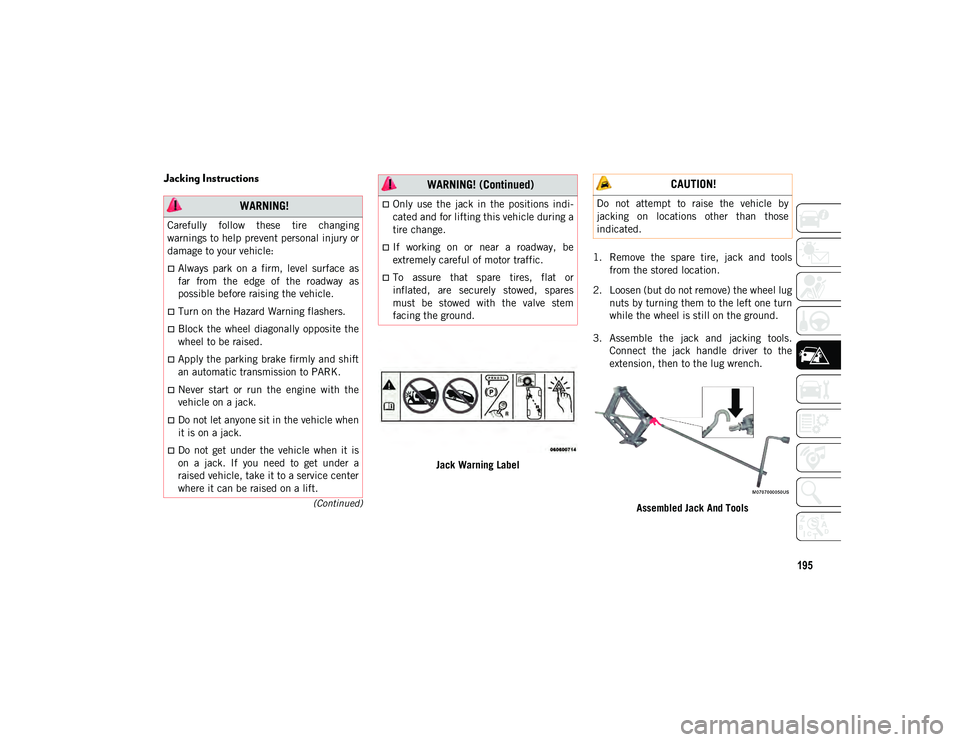
Jack Warning Label1. Remove the spare tire, jack and tools
from the stored location.
2. Loosen (but do not remove) the wheel lug nuts by turning them to the left one turn
while the wheel is still on the ground.
3. Assemble the jack and jacking tools. Connect the jack handle driver to the
extension, then to the lug wrench.
Assembled Jack And Tools
WARNING!
Carefully follow these tire changing
warnings to help prevent personal injury or
damage to your vehicle:
Always park on a firm, level surface as
far from the edge of the roadway as
possible before raising the vehicle.
Turn on the Hazard Warning flashers.
Block the wheel diagonally opposite the
wheel to be raised.
Apply the parking brake firmly and shift
an automatic transmission to PARK.
Never start or run the engine with the
vehicle on a jack.
Do not let anyone sit in the vehicle when
it is on a jack.
Do not get under the vehicle when it is
on a jack. If you need to get under a
raised vehicle, take it to a service center
where it can be raised on a lift.
Only use the jack in the positions indi -
cated and for lifting this vehicle during a
tire change.
If working on or near a roadway, be
extremely careful of motor traffic.
To assure that spare tires, flat or
inflated, are securely stowed, spares
must be stowed with the valve stem
facing the ground.
WARNING! (Continued) CAUTION!
Do not attempt to raise the vehicle by
jacking on locations other than those
indicated.
2020_JEEP_JL_WRANGLER_UG_RHD_UK.book Page 195
Page 198 of 330
IN CASE OF EMERGENCY
196
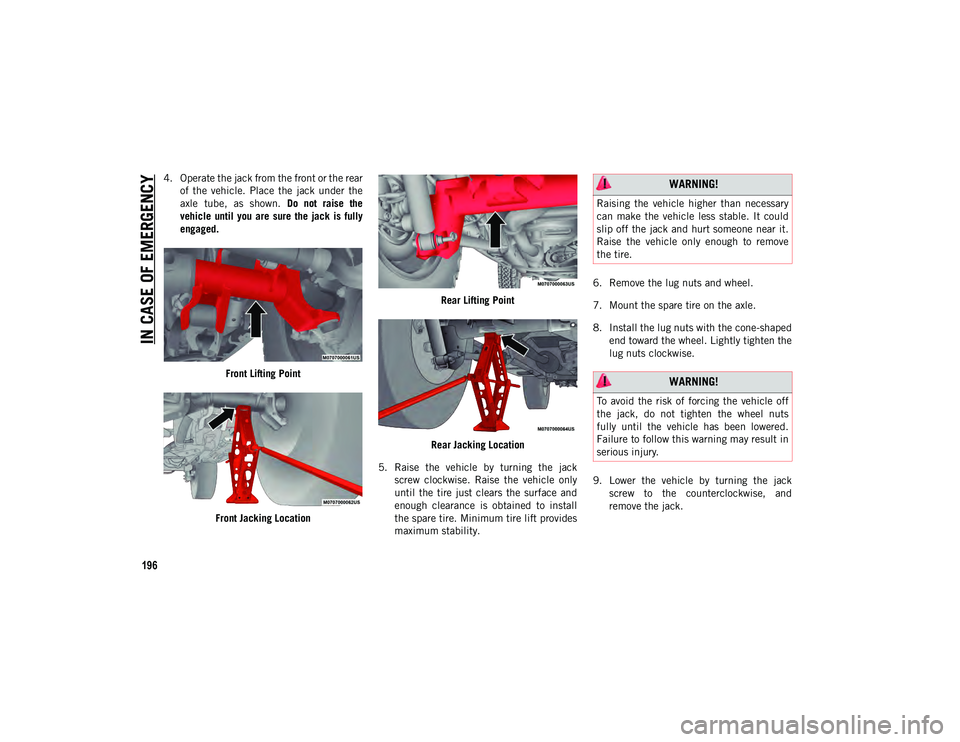
4. Operate the jack from the front or the rearof the vehicle. Place the jack under the
axle tube, as shown. Do not raise the
vehicle until you are sure the jack is fully
engaged.
Front Lifting Point
Front Jacking Location Rear Lifting Point
Rear Jacking Location
5. Raise the vehicle by turning the jack screw clockwise. Raise the vehicle only
until the tire just clears the surface and
enough clearance is obtained to install
the spare tire. Minimum tire lift provides
maximum stability. 6. Remove the lug nuts and wheel.
7. Mount the spare tire on the axle.
8. Install the lug nuts with the cone-shaped
end toward the wheel. Lightly tighten the
lug nuts clockwise.
9. Lower the vehicle by turning the jack screw to the counterclockwise, and
remove the jack. WARNING!
Raising the vehicle higher than necessary
can make the vehicle less stable. It could
slip off the jack and hurt someone near it.
Raise the vehicle only enough to remove
the tire.
WARNING!
To avoid the risk of forcing the vehicle off
the jack, do not tighten the wheel nuts
fully until the vehicle has been lowered.
Failure to follow this warning may result in
serious injury.
2020_JEEP_JL_WRANGLER_UG_RHD_UK.book Page 196
Page 199 of 330
197
10. Finish tightening the lug nuts. Pushdown on the wrench while tightening for
increased leverage. Alternate nuts until
each nut has been tightened twice. Refer
to “Wheel And Tire Torque Specifica -
tions” in “Technical Specifications” for
correct lug nut torque.
11. After 25 miles (40 km), check the lug nut torque with a torque wrench to
ensure that all lug nuts are properly
seated against the wheel.
12. Remove the jack assembly and wheel blocks.
13. Secure the jack and tools in their proper locations.
14. Secure the damaged wheel/tire on the spare tire carrier. Torque down lug nuts
and locking lug nut.
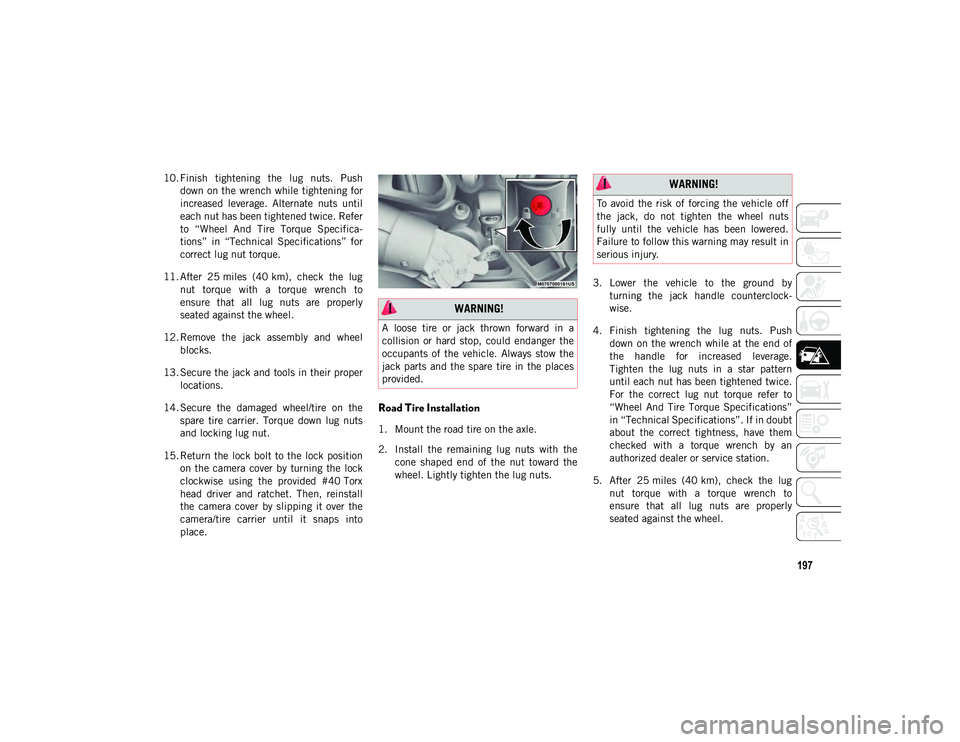
15. Return the lock bolt to the lock position on the camera cover by turning the lock
clockwise using the provided #40 Torx
head driver and ratchet. Then, reinstall
the camera cover by slipping it over the
camera/tire carrier until it snaps into
place.
Road Tire Installation
1. Mount the road tire on the axle.
2. Install the remaining lug nuts with thecone shaped end of the nut toward the
wheel. Lightly tighten the lug nuts. 3. Lower the vehicle to the ground by
turning the jack handle counterclock -
wise.
4. Finish tightening the lug nuts. Push down on the wrench while at the end of
the handle for increased leverage.
Tighten the lug nuts in a star pattern
until each nut has been tightened twice.
For the correct lug nut torque refer to
“Wheel And Tire Torque Specifications”
in “Technical Specifications”. If in doubt
about the correct tightness, have them
checked with a torque wrench by an
authorized dealer or service station.
5. After 25 miles (40 km), check the lug nut torque with a torque wrench to
ensure that all lug nuts are properly
seated against the wheel.
WARNING!
A loose tire or jack thrown forward in a
collision or hard stop, could endanger the
occupants of the vehicle. Always stow the
jack parts and the spare tire in the places
provided.
WARNING!
To avoid the risk of forcing the vehicle off
the jack, do not tighten the wheel nuts
fully until the vehicle has been lowered.
Failure to follow this warning may result in
serious injury.
2020_JEEP_JL_WRANGLER_UG_RHD_UK.book Page 197