tire size JEEP WRANGLER UNLIMITED 2021 Owner handbook (in English)
[x] Cancel search | Manufacturer: JEEP, Model Year: 2021, Model line: WRANGLER UNLIMITED, Model: JEEP WRANGLER UNLIMITED 2021Pages: 330, PDF Size: 9.16 MB
Page 73 of 330
71
Should one or more tires be in the condition
mentioned above, the display will show the
indications corresponding to each tire.
Each tire, including the spare (if provided),
should be checked monthly when cold and
inflated to the inflation pressure recom-
mended by the vehicle manufacturer on the
vehicle placard or tire inflation pressure
label. If your vehicle has tires of a different
size than the size indicated on the vehicle
placard or tire inflation pressure label, you
should determine the proper tire inflation
pressure for those tires.
As an added safety feature, your vehicle has
been equipped with a Tire Pressure Moni -
toring System (TPMS) that illuminates a low
tire pressure telltale when one or more of
your tires is significantly under-inflated.
Accordingly, when the low tire pressure tell -tale illuminates, you should stop and check
your tires as soon as possible, and inflate
them to the proper pressure. Driving on a
significantly under-inflated tire causes the
tire to overheat and can lead to tire failure.
Under-inflation also reduces fuel efficiency
and tire tread life, and may affect the
vehicle’s handling and stopping ability.
Please note that the TPMS is not a substitute
for proper tire maintenance, and it is the
driver’s responsibility to maintain correct tire
pressure, even if under-inflation has not
reached the level to trigger illumination of
the TPMS low tire pressure telltale.
Your vehicle has also been equipped with a
TPMS malfunction indicator to indicate
when the system is not operating properly.
The TPMS malfunction indicator is
combined with the low tire pressure telltale.
When the system detects a malfunction, the
telltale will flash for approximately one
minute and then remain continuously illumi
-
nated. This sequence will continue upon
subsequent vehicle start-ups as long as the
malfunction exists. When the malfunction
indicator is illuminated, the system may not
be able to detect or signal low tire pressure
as intended. TPMS malfunctions may occur
for a variety of reasons, including the instal -lation of replacement or alternate tires or
wheels on the vehicle that prevent the TPMS
from functioning properly. Always check the
TPMS malfunction telltale after replacing
one or more tires or wheels on your vehicle to
ensure that the replacement or alternate
tires and wheels allow the TPMS to continue
to function properly.
CAUTION!
Do not continue driving with one or more
flat tires as handling may be
compromised. Stop the vehicle, avoiding
sharp braking and steering. If a tire
puncture occurs, repair immediately using
the dedicated tire repair kit and contact an
authorized dealer as soon as possible.
CAUTION!
The TPMS has been optimized for the
original equipment tires and wheels.
TPMS pressures and warning have been
established for the tire size equipped on
your vehicle. Undesirable system operation
or sensor damage may result when using
replacement equipment that is not of the
same size, type, and/or style. Aftermarket
wheels can cause sensor damage. Using
aftermarket tire sealants may cause the
Tire Pressure Monitoring System (TPMS)
sensor to become inoperable. After using
an aftermarket tire sealant it is
recommended that you take your vehicle to
an authorized dealer to have your sensor
function checked.
2020_JEEP_JL_WRANGLER_UG_RHD_UK.book Page 71
Page 83 of 330
81
(Continued)ESC Operating Modes
NOTE:
Depending upon model and mode of opera-
tion, the ESC system may have multiple
operating modes.
ESC On
“ESC On” is the normal operating mode for
the ESC. Whenever the vehicle is started, the
ESC system will be in this mode. This mode should be used for most driving conditions.
Alternate ESC modes should only be used for
specific reasons as noted in the following
paragraphs.
Partial Off
The “Partial Off” mode is intended for times
when a more spirited driving experience is
desired. This mode may modify TCS and ESC
thresholds for activation, which allows for more
wheel spin than normally allowed. This mode
may be useful if the vehicle becomes stuck.
To enter the “Partial Off” mode, momentarily
push the “ESC OFF” switch and the “ESC
OFF Indicator Light” will illuminate. To turn
the ESC on again, momentarily push the
“ESC OFF” switch and the “ESC OFF Indi
-
cator Light” will turn off.
NOTE:
For vehicles with multiple partial ESC
modes, a momentary button push will toggle
the ESC mode. Multiple momentary button
pushes may be required to return to “ESC
On” mode.
WARNING!
Electronic Stability Control (ESC) cannot
prevent the natural laws of physics from
acting on the vehicle, nor can it increase
the traction afforded by prevailing road
conditions. ESC cannot prevent acci -
dents, including those resulting from
excessive speed in turns, driving on very
slippery surfaces, or hydroplaning. ESC
also cannot prevent accidents resulting
from loss of vehicle control due to inap -
propriate driver input for the conditions.
Only a safe, attentive, and skillful driver
can prevent accidents. The capabilities
of an ESC equipped vehicle must never
be exploited in a reckless or dangerous
manner which could jeopardize the
user’s safety or the safety of others.Vehicle modifications, or failure to prop -
erly maintain your vehicle, may change
the handling characteristics of your
vehicle, and may negatively affect the
performance of the ESC system.
Changes to the steering system, suspen -
sion, braking system, tire type and size
or wheel size may adversely affect ESC
performance. Improperly inflated and
unevenly worn tires may also degrade
ESC performance. Any vehicle modifica-
tion or poor vehicle maintenance that
reduces the effectiveness of the ESC
system can increase the risk of loss of
vehicle control, vehicle rollover, personal
injury and death.
WARNING! (Continued)
2020_JEEP_JL_WRANGLER_UG_RHD_UK.book Page 81
Page 95 of 330
93
Maintenance” for information on how to
properly inflate the vehicle’s tires. The tire
pressure will also increase as the vehicle is
driven. This is normal and there should be no
adjustment for this increased pressure.
The TPMS will warn the driver of a low tire
pressure if the tire pressure falls below the
low-pressure warning limit for any reason,
including low temperature effects and
natural pressure loss through the tire.
The TPMS will continue to warn the driver of
low tire pressure as long as the condition
exists, and will not turn off until the tire pres-
sure is at or above the recommended cold
placard pressure. Once the low tire pressure
warning (Tire Pressure Monitoring System
Warning Light) illuminates, you must
increase the tire pressure to the recom -
mended cold placard pressure in order for
the TPMS Light to turn off.
NOTE:
When filling warm tires, the tire pressure
may need to be increased up to an additional
4 psi (28 kPa) above the recommended cold
placard pressure in order to turn the TPMS
Warning Light off.
The system will automatically update and the
TPMS Warning Light will turn off once the
system receives the updated tire pressures. The
vehicle may need to be driven for up to
10 minutes above 15 mph (24 km/h) in order
for the TPMS to receive this information.
For example, your vehicle may have a
recommended cold (parked for more than
three hours) placard pressure of 33 psi
(227 kPa). If the ambient temperature is
68°F (20°C) and the measured tire pressure
is 28 psi (193 kPa), a temperature drop to
20°F (-7°C) will decrease the tire pressure
to approximately 24 psi (165 kPa). This tire
pressure is low enough to turn on the TPMS
Warning Light. Driving the vehicle may
cause the tire pressure to rise to approxi -
mately 28 psi (193 kPa), but the TPMS
Warning Light will still be on. In this situa -
tion, the TPMS Warning Light will turn off
only after the tires are inflated to the
vehicle’s recommended cold placard pres -
sure value. CAUTION!
The TPMS has been optimized for the orig -
inal equipment tires and wheels. TPMS
pressures and warning have been estab -
lished for the tire size equipped on your
vehicle. Undesirable system operation or
sensor damage may result when using
replacement equipment that is not of the
same size, type, and/or style. The TPM
sensor is not designed for use on after -
market wheels, and may contribute to a
poor overall system performance.
Customers are encouraged to use Original
Equipment Manufacturer (OEM) wheels to
assure TPMS feature operation.
Using aftermarket tire sealants may
cause the Tire Pressure Monitoring
System (TPMS) sensor to become inop -
erable. After using an aftermarket tire
sealant it is recommended that you take
your vehicle to an authorized dealer to
have your sensor function checked.
After inspecting or adjusting the tire
pressure always reinstall the valve stem
cap. This will prevent moisture and dirt
from entering the valve stem, which
could damage the TPMS sensor.
2020_JEEP_JL_WRANGLER_UG_RHD_UK.book Page 93
Page 98 of 330
SAFETY
96
Vehicles With Compact Spare or Non-Matching
Full Size Spare
1. The compact spare tire or non-matching full size does not have a tire pressure
monitoring sensor. Therefore, the TPMS
will not monitor the pressure in the
compact spare tire.
2. If you install the compact or non-matching full size spare tire in place
of a road tire that has a pressure below
the low-pressure warning limit, upon the
next ignition cycle, the TPMS Warning
Light will remain on and a chime will
sound. In addition, the graphic in the
instrument cluster will still display a
different color pressure value.
3. After driving the vehicle for up to 10 minutes above 15 mph (24 km/h),
the TPMS Warning Light will flash on and
off for 75 seconds and then remain on
solid. In addition, the instrument cluster
will display a “Service Tire Pressure
System” message for five seconds and
then display dashes (--) in place of the
pressure value. 4. For each subsequent ignition cycle, a
chime will sound, the TPMS Warning
Light will flash on and off for 75 seconds
and then remain on solid, and the instru -
ment cluster will display a “SERVICE
TIRE PRESSURE SYSTEM” message for
five seconds and then display dashes (--)
in place of the pressure value.
5. Once you repair or replace the original road tire and reinstall it on the vehicle in
place of the compact spare or
non-matching full size, the TPMS will
update automatically. In addition, the
TPMS Warning Light will turn off and the
graphic in the instrument cluster will
display a new pressure value instead of
dashes (--), as long as no tire pressure is
below the low-pressure warning limit in
any of the four active road tires. The
vehicle may need to be driven for up to
10 minutes above 15 mph (24 km/h) in
order for the TPMS to receive this
information. Vehicles With a Full Size Matching Spare
1. If your vehicle is equipped with a
matching full-size spare wheel and tire
assembly, it has a tire pressure moni -
toring sensor, and can be monitored by
the Tire Pressure Monitoring System
(TPMS) when swapped with a low pres -
sure road tire.
2. In the event that the matching full-size spare tire is swapped with a low pressure
road tire, the next ignition switch cycle
will still show the TPMS Warning Light to
be on, a chime to sound, and the graphic
display will still show the low tire pres -
sure value in a different color.
3. Driving the vehicle for up to 10 minutes above 15 mph (24 km/h) will turn off theTPMS Warning Light as long as none of
road tires are below the low pressure
warning threshold.
TPMS Deactivation — If Equipped
The TPMS can be deactivated if replacing all
four wheel and tire assemblies (road tires)
with wheel and tire assemblies that do not
have TPMS sensors, such as when installing
winter wheel and tire assemblies on your
vehicle.
2020_JEEP_JL_WRANGLER_UG_RHD_UK.book Page 96
Page 149 of 330
147
4H
Four-Wheel Drive High Range — This range
maximizes torque to the front driveshaft,
forcing the front and rear wheels to rotate at
the same speed. This range provides addi-
tional traction for loose, slippery road
surfaces only.
NEUTRAL (N)
Neutral — This range disengages both the
front and rear driveshafts from the power -
train. To be used for flat towing behind
another vehicle.
Refer to “Recreational Towing” in this
chapter for further information. 4L
Four-Wheel Drive Low Range — This range
provides low speed four-wheel drive. It maxi
-
mizes torque to the front driveshaft, forcing
the front and rear wheels to rotate at the
same speed. This range provides additional
traction and maximum pulling power for
loose, slippery road surfaces only. Do not
exceed 25 mph (40 km/h).
The transfer case is intended to be driven in
the 2H position for normal street and
highway conditions, such as hard-surfaced
roads.
In the event that additional traction is
required, the transfer case 4H and 4L posi -
tions can be used to lock the front and rear
driveshafts together, forcing the front and
rear wheels to rotate at the same speed. The
4H and 4L positions are intended for loose,
slippery road surfaces only and not intended
for normal driving. Driving in the 4H and 4L
positions on hard-surfaced roads will cause
increased tire wear and damage to the drive -
line components. Refer to “Shifting Proce -
dures” in this section for further information
on shifting into 4H or 4L. The instrument cluster alerts the driver that
the vehicle is in four-wheel drive, and the
front and rear driveshafts are locked
together. The light will illuminate when the
transfer case is shifted into the 4H position.
When operating your vehicle in 4L, the
engine speed will be approximately three
times (four times for Rubicon models) that of
the 2H or 4H positions at a given road speed.
Take care not to overspeed the engine.
Proper operation of four-wheel drive vehicles
depends on tires of equal size, type, and
circumference on each wheel. Any difference
will adversely affect shifting and cause
damage to the transfer case.
Because four-wheel drive provides improved
traction, there is a tendency to exceed safe
turning and stopping speeds. Do not go
faster than road conditions permit.
Shifting Procedures
2H To 4H Or 4H To 2H
Shifting between 2H and 4H can be made
with the vehicle stopped or in motion. The
preferred shifting speed would be 0 to
45 mph (72 km/h). With the vehicle in
motion, the transfer case will engage/disen
-
WARNING!
You or others could be injured or killed if
you leave the vehicle unattended with the
transfer case in the NEUTRAL (N) position
without first fully engaging the parking
brake. The transfer case NEUTRAL (N)
position disengages both the front and rear
driveshafts from the powertrain, and will
allow the vehicle to roll, even if the
automatic transmission is in PARK. The
parking brake should always be applied
when the driver is not in the vehicle.
2020_JEEP_JL_WRANGLER_UG_RHD_UK.book Page 147
Page 152 of 330
STARTING AND OPERATING
150
In the event that additional traction is
required, the transfer case 4H and 4L posi-
tions can be used to lock the front and rear
driveshafts together, forcing the front and
rear wheels to rotate at the same speed. The
4H and 4L positions are intended for loose,
slippery road surfaces only and not intended
for normal driving. Driving in the 4H and 4L
positions on hard-surfaced roads will cause
increased tire wear and damage to the drive -
line components. Refer to “Shifting Proce -
dures” in this section for further information
on shifting into 4H or 4L.
The instrument cluster alerts the driver that
the vehicle is in four-wheel drive, and the
front and rear driveshafts are locked
together. The light will illuminate when the
transfer case is shifted into the 4H position.
When operating your vehicle in 4L, the
engine speed will be approximately three
times (four times for Rubicon models) that of
the 2H or 4H positions at a given road speed.
Take care not to overspeed the engine.
Proper operation of four-wheel drive vehicles
depends on tires of equal size, type, and
circumference on each wheel. Any difference
will adversely affect shifting and cause
damage to the transfer case. Because four-wheel drive provides improved
traction, there is a tendency to exceed safe
turning and stopping speeds. Do not go
faster than road conditions permit.
Shifting Procedures
2H To 4H Auto Or 4H Auto To 2H
Shifting between 2H and 4H Auto can be
made with the vehicle stopped or in motion.
The preferred shifting speed would be 0 to
45 mph (72 km/h). With the vehicle in
motion, the transfer case will engage/disen
-
gage faster if you momentarily release the
accelerator pedal after completing the shift.
Do not accelerate while shifting the transfer
case. Apply a constant force when shifting
the transfer case lever.
2H/4H Auto To 4H Part Time Or 4H Part Time To
2H/4H Auto
Shifting between 2H/4H AUTO to 4H PART
TIME can be made with the vehicle stopped
or in motion. The preferred shifting speed
would be 0 to 45 mph (72 km/h). With the
vehicle in motion, the transfer case will
engage/disengage faster if you momentarily
release the accelerator pedal after
completing the shift. Do not accelerate while shifting the transfer case. Apply a constant
force when shifting the transfer case lever.
NOTE:
Do not attempt to make a shift while only
the front or rear wheels are spinning. The
front and rear driveshaft speeds must be
equal for the shift to take place. Shifting
while only the front or rear wheels are
spinning can cause damage to the transfer
case.
Delayed shifts out of four-wheel drive may
be experienced due to uneven tire wear,
low or uneven tire pressures, excessive
vehicle loading, or cold temperatures.
Shifting effort will increase with speed,
this is normal.
During cold weather, you may experience
increased effort in shifting until the transfer
case fluid warms up. This is normal.
4H Part Time/4H Auto To 4L Or 4L To 4H Part Time/
4H Auto
With the vehicle rolling at 2 to 3 mph (3 to
5 km/h), shift the transmission into
NEUTRAL (N). While the vehicle is coasting
at 2 to 3 mph (3 to 5 km/h), shift the
transfer case lever firmly to the desired posi -
2020_JEEP_JL_WRANGLER_UG_RHD_UK.book Page 150
Page 169 of 330
167
(Continued)
(Continued)
placed within 30 cm from the rear fascia/
bumper. Failure to do so can result in the
system misinterpreting a close obstacle as
a sensor problem, causing the “PARK
-
SENSE UNAVAILABLE SERVICE
REQUIRED” message to appear in the
instrument cluster display.
ParkSense should be disabled when the
swing gate is in the open position. An open
swing gate could provide a false indication
that an obstacle is behind the vehicle.
PARKVIEW REAR BACK UP
CAMERA — IF EQUIPPED
The ParkView Rear Back Up Camera allows
you to see an on-screen image of the rear
surroundings of your vehicle whenever the
gear selector is put into REVERSE. The
image will be displayed in the touchscreen
display along with a caution note to “check
entire surroundings” across the top of the
screen. After five seconds this note will
disappear. The ParkView camera is located
on the rear of the vehicle in the center of the
spare tire. WARNING!
Drivers must be careful when backing up
even when using ParkSense. Always
check carefully behind your vehicle, look
behind you, and be sure to check for
pedestrians, animals, other vehicles,
obstructions, and blind spots before
backing up. You are responsible for
safety and must continue to pay atten -
tion to your surroundings. Failure to do
so can result in serious injury or death.
Before using ParkSense, it is strongly
recommended that the ball mount and
hitch ball assembly is disconnected from
the vehicle when the vehicle is not used
for towing. Failure to do so can result in
injury or damage to vehicles or obstacles
because the hitch ball will be much
closer to the obstacle than the rear fascia
when the loudspeaker sounds the contin -
uous tone. Also, the sensors could detect
the ball mount and hitch ball assembly,
depending on its size and shape, giving
a false indication that an obstacle is
behind the vehicle.
CAUTION!
ParkSense is only a parking aid and it is
unable to recognize every obstacle,
including small obstacles. Parking curbs
might be temporarily detected or not
detected at all. Obstacles located above
or below the sensors will not be detected
when they are in close proximity.
WARNING! (Continued)
The vehicle must be driven slowly when
using ParkSense in order to be able to
stop in time when an obstacle is
detected. It is recommended that the
driver looks over his/her shoulder when
using ParkSense.
CAUTION! (Continued)
2020_JEEP_JL_WRANGLER_UG_RHD_UK.book Page 167
Page 235 of 330
233
Tread Wear
Improper cold tire inflation pressures can
cause abnormal wear patterns and reduced
tread life, resulting in the need for earlier tire
replacement.
Ride Comfort And Vehicle Stability
Proper tire inflation contributes to a comfort-
able ride. Overinflation produces a jarring
and uncomfortable ride.
Tire Inflation Pressures
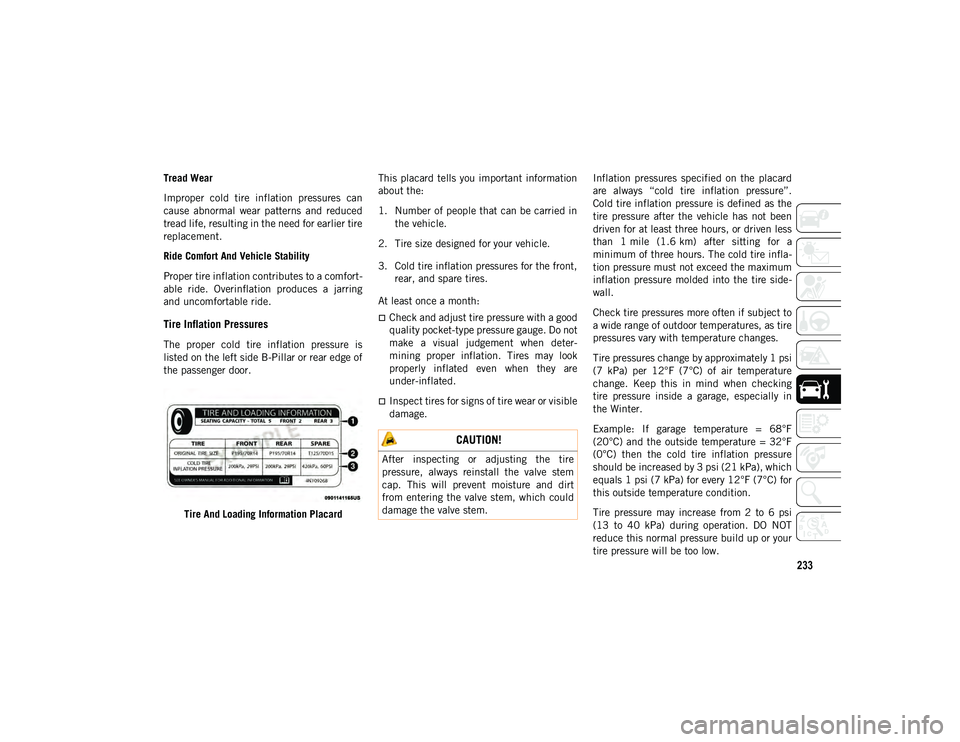
The proper cold tire inflation pressure is
listed on the left side B-Pillar or rear edge of
the passenger door.
Tire And Loading Information Placard This placard tells you important information
about the:
1. Number of people that can be carried in
the vehicle.
2. Tire size designed for your vehicle.
3. Cold tire inflation pressures for the front, rear, and spare tires.
At least once a month:
Check and adjust tire pressure with a good
quality pocket-type pressure gauge. Do not
make a visual judgement when deter -
mining proper inflation. Tires may look
properly inflated even when they are
under-inflated.
Inspect tires for signs of tire wear or visible
damage. Inflation pressures specified on the placard
are always “cold tire inflation pressure”.
Cold tire inflation pressure is defined as the
tire pressure after the vehicle has not been
driven for at least three hours, or driven less
than 1 mile (1.6 km) after sitting for a
minimum of three hours. The cold tire infla
-
tion pressure must not exceed the maximum
inflation pressure molded into the tire side -
wall.
Check tire pressures more often if subject to
a wide range of outdoor temperatures, as tire
pressures vary with temperature changes.
Tire pressures change by approximately 1 psi
(7 kPa) per 12°F (7°C) of air temperature
change. Keep this in mind when checking
tire pressure inside a garage, especially in
the Winter.
Example: If garage temperature = 68°F
(20°C) and the outside temperature = 32°F
(0°C) then the cold tire inflation pressure
should be increased by 3 psi (21 kPa), which
equals 1 psi (7 kPa) for every 12°F (7°C) for
this outside temperature condition.
Tire pressure may increase from 2 to 6 psi
(13 to 40 kPa) during operation. DO NOT
reduce this normal pressure build up or your
tire pressure will be too low.
CAUTION!
After inspecting or adjusting the tire
pressure, always reinstall the valve stem
cap. This will prevent moisture and dirt
from entering the valve stem, which could
damage the valve stem.
2020_JEEP_JL_WRANGLER_UG_RHD_UK.book Page 233
Page 236 of 330
SERVICING AND MAINTENANCE
234
Tire Pressures For High Speed Operation
The manufacturer advocates driving at safe
speeds and within posted speed limits.
Where speed limits or conditions are such
that the vehicle can be driven at high speeds,
maintaining correct tire inflation pressure is
very important. Increased tire pressure and
reduced vehicle loading may be required for
high-speed vehicle operation. Refer to an
authorized tire dealer or original equipment
vehicle dealer for recommended safe oper-
ating speeds, loading and cold tire inflation
pressures.
Radial Ply Tires
Tire Repair
If your tire becomes damaged, it may be
repaired if it meets the following criteria:
The tire has not been driven on when flat.
The damage is only on the tread section of
your tire (sidewall damage is not repairable).
The puncture is no greater than a ¼ of an
inch (6 mm).
Consult an authorized tire dealer for tire
repairs and additional information.
Damaged Run Flat tires, or Run Flat tires
that have experienced a loss of pressure
should be replaced immediately with another
Run Flat tire of identical size and service
description (Load Index and Speed Symbol).
Replace the tire pressure sensor as well as it
is not designed to be reused.
Run Flat Tires — If Equipped
Run Flat tires allow you the capability to
drive 50 miles (80 km) at 50 mph (80 km/h)
after a rapid loss of inflation pressure. This
rapid loss of inflation is referred to as the
Run Flat mode. A Run Flat mode occurs
when the tire inflation pressure is of/or below
14 psi (96 kPa). Once a Run Flat tire reaches
the run flat mode it has limited driving capa -
bilities and needs to be replaced immedi -
ately. A Run Flat tire is not repairable. When
a run flat tire is changed after driving with
underinflated tire condition, please replace
the TPM sensor as it is not designed to be
reused when driven under run flat mode 14
psi (96 kPa) condition.
NOTE:
TPM Sensor must be replaced after driving
the vehicle on a flat tire condition.
It is not recommended driving a vehicle
loaded at full capacity or to tow a trailer
while a tire is in the run flat mode.
See the tire pressure monitoring section for
more information.
WARNING!
High speed driving with your vehicle under
maximum load is dangerous. The added
strain on your tires could cause them to
fail. You could have a serious collision. Do
not drive a vehicle loaded to the maximum
capacity at continuous speeds above
75 mph (120 km/h).
WARNING!
Combining radial ply tires with other types
of tires on your vehicle will cause your
vehicle to handle poorly. The instability
could cause a collision. Always use radial
ply tires in sets of four. Never combine
them with other types of tires.
2020_JEEP_JL_WRANGLER_UG_RHD_UK.book Page 234
Page 238 of 330
SERVICING AND MAINTENANCE
236
(Continued)
NOTE:
Wheel Valve Stem must be replaced as well
when installing new tires due to wear and
tear in existing tires.
Keep dismounted tires in a cool, dry place
with as little exposure to light as possible.
Protect tires from contact with oil, grease,
and gasoline.
Replacement Tires
The tires on your new vehicle provide a
balance of many characteristics. They should
be inspected regularly for wear and correct
cold tire inflation pressures. The manufac-
turer strongly recommends that you use tires
equivalent to the originals in size, quality
and performance when replacement is
needed. Refer to the paragraph on “Tread
Wear Indicators” in this section. Refer to the
Tire and Loading Information placard or the
Vehicle Certification Label for the size desig -
nation of your tire. The Load Index and
Speed Symbol for your tire will be found on
the original equipment tire sidewall.
It is recommended to replace the two front
tires or two rear tires as a pair. Replacing just
one tire can seriously affect your vehicle’s handling. If you ever replace a wheel, make
sure that the wheel’s specifications match
those of the original wheels.
It is recommended you contact an authorized
tire dealer or original equipment dealer with
any questions you may have on tire specifica
-
tions or capability. Failure to use equivalent
replacement tires may adversely affect the
safety, handling, and ride of your vehicle. WARNING!
Do not use a tire, wheel size, load rating,
or speed rating other than that specified
for your vehicle. Some combinations of
unapproved tires and wheels may change
suspension dimensions and performance
characteristics, resulting in changes to
steering, handling, and braking of your
vehicle. This can cause unpredictable
handling and stress to steering and
suspension components. You could lose
control and have a collision resulting in
serious injury or death. Use only the tire
and wheel sizes with load ratings
approved for your vehicle.
Never use a tire with a smaller load index
or capacity, other than what was origi -
nally equipped on your vehicle. Using a
tire with a smaller load index could result
in tire overloading and failure. You could
lose control and have a collision.
Failure to equip your vehicle with tires
having adequate speed capability can
result in sudden tire failure and loss of
vehicle control.
CAUTION!
Replacing original tires with tires of a
different size may result in false
speedometer and odometer readings.
WARNING! (Continued)
2020_JEEP_JL_WRANGLER_UG_RHD_UK.book Page 236