spark plugs replace JEEP YJ 1995 Service And Owner's Manual
[x] Cancel search | Manufacturer: JEEP, Model Year: 1995, Model line: YJ, Model: JEEP YJ 1995Pages: 2158, PDF Size: 81.9 MB
Page 1347 of 2158
(9) If equipped, disconnect the power steering
pump bracket. Set the pump and bracket aside. DO
NOT disconnect the hoses.
(10) Perform the Fuel System Pressure Release
procedure (refer to Group 14, Fuel System).
(11) Remove the fuel lines and vacuum advance
hose.
(12) Remove the intake and engine exhaust mani-
folds from the engine cylinder head (refer to Group
11, Exhaust System and Intake Manifold for the
proper procedures).
(13) Disconnect the ignition wires and remove the
spark plugs.
(14) Disconnect the temperature sending unit wire
connector.
(15) Remove the ignition coil and bracket assem-
bly.
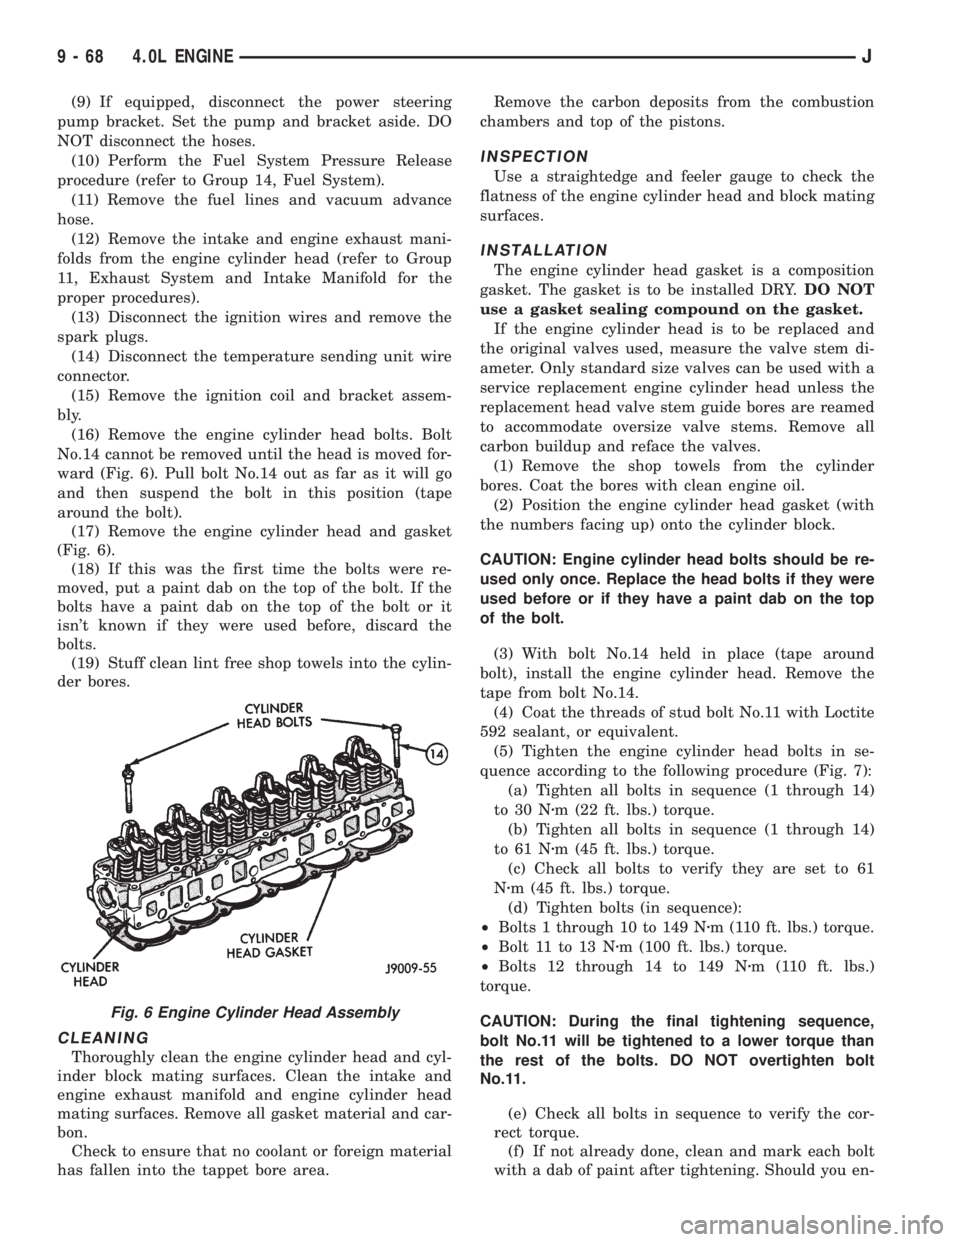
(16) Remove the engine cylinder head bolts. Bolt
No.14 cannot be removed until the head is moved for-
ward (Fig. 6). Pull bolt No.14 out as far as it will go
and then suspend the bolt in this position (tape
around the bolt).
(17) Remove the engine cylinder head and gasket
(Fig. 6).
(18) If this was the first time the bolts were re-
moved, put a paint dab on the top of the bolt. If the
bolts have a paint dab on the top of the bolt or it
isn't known if they were used before, discard the
bolts.
(19) Stuff clean lint free shop towels into the cylin-
der bores.
CLEANING
Thoroughly clean the engine cylinder head and cyl-
inder block mating surfaces. Clean the intake and
engine exhaust manifold and engine cylinder head
mating surfaces. Remove all gasket material and car-
bon.
Check to ensure that no coolant or foreign material
has fallen into the tappet bore area.Remove the carbon deposits from the combustion
chambers and top of the pistons.
INSPECTION
Use a straightedge and feeler gauge to check the
flatness of the engine cylinder head and block mating
surfaces.
INSTALLATION
The engine cylinder head gasket is a composition
gasket. The gasket is to be installed DRY.DO NOT
use a gasket sealing compound on the gasket.
If the engine cylinder head is to be replaced and
the original valves used, measure the valve stem di-
ameter. Only standard size valves can be used with a
service replacement engine cylinder head unless the
replacement head valve stem guide bores are reamed
to accommodate oversize valve stems. Remove all
carbon buildup and reface the valves.
(1) Remove the shop towels from the cylinder
bores. Coat the bores with clean engine oil.
(2) Position the engine cylinder head gasket (with
the numbers facing up) onto the cylinder block.
CAUTION: Engine cylinder head bolts should be re-
used only once. Replace the head bolts if they were
used before or if they have a paint dab on the top
of the bolt.
(3) With bolt No.14 held in place (tape around
bolt), install the engine cylinder head. Remove the
tape from bolt No.14.
(4) Coat the threads of stud bolt No.11 with Loctite
592 sealant, or equivalent.
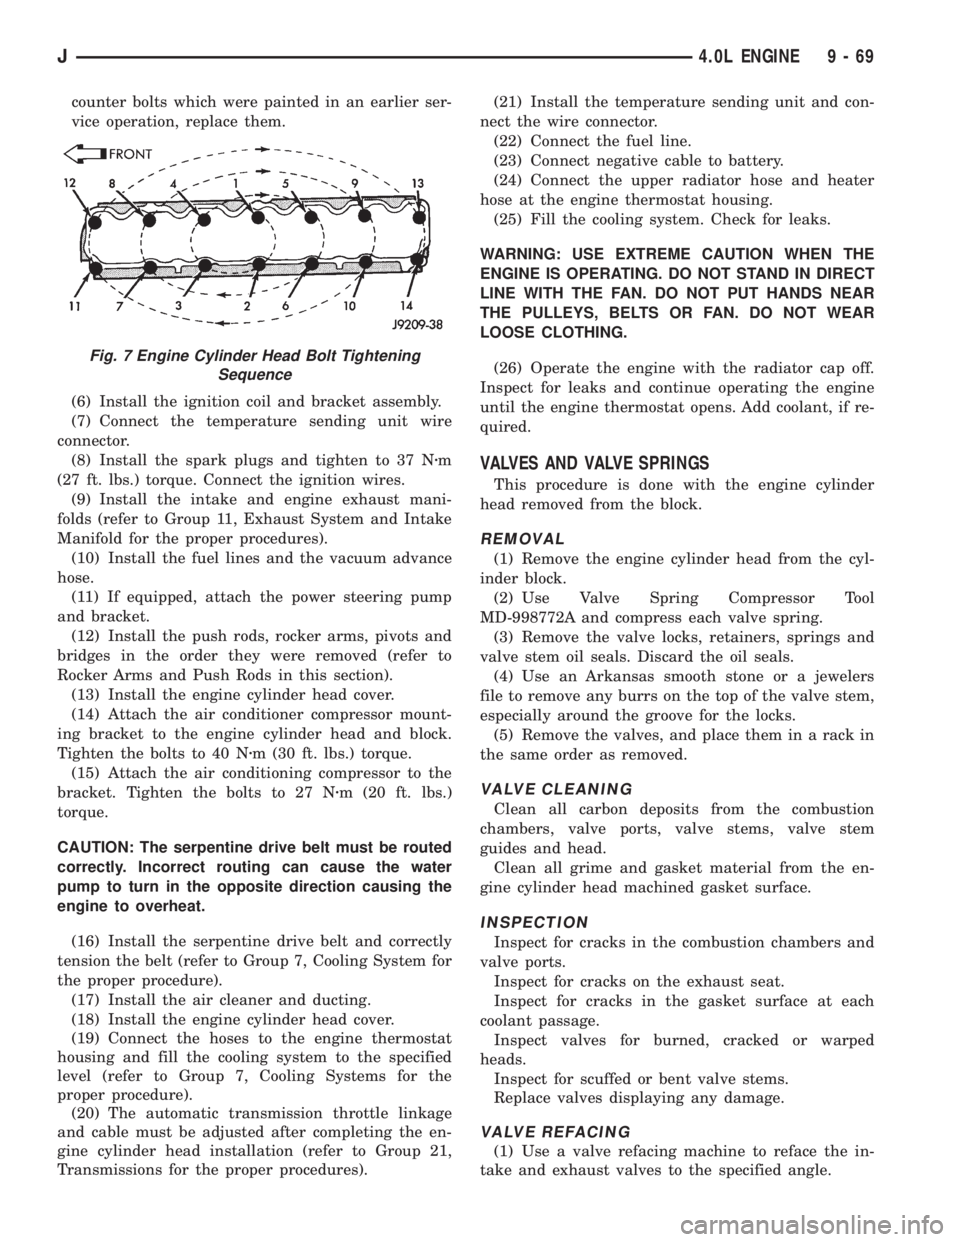
(5) Tighten the engine cylinder head bolts in se-
quence according to the following procedure (Fig. 7):
(a) Tighten all bolts in sequence (1 through 14)
to 30 Nzm (22 ft. lbs.) torque.
(b) Tighten all bolts in sequence (1 through 14)
to 61 Nzm (45 ft. lbs.) torque.
(c) Check all bolts to verify they are set to 61
Nzm (45 ft. lbs.) torque.
(d) Tighten bolts (in sequence):
²Bolts 1 through 10 to 149 Nzm (110 ft. lbs.) torque.
²Bolt 11 to 13 Nzm (100 ft. lbs.) torque.
²Bolts 12 through 14 to 149 Nzm (110 ft. lbs.)
torque.
CAUTION: During the final tightening sequence,
bolt No.11 will be tightened to a lower torque than
the rest of the bolts. DO NOT overtighten bolt
No.11.
(e) Check all bolts in sequence to verify the cor-
rect torque.
(f) If not already done, clean and mark each bolt
with a dab of paint after tightening. Should you en-
Fig. 6 Engine Cylinder Head Assembly
9 - 68 4.0L ENGINEJ
Page 1348 of 2158
counter bolts which were painted in an earlier ser-
vice operation, replace them.
(6) Install the ignition coil and bracket assembly.
(7) Connect the temperature sending unit wire
connector.
(8) Install the spark plugs and tighten to 37 Nzm
(27 ft. lbs.) torque. Connect the ignition wires.
(9) Install the intake and engine exhaust mani-
folds (refer to Group 11, Exhaust System and Intake
Manifold for the proper procedures).
(10) Install the fuel lines and the vacuum advance
hose.
(11) If equipped, attach the power steering pump
and bracket.
(12) Install the push rods, rocker arms, pivots and
bridges in the order they were removed (refer to
Rocker Arms and Push Rods in this section).
(13) Install the engine cylinder head cover.
(14) Attach the air conditioner compressor mount-
ing bracket to the engine cylinder head and block.
Tighten the bolts to 40 Nzm (30 ft. lbs.) torque.
(15) Attach the air conditioning compressor to the
bracket. Tighten the bolts to 27 Nzm (20 ft. lbs.)
torque.
CAUTION: The serpentine drive belt must be routed
correctly. Incorrect routing can cause the water
pump to turn in the opposite direction causing the
engine to overheat.
(16) Install the serpentine drive belt and correctly
tension the belt (refer to Group 7, Cooling System for
the proper procedure).
(17) Install the air cleaner and ducting.
(18) Install the engine cylinder head cover.
(19) Connect the hoses to the engine thermostat
housing and fill the cooling system to the specified
level (refer to Group 7, Cooling Systems for the
proper procedure).
(20) The automatic transmission throttle linkage
and cable must be adjusted after completing the en-
gine cylinder head installation (refer to Group 21,
Transmissions for the proper procedures).(21) Install the temperature sending unit and con-
nect the wire connector.
(22) Connect the fuel line.
(23) Connect negative cable to battery.
(24) Connect the upper radiator hose and heater
hose at the engine thermostat housing.
(25) Fill the cooling system. Check for leaks.
WARNING: USE EXTREME CAUTION WHEN THE
ENGINE IS OPERATING. DO NOT STAND IN DIRECT
LINE WITH THE FAN. DO NOT PUT HANDS NEAR
THE PULLEYS, BELTS OR FAN. DO NOT WEAR
LOOSE CLOTHING.
(26) Operate the engine with the radiator cap off.
Inspect for leaks and continue operating the engine
until the engine thermostat opens. Add coolant, if re-
quired.
VALVES AND VALVE SPRINGS
This procedure is done with the engine cylinder
head removed from the block.
REMOVAL
(1) Remove the engine cylinder head from the cyl-
inder block.
(2) Use Valve Spring Compressor Tool
MD-998772A and compress each valve spring.
(3) Remove the valve locks, retainers, springs and
valve stem oil seals. Discard the oil seals.
(4) Use an Arkansas smooth stone or a jewelers
file to remove any burrs on the top of the valve stem,
especially around the groove for the locks.
(5) Remove the valves, and place them in a rack in
the same order as removed.
VALVE CLEANING
Clean all carbon deposits from the combustion
chambers, valve ports, valve stems, valve stem
guides and head.
Clean all grime and gasket material from the en-
gine cylinder head machined gasket surface.
INSPECTION
Inspect for cracks in the combustion chambers and
valve ports.
Inspect for cracks on the exhaust seat.
Inspect for cracks in the gasket surface at each
coolant passage.
Inspect valves for burned, cracked or warped
heads.
Inspect for scuffed or bent valve stems.
Replace valves displaying any damage.
VALVE REFACING
(1) Use a valve refacing machine to reface the in-
take and exhaust valves to the specified angle.
Fig. 7 Engine Cylinder Head Bolt Tightening
Sequence
J4.0L ENGINE 9 - 69
Page 1350 of 2158
ments differ by more than 0.0635 mm (0.0025 in.),
ream the guide bore to accommodate an oversize
valve stem.
(7) Compare the measured valve guide bore diam-
eter with specifications (7.95-7.97 mm or 0.313-0.314
inch). If the measurement differs from specification
by more than 0.076 mm (0.003 inch), ream the guide
bore to accommodate an oversize valve stem.
ALTERNATIVE METHOD:
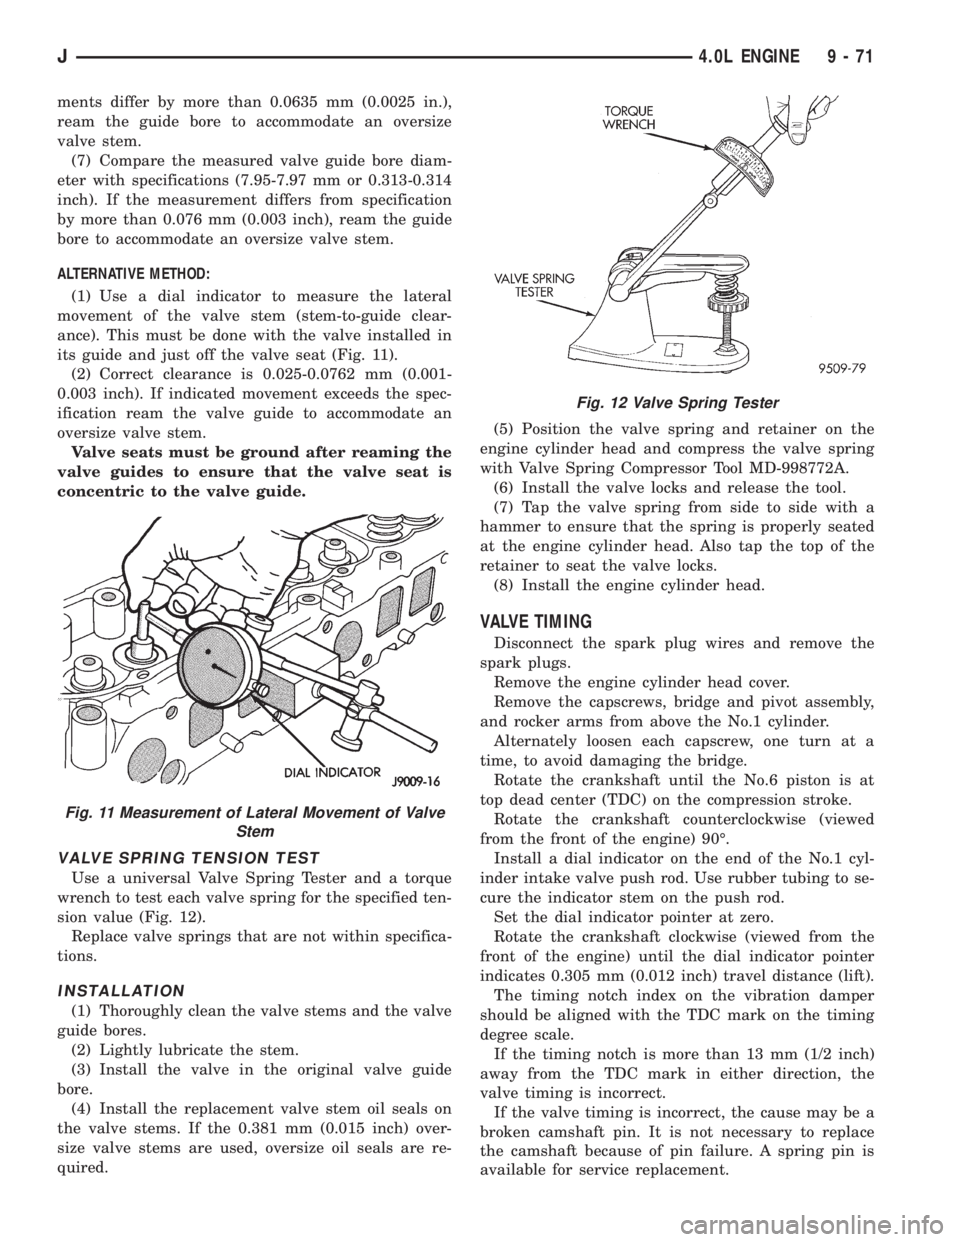
(1) Use a dial indicator to measure the lateral
movement of the valve stem (stem-to-guide clear-
ance). This must be done with the valve installed in
its guide and just off the valve seat (Fig. 11).
(2) Correct clearance is 0.025-0.0762 mm (0.001-
0.003 inch). If indicated movement exceeds the spec-
ification ream the valve guide to accommodate an
oversize valve stem.
Valve seats must be ground after reaming the
valve guides to ensure that the valve seat is
concentric to the valve guide.
VALVE SPRING TENSION TEST
Use a universal Valve Spring Tester and a torque
wrench to test each valve spring for the specified ten-
sion value (Fig. 12).
Replace valve springs that are not within specifica-
tions.
INSTALLATION
(1) Thoroughly clean the valve stems and the valve
guide bores.
(2) Lightly lubricate the stem.
(3) Install the valve in the original valve guide
bore.
(4) Install the replacement valve stem oil seals on
the valve stems. If the 0.381 mm (0.015 inch) over-
size valve stems are used, oversize oil seals are re-
quired.(5) Position the valve spring and retainer on the
engine cylinder head and compress the valve spring
with Valve Spring Compressor Tool MD-998772A.
(6) Install the valve locks and release the tool.
(7) Tap the valve spring from side to side with a
hammer to ensure that the spring is properly seated
at the engine cylinder head. Also tap the top of the
retainer to seat the valve locks.
(8) Install the engine cylinder head.
VALVE TIMING
Disconnect the spark plug wires and remove the
spark plugs.
Remove the engine cylinder head cover.
Remove the capscrews, bridge and pivot assembly,
and rocker arms from above the No.1 cylinder.
Alternately loosen each capscrew, one turn at a
time, to avoid damaging the bridge.
Rotate the crankshaft until the No.6 piston is at
top dead center (TDC) on the compression stroke.
Rotate the crankshaft counterclockwise (viewed
from the front of the engine) 90É.
Install a dial indicator on the end of the No.1 cyl-
inder intake valve push rod. Use rubber tubing to se-
cure the indicator stem on the push rod.
Set the dial indicator pointer at zero.
Rotate the crankshaft clockwise (viewed from the
front of the engine) until the dial indicator pointer
indicates 0.305 mm (0.012 inch) travel distance (lift).
The timing notch index on the vibration damper
should be aligned with the TDC mark on the timing
degree scale.
If the timing notch is more than 13 mm (1/2 inch)
away from the TDC mark in either direction, the
valve timing is incorrect.
If the valve timing is incorrect, the cause may be a
broken camshaft pin. It is not necessary to replace
the camshaft because of pin failure. A spring pin is
available for service replacement.
Fig. 11 Measurement of Lateral Movement of Valve
Stem
Fig. 12 Valve Spring Tester
J4.0L ENGINE 9 - 71
Page 1366 of 2158
(8) Lower the vehicle.
(9) Install the engine cylinder head, push rods,
rocker arms, bridges, pivots and engine cylinder head
cover.
(10) Fill the crankcase with engine oil.
CRANKSHAFT MAIN BEARINGS
REMOVAL
(1) Disconnect negative cable from battery.
(2) Remove the spark plugs.
(3) Raise the vehicle.
(4) Remove the oil pan and oil pump.
(5) Remove only one main bearing cap and lower
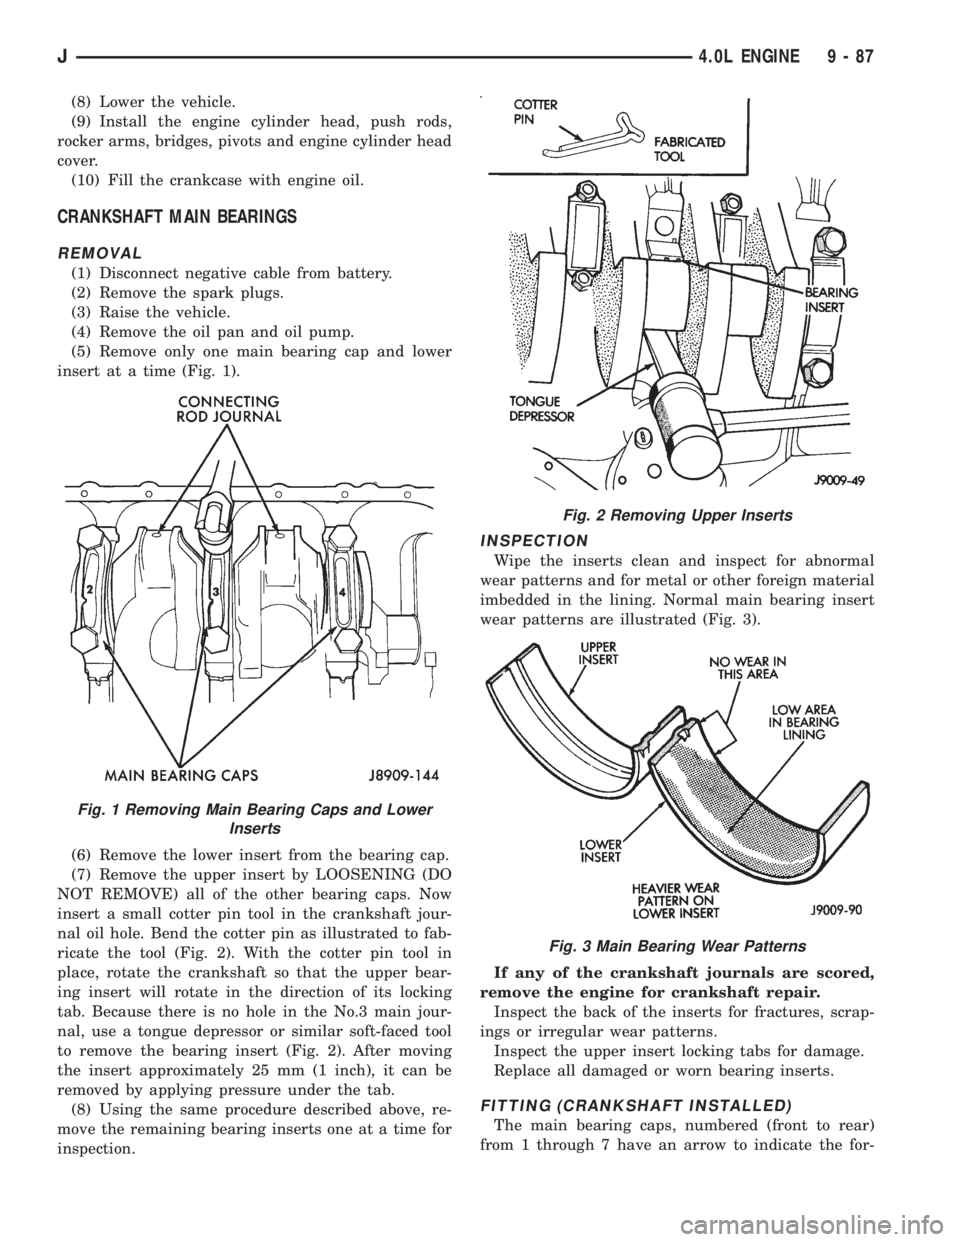
insert at a time (Fig. 1).
(6) Remove the lower insert from the bearing cap.
(7) Remove the upper insert by LOOSENING (DO
NOT REMOVE) all of the other bearing caps. Now
insert a small cotter pin tool in the crankshaft jour-
nal oil hole. Bend the cotter pin as illustrated to fab-
ricate the tool (Fig. 2). With the cotter pin tool in
place, rotate the crankshaft so that the upper bear-
ing insert will rotate in the direction of its locking
tab. Because there is no hole in the No.3 main jour-
nal, use a tongue depressor or similar soft-faced tool
to remove the bearing insert (Fig. 2). After moving
the insert approximately 25 mm (1 inch), it can be
removed by applying pressure under the tab.
(8) Using the same procedure described above, re-
move the remaining bearing inserts one at a time for
inspection.
INSPECTION
Wipe the inserts clean and inspect for abnormal
wear patterns and for metal or other foreign material
imbedded in the lining. Normal main bearing insert
wear patterns are illustrated (Fig. 3).
If any of the crankshaft journals are scored,
remove the engine for crankshaft repair.
Inspect the back of the inserts for fractures, scrap-
ings or irregular wear patterns.
Inspect the upper insert locking tabs for damage.
Replace all damaged or worn bearing inserts.
FITTING (CRANKSHAFT INSTALLED)
The main bearing caps, numbered (front to rear)
from 1 through 7 have an arrow to indicate the for-
Fig. 1 Removing Main Bearing Caps and Lower
Inserts
Fig. 2 Removing Upper Inserts
Fig. 3 Main Bearing Wear Patterns
J4.0L ENGINE 9 - 87
Page 1368 of 2158
If the clearance exceeds specification using a pair
of 0.051 mm (0.002 inch) undersize bearing inserts,
measure crankshaft journal diameter with a mi-
crometer. If the journal diameter is correct, the
crankshaft bore in the cylinder block may be mis-
aligned, which requires cylinder block replacement or
machining to true bore.
Replace the crankshaft or grind to accept the ap-
propriate undersize bearing inserts if:
²Journal diameters 1 through 6 are less than
63.4517 mm (2.4981 inches)
²Journal 7 diameter is less than 63.4365 mm
(2.4975 inches).
Once the proper clearances have been obtained,
proceed to Crankshaft Main BearingÐInstallation.
MAIN BEARING JOURNAL DIAMETER (CRANKSHAFT
REMOVED)
Remove the crankshaft from the cylinder block (re-
fer to Cylinder Block - Disassemble).
Clean the oil off the main bearing journal.
Determine the maximum diameter of the journal
with a micrometer. Measure at two locations 90É
apart at each end of the journal.
The maximum allowable taper and out of round is
0.013 mm (0.0005 inch). Compare the measured di-
ameter with the journal diameter specification (Main
Bearing Fitting Chart). Select inserts required to ob-
tain the specified bearing-to-journal clearance.
Install the crankshaft into the cylinder block (refer
to Cylinder Block - Assemble and Crankshaft Main
Bearings - Installation).
INSTALLATION
(1) Lubricate the bearing surface of each insert
with engine oil.
(2) Loosen all the main bearing caps. Install the
main bearing upper inserts.
(3) Install the lower bearing inserts into the main
bearing caps.
(4) Install the main bearing cap(s) and lower in-
sert(s).
(5) Tighten the bolts of caps 1, 2, 4, 5, 6, and 7 to
54 Nzm (40 ft. lbs.) torque. Now tighten these bolts to
95 Nzm (70 ft. lbs.) torque. Finally, tighten these
bolts to 108 Nzm (80 ft. lbs.) torque.
(6) Push the crankshaft forward and backward.
Load the crankshaft front or rear and tighten cap
bolt No.3 to 54 Nzm (40 ft. lbs.) torque. Then tighten
to 95 Nzm (70 ft. lbs.) torque and finally tighten to
108 Nzm (80 ft. lbs.) torque.
(7) Rotate the crankshaft after tightening each
main bearing cap to ensure the crankshaft rotates
freely.
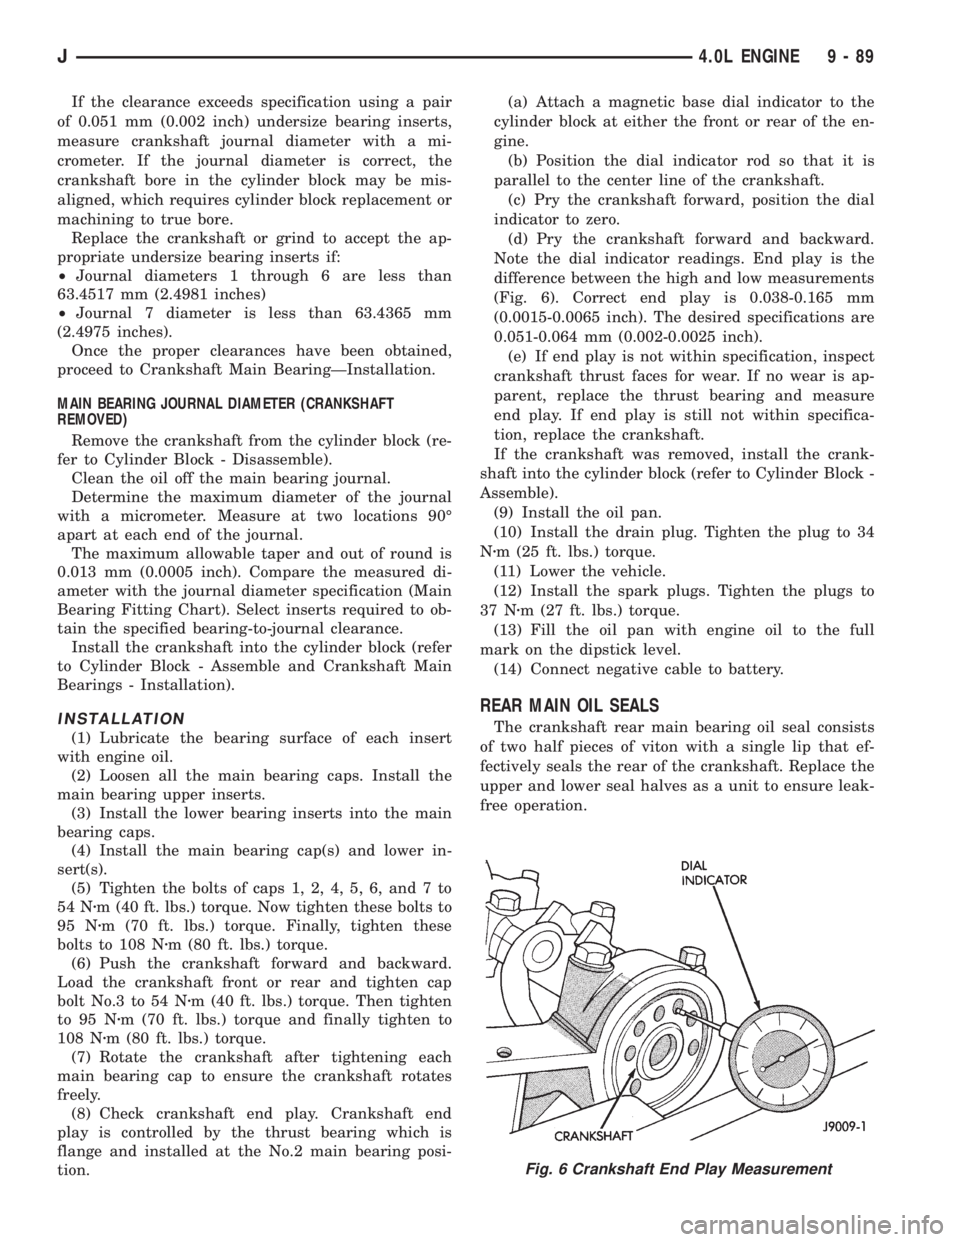
(8) Check crankshaft end play. Crankshaft end
play is controlled by the thrust bearing which is
flange and installed at the No.2 main bearing posi-
tion.(a) Attach a magnetic base dial indicator to the
cylinder block at either the front or rear of the en-
gine.
(b) Position the dial indicator rod so that it is
parallel to the center line of the crankshaft.
(c) Pry the crankshaft forward, position the dial
indicator to zero.
(d) Pry the crankshaft forward and backward.
Note the dial indicator readings. End play is the
difference between the high and low measurements
(Fig. 6). Correct end play is 0.038-0.165 mm
(0.0015-0.0065 inch). The desired specifications are
0.051-0.064 mm (0.002-0.0025 inch).
(e) If end play is not within specification, inspect
crankshaft thrust faces for wear. If no wear is ap-
parent, replace the thrust bearing and measure
end play. If end play is still not within specifica-
tion, replace the crankshaft.
If the crankshaft was removed, install the crank-
shaft into the cylinder block (refer to Cylinder Block -
Assemble).
(9) Install the oil pan.
(10) Install the drain plug. Tighten the plug to 34
Nzm (25 ft. lbs.) torque.
(11) Lower the vehicle.
(12) Install the spark plugs. Tighten the plugs to
37 Nzm (27 ft. lbs.) torque.
(13) Fill the oil pan with engine oil to the full
mark on the dipstick level.
(14) Connect negative cable to battery.
REAR MAIN OIL SEALS
The crankshaft rear main bearing oil seal consists
of two half pieces of viton with a single lip that ef-
fectively seals the rear of the crankshaft. Replace the
upper and lower seal halves as a unit to ensure leak-
free operation.
Fig. 6 Crankshaft End Play Measurement
J4.0L ENGINE 9 - 89
Page 2144 of 2158
PANEL (GOP)ÐXJ, GRILLE AND GRILLE
OPENING............................23-3
PANEL ILLUMINATION LAMPS,
INSTRUMENT; INTERIOR LIGHTING
(XJ).............................8W-44-1
PANEL ILLUMINATION LAMPS,
INSTRUMENT; INTERIOR LIGHTING
(XJ-RHD).........................8W-44-1
PANEL, INSTRUMENT.............8E-24,8E-1
PANEL INSULATOR PANELÐXJ, DASH....23-12
PANEL LAMP, ACCESSORY LAMP AND
HEATER CONTROL; INTERIOR
LIGHTING (YJ)....................8W-44-1
PANEL OUTLET VACUUM MOTOR
REPLACEMENT, HEATER/DEFROSTER/
INSTRUMENT.......................24-26
PANEL REMOVE/INSTALL, INSTRUMENT . . 8E-20
PANELÐXJ, DASH PANEL INSULATOR....23-12
PANELÐXJ, DOOR TRIM..............23-31
PANELÐXJ, FRONT INNER SCUFF
PLATE/COWL SIDE TRIM...............23-86
PANELÐXJ, LIFTGATE TRIM............23-59
PANELÐYJ, FULL-METAL DOOR TRIM . . . 23-137
PANELÐYJ, HOOD INSULATOR........23-107
PANELÐYJ, INSTRUMENT............23-151
PANELS AND SCUFF PLATESÐXJ,
INTERIOR TRIM......................23-84
PANELSÐXJ, QUARTER AND
WHEELHOUSE TRIM..................23-87
PARK GEAR OVERHAUL, GOVERNOR....21-127
PARK GEAR SERVICE, GOVERNOR......21-105
PARK INTERLOCK CABLE ADJUSTMENT . 21-195
PARK INTERLOCK CABLE ADJUSTMENT
(XJ)..............................21-101
PARK LOCK COMPONENT OVERHAUL,
ADAPTER/EXTENSION HOUSING
INSPECTION.......................21-127
PARK LOCK COMPONENT
REPLACEMENT.....................21-108
PARK NEUTRAL SWITCH..............14-63
PARK ROD AND PAWL SERVICE........21-190
PARKING BRAKE CABLE TENSIONER
ADJUSTMENT (XJ/YJ)..................5-69
PARKING BRAKE CABLE TENSIONER
REPLACEMENT (XJ)...................5-66
PARKING BRAKE FRONT CABLE
REPLACEMENT (YJ)...................5-67
PARKING BRAKE HANDLE COVERÐXJ....23-94
PARKING BRAKE LEVER INSTALLATION
(XJ WITH FULL CONSOLE)..............5-64
PARKING BRAKE LEVER INSTALLATION
(XJ WITH MINI CONSOLE)..............5-63
PARKING BRAKE LEVER INSTALLATION
(XJ WITHOUT CONSOLE)...............5-65
PARKING BRAKE LEVER REMOVAL (XJ
WITH FULL CONSOLE).................5-63
PARKING BRAKE LEVER REMOVAL (XJ
WITH MINI CONSOLE).................5-62
PARKING BRAKE LEVER REMOVAL (XJ
WITHOUT CONSOLE)...................5-64
PARKING BRAKE MALFUNCTIONS,
DIAGNOSING..........................5-8
PARKING BRAKE OPERATION............5-60
PARKING BRAKE PEDAL INSTALLATION
(YJ)................................5-66
PARKING BRAKE PEDAL REMOVAL (YJ) . . . 5-66
PARKING BRAKE REAR CABLE
REPLACEMENT (XJ)...................5-67
PARKING BRAKE REAR CABLE
REPLACEMENT (YJ)...................5-68
PARKING BRAKE SWITCH...............5-68
PARKING BRAKES.....................5-60
PARKING LAMPS; FRONT LIGHTING
(XJ).............................8W-50-1
PARKING LAMPS; FRONT LIGHTING
(XJ-RHD).........................8W-50-2
PARKING LAMPS; FRONT LIGHTING
(YJ).............................8W-50-1
PARK/NEUTRAL POSITION SWITCH;
FUEL/IGNITION (XJ)
................8W-30-4
PARK/NEUTRAL POSITION SWITCH;
FUEL/IGNITION (YJ)
................8W-30-4
PARK/NEUTRAL POSITION SWITCH;
TRANSMISSION AND TRANSFER CASE
. . 21-183
PARK/NEUTRAL POSITION SWITCH;
FUEL/IGNITION (XJ-RHD)
............8W-30-4
PARK/NEUTRAL POSITION SWITCH
SERVICE
..........................21-109PARK/NEUTRAL SWITCHÐPCM INPUT . . . 14-24
PARK/TURN SIGNAL LAMP BULB
REPLACEMENTÐXJ, FRONT.............8L-9
PARK/TURN SIGNAL LAMP BULB
REPLACEMENTÐYJ, FRONT............8L-25
PARTS INTERCHANGEABILITY,
TRANSMISSION CHANGES.............21-67
PARTS RECOMMENDATION,
LUBRICATION AND REPLACEMENT........0-2
PASSENGER'S POWER LOCK SWITCH.....8P-6
PASSENGER'S POWER WINDOW
SWITCH.............................8S-6
PATTERN ANALYSIS, BACKLASH AND
CONTACT; FRONT SUSPENSION AND
AXLE...............................2-45
PATTERN ANALYSIS, BACKLASH AND
CONTACT; REAR SUSPENSION AND
AXLES..............................3-27
PATTERN, SHIFT......................21-2
PATTERN, TRANSMISSION SHIFT........21-34
PATTERNS, TIRE WEAR................22-4
PAWL SERVICE, PARK ROD...........21-190
PCM SYSTEM SCHEMATICS............14-41
PEDAL, ACCELERATOR................14-17
PEDAL AND THROTTLE CABLE,
ACCELERATOR.................14-17,14-58
PEDAL BUSHINGS, CLUTCH AND BRAKE . . . 0-22
PEDAL INSTALLATION, BRAKE...........5-31
PEDAL INSTALLATION, CLUTCH..........6-15
PEDAL INSTALLATION (YJ), PARKING
BRAKE...............................5-66
PEDAL REMOVAL, BRAKE...............5-31
PEDAL REMOVAL, CLUTCH..............6-15
PEDAL REMOVAL (YJ), PARKING BRAKE . . . 5-66
PEDAL TRAVEL SENSOR, BRAKE;
ANTI-LOCK BRAKES (YJ)............8W-32-1
PEDALÐBRAKELIGHT SWITCH, POWER
BRAKE BOOSTERÐBRAKE..............5-22
PERFORMANCE, ENGINE.................9-2
PERFORMANCE TEMPERATURE AND
PRESSURE CHART, XJ................24-13
PERFORMANCE TEMPERATURE AND
PRESSURE CHART, YJ................24-13
PERFORMANCE TEST, REFRIGERANT
SERVICE...........................24-11
PERFORMANCE TESTS, AIR
CONDITIONING......................24-12
PILLAR TRIM COVERSÐXJ, B/C-PILLAR
AND LIFTGATE.......................23-88
PILOT BEARING REPLACEMENT..........6-12
PIN REPLACEMENT, CAMSHAFT......9-34,9-75
PIN REPLACEMENTÐXJ, DOOR
HINGE/HINGE.......................23-52
PINION GEAR ASSEMBLY/INSTALLATION . . . 2-42
PINION GEAR DEPTH INFORMATION;
FRONT SUSPENSION AND AXLE..........2-39
PINION GEAR DEPTH INFORMATION;
REAR SUSPENSION AND AXLES..........3-21
PINION GEAR DEPTH VARIANCE; FRONT
SUSPENSION AND AXLE................2-40
PINION GEAR DEPTH VARIANCE; REAR
SUSPENSION AND AXLES...........3-22,3-39
PINION MEASUREMENT AND ASSEMBLY . . . 3-22
PINION MEASUREMENT, DIFFERENTIAL....2-40
PINION REMOVAL/DISASSEMBLY; FRONT
SUSPENSION AND AXLE................2-36
PINION REMOVAL/DISASSEMBLY; REAR
SUSPENSION AND AXLES...............3-19
PINION SEAL REPLACEMENT; FRONT
SUSPENSION AND AXLE................2-25
PINION SEAL REPLACEMENT; REAR
SUSPENSION AND AXLES...............3-33
PINION SHAFT SEAL REPLACEMENT......3-15
PIPEÐXJ VEHICLES, EXHAUST..........11-3
PIPEÐYJ VEHICLES, EXHAUST..........11-4
PISTON AND TRANSMISSION CASE
OVERHAUL, FIRST-REVERSE BRAKE....21-247
PISTON AND WORM SHAFT
REPLACEMENT, RACK.................19-32
PISTON CLEARANCE, AW-4 BUSHING . . . 21-339
PISTON SPECIFICATIONS, AW-4
RETAINER.........................21-340
PISTONS AND CONNECTING RODS
. . . 9-39,9-81
PISTONS AND SPRINGS, ACCUMULATOR
. 21-189
PITMAN ARM
..................19-17,19-20
PITMAN SHAFT AND SIDE COVER
REPLACEMENT
......................19-28
PITMAN SHAFT SEAL REPLACEMENT
.....19-37PITMAN SHAFT SEALS AND BEARING
REPLACEMENT......................19-34
PITMAN SHAFT SEALSÐIN CAR
REPLACEMENT......................19-23
PIVOTS REMOVE/INSTALL, WINDSHIELD
WIPER LINKAGE.....................8K-17
PLANETARY GEAR AND CLUTCH
OVERHAUL, OVERDRIVE..............21-218
PLANETARY GEAR OVERHAUL, FRONT . . . 21-237
PLANETARY GEAR TRAIN OVERHAUL . . . 21-141
PLASTIC COMPONENT INSPECTION,
RUBBER............................0-20
PLASTIC HOSES/TUBING, RUBBER........0-26
PLASTIC INSERTÐXJ, REAR QUARTER
WINDOW GLASS/REAR QUARTER.......23-73
PLASTIGAGE, MEASURING WITH..........9-3
PLATE, FRONT SKID...................13-1
PLATE, FUEL TANK SKID...........13-15,13-3
PLATE LAMP HOUSINGÐXJ, LIFTGATE
LICENSE...........................23-65
PLATE LAMPÐXJ, LICENSE............8L-12
PLATE LAMPS, TAIL LAMPS AND
LICENSE.........................8W-51-1
PLATE LAMPS, TAIL LAMPS AND REAR
LICENSE; REAR LIGHTING (XJ).......8W-51-1
PLATE LAMPS, TAIL LAMPS AND REAR
LICENSE; REAR LIGHTING (XJ-RHD) . . . 8W-51-1
PLATE REPLACEMENT, SUPPORT.........5-58
PLATE SCREW ANCHOR AND BUMPERÐ
XJ, LIFTGATE LICENSE................23-65
PLATE SERVICE, CONVERTERÐPUMP
SEALÐDRIVE......................21-116
PLATE SPECIFICATIONS, 30RH/32RH
SNAP RING/THRUST WASHER/THRUST . . 21-335
PLATE THICKNESS, AW-4 CLUTCH DISC . 21-338
PLATE, TRANSFER CASE SKID......13-15,13-3
PLATE, VEHICLE CODE...............Intro.-4
PLATE, VEHICLE IDENTIFICATION
NUMBER (VIN).....................Intro.-4
PLATE/COWL SIDE TRIM PANELÐXJ,
FRONT INNER SCUFF.................23-86
PLATESÐXJ, INTERIOR TRIM PANELS
AND SCUFF.........................23-84
PLATESÐXJ, OUTER SCUFF............23-89
PLATESÐXJ, VEHICLE, LABELS........Intro.-2
PLATESÐYJ, VEHICLE, LABELS........Intro.-3
PLATFORMÐXJ, BUCKET SEAT.........23-82
PLUG ASSEMBLY REPLACEMENT,
ADJUSTER..........................19-29
PLUG CABLE RESISTANCE, SPARK......8D-14
PLUG, HOUSING END.................19-28
PLUG LOCATIONS, TRANSMISSION
SWITCH............................21-34
PLUG SECONDARY CABLES, SPARK.....8D-14,
8D-24
PLUGS, SPARK; IGNITION SYSTEMS....8D-12,
8D-23,8D-32
PLUGS, SPARK; LUBRICATION AND
MAINTENANCE.......................0-20
POLISHING, WET SANDING,BUFFING....23-158
POOR CONNECTIONS, INTERMITTENT;
WIRING DIAGRAMSÐGENERAL
INFORMATION (XJ)
...................8W-4
POSITION SENSOR, CAMSHAFT; FUEL
SYSTEM
............................14-60
POSITION SENSOR, CAMSHAFT;
FUEL/IGNITION (XJ)
................8W-30-3
POSITION SENSOR, CAMSHAFT;
FUEL/IGNITION (YJ)
................8W-30-3
POSITION SENSOR, CAMSHAFT;
IGNITION SYSTEMS
..............8D-17,8D-2
POSITION SENSOR, CAMSHAFT;
FUEL/IGNITION (XJ-RHD)
............8W-30-3
POSITION SENSOR, CRANKSHAFT; FUEL
SYSTEM
............................14-60
POSITION SENSOR, CRANKSHAFT;
FUEL/IGNITION (XJ)
................8W-30-3
POSITION SENSOR, CRANKSHAFT;
FUEL/IGNITION (YJ)
................8W-30-3
POSITION SENSOR, CRANKSHAFT;
IGNITION SYSTEMS
..............8D-17,8D-3
POSITION SENSOR, CRANKSHAFT;
FUEL/IGNITION (XJ-RHD)
............8W-30-3
POSITION SENSOR TEST, CAMSHAFT;
FUEL SYSTEM
.......................14-46
POSITION SENSOR TEST, CAMSHAFT;
IGNITION SYSTEMS
...................8D-6
20 INDEXJ
Description Group-Page Description Group-Page Description Group-Page
Page 2150 of 2158
SHUTDOWN (ASD) RELAY, AUTOMATIC;
FUEL SYSTEM.......................14-59
SHUTDOWN (ASD) RELAY, AUTOMATIC;
IGNITION SYSTEMS..............8D-17,8D-1
SHUTDOWN (ASD) RELAY TEST,
AUTOMATIC.........................8D-6
SHUTDOWN (ASD) RELAY TESTING,
AUTOMATIC.........................14-46
SHUTDOWN (ASD) RELAYÐPCM
OUTPUT, AUTO......................14-26
SHUTDOWN (ASD) SENSEÐPCM INPUT,
AUTOMATIC.........................14-21
SIDE COVER REPLACEMENT, PITMAN
SHAFT.............................19-28
SIDE MARKER LAMP BULB
REPLACEMENTÐXJ..................8L-10
SIDE MARKER LAMP BULB
REPLACEMENTÐYJ..................8L-25
SIDE MOLDING/CLADDINGÐXJ, BODY . . . 23-20
SIDE MOLDINGÐXJ, WINDSHIELD......23-86
SIDE STEP MOLDINGÐYJ, BODY.......23-115
SIDE TRIM PANELÐXJ, FRONT INNER
SCUFF PLATE/COWL..................23-86
SIGNAL INDICATOR LAMPS, TURN;
INSTRUMENT CLUSTER (XJ).........8W-40-2
SIGNAL INDICATOR LAMPS, TURN;
INSTRUMENT CLUSTER (XJ-RHD).....8W-40-2
SIGNAL LAMP BULB REPLACEMENTÐ
XJ, FRONT PARK/TURN.................8L-9
SIGNAL LAMP BULB REPLACEMENTÐ
YJ, FRONT PARK/TURN................8L-25
SIGNAL RELAY, TURN; TURN SIGNALS
(XJ-RHD)..........................8W-52-1
SIGNAL SYSTEM - YJ, TURN............8J-3
SIGNAL SYSTEM, TURN................8J-1
SIGNAL, TACHOMETER; FUEL/IGNITION
(XJ).............................8W-30-5
SIGNAL, TACHOMETER; FUEL/IGNITION
(YJ).............................8W-30-5
SIGNAL, TACHOMETER; FUEL/IGNITION
(XJ-RHD).........................8W-30-4
SIGNAL/HAZARD WARNING SWITCH
REMOVE/INSTALL - YJ, TURN............8J-5
SIGNAL/HAZARD WARNING SYSTEM -
XJ, TURN............................8J-3
SIGNALS, TURN; TURN SIGNALS (YJ) . . 8W-52-1
SIGNALS, WHEEL/TIRE SIZE AND INPUT....5-3
SIGNAL/TAIL LAMP BULB
REPLACEMENTÐXJ, BACK-UP/REAR
TURN..............................8L-12
SIGNAL/TAIL LAMP BULB
REPLACEMENTÐYJ, BACK-UP/REAR
TURN..............................8L-28
SINGLE CARDAN.....................16-10
SIZE AND INPUT SIGNALS, WHEEL/TIRE....5-3
SKID PLATE, FRONT...................13-1
SKID PLATE, FUEL TANK...........13-15,13-3
SKID PLATE, TRANSFER CASE......13-15,13-3
SLIP DIFFERENTIAL, LIMITED............3-10
SNAP, DRIVELINE; FRONT SUSPENSION
AND AXLE...........................2-19
SNAP, DRIVELINE; REAR SUSPENSION
AND AXLES..........................3-10
SNAP RING CHARTÐAX 15 MANUAL
TRANSMISSION, SELECTIVE...........21-334
SNAP RING/THRUST WASHER/THRUST
PLATE SPECIFICATIONS, 30RH/32RH....21-335
SOFT TOP DOORÐYJ, HALF-METAL.....23-134
SOFT TOP SERVICE INFORMATIONÐYJ . . 23-127
SOFT TOP SERVICEÐYJ..............23-129
SOLENOID AND RELAY, TORQUE
CONVERTER CLUTCH (TCC);
FUEL/IGNITION (XJ)................8W-30-4
SOLENOID AND RELAY, TORQUE
CONVERTER CLUTCH (TCC);
TRANSMISSION CONTROLS (YJ)......8W-31-1
SOLENOID AND RELAYÐ2.5L ENGINE
ONLY, TORQUE CONVERTER CLUTCH
(TCC); TRANSMISSION CONTROLS
(XJ)
.............................8W-31-1
SOLENOID TESTING SPECIFICATIONS,
2.5L STARTER
.......................8A-23
SOLENOID TESTING SPECIFICATIONS,
4.0L STARTER
.......................8A-23
SOLENOIDS, TRANSMISSION VALVE
BODY
.............................21-184
SOLVENTS, BRAKE FLUID/LUBRICANTS/
CLEANING
............................5-2SOUND BAR REMOVE/INSTALL - XJ.......8F-8
SOUND BAR REMOVE/INSTALL - YJ......8F-10
SOUND BARÐXJ....................23-94
SPACER BLOCKSÐTWO-DOOR
VEHICLES, FRONT DOOR..............23-53
SPARE TIRE/WHEEL HOLDDOWN AND
FLOOR BRACKETSÐXJ................23-98
SPARE/WHEEL TIRE CARRIERÐYJ,
EXTERNAL.........................23-133
SPARK PLUG CABLE RESISTANCE.......8D-14
SPARK PLUG SECONDARY CABLES . 8D-14,8D-24
SPARK PLUGS; IGNITION SYSTEMS.....8D-12,
8D-23,8D-32
SPARK PLUGS; LUBRICATION AND
MAINTENANCE.......................0-20
SPEAKERS; AUDIO SYSTEMS........8F-1,8F-2
SPEAKERS; RADIO (XJ).............8W-47-1
SPEAKERS; RADIO (XJ-RHD).........8W-47-1
SPEAKERS; RADIO (YJ).............8W-47-1
SPEAKERS REMOVE/INSTALL - XJ........8F-6
SPEAKERS REMOVE/INSTALL - YJ........8F-9
SPECIFICATION NOTATIONS..........Intro.-11
SPECIFICATIONS; BATTERY/STARTER/
GENERATOR SERVICE..................8B-8
SPECIFICATIONS; BATTERY/STARTING/
CHARGING SYSTEMS DIAGNOSTICS.....8A-23
SPECIFICATIONS; BRAKES..............5-70
SPECIFICATIONS; COOLING SYSTEM......7-45
SPECIFICATIONS; ENGINES...........9-52,9-93
SPECIFICATIONS; FUEL SYSTEM........14-67
SPECIFICATIONS; HORNS...............8G-5
SPECIFICATIONS; IGNITION SYSTEMS....8D-32
SPECIFICATIONS; INSTRUMENT PANEL
AND GAUGESÐXJ..............8E-23,8E-43
SPECIFICATIONS; WHEELS AND TIRES....22-12
SPECIFICATIONS, 2.5L STARTER AND
SOLENOID TESTING..................8A-23
SPECIFICATIONS, 2.5L STARTING
SYSTEM COLD CRANKING.............8A-23
SPECIFICATIONS, 30RH/32RH GENERAL . 21-335
SPECIFICATIONS, 30RH/32RH PRESSURE
TEST.............................21-336
SPECIFICATIONS, 30RH/32RH TORQUE . . 21-336
SPECIFICATIONS, 4.0L STARTER AND
SOLENOID TESTING..................8A-23
SPECIFICATIONS, 4.0L STARTING
SYSTEM COLD CRANKING.............8A-23
SPECIFICATIONS, AW-4 GENERAL......21-337
SPECIFICATIONS, AW-4 TORQUE.......21-344
SPECIFICATIONS, AXLE; FRONT
SUSPENSION AND AXLE................2-49
SPECIFICATIONS, AXLE; REAR
SUSPENSION AND AXLES...............3-51
SPECIFICATIONS, BATTERY; BATTERY/
STARTER/GENERATOR SERVICE..........8B-8
SPECIFICATIONS, BATTERY; BATTERY/
STARTING/CHARGING SYSTEMS
DIAGNOSTICS.......................8A-23
SPECIFICATIONS, BELT TENSION.........7-38
SPECIFICATIONS, BODY LUBRICANT......0-33
SPECIFICATIONS, BRAKE TORQUE........5-70
SPECIFICATIONS, CHARGING SYSTEM....8A-23
SPECIFICATIONS (CONT.), ENGINE....9-53,9-54,
9-94,9-95
SPECIFICATIONS, ENGINE...........9-52,9-93
SPECIFICATIONS, GENERATOR...........8B-8
SPECIFICATIONS, LUBRICANT; FRONT
SUSPENSION AND AXLE................2-22
SPECIFICATIONS, LUBRICANT; REAR
SUSPENSION AND AXLES...........3-13,3-31
SPECIFICATIONS, MANUAL STEERING
GEAR..............................19-46
SPECIFICATIONS, MEASUREMENT AND
TORQUE.........................Intro.-11
SPECIFICATIONS, NP231/NP242 TORQUE . 21-344
SPECIFICATIONS, OUTPUT VOLTAGE.....8A-23
SPECIFICATIONS, POWER STEERING
GEAR..............................19-36
SPECIFICATIONS, PUMP OPERATING......19-3
SPECIFICATIONS, RUNOUT..............16-4
SPECIFICATIONS, STARTER.............8B-8
SPECIFICATIONS, STARTING SYSTEM
....8A-23
SPECIFICATIONS, TORQUE; CLUTCH
......6-17
SPECIFICATIONS, TORQUE; ENGINES
. . 9-54,9-95
SPECIFICATIONS, TORQUE; EXHAUST
SYSTEM AND INTAKE MANIFOLD
........11-10
SPECIFICATIONS, TORQUE; FRONT
SUSPENSION AND AXLE
................2-49SPECIFICATIONS, TORQUE; HEATING
AND AIR CONDITIONING...............24-37
SPECIFICATIONS, TORQUE;
INTRODUCTION............Intro.-11,Intro.-12
SPECIFICATIONS, TORQUE; PROPELLER
SHAFTS............................16-15
SPECIFICATIONS, TORQUE; REAR
SUSPENSION AND AXLES...............3-51
SPECIFICATIONS, TORQUE; STEERING....19-78
SPECIFICATIONS, TRAILER TOWING....Intro.-5,
Intro.-9
SPECIFICATIONS, TRANSMISSION/
TRANSFER CASE....................21-333
SPECIFICATIONSÐACCESSORIES,
TORQUE...........................23-162
SPECIFICATIONSÐMANUAL
TRANSMISSION, TORQUE.............21-333
SPECIFICATIONSÐXJ VEHICLES,
ALIGNMENT..........................2-10
SPECIFICATIONSÐXJ VEHICLES,
TORQUE...........................23-161
SPECIFICATIONSÐYJ VEHICLES,
ALIGNMENT..........................2-10
SPEED CONTROL DIAGNOSTIC TROUBLE
CODE...............................8H-5
SPEED CONTROL SERVO...........8H-1,8H-6
SPEED CONTROL SERVO REMOVE/
INSTALL............................8H-9
SPEED CONTROL SWITCH..........8H-1,8H-6
SPEED CONTROL SWITCH REMOVE/
INSTALL............................8H-9
SPEED CONTROL, VEHICLE; VEHICLE
SPEED CONTROL (XJ)................8W-33-1
SPEED CONTROL, VEHICLE; VEHICLE
SPEED CONTROL (XJ-RHD)..........8W-33-1
SPEED CONTROLÐPCM INPUT.........14-25
SPEED CONTROLÐPCM OUTPUT........14-29
SPEED KNOCK, LOW; FRONT
SUSPENSION AND AXLE................2-19
SPEED KNOCK, LOW; REAR
SUSPENSION AND AXLES...............3-10
SPEED SENSOR.....................21-192
SPEED SENSOR AIR GAP...............5-37
SPEED SENSOR OPERATION, WHEEL......5-37
SPEED SENSOR, PUMP MOTOR;
ANTI-LOCK BRAKES (XJ)............8W-32-2
SPEED SENSOR, PUMP MOTOR;
ANTI-LOCK BRAKES (XJ-RHD)........8W-32-2
SPEED SENSOR, PUMP MOTOR;
ANTI-LOCK BRAKES (YJ)............8W-32-1
SPEED SENSOR ROTORÐ
SPEEDOMETER DRIVE GEAR..........21-193
SPEED SENSOR TEST, VEHICLE.........14-48
SPEED SENSOR, VEHICLE; FUEL
SYSTEM............................14-66
SPEED SENSOR, VEHICLE; FUEL/
IGNITION (XJ).....................8W-30-2
SPEED SENSOR, VEHICLE; FUEL/
IGNITION (YJ).....................8W-30-3
SPEED SENSOR, VEHICLE; VEHICLE
SPEED CONTROL SYSTEM..........8H-1,8H-5
SPEED SENSOR, VEHICLE; FUEL/
IGNITION (XJ-RHD)................8W-30-2
SPEED SENSORÐPCM INPUT, VEHICLE . . 14-25
SPEED SENSORS, WHEEL; ANTI-LOCK
BRAKES (XJ)......................8W-32-1
SPEED SENSORS, WHEEL; ANTI-LOCK
BRAKES (XJ-RHD).................8W-32-1
SPEED SENSORS, WHEEL; ANTI-LOCK
BRAKES (YJ)
......................8W-32-1
SPEED SENSORS, WHEEL; BRAKES
.......5-34
SPEEDOMETER; INSTRUMENT CLUSTER
(XJ)
.............................8W-40-2
SPEEDOMETER; INSTRUMENT CLUSTER
(XJ-RHD)
.........................8W-40-1
SPEEDOMETER CABLE
.................0-33
SPEEDOMETER SERVICE
. . 21-109,21-287,21-309
SPLASH APRONSÐYJ, FENDER
........23-115
SPLASH LINERSÐYJ, WHEELHOUSE
....23-115
SPLASH SHIELD, GENERATOR
..........13-13
SPLASH SHIELDÐXJ VEHICLES, FUEL
FILLER HOSE
.........................13-4
SPLASH SHIELDSÐYJ, FENDER INNER
. . 23-116
SPLICE INDEX; SPLICE INFORMATION
(XJ)
.............................8W-70-1
SPLICE INDEX; SPLICE INFORMATION
(XJ-RHD)
.........................8W-70-1
26 INDEXJ
Description Group-Page Description Group-Page Description Group-Page