KIA AMANTI 2009 Owners Manual
Manufacturer: KIA, Model Year: 2009, Model line: AMANTI, Model: KIA AMANTI 2009Pages: 321, PDF Size: 23.77 MB
Page 111 of 321
399
Knowing your vehicle
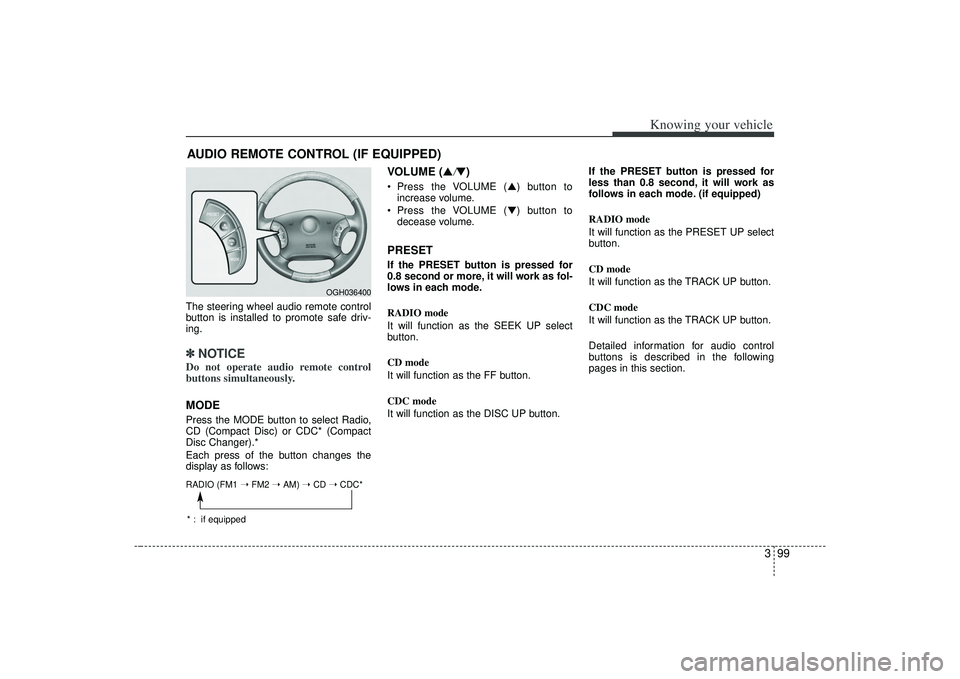
The steering wheel audio remote control
button is installed to promote safe driv-
ing.✽ ✽NOTICEDo not operate audio remote control
buttons simultaneously.MODEPress the MODE button to select Radio,
CD (Compact Disc) or CDC* (Compact
Disc Changer).*
Each press of the button changes the
display as follows:
VOLUME (▲
/▼)
Press the VOLUME ( ▲) button to
increase volume.
Press the VOLUME ( ▼) button to
decease volume.PRESETIf the PRESET button is pressed for
0.8 second or more, it will work as fol-
lows in each mode.
RADIO mode
It will function as the SEEK UP select
button.
CD mode
It will function as the FF button.
CDC mode
It will function as the DISC UP button. If the PRESET button is pressed for
less than 0.8 second, it will work as
follows in each mode. (if equipped)
RADIO mode
It will function as the PRESET UP select
button.
CD mode
It will function as the TRACK UP button.
CDC mode
It will function as the TRACK UP button.
Detailed information for audio control
buttons is described in the following
pages in this section.
AUDIO REMOTE CONTROL (IF EQUIPPED)
OGH036400
RADIO (FM1
➝ FM2 ➝ AM) ➝ CD ➝ CDC** : if equipped
Page 112 of 321
Knowing your vehicle100
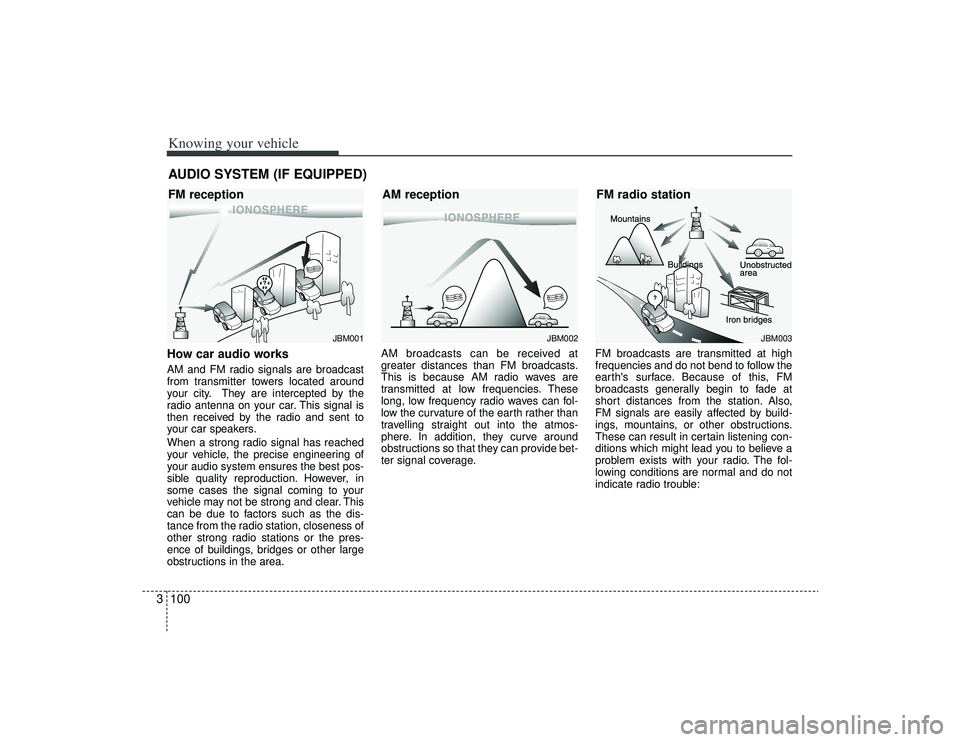
3How car audio worksAM and FM radio signals are broadcast
from transmitter towers located around
your city. They are intercepted by the
radio antenna on your car. This signal is
then received by the radio and sent to
your car speakers.
When a strong radio signal has reached
your vehicle, the precise engineering of
your audio system ensures the best pos-
sible quality reproduction. However, in
some cases the signal coming to your
vehicle may not be strong and clear. This
can be due to factors such as the dis-
tance from the radio station, closeness of
other strong radio stations or the pres-
ence of buildings, bridges or other large
obstructions in the area. AM broadcasts can be received at
greater distances than FM broadcasts.
This is because AM radio waves are
transmitted at low frequencies. These
long, low frequency radio waves can fol-
low the curvature of the earth rather than
travelling straight out into the atmos-
phere. In addition, they curve around
obstructions so that they can provide bet-
ter signal coverage.
FM broadcasts are transmitted at high
frequencies and do not bend to follow the
earth's surface. Because of this, FM
broadcasts generally begin to fade at
short distances from the station. Also,
FM signals are easily affected by build-
ings, mountains, or other obstructions.
These can result in certain listening con-
ditions which might lead you to believe a
problem exists with your radio. The fol-
lowing conditions are normal and do not
indicate radio trouble:AUDIO SYSTEM (IF EQUIPPED)
¢¢¢
JBM001
¢¢¢
¢¢¢JBM002
JBM003
FM reception
AM receptionFM radio station
Page 113 of 321
3101
Knowing your vehicle
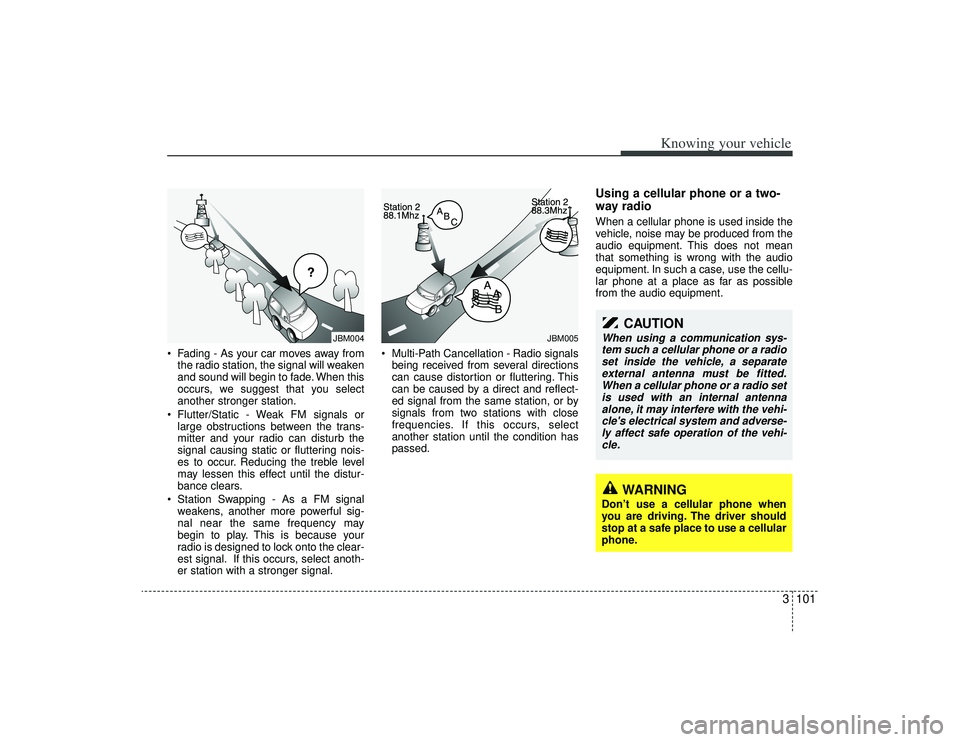
• Fading - As your car moves away fromthe radio station, the signal will weaken
and sound will begin to fade. When this
occurs, we suggest that you select
another stronger station.
Flutter/Static - Weak FM signals or large obstructions between the trans-
mitter and your radio can disturb the
signal causing static or fluttering nois-
es to occur. Reducing the treble level
may lessen this effect until the distur-
bance clears.
Station Swapping - As a FM signal weakens, another more powerful sig-
nal near the same frequency may
begin to play. This is because your
radio is designed to lock onto the clear-
est signal. If this occurs, select anoth-
er station with a stronger signal. Multi-Path Cancellation - Radio signals
being received from several directions
can cause distortion or fluttering. This
can be caused by a direct and reflect-
ed signal from the same station, or by
signals from two stations with close
frequencies. If this occurs, select
another station until the condition has
passed.
Using a cellular phone or a two-
way radio When a cellular phone is used inside the
vehicle, noise may be produced from the
audio equipment. This does not mean
that something is wrong with the audio
equipment. In such a case, use the cellu-
lar phone at a place as far as possible
from the audio equipment.
¢¢¢
JBM004
JBM005
CAUTION
When using a communication sys-tem such a cellular phone or a radioset inside the vehicle, a separate external antenna must be fitted.When a cellular phone or a radio setis used with an internal antenna alone, it may interfere with the vehi-cle's electrical system and adverse- ly affect safe operation of the vehi-cle.
WARNING
Don’t use a cellular phone when
you are driving. The driver should
stop at a safe place to use a cellular
phone.
Page 114 of 321
Knowing your vehicle102
3Care of disc (if equipped) If the temperature inside the car is too
high, open the car windows for ventilation
before using your car audio.
Do not apply volatile agents such as benzene and thinner, normal cleaners
and magnetic sprays made for ana-
logue disc onto CDs.
To prevent the disc surface from get- ting damaged. Hold and carry CDs by
the edges or the edges of the center
hole only.
Clean the disc surface with a piece of soft cloth before playback (wipe it from the
center to the outside edge.)
Do not damage the disc surface or attach pieces of sticky tape or paper
onto it.
Make sure on undesirable matter other than CDs are inserted into the CD
player (Do not insert more than one
CD at a time).
Keep CDs in their cases after use to protect them from scratches or dirt. Depending on the type of CD-R/CD-
RW CDs, certain CDs may not operate
normally according to manufacturing
companies or making and recording
methods. In such circumstances, if you
still continue to use those CDs, they
may cause the malfunction of your car
audio system.
✽ ✽ NOTICE
- Playing an
Incompatible Copy-Protected
Audio CD
Some copy-protected CDs, which do not
comply with the international audio CD
standards (Red Book), may not play on
your car audio. Please note that if you
try to play copy protected CDs and the
CD player of your car audio is not per-
forming to your expectation, this may be
caused by those CDs and not a defect in
the device itself. Please replace those
CDs.
Page 115 of 321
3103
Knowing your vehicle
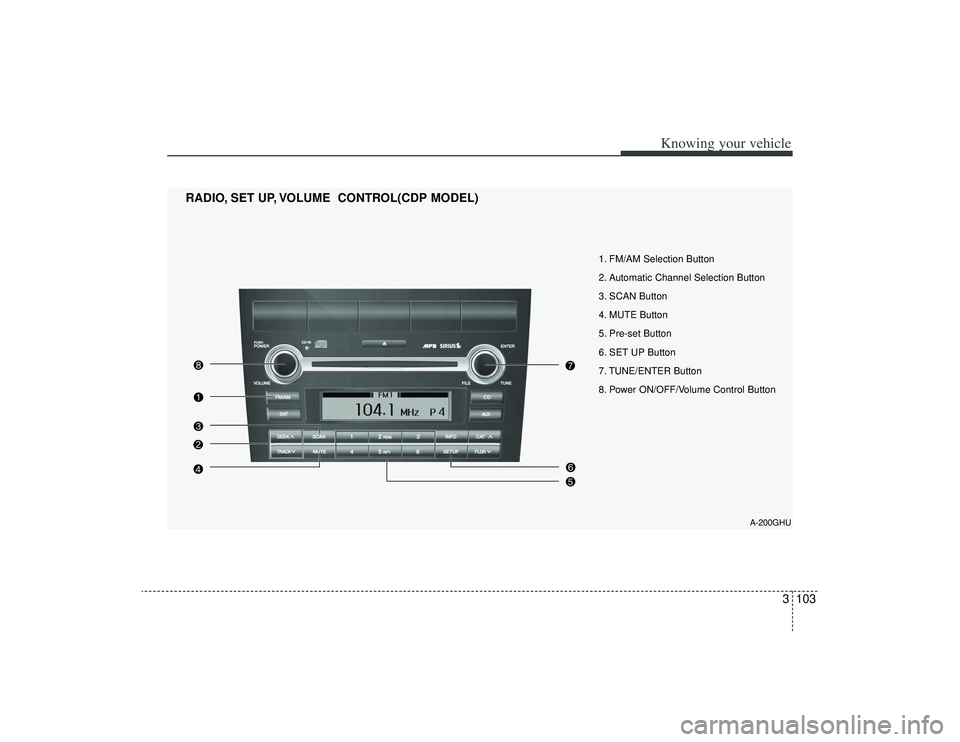
A-200GHU
1. FM/AM Selection Button
2. Automatic Channel Selection Button
3. SCAN Button
4. MUTE Button
5. Pre-set Button
6. SET UP Button
7. TUNE/ENTER Button
8. Power ON/OFF/Volume Control Button
RADIO, SET UP, VOLUME CONTROL(CDP MODEL)
Page 116 of 321
Knowing your vehicle104
3
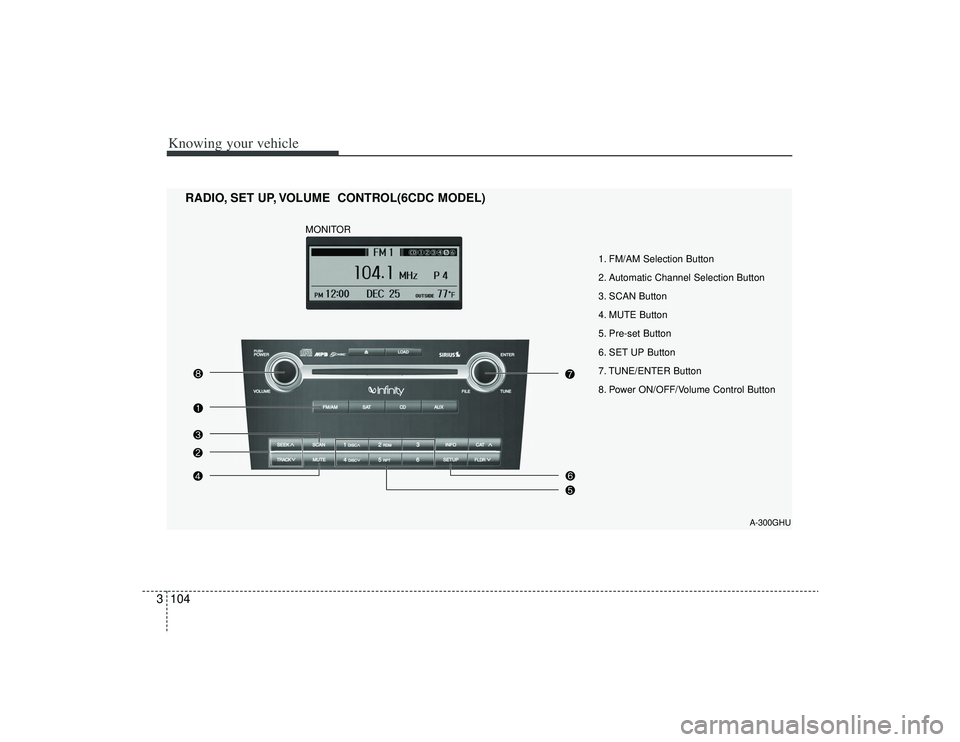
A-300GHU
1. FM/AM Selection Button
2. Automatic Channel Selection Button
3. SCAN Button
4. MUTE Button
5. Pre-set Button
6. SET UP Button
7. TUNE/ENTER Button
8. Power ON/OFF/Volume Control Button
RADIO, SET UP, VOLUME CONTROL(6CDC MODEL)
MONITOR
Page 117 of 321
3105
Knowing your vehicle
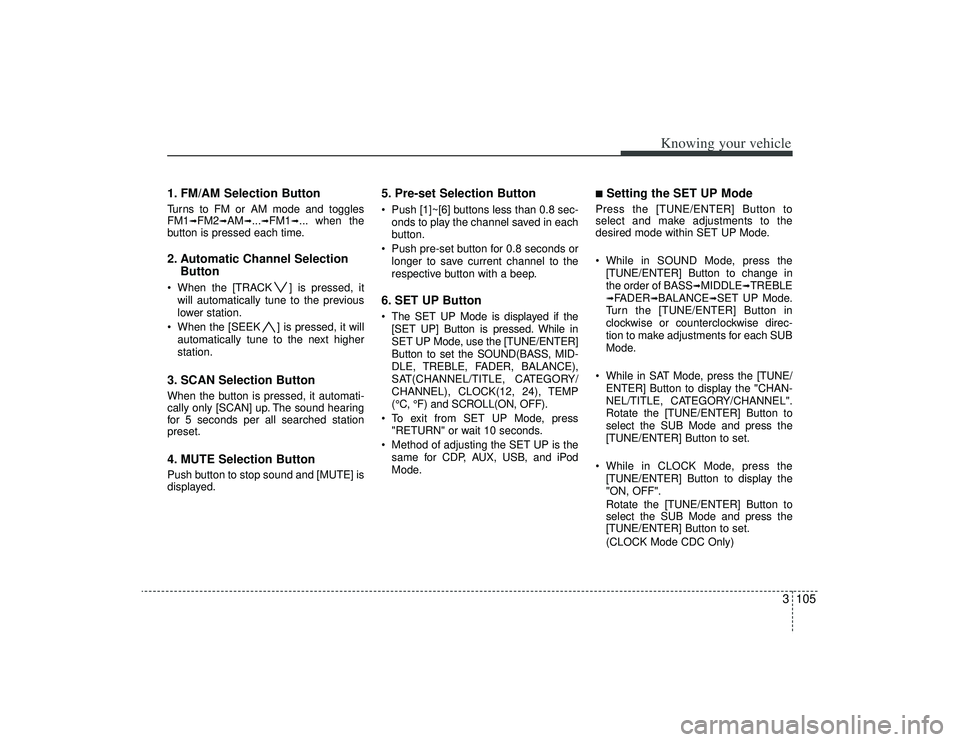
1. FM/AM Selection ButtonTurns to FM or AM mode and toggles
FM1
➟FM2
➟AM
➟...➟FM1
➟... when the
button is pressed each time.
2. Automatic Channel Selection Button When the [TRACK ] is pressed, it
will automatically tune to the previous
lower station.
When the [SEEK ] is pressed, it will automatically tune to the next higher
station.3. SCAN Selection ButtonWhen the button is pressed, it automati-
cally only [SCAN] up. The sound hearing
for 5 seconds per all searched station
preset.4. MUTE Selection ButtonPush button to stop sound and [MUTE] is
displayed.
5. Pre-set Selection Button Push [1]~[6] buttons less than 0.8 sec-onds to play the channel saved in each
button.
Push pre-set button for 0.8 seconds or longer to save current channel to the
respective button with a beep.6. SET UP Button The SET UP Mode is displayed if the[SET UP] Button is pressed. While in
SET UP Mode, use the [TUNE/ENTER]
Button to set the SOUND(BASS, MID-
DLE, TREBLE, FADER, BALANCE),
SAT(CHANNEL/TITLE, CATEGORY/
CHANNEL), CLOCK(12, 24), TEMP
(°C, °F) and SCROLL(ON, OFF).
To exit from SET UP Mode, press "RETURN" or wait 10 seconds.
Method of adjusting the SET UP is the same for CDP, AUX, USB, and iPod
Mode.
■Setting the SET UP Mode Press the [TUNE/ENTER] Button to
select and make adjustments to the
desired mode within SET UP Mode.
While in SOUND Mode, press the[TUNE/ENTER] Button to change in
the order of BASS
➟MIDDLE
➟TREBLE
➟FADER
➟BALANCE
➟SET UP Mode.
Turn the [TUNE/ENTER] Button in
clockwise or counterclockwise direc-
tion to make adjustments for each SUB
Mode.
While in SAT Mode, press the [TUNE/ ENTER] Button to display the "CHAN-
NEL/TITLE, CATEGORY/CHANNEL".
Rotate the [TUNE/ENTER] Button to
select the SUB Mode and press the
[TUNE/ENTER] Button to set.
While in CLOCK Mode, press the [TUNE/ENTER] Button to display the
"ON, OFF".
Rotate the [TUNE/ENTER] Button to
select the SUB Mode and press the
[TUNE/ENTER] Button to set.
(CLOCK Mode CDC Only)
Page 118 of 321
![KIA AMANTI 2009 Owners Manual Knowing your vehicle106
3 While in TEMP Mode, press the [TUNE
/ENTER] Button to display the "°C, °F".
Rotate the [TUNE/ENTER] Button to
select the SUB Mode and press the
[TUNE/ENTER] Button to set.
KIA AMANTI 2009 Owners Manual Knowing your vehicle106
3 While in TEMP Mode, press the [TUNE
/ENTER] Button to display the "°C, °F".
Rotate the [TUNE/ENTER] Button to
select the SUB Mode and press the
[TUNE/ENTER] Button to set.](/img/2/57931/w960_57931-117.png)
Knowing your vehicle106
3 While in TEMP Mode, press the [TUNE
/ENTER] Button to display the "°C, °F".
Rotate the [TUNE/ENTER] Button to
select the SUB Mode and press the
[TUNE/ENTER] Button to set.
(TEMP Mode CDC Only)
While in SCROLL Mode, press the [TUNE/ENTER] Button to display the
"ON, OFF".
Rotate the [TUNE/ENTER] Button to
select the SUB Mode and press the
[TUNE/ENTER] Button to set.7. TUNE/ENTER Button Turn this button clockwise by one notchto increase frequency by 200KHz(AM:
10KHz) from current frequency.
Turn this button counterclockwise by one notch to decrease frequency by
200KHz(AM:10KHz)from current fre-
quency.
Press this button while holding SET UP button to activate/inactivate the
item to select SET UP item using left
and right function of the Tune button.
8. Power ON/OFF & Volume Control ButtonTurns on/off the set when the IGNITION
SWITCH is on ACC or ON. If the button
is turned to the right, it increases the vol-
ume and left, decreases the volume.
channel is found.
Page 119 of 321
3107
Knowing your vehicle
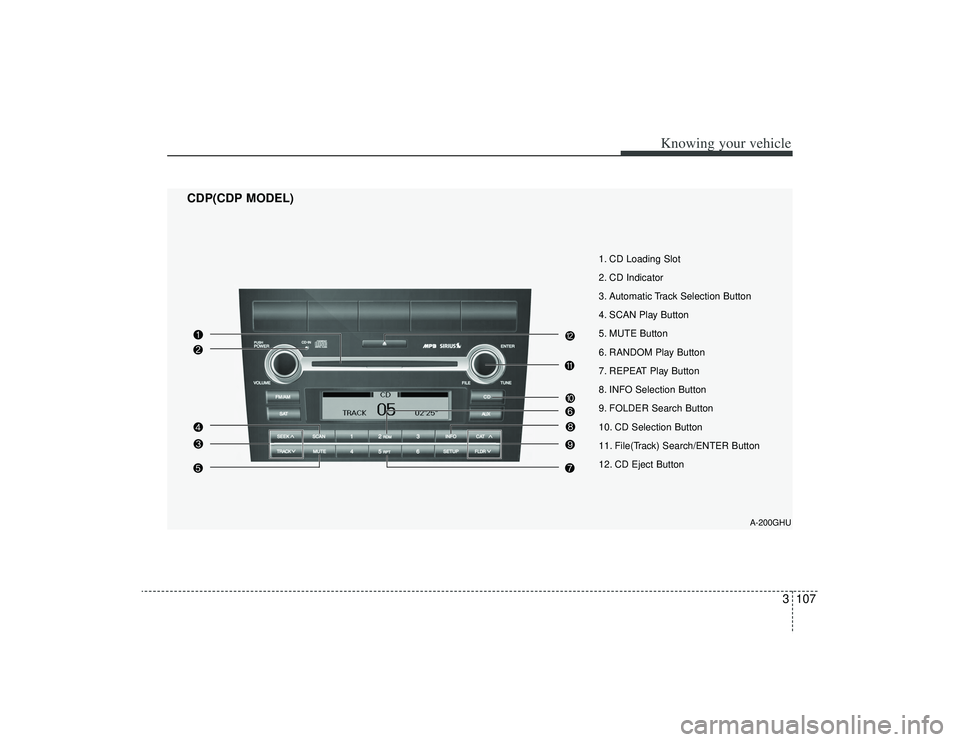
A-200GHU
1. CD Loading Slot
2. CD Indicator
3. Automatic Track Selection Button
4. SCAN Play Button
5. MUTE Button
6. RANDOM Play Button
7. REPEAT Play Button
8. INFO Selection Button
9. FOLDER Search Button
10. CD Selection Button
11. File(Track) Search/ENTER Button
12. CD Eject Button
CDP(CDP MODEL)
Page 120 of 321
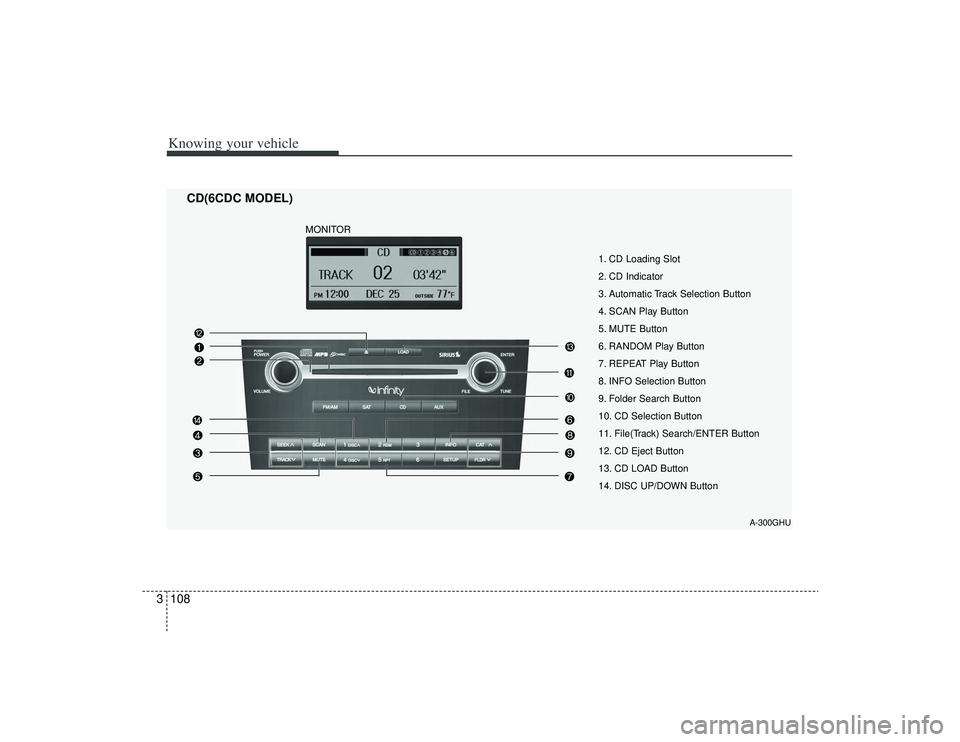
Knowing your vehicle108
3
A-300GHU
1. CD Loading Slot
2. CD Indicator
3. Automatic Track Selection Button
4. SCAN Play Button
5. MUTE Button
6. RANDOM Play Button
7. REPEAT Play Button
8. INFO Selection Button
9. Folder Search Button
10. CD Selection Button
11. File(Track) Search/ENTER Button
12. CD Eject Button
13. CD LOAD Button
14. DISC UP/DOWN Button
CD(6CDC MODEL)
MONITOR