KIA AMANTI 2009 Owners Manual
Manufacturer: KIA, Model Year: 2009, Model line: AMANTI, Model: KIA AMANTI 2009Pages: 321, PDF Size: 23.77 MB
Page 131 of 321
3119
Knowing your vehicle
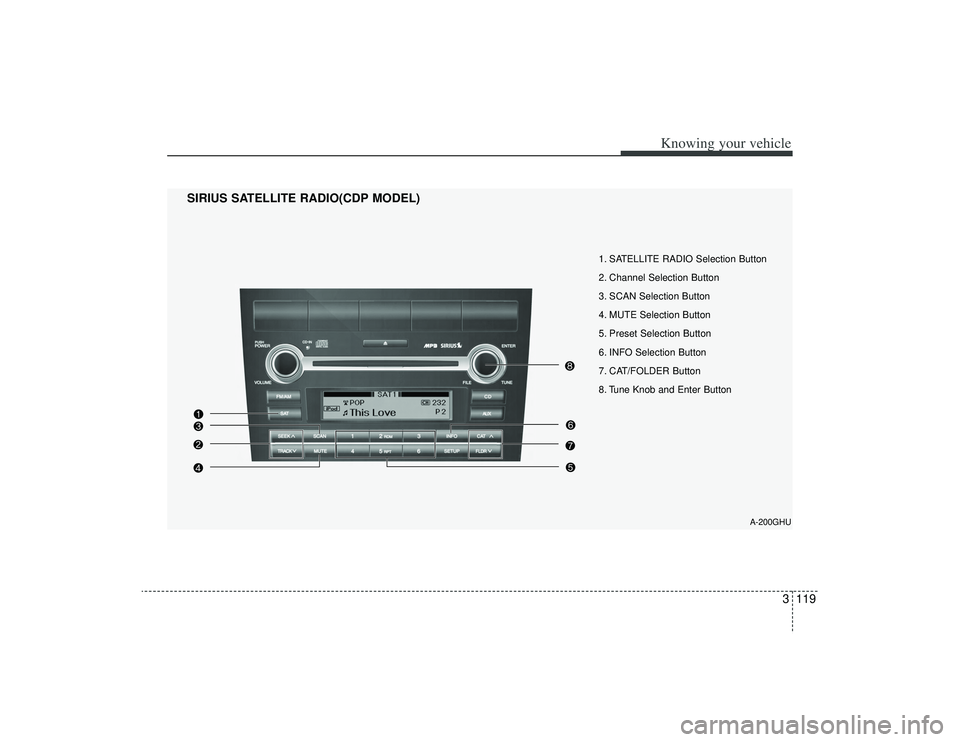
1. SATELLITE RADIO Selection Button
2. Channel Selection Button
3. SCAN Selection Button
4. MUTE Selection Button
5. Preset Selection Button
6. INFO Selection Button
7. CAT/FOLDER Button
8. Tune Knob and Enter Button
SIRIUS SATELLITE RADIO(CDP MODEL)
A-200GHU
Page 132 of 321
Knowing your vehicle120
3
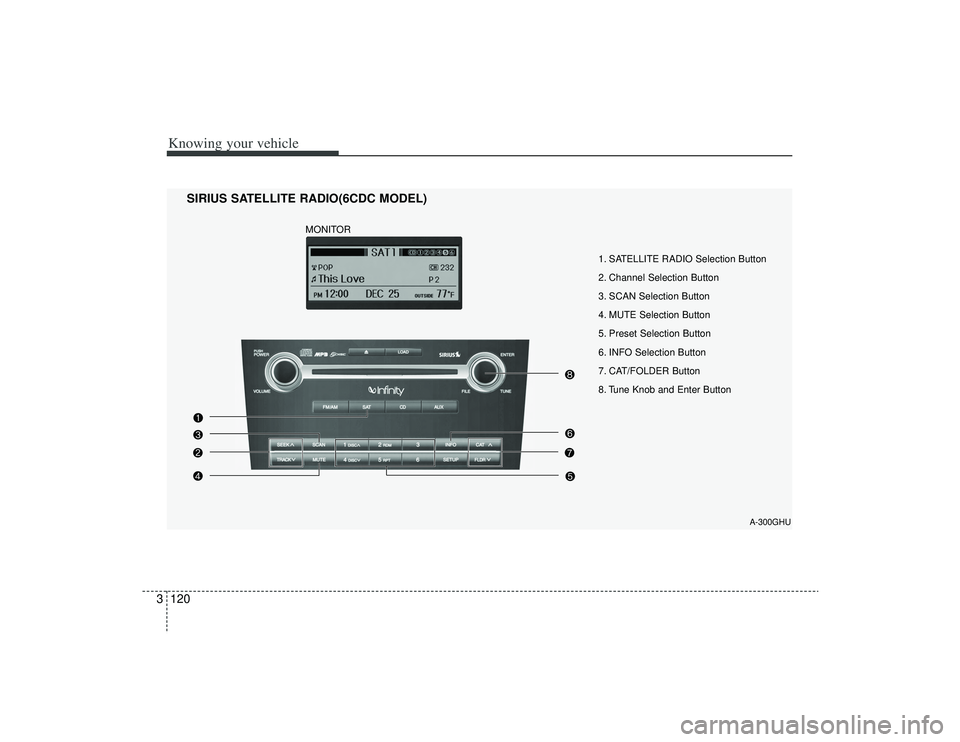
1. SATELLITE RADIO Selection Button
2. Channel Selection Button
3. SCAN Selection Button
4. MUTE Selection Button
5. Preset Selection Button
6. INFO Selection Button
7. CAT/FOLDER Button
8. Tune Knob and Enter Button
SIRIUS SATELLITE RADIO(6CDC MODEL)
A-300GHU
MONITOR
Page 133 of 321
3121
Knowing your vehicle
How to Use SIRIUS Satellite
RadioYour new Kia vehicle is equipped with 3
months complimentary period of SIRIUS
Satellite Radio so you have access to
over 130 channels of music, information
and entertainment programming.ActivationIn order to extend or reactivate your sub-
scription to SIRIUS Satellite Radio, you
will need to contact SIRIUS Customer
Care at 888-539-7474. Have your 12 digit
SID(Sirius Identification Number)/ESN
(Electronic Serial Number) ready. To
retrieve the SID/ESN, turn on the radio,
press the [SAT] button and tune to chan-
nel zero. please note that the vehicle will
need to be turned on, in Sirius mode, and
have an unobstructed view of the sky in
order for the radio to receive the activation
signal.1. SATELLITE RADIO SelectionButton(SIRIUS Satellite Radio)Press the [SAT] button to switch to SIR-
IUS Satellite Radio. It cycles through the
different bands as noted below.
SAT1
➟SAT2
➟SAT3
➟SAT1
➟...
2. Channel Selection Button Press [TRACK ] or [SEEK ] but-
ton for less than 0.8 seconds to select
previous or next channel.
Press [TRACK ] or [SEEK ] but- ton for 0.8 or longer to continuously
move to previous or next channel.
if "CATEGORY" Icon is displayed at the top of the screen, channel up/down is
done through the channels within cur-
rent category.3. SCAN Selection Button When the button is pressed, it automat-ically scans the radio stations upwards.
The SCAN feature steps through each channel, starting from the initial chan-
nel, for ten seconds. Press the [SCAN]
button again to stop the scan feature
and to listen to the currently selected
channel.4. MUTE Selection ButtonPress this button to temporarily cut off
the Sound. "MUTE" is displayed on the
LCD. Press the button once again to can-
cel MUTE mode.
5. Preset Selection Button Press [1]~[6] buttons less than 0.8seconds to play the Channel saved in
each button.
Press [1]~[6] button for 0.8 seconds or longer to save current Channel to the
respective button with a beep.6. INFO Selection ButtonDisplays the information of the channel
currently played by in the order of CATE-
GORY NAME
➟ARTIST NAME
➟COM-
POSER NAME
➟...(CH/TITLE Selection)
Displays the information of the channel
currently played in the order of SONG
TITLE
➟ARTIST NAME
➟COMPOSER
NAME
➟... (CAT/CH Selection) (If there is
no information of COMPOSER NAME, it
returns to main display.)
Page 134 of 321
![KIA AMANTI 2009 Owners Manual Knowing your vehicle122
37. CAT/FOLDER Button Press [CAT ] or [FLDR ] button to
enter the Category list Mode, it dis-
plays cateogry items and highlights the
category that currently tuned channel
belo KIA AMANTI 2009 Owners Manual Knowing your vehicle122
37. CAT/FOLDER Button Press [CAT ] or [FLDR ] button to
enter the Category list Mode, it dis-
plays cateogry items and highlights the
category that currently tuned channel
belo](/img/2/57931/w960_57931-133.png)
Knowing your vehicle122
37. CAT/FOLDER Button Press [CAT ] or [FLDR ] button to
enter the Category list Mode, it dis-
plays cateogry items and highlights the
category that currently tuned channel
belongs to.
On Category List Mode, press these buttons to navigate category list.
Press [ENTER] Button to select the lowest channel in highlighted category.
If channel is selected by selecting cat- egory CATEGORY Icon is displayed at
the top of the screen.8. Tune Knob and Enter Button Rotate clockwise to increase the chan-nel number or to down the category in
the category list.
Rotate counterclockwise to decrease the channel number or to up the cate-
gory in the category list.
Press this button to make selection of channels or items.
❈ ❈ Troubleshooting1. Antenna Error
If this message is displayed, the antenna
or antenna cable is broken or unplugged.
Please consult with your Kia dealership.
2. Acquiring Signal
If this message is displayed, it means that
the antenna is covered and that the SIR-
IUS Satellite Radio signal is not available.
Ensure the antenna is uncovered and has
a clear view of the sky.
Page 135 of 321
3123
Knowing your vehicle
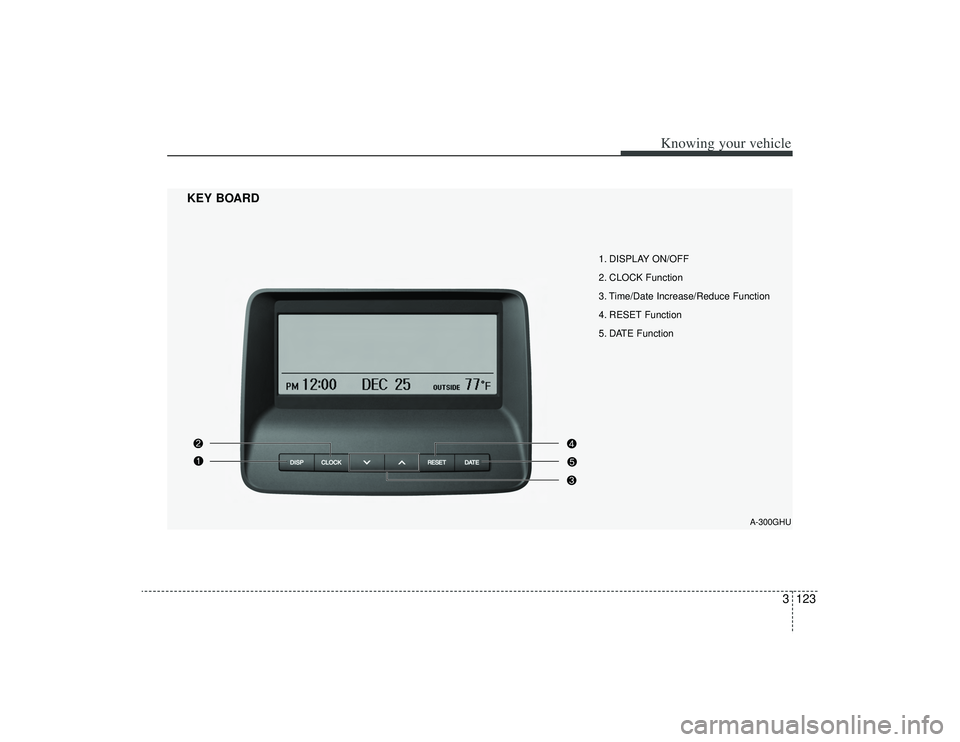
1. DISPLAY ON/OFF
2. CLOCK Function
3. Time/Date Increase/Reduce Function
4. RESET Function
5. DATE Function
KEY BOARD
A-300GHU
Page 136 of 321
![KIA AMANTI 2009 Owners Manual Knowing your vehicle124
31. DISPLAY ON/OFF This is the display window ON/OFF
function.
Each time the [DISP] button is pressed, the display window will be turned
ON/OFF.2. CLOCK Function This is the KIA AMANTI 2009 Owners Manual Knowing your vehicle124
31. DISPLAY ON/OFF This is the display window ON/OFF
function.
Each time the [DISP] button is pressed, the display window will be turned
ON/OFF.2. CLOCK Function This is the](/img/2/57931/w960_57931-135.png)
Knowing your vehicle124
31. DISPLAY ON/OFF This is the display window ON/OFF
function.
Each time the [DISP] button is pressed, the display window will be turned
ON/OFF.2. CLOCK Function This is the clock adjustment function.
Each time [CLOCK] is pressed, thesecond
➟minute will blink once every
0.5 seconds and switch modes.
Pressing the [CLOCK] again while the "minute" mode is blinking or waiting 10
seconds will turn off time adjustment
mode and save the set time.
The clock can be set in 12 hour or 24 hour modes. The 12 hour system is the
default and can be changed to 24 hour
system within the SET-UP menu.
3. Time/Date Increase/Decrease Function While in Time/Date mode, pressing the
[ ], [ ] buttons will increase/
decrease the time/date.
This function will operate only after pressing the time/date button and the
hour/minute/month/day is blinking.
4. RESET Function The RESET function can be usedwhen adjusting the time.
If the [RESET] is pressed while adjust- ing the "hour", the hour will display
"AM12" when using 12 hour clock
mode and "00" when using 24 hour
clock mode.
If the RESET is pressed while adjust- ing the "min", the minute display will be
changed to "00".
The RESET function can be used while adjusting the date.
If the [RESET] is pressed while adjust- ing the "month/day", the corresponding
display will be changed to "01month/
01day".
5. DATE Function This is used to adjust the date.
Each time [DATE] is pressed, the mon-th
➟day will blink once every 0.5 sec-
onds and switch modes.
Pressing the [DATE] again while the "day" is blinking or waiting 10 seconds
will turn off date adjustment mode and
save the set date.
❈Slight differences with actual time may
occur. Please readjust the time upon
the occurrence of such differences.
Page 137 of 321
4
Ignition switch / 4-2
Starting the engine / 4-4
Automatic transaxle / 4-5
Brake system / 4-10
Steering wheel / 4-17
Cruise control system / 4-19
Electronic stability control / 4-22
Instrument cluster / 4-25
Warnings and indicators / 4-31
Lighting / 4-38
Wipers and washers / 4-42
Defroster / 4-44
Hazard warning flasher / 4-45
Automatic climate control system / 4-46
Windshield defrosting and defogging / 4-56
Driving your vehicle
Page 138 of 321
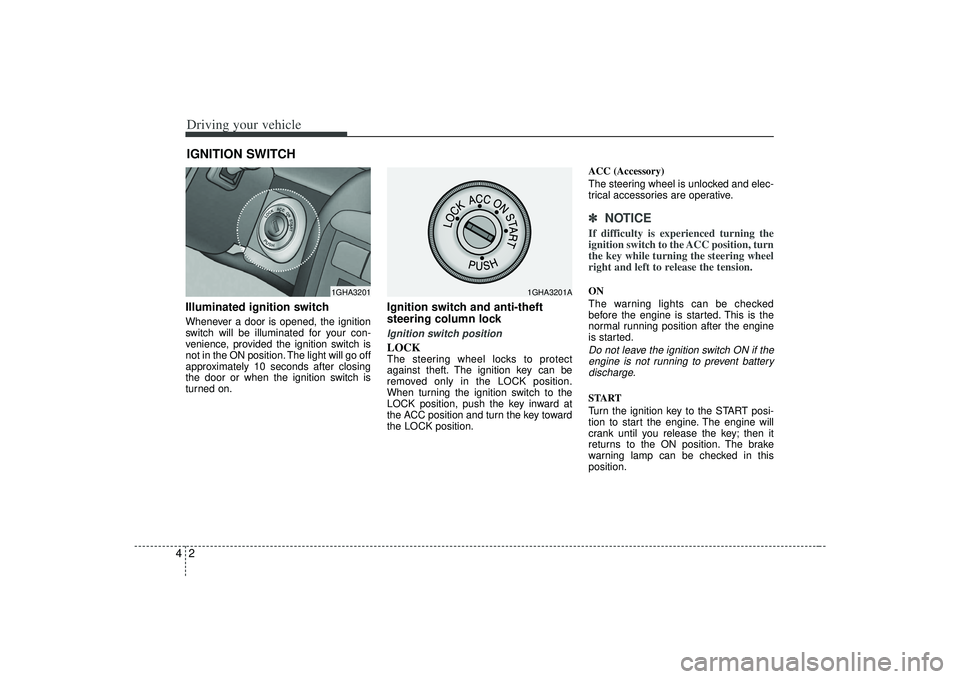
Driving your vehicle24Illuminated ignition switchWhenever a door is opened, the ignition
switch will be illuminated for your con-
venience, provided the ignition switch is
not in the ON position. The light will go off
approximately 10 seconds after closing
the door or when the ignition switch is
turned on.
Ignition switch and anti-theft
steering column lock Ignition switch positionLOCKThe steering wheel locks to protect
against theft. The ignition key can be
removed only in the LOCK position.
When turning the ignition switch to the
LOCK position, push the key inward at
the ACC position and turn the key toward
the LOCK position.ACC (Accessory)
The steering wheel is unlocked and elec-
trical accessories are operative.
✽ ✽
NOTICEIf difficulty is experienced turning the
ignition switch to the ACC position, turn
the key while turning the steering wheel
right and left to release the tension.ON
The warning lights can be checked
before the engine is started. This is the
normal running position after the engine
is started.Do not leave the ignition switch ON if the
engine is not running to prevent batterydischarge.START
Turn the ignition key to the START posi-
tion to start the engine. The engine will
crank until you release the key; then it
returns to the ON position. The brake
warning lamp can be checked in this
position.
IGNITION SWITCH
1GHA3201
1GHA3201A
Page 139 of 321
43
Driving your vehicle
Automatic transaxleWhen turning the ignition switch to the
LOCK position, the shift lever must be in
the P (Park) position.
WARNING
- Ignition switch
• Never turn the ignition switch toLOCK or ACC while the vehicle is
moving. This would result in loss
of directional control and braking
function, which could cause an
immediate accident.
The anti-theft steering column lock is not a substitute for the
parking brake. Before leaving the
driver’s seat, always make sure
the shift lever is engaged in P
(Park), set the parking brake fully
and shut the engine off.
Unexpected and sudden vehicle
movement may occur if these pre-
cautions are not taken.
Never reach for the ignition switch, or any other controls
through the steering wheel while
the vehicle is in motion. The pres-
ence of your hand or arm in this
area could cause a loss of vehicle
control, an accident and serious
bodily injury or death.
Do not put any movable things around the driver’s seat as they
can disturb your driving and may
cause accidents.
WARNING
When you intend to park or stop the
vehicle with the engine on, be care-
ful not to depress the accelerator
pedal for a long period of time. It
may overheat the engine or exhaust
system and cause fire.
Page 140 of 321
Driving your vehicle441. Make sure the parking brake isapplied.
2. Place the transaxle shift lever in P (Park). Depress the brake pedal fully.
You can also start the engine when the shift lever is in the N (Neutral)
position.
3. Turn the ignition switch to START and hold it there until the engine starts (a
maximum of 10 seconds), then
release the key.
4. In extremely cold weather (below -18°C / 0°F) or after the vehicle has
not been operated for several days, let
the engine warm up without depress-
ing the accelerator.Whether the engine is cold or warm, itshould be started without depressingthe accelerator.STARTING THE ENGINE
CAUTION
If the engine stalls while you are inmotion, do not attempt to move the shift lever to the P (Park) position. Iftraffic and road conditions permit,you may put the shift lever in the N(Neutral) position while the vehicleis still moving and turn the ignition switch to the START position in anattempt to restart the engine.
WARNING
Always wear appropriate shoes
when operating your vehicle.
Unsuitable shoes (high heels, ski
boots,etc.) may interfere with your
ability to use the brake and acceler-
ator pedal.