ECO mode KIA AMANTI 2009 Owners Manual
[x] Cancel search | Manufacturer: KIA, Model Year: 2009, Model line: AMANTI, Model: KIA AMANTI 2009Pages: 321, PDF Size: 23.77 MB
Page 3 of 321
i
Thank you for choosing a Kia vehicle.
When you require service, remember that your dealer knows
your vehicle best. Your dealer has factory-trained technicians,
recommended special tools, genuine Kia replacement parts and
is dedicated to your complete satisfaction.
Because subsequent owners require this important information
as well, this publication should remain with the vehicle if it is
sold.
This manual will familiarize you with operational, mainte-
nance and safety information about your new vehicle. It is sup-
plemented by a Warranty and Consumer Information manual
that provides important information on all warranties regarding
your vehicle. If your vehicle is equipped with an audio system,
you will also have a Kia Integrated Audio System manual
explaining its operation. We urge you to read these publica-
tions carefully and follow the recommendations to help assure
enjoyable and safe operation of your new vehicle.
Kia offers a great variety of options, components and features
for its various models.
Therefore, the equipment described in this manual, along with
the various illustrations, may not all be applicable to your par-
ticular vehicle.
The information and specifications provided in this manual
were accurate at the time of printing. Kia reserves the right to
discontinue or change specifications or design at any time
without notice and without incurring any obligation. If you
have questions, always check with your Kia Dealer.
We assure you of our continuing interest in your motoring
pleasure and satisfaction in your Kia vehicle.
© 2008 Kia Motors Corp.
All rights reserved. May not be reproduced or translated in
whole or in part without the written consent of Kia Motors
America, Inc.
Printed in KoreaForeword
Page 45 of 321
333
Knowing your vehicle
Since the inertial locks do not require a
collision in order to lock up, you may
become aware of the safety belts locking
while braking or going around sharp cor-
ners.The rear safety belts use a special auto-
lock feature designed to allow a child
restraint to be used without an added
locking clip. These safety belt positions
normally lock only under extreme or
emergency conditions (emergency lock
mode). However, they can be adjusted so
that they remain in fixed and locked when
a child restraint system is in place. (Use
this auto-lock mode only to secure a child
restraint, never for passengers restrained
by the safety belts.) Page 3-46 gives
instructions on placing the safety belt in
the auto lock mode.
The driver’s safety belt can only operate
in the emergency lock mode.Safety belts provide the best restraint
when:
The seatback is upright.
The occupant is sitting upright (not
slouched).
The lap belt is snug across the hips.
The shoulder belt is snug across the chest.
The knees are straight forward.
To help you remember to fasten your
safety belt, a warning light will come on
and a chime will sound. See Safety Belt
Warning Light and Chime on page 3-35.
WARNING
Always use the rear seat position(s)
to install your child restraint(s).
Never install a child restraint sys-
tem in the front passenger position,
as an inflating air bag could cause
serious or fatal injury to a child in
that position.
WARNING
- After a colli- sion
Lap/shoulder belt assemblies
may be stretched or damaged
when subjected to the stress and
forces of a collision.
The entire restraint system should be inspected following
any collision. All belts, retractors,
anchors and hardware damaged
by a collision should be replaced
before the vehicle is operated
again.
Page 57 of 321
345
Knowing your vehicle
Installing a child restraint system For safety reasons, we recommend that
the child restraint system be used in the
rear seats.Never place a rear-facing
child restraint in the front passenger
seat, because of the danger that an
inflating passenger side air bag could
impact the rear-facing child restraint
and kill the child.
Since all passenger’s (except driver’s)
safety belts move freely under normal
conditions and only lock under extreme
or emergency conditions (emergency
lock mode), you must manually change
these safety belts to the auto lock mode
to secure a child restraint.✽ ✽ NOTICEThe driver’s safety belt incorporates the
emergency lock mode only.
WARNING
Do not install any child restraint
system in the front passenger
seat. Should an accident occur
and cause the passenger air bag
to deploy, it could severely injure
or kill an infant or child seated in
an infant or child seat. Therefore,
only use a child restraint system
in the rear seat of your vehicle.
If the child restraint seat is not anchored properly, the risk of a
child being seriously injured or
killed in a collision greatly
increases.
WARNING
Before installing the childrestraint system, read the instruc-
tions supplied by the child
restraint system manufacturer.
If the seat belt does not operate as described, have the system
checked immediately by your
authorized Kia dealer.
Failure to observe this manual instructions regarding child
restraint system and the instruc-
tions provided with the child
restraint system could increase
the chance and/or severity of
injury in an accident.
Page 68 of 321
Knowing your vehicle56
3The advanced SRS offers the ability to
control the air bag inflation with two lev-
els. A first stage level is provided for
moderate-severity impacts. A second
stage level is provided for more severe
impacts.
According to the impact severity, seating
position (only driver) and safety belt
usage, the SRSCM (SRS Control
Module) controls the air bag inflation.
Failure to properly wear safety belts
can increase the risk or severity of
injury in an accident.
Additionally, your SRS is equipped with
an occupant classification system in the
front passenger’s seat. The occupant
classification system detects the pres-
ence of a passenger in the front passen-
ger’s seat and will turn off the front pas-
senger’s air bag under certain conditions.
For more detail, see “Occupant
Classification System” later in this sec-
tion.
CAUTION
If the seat position sensor is not
working properly, the SRS air bag warning light ( ) on the instru-ment panel will illuminate even ifthere is no malfunction of the SRSair bag system, because the SRS airbag warning light is connected with the seat position sensor. If the SRSair bag warning light does not illu- minate when the ignition key isturned to the "ON" position, if it remains illuminated after blinkingfor approximately 6 seconds, or if it illuminates while the vehicle isbeing driven, have an authorizedKia dealer inspect the seat positionsensor and the advanced SRS air bag system as soon as possible.
AIR
BAG
WARNING
Modification to the seat structure
can adversely affect the seat
position sensor and cause the air
bag to deploy at a different level
than should be provided.
Failure to properly wear safety belts can increase the risk or
severity of injury by causing the
air bags to deploy at a different
level than should be provided.
Do not place any objects under- neath the driver’s seats which
could damage the seat position
sensor.
Do not place any objects that may cause magnetic fields near the
front seat. These may cause a
malfunction of the seat position
sensor.
Page 111 of 321
399
Knowing your vehicle
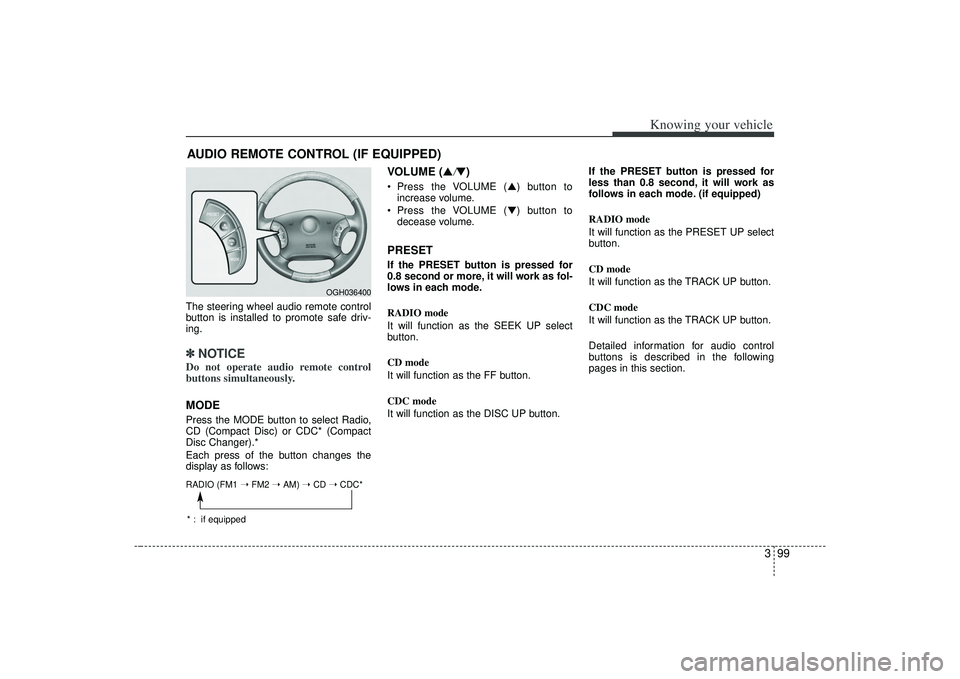
The steering wheel audio remote control
button is installed to promote safe driv-
ing.✽ ✽NOTICEDo not operate audio remote control
buttons simultaneously.MODEPress the MODE button to select Radio,
CD (Compact Disc) or CDC* (Compact
Disc Changer).*
Each press of the button changes the
display as follows:
VOLUME (▲
/▼)
Press the VOLUME ( ▲) button to
increase volume.
Press the VOLUME ( ▼) button to
decease volume.PRESETIf the PRESET button is pressed for
0.8 second or more, it will work as fol-
lows in each mode.
RADIO mode
It will function as the SEEK UP select
button.
CD mode
It will function as the FF button.
CDC mode
It will function as the DISC UP button. If the PRESET button is pressed for
less than 0.8 second, it will work as
follows in each mode. (if equipped)
RADIO mode
It will function as the PRESET UP select
button.
CD mode
It will function as the TRACK UP button.
CDC mode
It will function as the TRACK UP button.
Detailed information for audio control
buttons is described in the following
pages in this section.
AUDIO REMOTE CONTROL (IF EQUIPPED)
OGH036400
RADIO (FM1
➝ FM2 ➝ AM) ➝ CD ➝ CDC** : if equipped
Page 117 of 321
3105
Knowing your vehicle
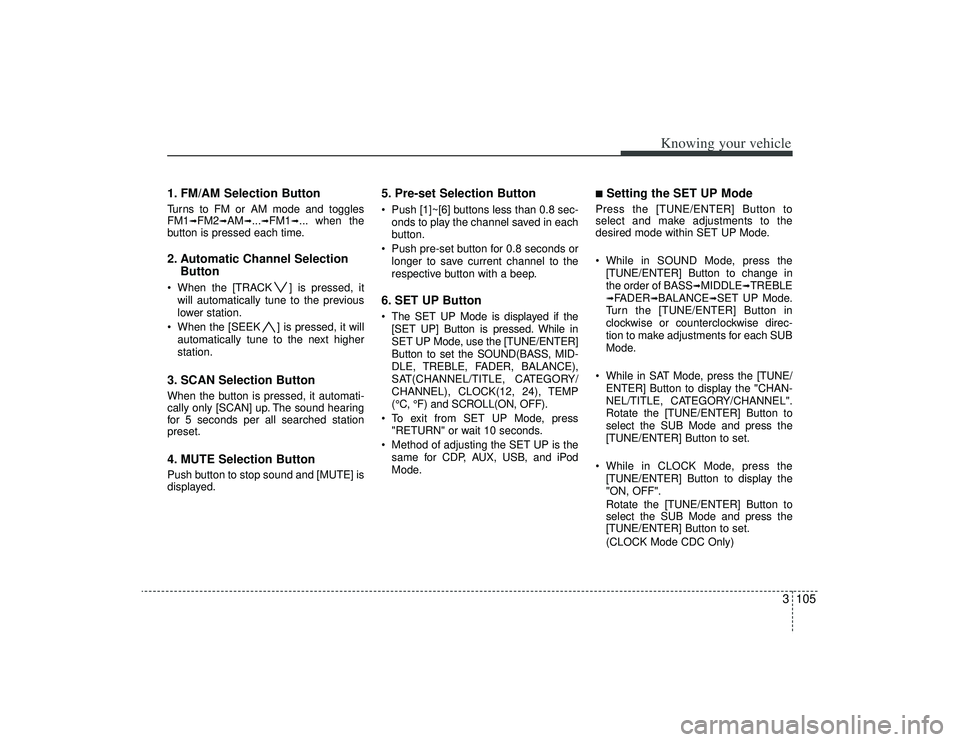
1. FM/AM Selection ButtonTurns to FM or AM mode and toggles
FM1
➟FM2
➟AM
➟...➟FM1
➟... when the
button is pressed each time.
2. Automatic Channel Selection Button When the [TRACK ] is pressed, it
will automatically tune to the previous
lower station.
When the [SEEK ] is pressed, it will automatically tune to the next higher
station.3. SCAN Selection ButtonWhen the button is pressed, it automati-
cally only [SCAN] up. The sound hearing
for 5 seconds per all searched station
preset.4. MUTE Selection ButtonPush button to stop sound and [MUTE] is
displayed.
5. Pre-set Selection Button Push [1]~[6] buttons less than 0.8 sec-onds to play the channel saved in each
button.
Push pre-set button for 0.8 seconds or longer to save current channel to the
respective button with a beep.6. SET UP Button The SET UP Mode is displayed if the[SET UP] Button is pressed. While in
SET UP Mode, use the [TUNE/ENTER]
Button to set the SOUND(BASS, MID-
DLE, TREBLE, FADER, BALANCE),
SAT(CHANNEL/TITLE, CATEGORY/
CHANNEL), CLOCK(12, 24), TEMP
(°C, °F) and SCROLL(ON, OFF).
To exit from SET UP Mode, press "RETURN" or wait 10 seconds.
Method of adjusting the SET UP is the same for CDP, AUX, USB, and iPod
Mode.
■Setting the SET UP Mode Press the [TUNE/ENTER] Button to
select and make adjustments to the
desired mode within SET UP Mode.
While in SOUND Mode, press the[TUNE/ENTER] Button to change in
the order of BASS
➟MIDDLE
➟TREBLE
➟FADER
➟BALANCE
➟SET UP Mode.
Turn the [TUNE/ENTER] Button in
clockwise or counterclockwise direc-
tion to make adjustments for each SUB
Mode.
While in SAT Mode, press the [TUNE/ ENTER] Button to display the "CHAN-
NEL/TITLE, CATEGORY/CHANNEL".
Rotate the [TUNE/ENTER] Button to
select the SUB Mode and press the
[TUNE/ENTER] Button to set.
While in CLOCK Mode, press the [TUNE/ENTER] Button to display the
"ON, OFF".
Rotate the [TUNE/ENTER] Button to
select the SUB Mode and press the
[TUNE/ENTER] Button to set.
(CLOCK Mode CDC Only)
Page 121 of 321
3109
Knowing your vehicle
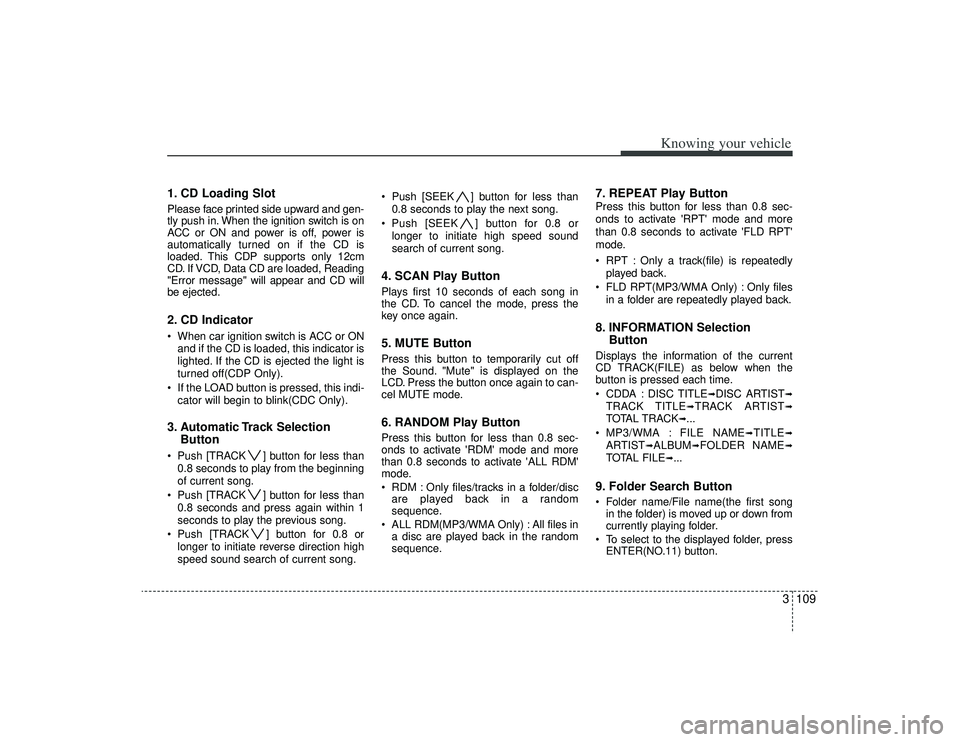
1. CD Loading SlotPlease face printed side upward and gen-
tly push in. When the ignition switch is on
ACC or ON and power is off, power is
automatically turned on if the CD is
loaded. This CDP supports only 12cm
CD. If VCD, Data CD are loaded, Reading
"Error message" will appear and CD will
be ejected.2. CD Indicator When car ignition switch is ACC or ONand if the CD is loaded, this indicator is
lighted. If the CD is ejected the light is
turned off(CDP Only).
If the LOAD button is pressed, this indi- cator will begin to blink(CDC Only).3. Automatic Track Selection Button Push [TRACK ] button for less than
0.8 seconds to play from the beginning
of current song.
Push [TRACK ] button for less than 0.8 seconds and press again within 1
seconds to play the previous song.
Push [TRACK ] button for 0.8 or longer to initiate reverse direction high
speed sound search of current song. Push [SEEK ] button for less than
0.8 seconds to play the next song.
Push [SEEK ] button for 0.8 or longer to initiate high speed sound
search of current song.
4. SCAN Play ButtonPlays first 10 seconds of each song in
the CD. To cancel the mode, press the
key once again.5. MUTE ButtonPress this button to temporarily cut off
the Sound. "Mute" is displayed on the
LCD. Press the button once again to can-
cel MUTE mode.6. RANDOM Play ButtonPress this button for less than 0.8 sec-
onds to activate 'RDM' mode and more
than 0.8 seconds to activate 'ALL RDM'
mode.
RDM : Only files/tracks in a folder/discare played back in a random
sequence.
ALL RDM(MP3/WMA Only) : All files in a disc are played back in the random
sequence.
7. REPEAT Play ButtonPress this button for less than 0.8 sec-
onds to activate 'RPT' mode and more
than 0.8 seconds to activate 'FLD RPT'
mode.
RPT : Only a track(file) is repeatedly
played back.
FLD RPT(MP3/WMA Only) : Only files in a folder are repeatedly played back.8. INFORMATION Selection ButtonDisplays the information of the current
CD TRACK(FILE) as below when the
button is pressed each time.
CDDA : DISC TITLE
➟DISC ARTIST
➟
TRACK TITLE
➟TRACK ARTIST
➟
TOTAL TRACK
➟...
MP3/WMA : FILE NAME
➟TITLE
➟
ARTIST
➟ALBUM
➟FOLDER NAME
➟
TOTAL FILE
➟...
9. Folder Search Button Folder name/File name(the first song in the folder) is moved up or down from
currently playing folder.
To select to the displayed folder, press ENTER(NO.11) button.
Page 122 of 321
Knowing your vehicle110
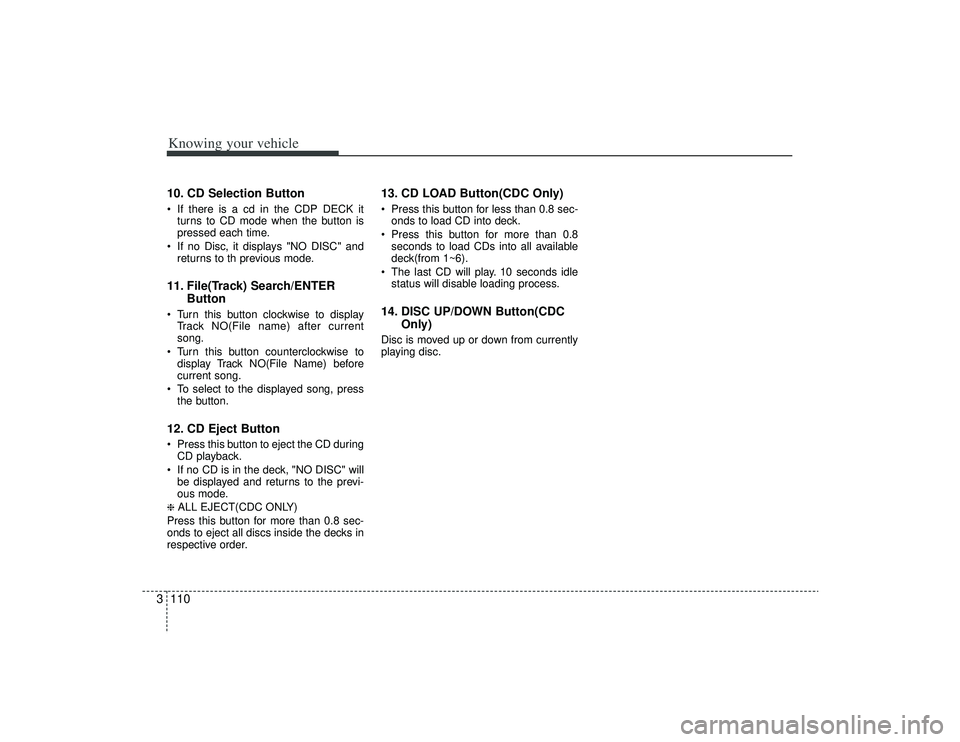
310. CD Selection Button If there is a cd in the CDP DECK it
turns to CD mode when the button is
pressed each time.
If no Disc, it displays "NO DISC" and returns to th previous mode.11. File(Track) Search/ENTER Button Turn this button clockwise to display
Track NO(File name) after current
song.
Turn this button counterclockwise to display Track NO(File Name) before
current song.
To select to the displayed song, press the button.12. CD Eject Button Press this button to eject the CD duringCD playback.
If no CD is in the deck, "NO DISC" will be displayed and returns to the previ-
ous mode.❈ ALL EJECT(CDC ONLY)
Press this button for more than 0.8 sec-
onds to eject all discs inside the decks in
respective order.
13. CD LOAD Button(CDC Only) Press this button for less than 0.8 sec- onds to load CD into deck.
Press this button for more than 0.8 seconds to load CDs into all available
deck(from 1~6).
The last CD will play. 10 seconds idle status will disable loading process.14. DISC UP/DOWN Button(CDC Only)Disc is moved up or down from currently
playing disc.
Page 123 of 321
3111
Knowing your vehicle
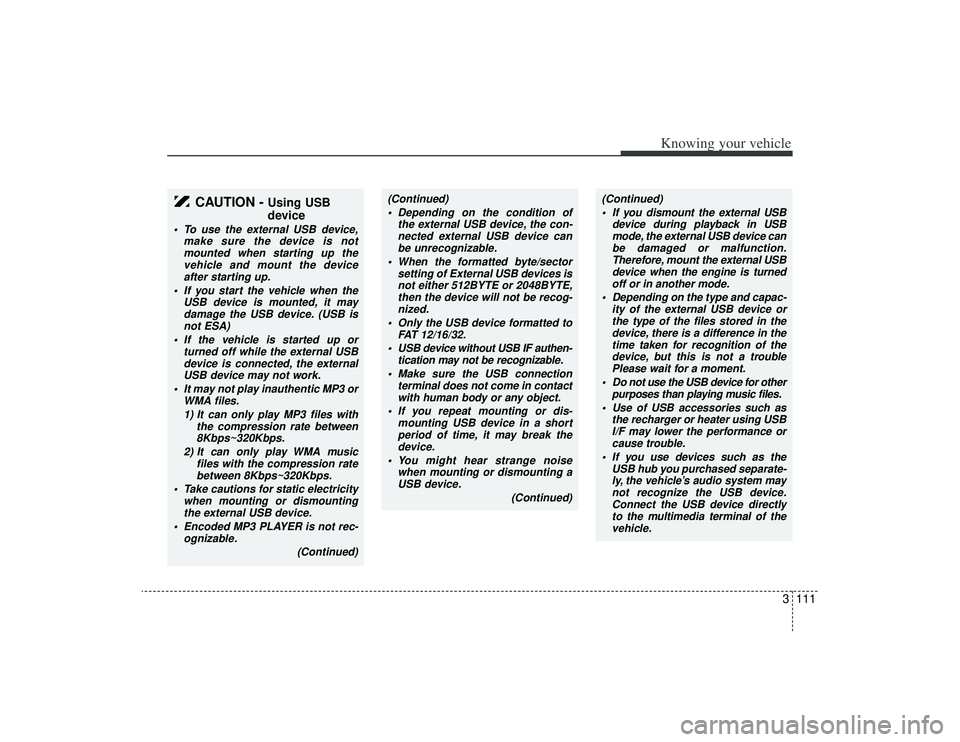
CAUTION -
Using USB
device
To use the external USB device,make sure the device is notmounted when starting up thevehicle and mount the deviceafter starting up.
If you start the vehicle when the USB device is mounted, it maydamage the USB device. (USB isnot ESA)
If the vehicle is started up or turned off while the external USBdevice is connected, the external USB device may not work.
It may not play inauthentic MP3 or WMA files.
1) It can only play MP3 files with the compression rate between8Kbps~320Kbps.
2) It can only play WMA music files with the compression ratebetween 8Kbps~320Kbps.
Take cautions for static electricity when mounting or dismountingthe external USB device.
Encoded MP3 PLAYER is not rec- ognizable.
(Continued)
(Continued) Depending on the condition of the external USB device, the con-nected external USB device can be unrecognizable.
When the formatted byte/sector setting of External USB devices isnot either 512BYTE or 2048BYTE,then the device will not be recog- nized.
Only the USB device formatted to FAT 12/16/32.
USB device without USB IF authen- tication may not be recognizable.
Make sure the USB connection terminal does not come in contactwith human body or any object.
If you repeat mounting or dis- mounting USB device in a shortperiod of time, it may break thedevice.
You might hear strange noise when mounting or dismounting aUSB device.
(Continued)
(Continued) If you dismount the external USB device during playback in USBmode, the external USB device can be damaged or malfunction.Therefore, mount the external USBdevice when the engine is turnedoff or in another mode.
Depending on the type and capac- ity of the external USB device orthe type of the files stored in thedevice, there is a difference in thetime taken for recognition of the device, but this is not a troublePlease wait for a moment.
Do not use the USB device for other purposes than playing music files.
Use of USB accessories such as the recharger or heater using USBI/F may lower the performance or cause trouble.
If you use devices such as the USB hub you purchased separate-ly, the vehicle’s audio system maynot recognize the USB device.Connect the USB device directly to the multimedia terminal of thevehicle.
Page 126 of 321
Knowing your vehicle114
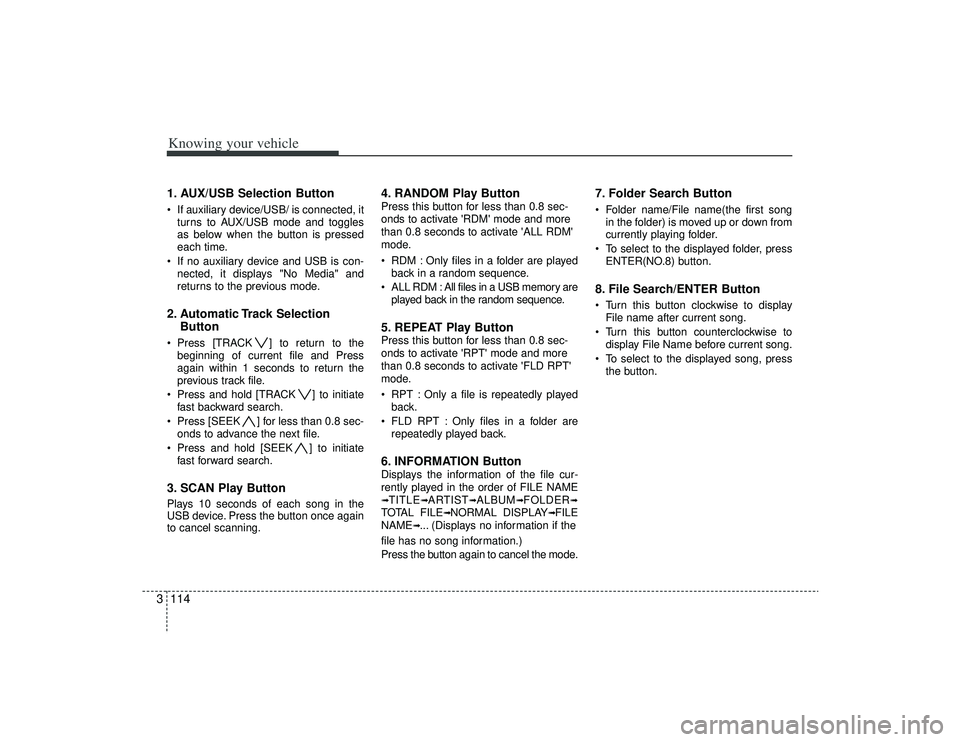
31. AUX/USB Selection Button If auxiliary device/USB/ is connected, it
turns to AUX/USB mode and toggles
as below when the button is pressed
each time.
If no auxiliary device and USB is con- nected, it displays "No Media" and
returns to the previous mode.2. Automatic Track Selection Button Press [TRACK ] to return to the
beginning of current file and Press
again within 1 seconds to return the
previous track file.
Press and hold [TRACK ] to initiate fast backward search.
Press [SEEK ] for less than 0.8 sec- onds to advance the next file.
Press and hold [SEEK ] to initiate fast forward search.3. SCAN Play ButtonPlays 10 seconds of each song in the
USB device. Press the button once again
to cancel scanning.
4. RANDOM Play ButtonPress this button for less than 0.8 sec-
onds to activate 'RDM' mode and more
than 0.8 seconds to activate 'ALL RDM'
mode.
RDM : Only files in a folder are playedback in a random sequence.
ALL RDM : All files in a USB memory are played back in the random sequence.5. REPEAT Play ButtonPress this button for less than 0.8 sec-
onds to activate 'RPT' mode and more
than 0.8 seconds to activate 'FLD RPT'
mode.
RPT : Only a file is repeatedly playedback.
FLD RPT : Only files in a folder are repeatedly played back.6. INFORMATION ButtonDisplays the information of the file cur-
rently played in the order of FILE NAME➟TITLE
➟ARTIST
➟ALBUM
➟FOLDER
➟
TOTAL FILE
➟NORMAL DISPLAY
➟FILE
NAME
➟... (Displays no information if the
file has no song information.)
Press the button again to cancel the mode.
7. Folder Search Button Folder name/File name(the first song in the folder) is moved up or down from
currently playing folder.
To select to the displayed folder, press ENTER(NO.8) button.8. File Search/ENTER Button Turn this button clockwise to displayFile name after current song.
Turn this button counterclockwise to display File Name before current song.
To select to the displayed song, press the button.