bulb KIA AMANTI 2009 Owners Manual
[x] Cancel search | Manufacturer: KIA, Model Year: 2009, Model line: AMANTI, Model: KIA AMANTI 2009Pages: 321, PDF Size: 23.77 MB
Page 169 of 321
433
Driving your vehicle
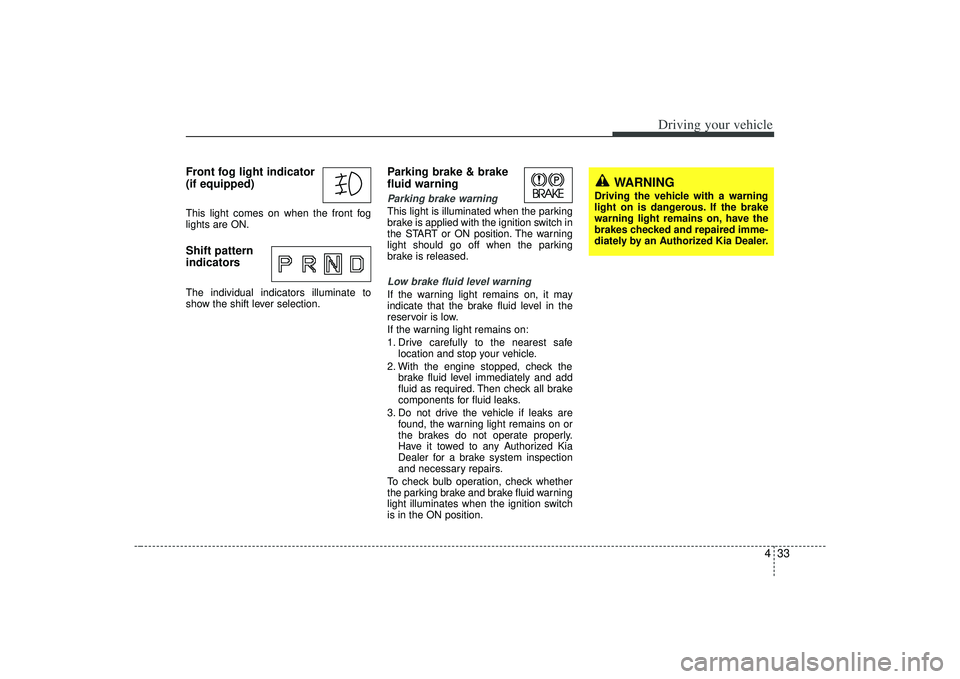
Front fog light indicator
(if equipped) This light comes on when the front fog
lights are ON.Shift pattern
indicatorsThe individual indicators illuminate to
show the shift lever selection.
Parking brake & brake
fluid warning Parking brake warning This light is illuminated when the parking
brake is applied with the ignition switch in
the START or ON position. The warning
light should go off when the parking
brake is released.Low brake fluid level warningIf the warning light remains on, it may
indicate that the brake fluid level in the
reservoir is low.
If the warning light remains on:
1. Drive carefully to the nearest safelocation and stop your vehicle.
2. With the engine stopped, check the brake fluid level immediately and add
fluid as required. Then check all brake
components for fluid leaks.
3. Do not drive the vehicle if leaks are found, the warning light remains on or
the brakes do not operate properly.
Have it towed to any Authorized Kia
Dealer for a brake system inspection
and necessary repairs.
To check bulb operation, check whether
the parking brake and brake fluid warning
light illuminates when the ignition switch
is in the ON position.
WARNING
Driving the vehicle with a warning
light on is dangerous. If the brake
warning light remains on, have the
brakes checked and repaired imme-
diately by an Authorized Kia Dealer.
Page 173 of 321

437
Driving your vehicle
Low tire pressure tell-
taleThe low tire pressure telltale comes on
for 3 seconds after the ignition key is
turned to the "ON" position.
If the warning light does not come on, the
Tire Pressure Monitoring System is not
working properly. If this occurs, have your
vehicle checked by an authorized Kia
dealer as soon as possible.
This warning light will also illuminate if
one or more of your tires are significantly
under-inflated.
You should stop and check your tires as
soon as possible. If the warning lights
illuminate while driving, reduce vehicle
speed immediately and stop the vehicle.
Avoid hard braking and overcorrecting at
the steering wheel. Inflate the tires to the
proper pressure as indicated on the vehi-
cle’s tire information placard.
TPMS (Tire pressure
monitoring system)
malfunction indicatorTPMS malfunction indicator illuminates
for 3 seconds after the ignition key is
turned to the "ON" position. If the warn-
ing light does not come on, or continu-
ously remains on after the 3-second bulb
check when you turned the ignition key to
the "ON" position, the Tire Pressure
Monitoring System is not working proper-
ly. If this occurs, have your vehicle
checked by an authorized Kia dealer as
soon as possible.
The warning light also comes on and
stays on when there is a problem with the
Tire Pressure Monitoring System.
If this happens, the system may not mon-
itor the tire pressure. Have the system
checked by an authorized Kia dealer as
soon as possible.
TPMS
WARNING
Significantly low tire pressure
makes the vehicle unstable and can
contribute to loss of vehicle control
and increased braking distances.
Continued driving on low pressure
tires will cause the tires to overheat
and fail.
WARNING
The TPMS cannot alert you tosevere and sudden tire damage
caused by external factors.
If you feel any vehicle instability, immediately take your foot off the
accelerator and slowly move to a
safe position off the road.
Page 177 of 321
441
Driving your vehicle
Lane change signals To signal a lane change, move the turn
signal lever slightly and hold it in position.
The lever will return to the OFF position
when released.
If an indicator stays on and does not
flash or if it flashes abnormally, one of the
turn signal bulbs may be burned out and
will require replacement.✽ ✽NOTICEIf an indicator flash is abnormally quick
or slow, bulb may be burned out or have
a poor electrical connection in the cir-
cuit.
Automatic headlight aiming
(if equipped)To provide better driver visibility and
reduce eye fatigue, the headlight aiming
(direction) is automatically controlled
depending on vehicle load and vehicle
angle (when vehicle is loaded with pas-
sengers, cargo or used for towing, the
additional load can alter the headlight
aiming point on the road surface). This
system provides constant automatic
headlight aiming under various vehicle
conditions and angles to ensure the
headlights are always pointed in the right
direction.
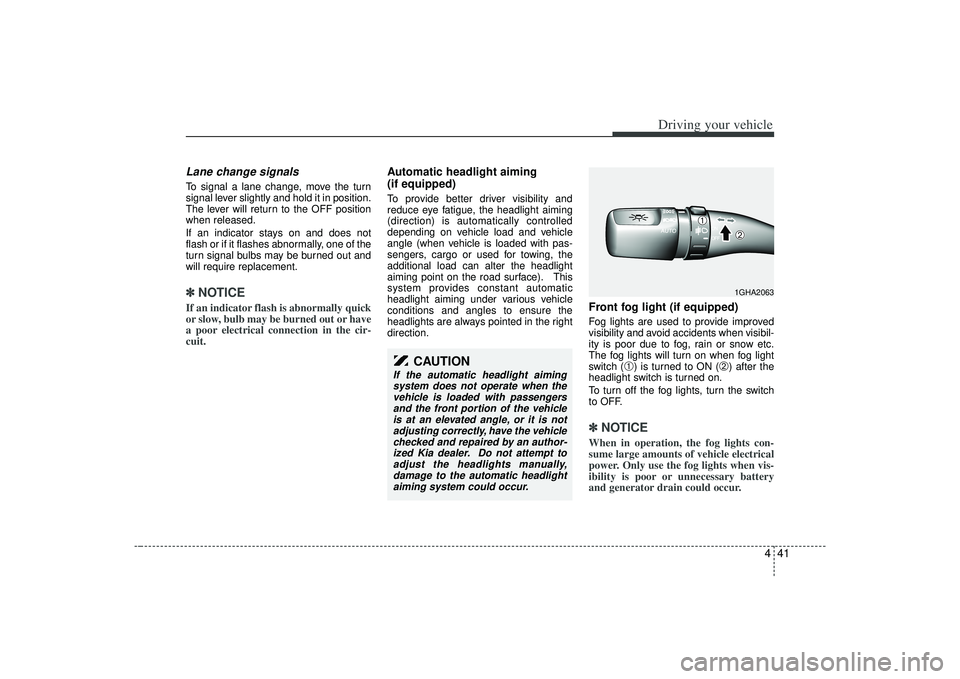
Front fog light (if equipped) Fog lights are used to provide improved
visibility and avoid accidents when visibil-
ity is poor due to fog, rain or snow etc.
The fog lights will turn on when fog light
switch (
➀) is turned to ON (
➁) after the
headlight switch is turned on.
To turn off the fog lights, turn the switch
to OFF.
✽ ✽ NOTICEWhen in operation, the fog lights con-
sume large amounts of vehicle electrical
power. Only use the fog lights when vis-
ibility is poor or unnecessary battery
and generator drain could occur.
CAUTION
If the automatic headlight aiming
system does not operate when thevehicle is loaded with passengersand the front portion of the vehicleis at an elevated angle, or it is not adjusting correctly, have the vehiclechecked and repaired by an author- ized Kia dealer. Do not attempt toadjust the headlights manually, damage to the automatic headlightaiming system could occur.
1GHA2063
➀
➁
Page 214 of 321
Driving tips22
5Following distance Stay at least twice as far behind the vehi-
cle ahead as you would when driving
your vehicle without a trailer. This can
help you avoid situations that require
heavy braking and sudden turns.Passing You’ll need more passing distance up
ahead when you’re towing a trailer. And,
because you’re a good deal longer, you’ll
need to go much farther beyond the
passed vehicle before you can return to
your lane.
Backing up Hold the bottom of the steering wheel
with one hand. Then, to move the trailer
to the left, just move your hand to the left.
To move the trailer to the right, move your
hand to the right. Always back up slowly
and, if possible, have someone guide
you.Making turns When you’re turning with a trailer, make
wider turns than normal. Do this so your
trailer won’t strike soft shoulders, curbs,
road signs, trees, or other objects. Avoid
jerky or sudden maneuvers. Signal well
in advance.
Turn signals when towing a trailer When you tow a trailer, your vehicle has
to have a different turn signal flasher and
extra wiring. The green arrows on your
instrument panel will flash whenever you
signal a turn or lane change. Properly
connected, the trailer lights will also flash
to alert other drivers you’re about to turn,
change lanes, or stop.
When towing a trailer, the green arrows
on your instrument panel will flash for
turns even if the bulbs on the trailer are
burned out. Thus, you may think drivers
behind you are seeing your signals
when, in fact, they are not. It’s important
to check occasionally to be sure the trail-
er bulbs are still working. You must also
check the lights every time you discon-
nect and then reconnect the wires.
Do not connect a trailer lighting system
directly to your vehicle’s lighting system.
Use only an approved trailer wiring har-
ness.
Your Authorized Kia Dealer can assist
you in installing the wiring harness.
WARNING
Failure to use an approved trailer
wiring harness could result in dam-
age to the vehicle electrical system
and/or personal injury.
Page 251 of 321
7
Maintenance services / 7-2
Normal maintenance schedule / 7-3
Severe maintenance schedule / 7-6
Owner maintenance / 7-9
Engine compartment / 7-12
Engine oil and oil filter / 7-13
Engine cooling system / 7-14
Brakes / 7-16
Power steering / 7-17
Automatic transaxle / 7-18
Lubricants and fluids / 7-20
Air cleaner / 7-21
Climate control air filter / 7-22
Wiper blades / 7-24
Battery / 7-26
Tires and wheels / 7-29
Bulb replacement / 7-41
Lubricant specifications / 7-46
Exterior care / 7-48
Interior care / 7-51
California perchlorate notice / 7-52
Maintenance
Page 291 of 321
741
Maintenance
BULB REPLACEMENT Use only the bulbs of the specifiedwattage.
Headlight bulb replacement ✽
✽ NOTICEAfter heavy, driving rain or washing,
headlight and taillight lenses could
appear frosty. This condition is caused by
the temperature difference between the
lamp inside and outside. This is similar
to the condensation on your windows
inside your vehicle during the rain and
doesn’t indicate a problem with your
vehicle. If the water leaks into the lamp
bulb circuitry, have the vehicle checked
by an Authorized Kia Dealer.
WARNING
- Working on
the lights
Prior to working on the light, firmly
apply the parking brake and ensure
that the ignition switch is turned to
the “LOCK” position to avoid sud-
den movement of the vehicle and
burning your fingers or receiving an
electric shock.
CAUTION
If you don’t have necessary tools,
the correct bulbs and the expertise,consult an Authorized Kia Dealer. In many cases, it is difficult to replacevehicle light bulbs because otherparts of the vehicle must beremoved before you can get the bulb. Especially if you must removethe front bumper to replace the lightbulbs in the front of the vehicle. This may result in damage to thevehicle.
OGH056016
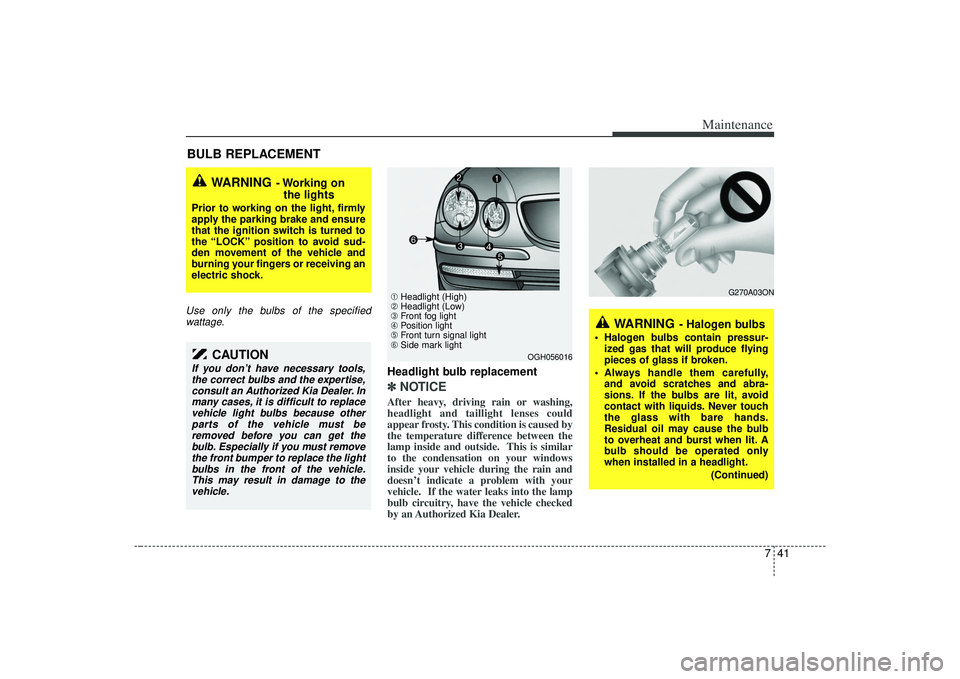
➀ Headlight (High)
➁ Headlight (Low)
➂ Front fog light
➃ Position light
➄ Front turn signal light
\b Side mark light
WARNING
- Halogen bulbs
Halogen bulbs contain pressur-
ized gas that will produce flying
pieces of glass if broken.
Always handle them carefully, and avoid scratches and abra-
sions. If the bulbs are lit, avoid
contact with liquids. Never touch
the glass with bare hands.
Residual oil may cause the bulb
to overheat and burst when lit. A
bulb should be operated only
when installed in a headlight.
(Continued)
G270A03ON
Page 292 of 321
Maintenance42
7
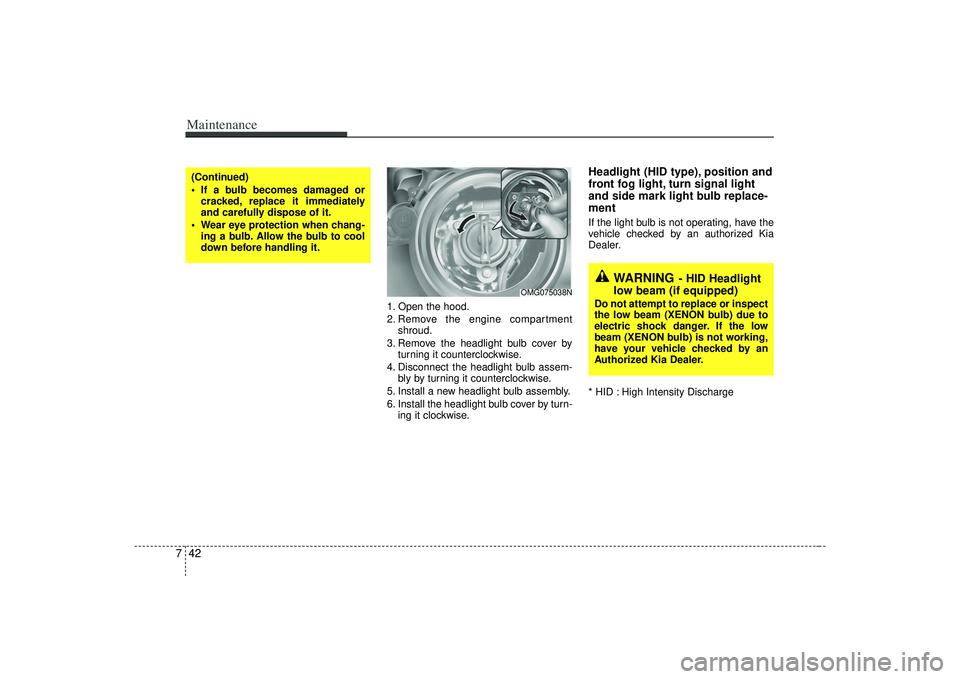
1. Open the hood.
2. Remove the engine compartment
shroud.
3. Remove the headlight bulb cover by turning it counterclockwise.
4. Disconnect the headlight bulb assem- bly by turning it counterclockwise.
5. Install a new headlight bulb assembly.
6. Install the headlight bulb cover by turn- ing it clockwise.
Headlight (HID type), position and
front fog light, turn signal light
and side mark light bulb replace-
mentIf the light bulb is not operating, have the
vehicle checked by an authorized Kia
Dealer.
* HID : High Intensity Discharge
(Continued)
If a bulb becomes damaged orcracked, replace it immediately
and carefully dispose of it.
Wear eye protection when chang- ing a bulb. Allow the bulb to cool
down before handling it.
OMG075038N
WARNING
- HID Headlight
low beam (if equipped)
Do not attempt to replace or inspect
the low beam (XENON bulb) due to
electric shock danger. If the low
beam (XENON bulb) is not working,
have your vehicle checked by an
Authorized Kia Dealer.
Page 293 of 321
743
Maintenance
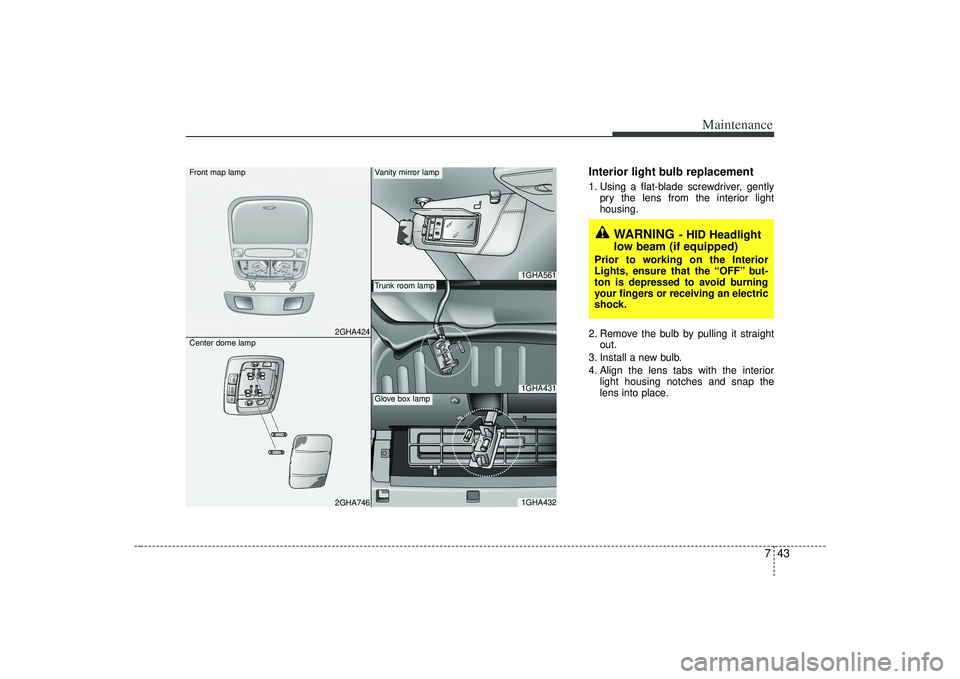
Interior light bulb replacement1. Using a flat-blade screwdriver, gentlypry the lens from the interior light
housing.
2. Remove the bulb by pulling it straight out.
3. Install a new bulb.
4. Align the lens tabs with the interior light housing notches and snap the
lens into place.
2GHA424
OFFDOORON
2GHA746
1GHA5611GHA4311GHA432
Front map lamp
Center dome lamp
Vanity mirror lampTrunk room lampGlove box lamp
WARNING
- HID Headlight
low beam (if equipped)
Prior to working on the Interior
Lights, ensure that the “OFF” but-
ton is depressed to avoid burning
your fingers or receiving an electric
shock.
Page 294 of 321
Maintenance44
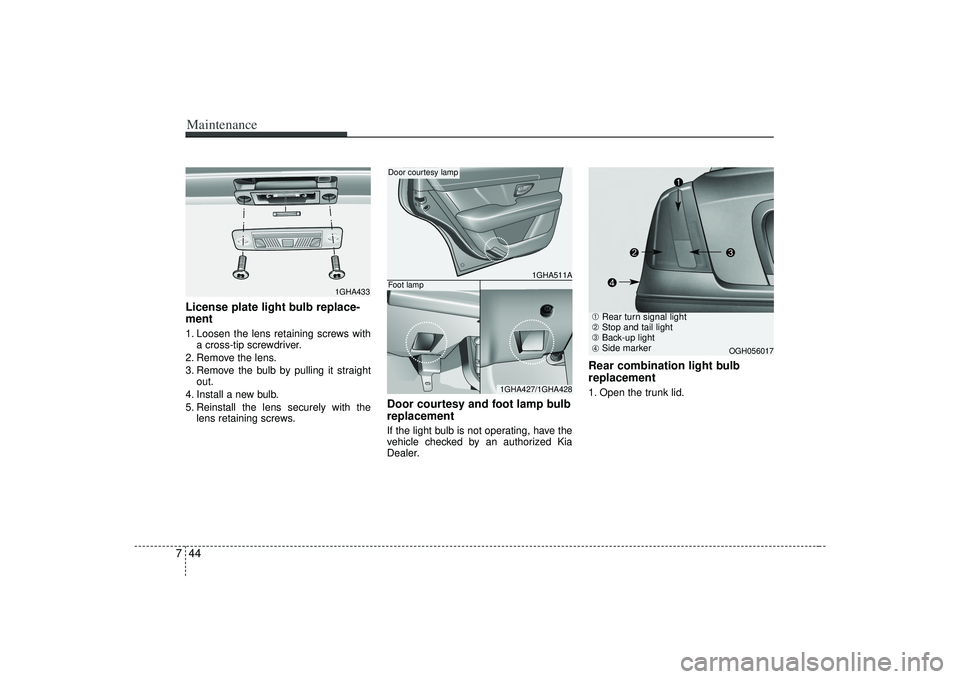
7License plate light bulb replace-
ment 1. Loosen the lens retaining screws with
a cross-tip screwdriver.
2. Remove the lens.
3. Remove the bulb by pulling it straight out.
4. Install a new bulb.
5. Reinstall the lens securely with the lens retaining screws.
Door courtesy and foot lamp bulb
replacementIf the light bulb is not operating, have the
vehicle checked by an authorized Kia
Dealer.
Rear combination light bulb
replacement1. Open the trunk lid.
1GHA433
1GHA511A
1GHA427/1GHA428
Door courtesy lampFoot lamp
➀ Rear turn signal light
➁ Stop and tail light
➂ Back-up light
➃ Side marker
OGH056017
Page 295 of 321
745
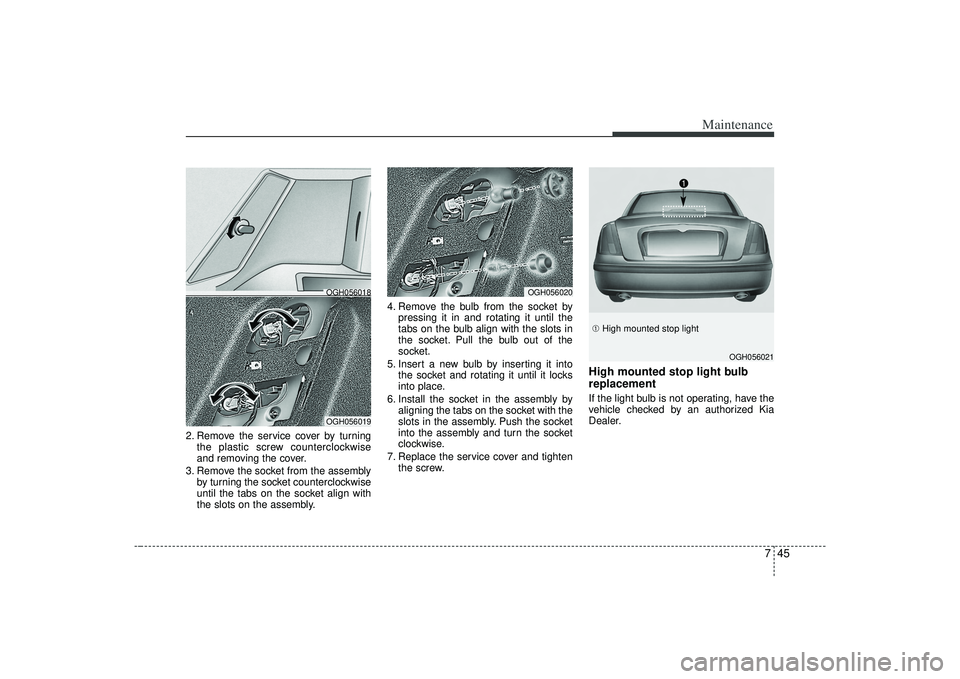
Maintenance
2. Remove the service cover by turningthe plastic screw counterclockwise
and removing the cover.
3. Remove the socket from the assembly by turning the socket counterclockwise
until the tabs on the socket align with
the slots on the assembly. 4. Remove the bulb from the socket by
pressing it in and rotating it until the
tabs on the bulb align with the slots in
the socket. Pull the bulb out of the
socket.
5. Insert a new bulb by inserting it into the socket and rotating it until it locks
into place.
6. Install the socket in the assembly by aligning the tabs on the socket with the
slots in the assembly. Push the socket
into the assembly and turn the socket
clockwise.
7. Replace the service cover and tighten the screw.
High mounted stop light bulb
replacementIf the light bulb is not operating, have the
vehicle checked by an authorized Kia
Dealer.
OGH056020
OGH056019OGH056018
➀ High mounted stop light
OGH056021