check engine light KIA Borrego 2010 1.G Owner's Guide
[x] Cancel search | Manufacturer: KIA, Model Year: 2010, Model line: Borrego, Model: KIA Borrego 2010 1.GPages: 461, PDF Size: 12.25 MB
Page 318 of 461
Driving your vehicle20
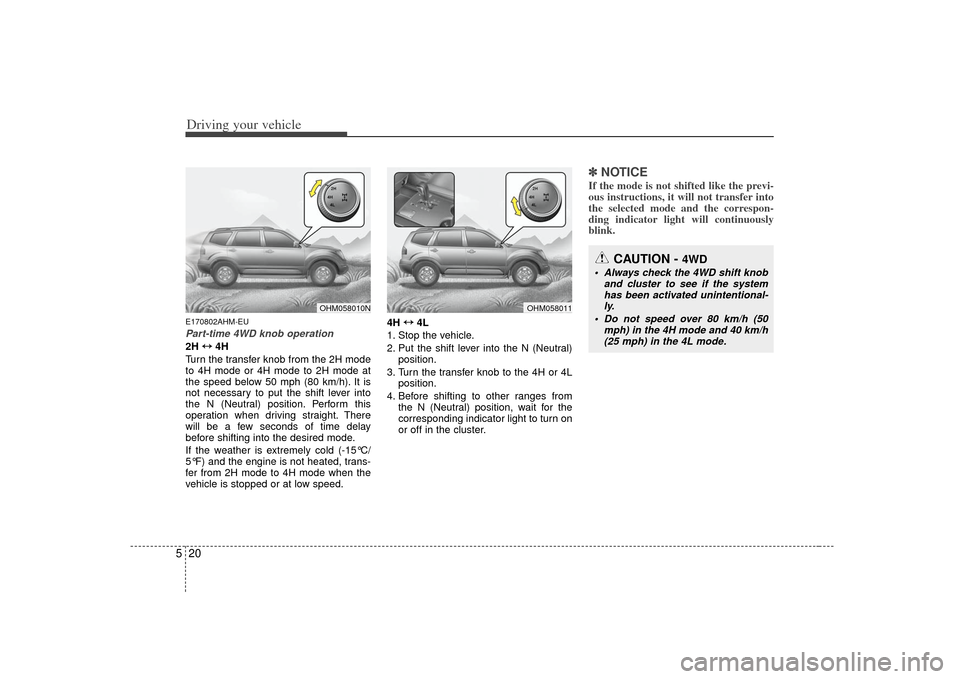
5E170802AHM-EUPart-time 4WD knob operation2H ↔
↔
4H
Turn the transfer knob from the 2H mode
to 4H mode or 4H mode to 2H mode at
the speed below 50 mph (80 km/h). It is
not necessary to put the shift lever into
the N (Neutral) position. Perform this
operation when driving straight. There
will be a few seconds of time delay
before shifting into the desired mode.
If the weather is extremely cold (-15°C/
5°F) and the engine is not heated, trans-
fer from 2H mode to 4H mode when the
vehicle is stopped or at low speed. 4H
↔ ↔
4L
1. Stop the vehicle.
2. Put the shift lever into the N (Neutral) position.
3. Turn the transfer knob to the 4H or 4L position.
4. Before shifting to other ranges from the N (Neutral) position, wait for the
corresponding indicator light to turn on
or off in the cluster.
✽ ✽NOTICEIf the mode is not shifted like the previ-
ous instructions, it will not transfer into
the selected mode and the correspon-
ding indicator light will continuously
blink.
OHM058010N
OHM058011
CAUTION -
4WD
Always check the 4WD shift knob
and cluster to see if the systemhas been activated unintentional-ly.
Do not speed over 80 km/h (50 mph) in the 4H mode and 40 km/h(25 mph) in the 4L mode.
Page 320 of 461
Driving your vehicle22
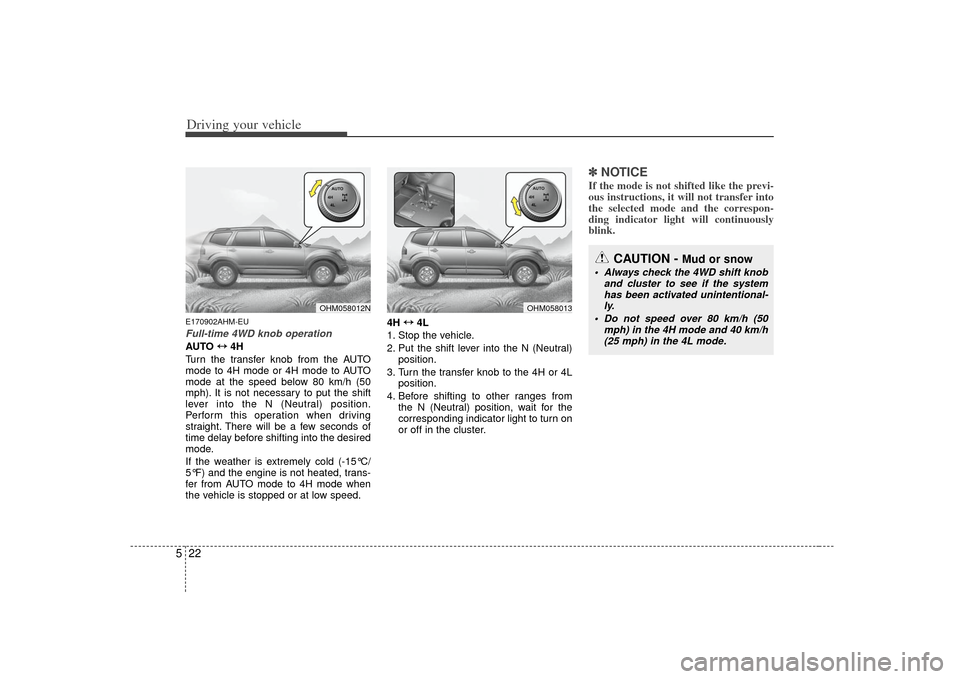
5E170902AHM-EUFull-time 4WD knob operationAUTO ↔
↔
4H
Turn the transfer knob from the AUTO
mode to 4H mode or 4H mode to AUTO
mode at the speed below 80 km/h (50
mph). It is not necessary to put the shift
lever into the N (Neutral) position.
Perform this operation when driving
straight. There will be a few seconds of
time delay before shifting into the desired
mode.
If the weather is extremely cold (-15°C/
5°F) and the engine is not heated, trans-
fer from AUTO mode to 4H mode when
the vehicle is stopped or at low speed. 4H
↔ ↔
4L
1. Stop the vehicle.
2. Put the shift lever into the N (Neutral) position.
3. Turn the transfer knob to the 4H or 4L position.
4. Before shifting to other ranges from the N (Neutral) position, wait for the
corresponding indicator light to turn on
or off in the cluster.
✽ ✽NOTICEIf the mode is not shifted like the previ-
ous instructions, it will not transfer into
the selected mode and the correspon-
ding indicator light will continuously
blink.
OHM058012N
OHM058013
CAUTION -
Mud or snow
Always check the 4WD shift knob
and cluster to see if the systemhas been activated unintentional-ly.
Do not speed over 80 km/h (50 mph) in the 4H mode and 40 km/h(25 mph) in the 4L mode.
Page 325 of 461
527
Driving your vehicle
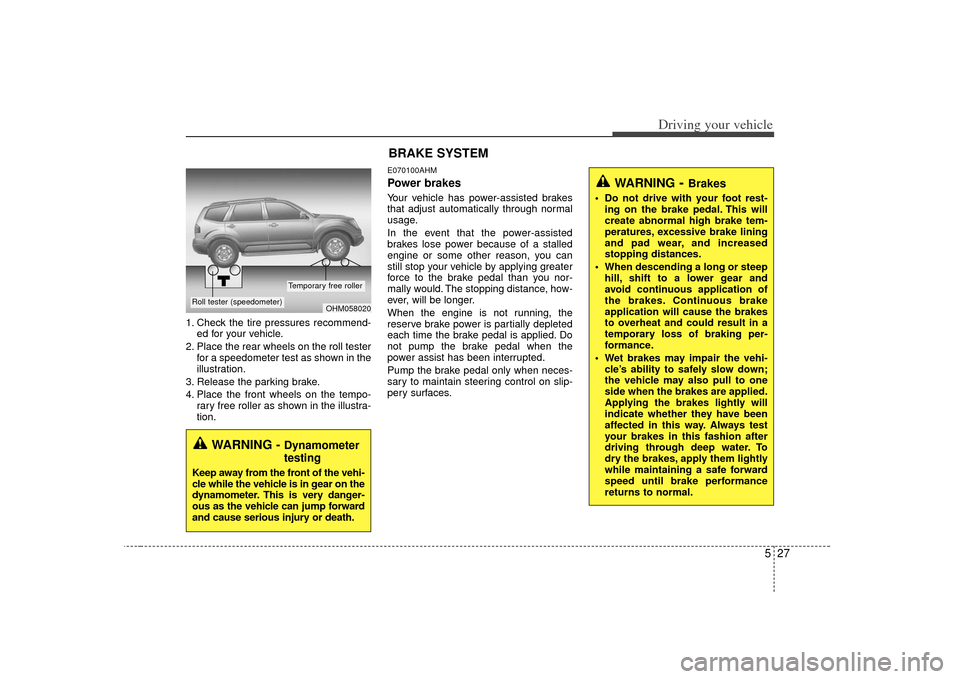
1. Check the tire pressures recommend-ed for your vehicle.
2. Place the rear wheels on the roll tester for a speedometer test as shown in the
illustration.
3. Release the parking brake.
4. Place the front wheels on the tempo- rary free roller as shown in the illustra-
tion.
E070100AHMPower brakesYour vehicle has power-assisted brakes
that adjust automatically through normal
usage.
In the event that the power-assisted
brakes lose power because of a stalled
engine or some other reason, you can
still stop your vehicle by applying greater
force to the brake pedal than you nor-
mally would. The stopping distance, how-
ever, will be longer.
When the engine is not running, the
reserve brake power is partially depleted
each time the brake pedal is applied. Do
not pump the brake pedal when the
power assist has been interrupted.
Pump the brake pedal only when neces-
sary to maintain steering control on slip-
pery surfaces.
WARNING
- Brakes
Do not drive with your foot rest-ing on the brake pedal. This will
create abnormal high brake tem-
peratures, excessive brake lining
and pad wear, and increased
stopping distances.
When descending a long or steep hill, shift to a lower gear and
avoid continuous application of
the brakes. Continuous brake
application will cause the brakes
to overheat and could result in a
temporary loss of braking per-
formance.
Wet brakes may impair the vehi- cle’s ability to safely slow down;
the vehicle may also pull to one
side when the brakes are applied.
Applying the brakes lightly will
indicate whether they have been
affected in this way. Always test
your brakes in this fashion after
driving through deep water. To
dry the brakes, apply them lightly
while maintaining a safe forward
speed until brake performance
returns to normal.
WARNING -
Dynamometer
testing
Keep away from the front of the vehi-
cle while the vehicle is in gear on the
dynamometer. This is very danger-
ous as the vehicle can jump forward
and cause serious injury or death.
OHM058020
Roll tester (speedometer)
Temporary free roller
BRAKE SYSTEM
Page 327 of 461

529
Driving your vehicle
E070202AHMReleasing the parking brakeTo release the parking brake, depress
the parking brake pedal a second time
while applying the foot brake. The pedal
will automatically extend to the fully
released position. If the parking brake
pedal does not release or does not
release all the way, have the system
checked by an authorized KIA dealer.Check the brake warning light by turning
the ignition switch ON (do not start the
engine). This light will be illuminated when
the parking brake is applied with the igni-
tion switch in the START or ON position.
Before driving, be sure the parking brake
is fully released and the brake warning
light is off.
If the brake warning light remains on after
the parking brake is released while the
engine is running, there may be a mal-
function in the brake system. Immediate
attention is necessary.
If at all possible, cease driving the vehi-
cle immediately. If that is not possible,
use extreme caution while operating the
vehicle and only continue to drive the
vehicle until you can reach a safe loca-
tion or repair shop.
WARNING
To prevent unintentional move-
ment when stopped and leaving
the vehicle, do not use the shift
lever in place of the parking
brake. Set the parking brake AND
make sure the shift lever is
securely positioned in P (Park).
Never allow anyone who is unfa- miliar with the vehicle to touch
the parking brake. If the parking
brake is released unintentionally,
serious injury may occur.
All vehicles should always have the parking brake fully engaged
when parking to avoid inadver-
tent movement of the vehicle
which can injure occupants or
pedestrians.
OHM058022
W-75
Page 331 of 461

533
Driving your vehicle
E070501AUN-EUESC operationESC ON conditionON, ESC and ESC OFF indi-
cator lights illuminate for
approximately 3 seconds,
then ESC is turned on.
for at least half a second after
turning the ignition ON to turn
ESC off. (ESC OFF indicator
will illuminate). To turn the
ESC on, press the ESC OFF
button (ESC OFF indicator
light will go off).
you may hear a slight ticking
sound. This is the ESC per-
forming an automatic system
self-check and does not indi-
cate a problem. When operating
When the ESC is in operation,
ESC indicator light blinks.
Control is operating properly,
you can feel a slight pulsation
in the vehicle. This is only the
effect of brake control and
indicates nothing unusual.
or slippery road, pressing the
accelerator pedal may not
cause the engine rpm (revo-
lutions per minute) to
increase.
E070502AUN-EUESC operation offESC OFF state
press the ESC OFF button
(ESC OFF indicator light illu-
minates).
to LOCK position when ESC
is off, ESC remains off. Upon
restarting the engine, the
ESC will automatically turn
on again.
-
ESC
ESCOFF
Page 343 of 461
545
Driving your vehicle
E100000AHM-ECYour vehicle's fuel economy depends
mainly on your style of driving, where you
drive and when you drive.
Each of these factors affects how many
kilometers (miles) you can get from a liter
(gallon) of fuel. To operate your vehicle
as economically as possible, use the fol-
lowing driving suggestions to help save
money in both fuel and repairs:
Drive smoothly. Accelerate at a moder-ate rate. Don't make "jack-rabbit" starts
or full-throttle shifts and maintain a
steady cruising speed. Don't race
between stoplights. Try to adjust your
speed to the traffic so you don't have to
change speeds unnecessarily. Avoid
heavy traffic whenever possible.
Always maintain a safe distance from
other vehicles so you can avoid unnec-
essary braking. This also reduces
brake wear.
Drive at a moderate speed. The faster you drive, the more fuel your vehicle
uses. Driving at a moderate speed,
especially on the highway, is one of the
most effective ways to reduce fuel con-
sumption. Don't "ride" the brake pedal. This can
increase fuel consumption and also
increase wear on these components.
In addition, driving with your foot rest-
ing on the brake pedal may cause the
brakes to overheat, which reduces
their effectiveness and may lead to
more serious consequences.
Take care of your tires. Keep them inflated to the recommended pressure.
Incorrect inflation, either too much or
too little, results in unnecessary tire
wear. Check the tire pressures at least
once a month.
Be sure that the wheels are aligned correctly. Improper alignment can
result from hitting curbs or driving too
fast over irregular surfaces. Poor align-
ment causes faster tire wear and may
also result in other problems as well as
greater fuel consumption. Keep your vehicle in good condition.
For better fuel economy and reduced
maintenance costs, maintain your vehi-
cle in accordance with the mainte-
nance schedule in section 7. If you
drive your vehicle in severe conditions,
more frequent maintenance is required
(see section 7 for details).
Keep your vehicle clean. For maximum service, your vehicle should be kept
clean and free of corrosive materials. It
is especially important that mud, dirt,
ice, etc. not be allowed to accumulate
on the underside of the vehicle. This
extra weight can result in increased
fuel consumption and also contribute
to corrosion.
Travel lightly. Don't carry unnecessary weight in your vehicle. Weight reduces
fuel economy.
Don't let the engine idle longer than necessary. If you are waiting (and not
in traffic), turn off your engine and
restart only when you're ready to go.ECONOMICAL OPERATION
Page 355 of 461
557
Driving your vehicle
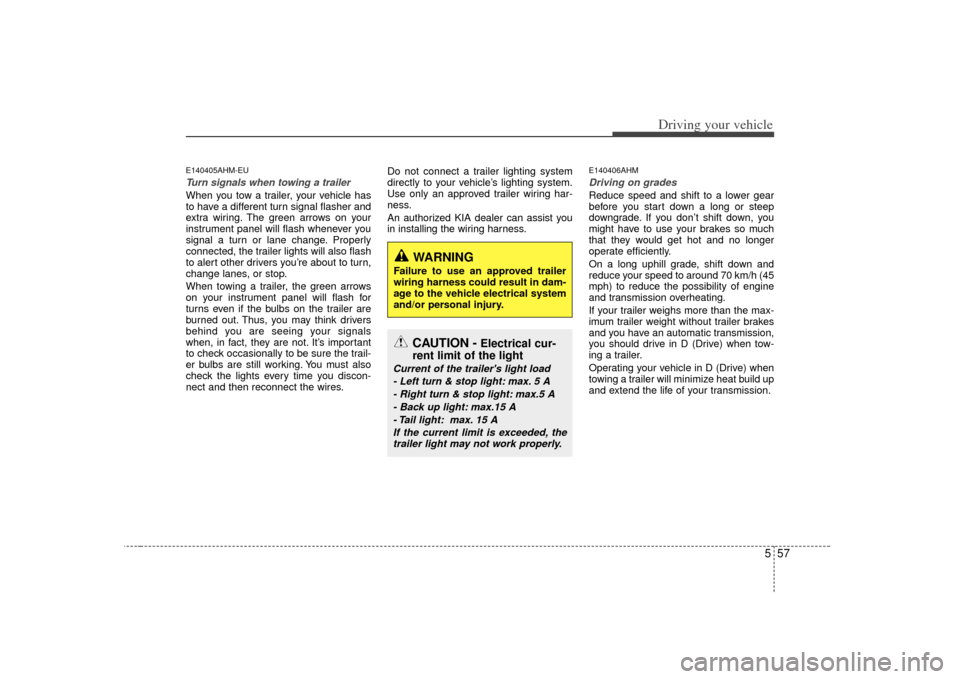
E140405AHM-EUTurn signals when towing a trailer When you tow a trailer, your vehicle has
to have a different turn signal flasher and
extra wiring. The green arrows on your
instrument panel will flash whenever you
signal a turn or lane change. Properly
connected, the trailer lights will also flash
to alert other drivers you’re about to turn,
change lanes, or stop.
When towing a trailer, the green arrows
on your instrument panel will flash for
turns even if the bulbs on the trailer are
burned out. Thus, you may think drivers
behind you are seeing your signals
when, in fact, they are not. It’s important
to check occasionally to be sure the trail-
er bulbs are still working. You must also
check the lights every time you discon-
nect and then reconnect the wires.Do not connect a trailer lighting system
directly to your vehicle’s lighting system.
Use only an approved trailer wiring har-
ness.
An authorized KIA dealer can assist you
in installing the wiring harness.
E140406AHMDriving on grades Reduce speed and shift to a lower gear
before you start down a long or steep
downgrade. If you don’t shift down, you
might have to use your brakes so much
that they would get hot and no longer
operate efficiently.
On a long uphill grade, shift down and
reduce your speed to around 70 km/h (45
mph) to reduce the possibility of engine
and transmission overheating.
If your trailer weighs more than the max-
imum trailer weight without trailer brakes
and you have an automatic transmission,
you should drive in D (Drive) when tow-
ing a trailer.
Operating your vehicle in D (Drive) when
towing a trailer will minimize heat build up
and extend the life of your transmission.
CAUTION -
Electrical cur-
rent limit of the light
Current of the trailer's light load
- Left turn & stop light: max. 5 A- Right turn & stop light: max.5 A- Back up light: max.15 A - Tail light: max. 15 AIf the current limit is exceeded, thetrailer light may not work properly.
WARNING
Failure to use an approved trailer
wiring harness could result in dam-
age to the vehicle electrical system
and/or personal injury.
Page 369 of 461
63
What to do in an emergency
2. When the vehicle is stopped, turn onyour emergency hazard flashers, set
the parking brake and put the trans-
mission in P (Park).
3. Have all passengers get out of the vehicle. Be sure they all get out on the
side of the car that is away from traffic.
4. When changing a flat tire, follow the instruction provided later in this sec-
tion.F020300AUNIf engine stalls while driving1. Reduce your speed gradually, keeping a straight line. Move cautiously off the
road to a safe place.
2. Turn on your emergency flashers.
3. Try to start the engine again. If your vehicle will not start, contact an
authorized KIA dealer or seek other
qualified assistance.
F030100AHMIf engine doesn't turn over or
turns over slowly1. If your car has an automatic transmis-sion, be sure the shift lever is in N
(Neutral) or P (Park) and the emer-
gency brake is set.
2. Check the battery connections to be sure they are clean and tight.
3. Turn on the interior light. If the light dims or goes out when you operate the
starter, the battery is discharged.
4. Check the starter connections to be sure they are securely tightened.
5. Do not push or pull the vehicle to start it. See instructions for "Jump starting".
F030200AHMIf engine turns over normally but
does not start1. Check the fuel level.
2. With the ignition switch in the LOCKposition, check all connectors at the
ignition coils and spark plugs.
Reconnect any that may be discon-
nected or loose.
3. Check the fuel line in the engine com- partment.
4. If the engine still does not start, call an authorized KIA dealer or seek other
qualified assistance.
IF THE ENGINE WILL NOT START
WARNING
If the engine will not start, do not
push or pull the car to start it. This
could result in a collision or cause
other damage. In addition, push or
pull starting may cause the catalyt-
ic converter to be overloaded and
create a fire hazard.
Page 395 of 461
Maintenance67G030102AHMWhile operating your vehicle: Note any changes in the sound of theexhaust or any smell of exhaust fumes
in the vehicle.
Check for vibrations in the steering wheel. Notice any increased steering
effort or looseness in the steering
wheel, or change in its straight-ahead
position.
Notice if your vehicle constantly turns slightly or “pulls” to one side when trav-
eling on smooth, level road.
When stopping, listen and check for unusual sounds, pulling to one side,
increased brake pedal travel or “hard-
to-push” brake pedal.
If any slipping or changes in the oper- ation of your transmission occurs,
check the transmission fluid level.
Check the automatic transmission P (Park) function.
Check the parking brake.
Check for fluid leaks under your vehicle (water dripping from the air condition-
ing system during or after use is nor-
mal).
G030103AHMAt least monthly: Check the coolant level in the enginecoolant reservoir.
Check the operation of all exterior lights, including the stoplights, turn sig-
nals and hazard warning flashers.
Check the inflation pressures of all tires including the spare.G030104AHMAt least twice a year (i.e., every Spring and Fall): Check the radiator, heater and air con- ditioning hoses for leaks or damage.
Check the windshield washer spray and wiper operation. Clean the wiper
blades with clean cloth dampened with
washer fluid.
Check the headlight alignment.
Check the muffler, exhaust pipes, shields and clamps.
Check the lap/shoulder belts for wear and function.
Check for worn tires and loose wheel lug nuts.
G030105AHMAt least once a year: Clean the body and door drain holes.
Lubricate the door hinges and checks,and hood hinges.
Lubricate the door and hood locks and latches.
Lubricate the door rubber weather- strips.
Check the air conditioning system.
Check the power steering fluid level.
Inspect and lubricate the automatic transmission linkage and controls.
Clean the battery and terminals.
Check the brake fluid level.
Page 415 of 461
Maintenance26
7
G190200AUNBattery recharging Your vehicle has a maintenance-free,
calcium-based battery.
If the battery becomes discharged in a
short time (because, for example, the
headlights or interior lights were left on
while the vehicle was not in use),
recharge it by slow charging (trickle)
for 10 hours.
If the battery gradually discharges because of high electric load while the
vehicle is being used, recharge it at 20-
30A for two hours.
(Continued)
When lifting a plastic-cased bat-tery, excessive pressure on the
case may cause battery acid to
leak, resulting in personal injury.
Lift with a battery carrier or with
your hands on opposite corners.
Never attempt to recharge the battery when the battery cables
are connected.
The electrical ignition system works with high voltage. Never
touch these components with the
engine running or the ignition
switched on.
Failure to follow the above warn-
ings can result in serious bodily
injury or death.
WARNING
- Recharging battery
When recharging the battery,
observe the following precautions:
The battery must be removed
from the vehicle and placed in an
area with good ventilation.
Do not allow cigarettes, sparks, or flame near the battery.
Watch the battery during charg- ing, and stop or reduce the charg-
ing rate if the battery cells begin
gassing (boiling) violently or if
the temperature of the electrolyte
of any cell exceeds 49°C (120°F).
Wear eye protection when check- ing the battery during charging.
Disconnect the battery charger in the following order.
1. Turn off the battery charger main switch.
2. Unhook the negative clamp from the negative battery terminal.
3. Unhook the positive clamp from the positive battery terminal.