ECO mode KIA BORREGO 2015 User Guide
[x] Cancel search | Manufacturer: KIA, Model Year: 2015, Model line: BORREGO, Model: KIA BORREGO 2015Pages: 420, PDF Size: 41.56 MB
Page 190 of 420

Features of your vehicle
116
4
D250300AHM
Defogging logic
To reduce the possibility of fogging up
the inside of the windshield, the air intakeor air conditioning are controlled auto-
matically according to certain conditions
such as or position. To cancel or
return to the defogging logic, do the fol-
lowing.
D250301AHM-EE
Manual climate control system
1. Turn the ignition switch to the ON posi-tion.
2. Turn the mode selection knob to the defrost position ( ).
3. Press the air intake control button at least 5 times within 3 seconds.
The indicator light in the air intake control
button will blink 3 times with 0.5 second
of interval. It indicates that the defogging
logic is canceled or returned to the pro-
grammed status.
If the battery has been discharged or dis-
connected, it resets to the defog logic
status. D250302AHM-EE
Automatic climate control system
1. Turn the ignition switch to the ON posi-
tion.
2. Select the defroster position pressing the defroster button ( ).
3. While pressing the air conditioning button (A/C), press the air intake con-
trol button at least 5 times within 3 sec-
onds.
The A/C display blinks 3 times with 0.5
second of interval. It indicates that the
defogging logic is canceled or returned to
the programmed status.
If the battery has been discharged or dis-
connected, it resets to the defog logic
status.
OHM048123LOHM048124L
Page 191 of 420

4117
Features of your vehicle
D270000AHM
These compartments can be used to
store small items.D270100AHM
Center console storage (if equipped)
To open the center console storage, push
the button (1) or pull up the lever (2).D230600AEN
Cool box (if equipped)
You can keep beverage cans or other
items warm or cool using the open/close
lever of the vent installed in the center
console box.
1. Turn on the fan and set the tempera-
ture control to the desired position.
2. Set the mode control to the face ( ) or bi-level ( ) position.
3. Turn the open/close lever of the vent installed in the center console box to the open position (2).
4. When the cool box is not used, turn the lever to its closed position (1).
STORAGE COMPARTMENT
WARNING - Flammable
materials
Do not store cigarette lighters,
propane cylinders, or other flamma-
ble/explosive materials in the vehi-
cle. These items may catch fire
and/or explode if the vehicle is
exposed to hot temperatures for
extended periods.
OHM048125
CAUTION
To avoid possible theft, do not leave valuables in the storage
compartment.
Always keep the storage com- partment covers closed whiledriving. Do not attempt to place
so many items in the storage compartment that the storagecompartment cover cannot close securely.
OHM048097
Page 198 of 420

Features of your vehicle
124
4
Minute (2)
Press the M button to advance the time
displayed by one minute.
Hold the M button to advance the hour
reading more rapildy.
Reset (3)
To clear away minutes, press the R but-
ton. Then the clock will be set precisely
on the hour.
For example, if the R button is pressed
while the time is between 9:01 and 9:29,
the display will reset to 9:00.
9:01 ~ 9:29 display changed to 9:00
9:30 ~ 9:59 display changed to 10:00 D280604AHM
Display conversion
To change the 12 hour format to the 24
hour format, press the R button until the
display blinks.
For example, if the R button is pressed
while the time is 10:15 p.m., the displaywill change to 22:15. D281200AHM-EE Outside thermometer
The current outside temperature is dis-
played in 1°C (1°F) increments. The tem-
perature range is between -40°C ~ 60°C(-40°F~140°F). The outside temperature on the display
may not change immediately like a
general thermometer to prevent the
driver from being inattentive.
For details, refer to the "Climate control system" in section 4.
Temperature �
�
Seconds
1. Turn the ignition switch to the ON posi- tion.
2. Press the H button at least 3 times within 3 seconds while pressing the R
button.
3. The temperature mode will change to the time mode. The time displays in
seconds.
4. If the M button is pressed, the clock’s minute will change and the counting
will start again from the beginning(00).
5. To return to the temperature mode, press the H button at least 3 timeswithin 3 seconds while pressing the R
button.
If the ignition switch turns OFF and ON
again, the temperature mode will be dis-
played.
OHM048138
OHM048139
■ Type A
■ Type B
Page 205 of 420

4131
Features of your vehicle
D300200AEN
Steering wheel audio control (if equipped)
The steering wheel audio control button
is installed to promote safe driving. D300204AHM
VOLUME (VOL / ) (1)
• Pull the up button ( ) to increase thevolume.
Pull the down button ( ) to decrease the volume. D300203AHM
SEEK/PRESET ( / ) (2)
The SEEK/PRESET button has different
functions base on the system mode. For
the following functions the button should
be pressed for 0.8 seconds or more.
RADIO mode
It will function as the AUTO SEEK select
button.
CDP mode
It will function as the FF/REW button.
CDC mode
It will function as the DISC UP/DOWN
button.
If the SEEK/PRESET button is pressed
for less than 0.8 second, it will work as
follows in each mode.
RADIO mode
It will function as the PRESET STATION
select buttons.
CDP mode
It will function as the TRACK UP/DOWN
button.
CDC mode
It will function as the TRACK UP/DOWN
button. D300202AHM
MODE (3)
Press the button to select Radio, CD
(compact disc), AUX* or USB (iPod)*.
If there is no CD or the auxiliary device is
not connected, the mode may not be
converted to the CD, AUX or USB (iPod)
mode.
* : if equipped D300205AHM
MUTE (4)
Pull the MUTE button to cancel the
sound.
Pull the MUTE button again to activate the sound.
Detailed information for audio control
buttons is described in the followingpages in this section.
OHM048146N
CAUTION
Do not operate audio remote con- trol buttons simultaneously.
Page 212 of 420
![KIA BORREGO 2015 User Guide Features of your vehicle
138
4
■■
Sound Setup MODE
Press and Rotate [AUDIO] repeatedly to
choose the desired mode.
Each press changes the mode as below
: (Hierarchy 4(AVC) mode is only select- KIA BORREGO 2015 User Guide Features of your vehicle
138
4
■■
Sound Setup MODE
Press and Rotate [AUDIO] repeatedly to
choose the desired mode.
Each press changes the mode as below
: (Hierarchy 4(AVC) mode is only select-](/img/2/57933/w960_57933-211.png)
Features of your vehicle
138
4
■■
Sound Setup MODE
Press and Rotate [AUDIO] repeatedly to
choose the desired mode.
Each press changes the mode as below
: (Hierarchy 4(AVC) mode is only select-
ed in the CDP.)
Hierarchy 1
Hierarchy 2
Hierarchy 3
Hierarchy 4 ❈
For example: To adjust FADER
Press [AUDIO] to activate SETUP mode, then Hierarchy 1 is selected.
Rotate [AUDIO], Hierarchy 2 is dis- played.
Press [AUDIO] to select the FADER control mode.
Rotate [AUDIO], to adjust the FADER level.
- If [AUDIO] is not pressed/rotated for 5 seconds after adjusting, the display
automatically returns to normal mode.
- Other modes can be adjusted as above.7. MUTE Selection Button (CDP ONLY)
(if equipped)
Press [MUTE] to stop the sound and
"MUTE" is displayed on the LCD.
Page 215 of 420
4141
Features of your vehicle
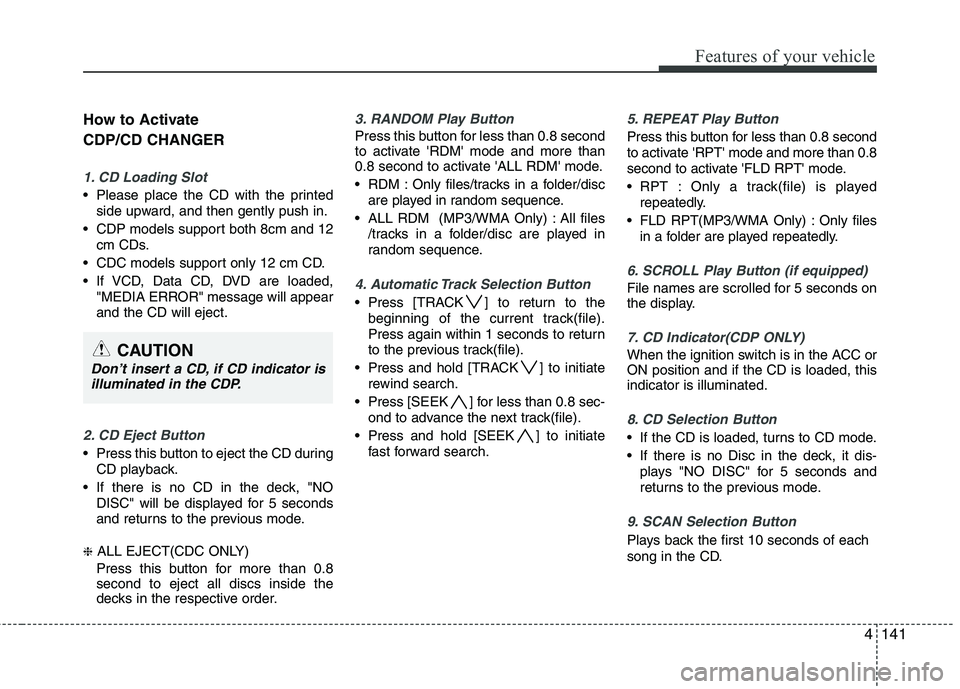
How to Activate CDP/CD CHANGER
1. CD Loading Slot
Please place the CD with the printedside upward, and then gently push in.
CDP models support both 8cm and 12 cm CDs.
CDC models support only 12 cm CD.
If VCD, Data CD, DVD are loaded, "MEDIA ERROR" message will appear and the CD will eject.
2. CD Eject Button
Press this button to eject the CD duringCD playback.
If there is no CD in the deck, "NO DISC" will be displayed for 5 seconds
and returns to the previous mode.
❈ ALL EJECT(CDC ONLY)
Press this button for more than 0.8 second to eject all discs inside the
decks in the respective order.
3. RANDOM Play Button
Press this button for less than 0.8 second
to activate 'RDM' mode and more than
0.8 second to activate 'ALL RDM' mode.
RDM : Only files/tracks in a folder/disc are played in random sequence.
ALL RDM (MP3/WMA Only) : All files /tracks in a folder/disc are played in
random sequence.
4. Automatic Track Selection Button
Press [TRACK ] to return to thebeginning of the current track(file).
Press again within 1 seconds to return
to the previous track(file).
Press and hold [TRACK ] to initiate rewind search.
Press [SEEK ] for less than 0.8 sec- ond to advance the next track(file).
Press and hold [SEEK ] to initiate fast forward search.
5. REPEAT Play Button
Press this button for less than 0.8 second
to activate 'RPT' mode and more than 0.8
second to activate 'FLD RPT' mode.
RPT : Only a track(file) is playedrepeatedly.
FLD RPT(MP3/WMA Only) : Only files in a folder are played repeatedly.
6. SCROLL Play Button (if equipped)
File names are scrolled for 5 seconds on
the display.
7. CD Indicator(CDP ONLY)
When the ignition switch is in the ACC or ON position and if the CD is loaded, thisindicator is illuminated.
8. CD Selection Button
If the CD is loaded, turns to CD mode.
If there is no Disc in the deck, it dis-plays "NO DISC" for 5 seconds and
returns to the previous mode.
9. SCAN Selection Button
Plays back the first 10 seconds of each
song in the CD.
CAUTION
Don’t insert a CD, if CD indicator isilluminated in the CDP.
Page 217 of 420
4143
Features of your vehicle
CAUTION - Using USB
device
To use the external USB device,
make sure the device is not con-
nected when starting the vehicle.Connect the device after starting.
If you start the vehicle when the USB device is mounted, it may
damage the USB device. (USB is not ESA)
If the vehicle is started or turned off while the external USB deviceis connected, the external USB
device may not work.
It may not play inauthentic MP3 or WMA files.
1) It can only play MP3 files with the compression rate between8Kbps~320Kbps.
2) It can only play WMA music files with the compression ratebetween 8Kbps~320Kbps.
Take cautions for static electricity when connect or disconnect the
external USB device.
Encoded MP3 PLAYER is not rec- ognizable.
(Continued)
(Continued) Depending on the condition of the external USB device, the con-nected external USB device canbe unrecognizable.
When the formatted byte/sector setting of External USB devices isnot either 512byte or 2048byte,then the device will not be recog-
nized.
USB only a device formatted to FAT 12/16/32.
USB device without USB I/F (IMPLEMENTERS FORUM)authentication may not be recog-
nizable.
Make sure the USB connection terminal does not come in con-tact with human body or any
object.
If you repeat connecting or dis- connecting USB device in a shortperiod of time, it may break thedevice.
You might hear a strange noise when connecting or disconnect-ing USB device.
(Continued)(Continued) If you disconnect the external USB device during playback inUSB mode, the external USBdevice can be damaged or mal-
function. Therefore, disconnectthe external USB device when the engine is turned off or in another
mode. (e.g., radio or CD)
Depending on the type and capacity of the external USBdevice or the type of files storedin the device, there is a difference
in the time taken for recognitionof the device, so you may have to wait.
Do not use the USB device for other purposes than playing
music files.
Use of USB accessories such as recharger or heater using USB I/F(IMPLEMENTERS FORUM) may
lower the performance or cause trouble.
(Continued)
Page 221 of 420
4147
Features of your vehicle
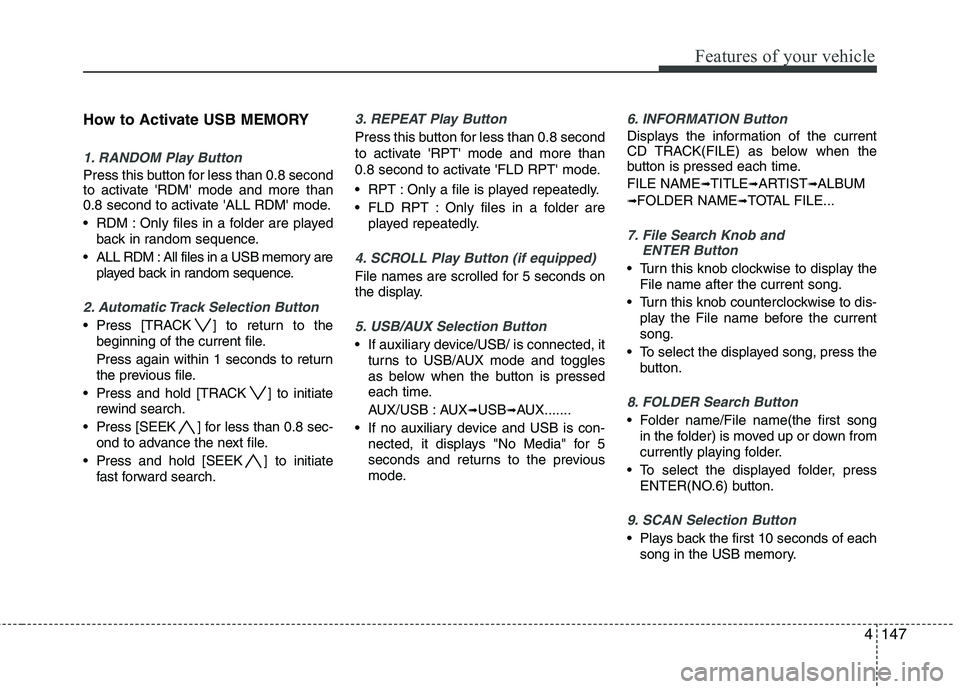
How to Activate USB MEMORY
1. RANDOM Play Button
Press this button for less than 0.8 second
to activate 'RDM' mode and more than
0.8 second to activate 'ALL RDM' mode.
RDM : Only files in a folder are playedback in random sequence.
ALL RDM : All files in a USB memory are played back in random sequence.
2. Automatic Track Selection Button
Press [TRACK ] to return to thebeginning of the current file.
Press again within 1 seconds to return
the previous file.
Press and hold [TRACK ] to initiate rewind search.
Press [SEEK ] for less than 0.8 sec- ond to advance the next file.
Press and hold [SEEK ] to initiate fast forward search.
3. REPEAT Play Button
Press this button for less than 0.8 second
to activate 'RPT' mode and more than
0.8 second to activate 'FLD RPT' mode.
RPT : Only a file is played repeatedly.
FLD RPT : Only files in a folder areplayed repeatedly.
4. SCROLL Play Button (if equipped)
File names are scrolled for 5 seconds on
the display.
5. USB/AUX Selection Button
If auxiliary device/USB/ is connected, itturns to USB/AUX mode and toggles
as below when the button is pressed
each time.
AUX/USB : AUX ➟USB ➟AUX.......
If no auxiliary device and USB is con- nected, it displays "No Media" for 5
seconds and returns to the previous
mode.
6. INFORMATION Button
Displays the information of the current
CD TRACK(FILE) as below when the
button is pressed each time. FILE NAME ➟
TITLE ➟ARTIST ➟ALBUM
➟ FOLDER NAME ➟TOTAL FILE...
7. File Search Knob and
ENTER Button
Turn this knob clockwise to display the
File name after the current song.
Turn this knob counterclockwise to dis- play the File name before the current song.
To select the displayed song, press the button.
8. FOLDER Search Button
Folder name/File name(the first songin the folder) is moved up or down from
currently playing folder.
To select the displayed folder, press ENTER(NO.6) button.
9. SCAN Selection Button
Plays back the first 10 seconds of eachsong in the USB memory.
Page 222 of 420
Features of your vehicle
148
4
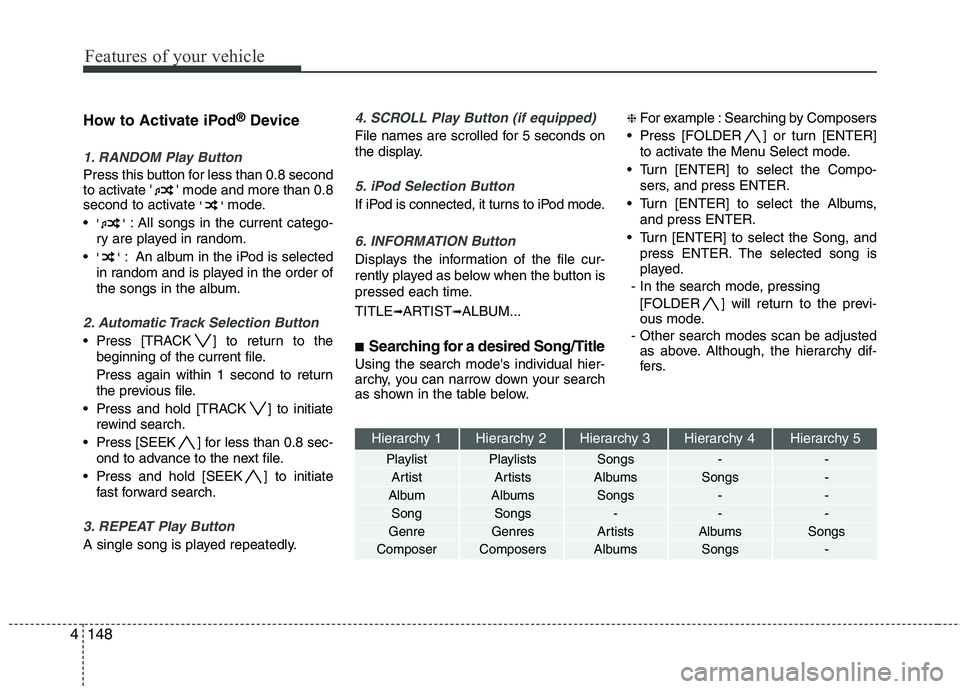
How to Activate iPod ®
Device
1. RANDOM Play Button
Press this button for less than 0.8 second
to activate ' ' mode and more than 0.8
second to activate ''mode.
'' : All songs in the current catego-
ry are played in random.
'' : An album in the iPod is selected
in random and is played in the order of
the songs in the album.
2. Automatic Track Selection Button
Press [TRACK ] to return to the beginning of the current file.
Press again within 1 second to return
the previous file.
Press and hold [TRACK ] to initiate rewind search.
Press [SEEK ] for less than 0.8 sec- ond to advance to the next file.
Press and hold [SEEK ] to initiate fast forward search.
3. REPEAT Play Button
A single song is played repeatedly.
4. SCROLL Play Button (if equipped)
File names are scrolled for 5 seconds on
the display.
5. iPod Selection Button
If iPod is connected, it turns to iPod mode.
6. INFORMATION Button
Displays the information of the file cur-
rently played as below when the button is
pressed each time. TITLE ➟ARTIST ➟ALBUM...
■ Searching for a desired Song/Title
Using the search mode's individual hier-
archy, you can narrow down your search
as shown in the table below. ❈
For example : Searching by Composers
Press [FOLDER ] or turn [ENTER] to activate the Menu Select mode.
Turn [ENTER] to select the Compo- sers, and press ENTER.
Turn [ENTER] to select the Albums, and press ENTER.
Turn [ENTER] to select the Song, and press ENTER. The selected song is
played.
- In the search mode, pressing [FOLDER ] will return to the previ-
ous mode.
- Other search modes scan be adjusted as above. Although, the hierarchy dif-
fers.
Hierarchy 1 Hierarchy 2 Hierarchy 3 Hierarchy 4 Hierarchy 5
Playlist Playlists Songs - -
Artist Artists Albums Songs -
Album Albums Songs - - Song Songs - - -
Genre Genres Artists Albums Songs
Composer Composers Albums Songs -
Page 226 of 420
Features of your vehicle
152
4
Using RADIO, SETUP, VOLUME and
AUDIO CONTROL
1. FM/AM Button
FM Button
Turns to FM mode and switches
among FM1, FM2 when the button is
pressed each time.
AM Button Turns to AM mode when the button ispressed.
2. POWER Button & VOLUME Knob
Turns the Audio system on/off whenthe ignition switch is on ACC or ON.
If the knob is turned clockwise/counter- clockwise, the volume will increase
/decrease.
3. SEEK Button
When the [SEEK ] is pressed, it will automatically tune to the next lower station.
When the [SEEK ] is pressed, it will automatically tune to the next higherstation. 4. AST(AUTO STORE) Button
When AST is pressed, the frequency is
stored on the preset memory [1]~[6]
and automatically plays a channelstored on the Preset [1].
If nothing has been stored because there was no frequency received, it will
return to the previous frequency.
5. PRESET Buttons
Press [1]~[6] buttons less than 0.8 sec- ond to play the station saved in each
button.
Press [1]~[6] b uttons more than 0.8
second or longer to save the current
station to the respective button with a
beep. 6. TUNE Knob & ENTER Button
If the knob is turned clockwise/counter-
clockwise, the frequency will increase/
decrease.
Countries not using Europe frequency
AM 9kHz, FM 100MHz
Countries using Europe frequency FM 50MHz, AW 9kHz