change time KIA Cadenza 2015 1.G Owner's Guide
[x] Cancel search | Manufacturer: KIA, Model Year: 2015, Model line: Cadenza, Model: KIA Cadenza 2015 1.GPages: 429, PDF Size: 5.47 MB
Page 253 of 429
Driving your vehicle
26
5
Cancel
To cancel the Auto Hold operation,
press the Auto Hold switch. The
AUTO HOLD indicator will go out.
To cancel the Auto Hold operation
when the vehicle is at a standstill,
press the Auto Hold switch while
depressing the brake pedal.
✽ ✽
NOTICE
• The Auto Hold does not operate
when:
- The driver's seat belt is unfas-tened and driver's door is opened
- The engine hood is opened
- The trunk is opened
- The shift lever is in P (Park)
- The EPB is applied
• For your safety, the Auto Hold automatically switches to EPB in
such cases:
- The driver's seat belt is unfas-tened and driver's door is opened
- The engine hood is opened
- The trunk is opened
- The vehicle is in a standstill for more than 10 minutes
- The vehicle is standing on a steep slope
- The vehicle moved several times (Continued)(Continued)
In these cases, the brake warning
light comes on, the AUTO HOLD
indicator changes from green to
white, and a warning sounds and a
message will appear to inform you
that EPB has been automatically
engaged. Before driving off again,
press foot brake pedal, check the
surrounding area near your vehi-
cle and release parking brake
manually with the EPB switch.
• If the AUTO HOLD indicator lights up yellow, the Auto Hold is
not working properly. Take your
vehicle to an authorized Kia
Premium dealer and have the sys-
tem checked.
• While operating Auto Hold, you may hear mechanical noise.
However, it is normal operating
noise.
Page 260 of 429
533
Driving your vehicle
Hill-start assist control (HAC)
Hill start Assist Control is a comfort
function. The main intent is to pre-
vent the vehicle from rolling back-
wards while driving uphill on an
inclined surface. HAC holds the brak-
ing pressure builtup by driver during
stopping procedure for 2 seconds
after releasing brake pedal.
During the pressure-hold period, the
driver has enough time to press the
accelerator pedal to drive off.
The braking pressure is reduced as
soon as the system detects the dri-
ver’s intention to drive off. The HAC does not operate when
the transaxle shift lever is in the P
(Park) or N (Neutral) position.
The HAC activates even though the ESC is off but it does not acti-
vate when the ESC has malfunc-
tioned.
Vehicle stability management
(VSM)
This system provides further
enhancements to vehicle stability
and steering responses when a vehi-
cle is driving on a slippery road or a
vehicle detected changes in coeffi-
cient of friction between right wheels
and left wheels when braking.
WARNING- Maintaining
Brake Pressure on Incline
HAC does not replace the need
to apply brakes while stopped on
an incline. While stopped, make
sure you maintain brake pres-
sure sufficient to prevent your
vehicle from rolling backward
and causing an accident. Don’t
release the brake pedal until you
are ready to accelerate forward.
WARNING
For maximum protection,
always wear your seat belt. No
system, no matter how
advanced, can compensate for
all driver error and/or driving
conditions. Always drive
responsibly
Page 270 of 429
543
Driving your vehicle
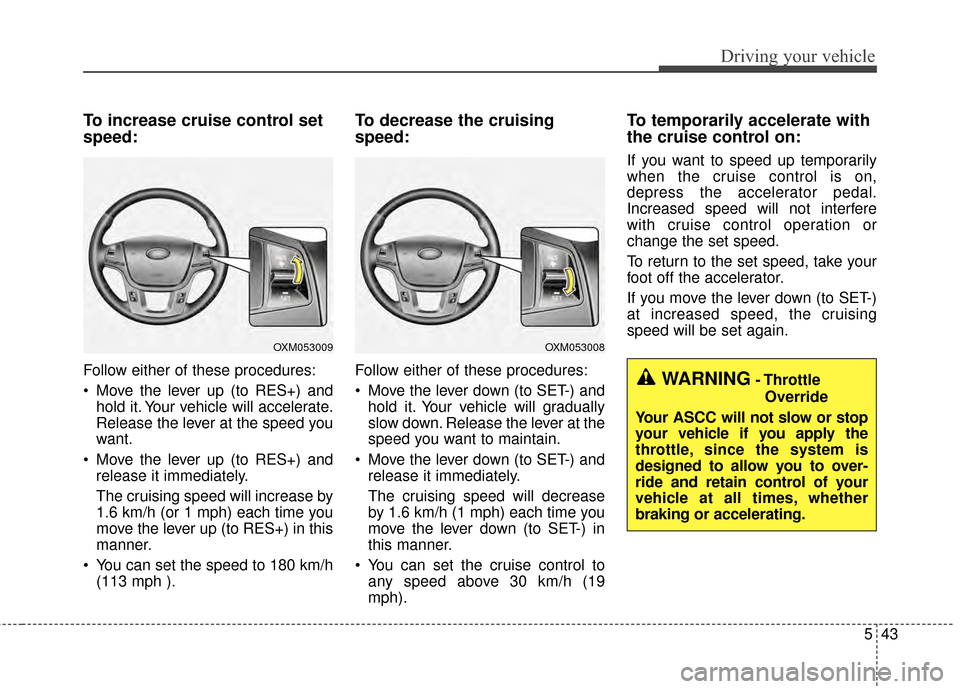
To increase cruise control set
speed:
Follow either of these procedures:
Move the lever up (to RES+) andhold it. Your vehicle will accelerate.
Release the lever at the speed you
want.
Move the lever up (to RES+) and release it immediately.
The cruising speed will increase by
1.6 km/h (or 1 mph) each time you
move the lever up (to RES+) in this
manner.
You can set the speed to 180 km/h (113 mph ).
To decrease the cruising
speed:
Follow either of these procedures:
Move the lever down (to SET-) andhold it. Your vehicle will gradually
slow down. Release the lever at the
speed you want to maintain.
Move the lever down (to SET-) and release it immediately.
The cruising speed will decrease
by 1.6 km/h (1 mph) each time you
move the lever down (to SET-) in
this manner.
You can set the cruise control to any speed above 30 km/h (19
mph).
To temporarily accelerate with
the cruise control on:
If you want to speed up temporarily
when the cruise control is on,
depress the accelerator pedal.
Increased speed will not interfere
with cruise control operation or
change the set speed.
To return to the set speed, take your
foot off the accelerator.
If you move the lever down (to SET-)
at increased speed, the cruising
speed will be set again.
OXM053009OXM053008
WARNING- Throttle
Override
Your ASCC will not slow or stop
your vehicle if you apply the
throttle, since the system is
designed to allow you to over-
ride and retain control of your
vehicle at all times, whether
braking or accelerating.
Page 273 of 429
Driving your vehicle
46
5
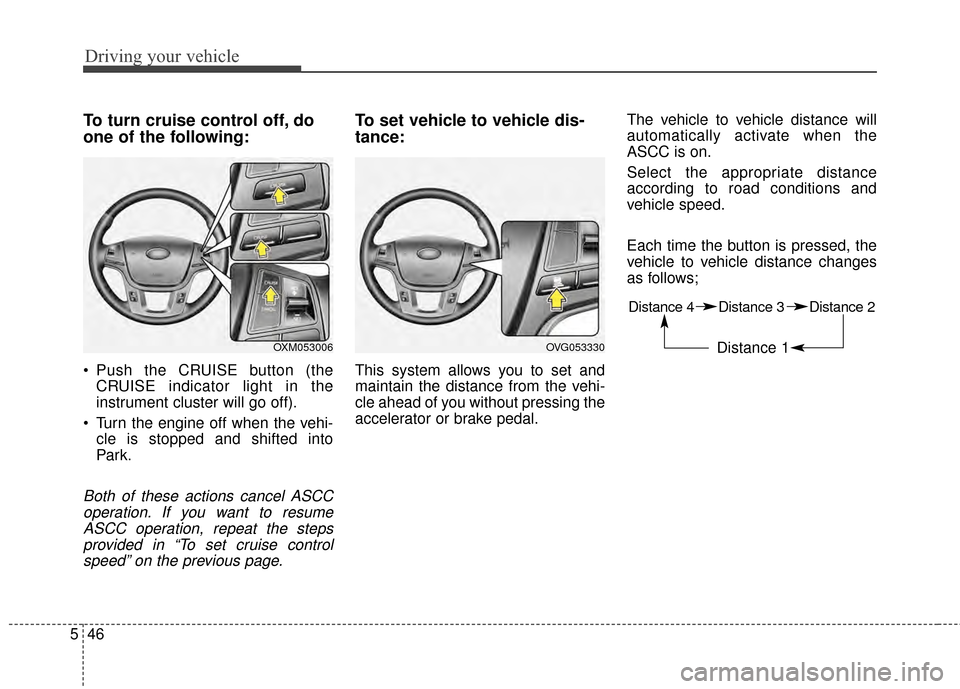
To turn cruise control off, do
one of the following:
Push the CRUISE button (the
CRUISE indicator light in the
instrument cluster will go off).
Turn the engine off when the vehi- cle is stopped and shifted into
Par k.
Both of these actions cancel ASCCoperation. If you want to resumeASCC operation, repeat the stepsprovided in “To set cruise controlspeed” on the previous page.
To set vehicle to vehicle dis-
tance:
This system allows you to set and
maintain the distance from the vehi-
cle ahead of you without pressing the
accelerator or brake pedal. The vehicle to vehicle distance will
automatically activate when the
ASCC is on.
Select the appropriate distance
according to road conditions and
vehicle speed.
Each time the button is pressed, the
vehicle to vehicle distance changes
as follows;
OVG053330
Distance 4 Distance 3 Distance 2
Distance 1 OXM053006
Page 359 of 429
Maintenance
30
7
Changing the engine oil and
filter
Have engine oil and filter changed by
an authorized Kia Premium dealer
according to the Maintenance
Schedule at the beginning of this
chapter.
WARNING
Used engine oil may cause irri-
tation or cancer of the skin if
left in contact with the skin for
prolonged periods of time.
Always protect your skin by
washing your hands thoroughly
with soap and warm water as
soon as possible after handling
used oil.
Page 426 of 429
I5
Index
Trunk room lamp . . . . . . . . . . . . . . . . . . . . . . . . . . 4-110
Vanity mirror lamp . . . . . . . . . . . . . . . . . . . . . . . . . 4-111
Interior overview. . . . . . . . . . . . . . . . . . . . . . . . . . . . . . . 2-4
Lane Departure Warning System (LDWS) . . . . . . . . . . 5-54
LCD display . . . . . . . . . . . . . . . . . . . . . . . . . . . . . . . . . 4-59 A/V Mode. . . . . . . . . . . . . . . . . . . . . . . . . . . . . . . . . 4-65
LCD Modes . . . . . . . . . . . . . . . . . . . . . . . . . . . . . . . 4-59
Service Mode . . . . . . . . . . . . . . . . . . . . . . . . . . . . . . 4-60
Turn By Turn Mode . . . . . . . . . . . . . . . . . . . . . . . . . 4-65
User Settings Mode . . . . . . . . . . . . . . . . . . . . . . . . . 4-62
Warning Messages . . . . . . . . . . . . . . . . . . . . . . . . . . 4-66
Lighting. . . . . . . . . . . . . . . . . . . . . . . . . . . . . . . . . . . . \
. 4-97 Battery saver function . . . . . . . . . . . . . . . . . . . . . . . 4-97
Daytime running light . . . . . . . . . . . . . . . . . . . . . . . 4-97
Front fog light . . . . . . . . . . . . . . . . . . . . . . . . . . . . 4-102
Headlight escort function . . . . . . . . . . . . . . . . . . . . . 4-97
Headlight leveling device . . . . . . . . . . . . . . . . . . . . 4-103
High beam operation . . . . . . . . . . . . . . . . . . . . . . . 4-100
Lighting control . . . . . . . . . . . . . . . . . . . . . . . . . . . . 4-98
Turn signals and lane change signals . . . . . . . . . . . 4-101
Maintenance services . . . . . . . . . . . . . . . . . . . . . . . . . . . 7-4 Owner maintenance precautions . . . . . . . . . . . . . . . . 7-5 Owner’s responsibility . . . . . . . . . . . . . . . . . . . . . . . . 7-4
Mirrors . . . . . . . . . . . . . . . . . . . . . . . . . . . . . . . . . . . . \
. 4-40 Inside rearview mirror . . . . . . . . . . . . . . . . . . . . . . . 4-40
Outside rearview mirror . . . . . . . . . . . . . . . . . . . . . 4-48
Owner maintenance . . . . . . . . . . . . . . . . . . . . . . . . . . . . 7-6 Owner maintenance schedule. . . . . . . . . . . . . . . . . . . 7-6
Panoramic sunroof . . . . . . . . . . . . . . . . . . . . . . . . . . . . 4-32 Closing the sunroof . . . . . . . . . . . . . . . . . . . . . . . . . 4-33
Resetting the sunroof . . . . . . . . . . . . . . . . . . . . . . . . 4-36
Sliding the sunroof . . . . . . . . . . . . . . . . . . . . . . . . . . 4-33
Sunroof open warning . . . . . . . . . . . . . . . . . . . . . . . 4-32
Sunshade. . . . . . . . . . . . . . . . . . . . . . . . . . . . . . . . . . 4-35\
Tilting the sunroof . . . . . . . . . . . . . . . . . . . . . . . . . . 4-34
Parking brake . . . . . . . . . . . . . . . . . . . . . . . . . . . . . . . . 7-36 Checking the parking brake . . . . . . . . . . . . . . . . . . . 7-36
Rearview camera display . . . . . . . . . . . . . . . . . . . . . . . 4-94
Recommended lubricants and capacities . . . . . . . . . . . . 8-5 Recommended SAE viscosity number . . . . . . . . . . . 8-6
L
M
O
P
R