display KIA Cadenza 2016 1.G Owner's Guide
[x] Cancel search | Manufacturer: KIA, Model Year: 2016, Model line: Cadenza, Model: KIA Cadenza 2016 1.GPages: 419, PDF Size: 8.03 MB
Page 221 of 419
Driving your vehicle
85
Starting the engine with a
smart key
1.Carry the smart key or leave itinside the vehicle.
2.Make sure the parking brake is firmly applied
3.Place the transaxle shift lever in P (Park).
4.Press the ENGINE START/STOP button while depressing the brake
pedal.
5.Do not wait for the engine to warm up while the vehicle remains sta-
tionary.
Start driving at moderate engine
speeds. (Steep accelerating and
decelerating should be avoided.)
It should be started without depress-
ing the accelerator. Even if the smart key is in the vehi-
cle, but is far away from you, the
engine may not start.
When the ENGINE START/STOP button is in the ACC position or
above, if any door is opened, the
system checks for the smart key. If
the smart key is not in the vehi-
cle,the “ ” indicator will blink or
the warning "Key not in vehicle" will
illuminate on the LCD display. And
if all doors are closed, the chime
will sound for 5 seconds. The indi-
cator or warning will turn off while
the vehicle is moving. Always have
the smart key with you.
The engine will start only when the
smart key is in the vehicle.
STARTING THE ENGINE
WARNING - Proper footwear
Always wear appropriate shoes
when operating your vehicle.
Unsuitable shoes (high heels,
ski boots, sandals, etc.) may
interfere with your ability to use
the brake and accelerator ped-
als.
CAUTION- Starter
Do not engage the starter for
more than 10 seconds. If theengine stalls or fails to start, wait5 to 10 seconds before re-engag-ing the starter. Improper use ofthe starter may damage it.
Page 224 of 419
511
Driving your vehicle
For smooth operation, depress thebrake pedal when shifting from N(Neutral) to a forward or reversegear.
When stopped on an upgrade, do not
hold the vehicle with engine power.
Use the service brake or the parking
brake.
Transaxle ranges
The indicator light in the instrument
cluster displays the shift lever posi-
tion when the ignition switch is in the
ON position.
P (Park)
Always come to a complete stop
before shifting into P (Park). This
position locks the transaxle and pre-
vents the front wheels from rotating.
Shifting into P (Park) while the vehi-
cle is in motion will cause the drive
wheels to lock which will cause you
to lose control of the vehicle.CAUTION - Transaxle
To avoid damage to yourtransaxle, do not accelerate theengine in R (Reverse) or any for-ward gear position with thebrakes on. The transaxle may bedamaged if you shift into P(Park) while the vehicle is inmotion.
WARNING- Leaving the
Vehicle
To avoid unexpected or sudden
vehicle movement, never leave
your vehicle if the transmission
is not locked in the P (Park)
position and the parking brake
is fully engaged. Before leaving
the driver's seat, always make
sure the shift lever is engaged in
P (Park), set the parking brake
fully and shut the engine off.
Page 260 of 419
547
Driving your vehicle
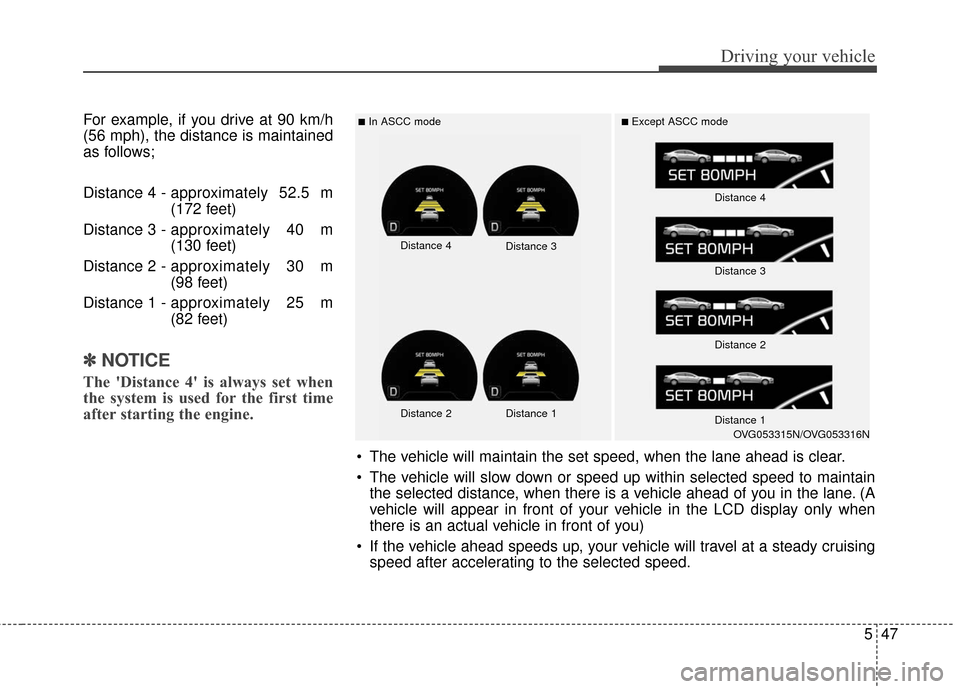
For example, if you drive at 90 km/h
(56 mph), the distance is maintained
as follows;
Distance 4 - approximately 52.5 m
(172 feet)
Distance 3 - approximately 40 m
(130 feet)
Distance 2 - approximately 30 m
(98 feet)
Distance 1 - approximately 25 m
(82 feet)
✽ ✽
NOTICE
The 'Distance 4' is always set when
the system is used for the first time
after starting the engine.
■In ASCC mode■Except ASCC mode
The vehicle will maintain the set speed, when the lane ahead is clear.
The vehicle will slow down or speed up within selected speed to maintain
the selected distance, when there is a vehicle ahead of you in the lane. (A
vehicle will appear in front of your vehicle in the LCD display only when
there is an actual vehicle in front of you)
If the vehicle ahead speeds up, your vehicle will travel at a steady cruising speed after accelerating to the selected speed.
Distance 4 Distance 3
Distance 2 Distance 1
Distance 4
Distance 3
Distance 2
Distance 1
OVG053315N/OVG053316N
Page 269 of 419
Driving your vehicle
56
5
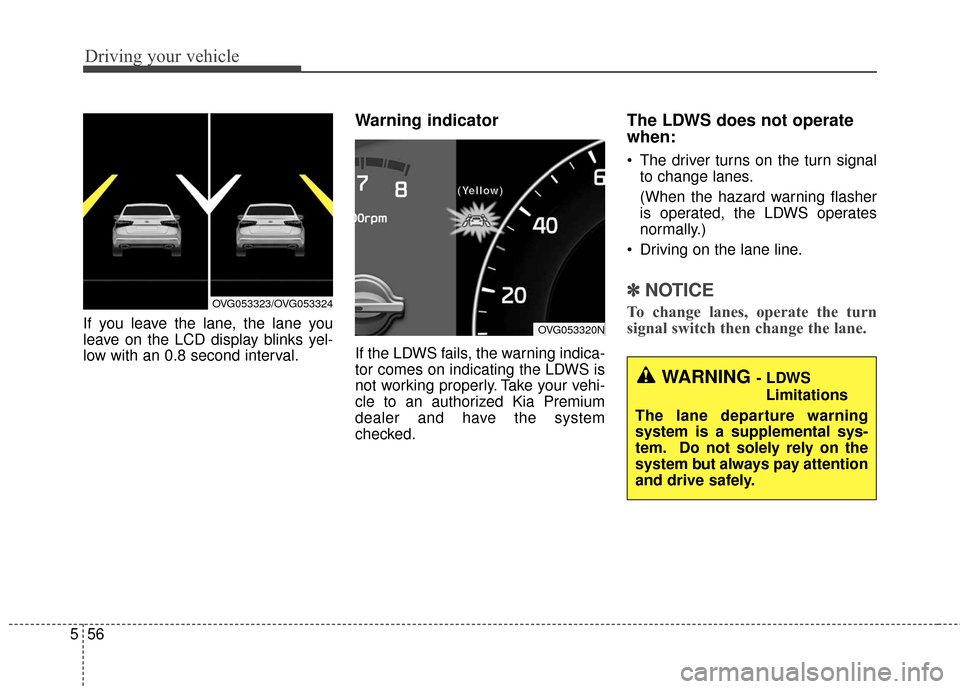
If you leave the lane, the lane you
leave on the LCD display blinks yel-
low with an 0.8 second interval.
Warning indicator
If the LDWS fails, the warning indica-
tor comes on indicating the LDWS is
not working properly. Take your vehi-
cle to an authorized Kia Premium
dealer and have the system
checked.
The LDWS does not operate
when:
The driver turns on the turn signal
to change lanes.
(When the hazard warning flasher
is operated, the LDWS operates
normally.)
Driving on the lane line.
✽ ✽ NOTICE
To change lanes, operate the turn
signal switch then change the lane.
OVG053320N
(
(
(
(
Y
Y
Y
Y
e
e
e
e
l
l
l
l
l
l
l
l
o
o
o
o
w
w
w
w
)
)
)
)
WARNING - LDWS
Limitations
The lane departure warning
system is a supplemental sys-
tem. Do not solely rely on the
system but always pay attention
and drive safely.
OVG053323/OVG053324
Page 276 of 419
563
Driving your vehicle
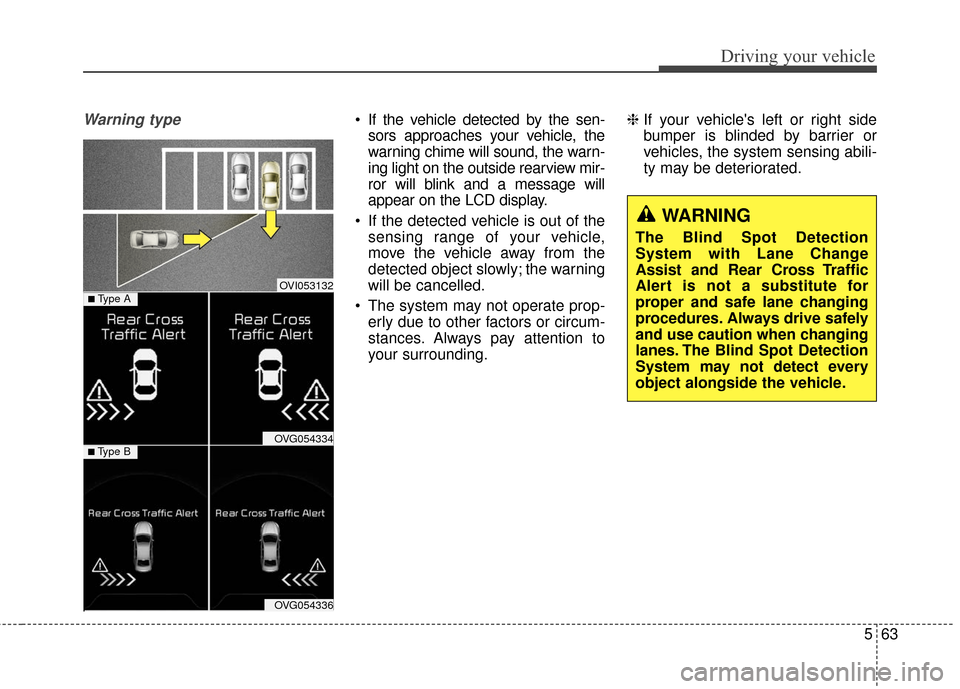
Warning type If the vehicle detected by the sen-sors approaches your vehicle, the
warning chime will sound, the warn-
ing light on the outside rearview mir-
ror will blink and a message will
appear on the LCD display.
If the detected vehicle is out of the sensing range of your vehicle,
move the vehicle away from the
detected object slowly; the warning
will be cancelled.
The system may not operate prop- erly due to other factors or circum-
stances. Always pay attention to
your surrounding. ❈
If your vehicle's left or right side
bumper is blinded by barrier or
vehicles, the system sensing abili-
ty may be deteriorated.
WARNING
The Blind Spot Detection
System with Lane Change
Assist and Rear Cross Traffic
Alert is not a substitute for
proper and safe lane changing
procedures. Always drive safely
and use caution when changing
lanes. The Blind Spot Detection
System may not detect every
object alongside the vehicle.
OVI053132
OVG054334
OVG054336
■ Type A
■ Type B
Page 301 of 419
What to do in an emergency
86
TIRE PRESSURE MONITORING SYSTEM (TPMS) (IF EQUIPPED)
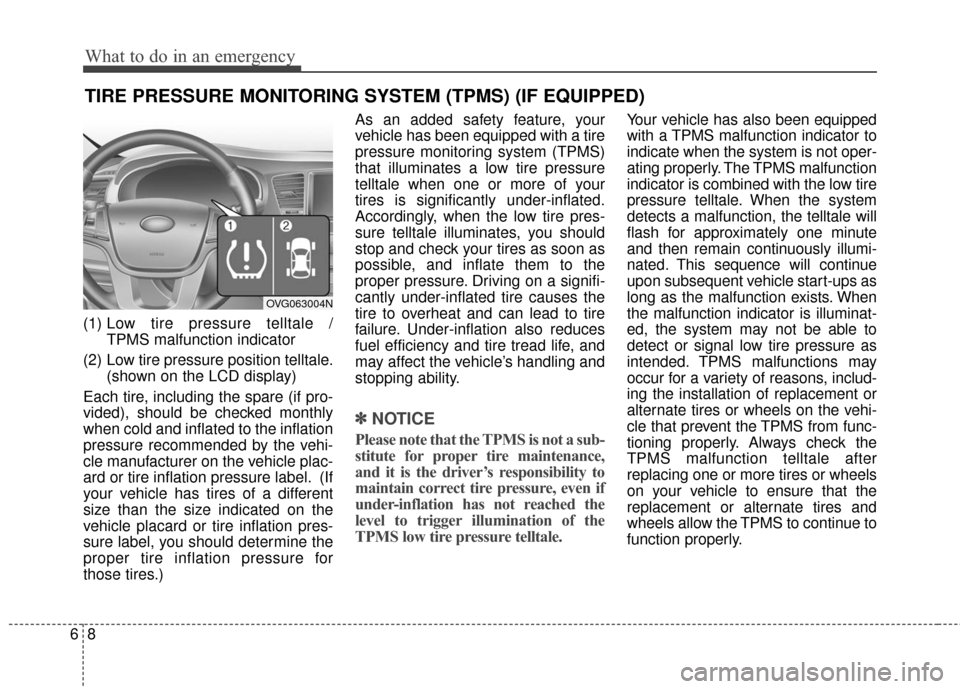
(1) Low tire pressure telltale /
TPMS malfunction indicator
(2) Low tire pressure position telltale. (shown on the LCD display)
Each tire, including the spare (if pro-
vided), should be checked monthly
when cold and inflated to the inflation
pressure recommended by the vehi-
cle manufacturer on the vehicle plac-
ard or tire inflation pressure label. (If
your vehicle has tires of a different
size than the size indicated on the
vehicle placard or tire inflation pres-
sure label, you should determine the
proper tire inflation pressure for
those tires.) As an added safety feature, your
vehicle has been equipped with a tire
pressure monitoring system (TPMS)
that illuminates a low tire pressure
telltale when one or more of your
tires is significantly under-inflated.
Accordingly, when the low tire pres-
sure telltale illuminates, you should
stop and check your tires as soon as
possible, and inflate them to the
proper pressure. Driving on a signifi-
cantly under-inflated tire causes the
tire to overheat and can lead to tire
failure. Under-inflation also reduces
fuel efficiency and tire tread life, and
may affect the vehicle’s handling and
stopping ability.
✽ ✽
NOTICE
Please note that the TPMS is not a sub-
stitute for proper tire maintenance,
and it is the driver’s responsibility to
maintain correct tire pressure, even if
under-inflation has not reached the
level to trigger illumination of the
TPMS low tire pressure telltale.
Your vehicle has also been equipped
with a TPMS malfunction indicator to
indicate when the system is not oper-
ating properly. The TPMS malfunction
indicator is combined with the low tire
pressure telltale. When the system
detects a malfunction, the telltale will
flash for approximately one minute
and then remain continuously illumi-
nated. This sequence will continue
upon subsequent vehicle start-ups as
long as the malfunction exists. When
the malfunction indicator is illuminat-
ed, the system may not be able to
detect or signal low tire pressure as
intended. TPMS malfunctions may
occur for a variety of reasons, includ-
ing the installation of replacement or
alternate tires or wheels on the vehi-
cle that prevent the TPMS from func-
tioning properly. Always check the
TPMS malfunction telltale after
replacing one or more tires or wheels
on your vehicle to ensure that the
replacement or alternate tires and
wheels allow the TPMS to continue to
function properly.
OVG063004N
Page 302 of 419
69
What to do in an emergency
✽
✽NOTICE
If any of the below happens, have
the system be checked by an author-
ized Kia Premium dealer.
1.The low tire pressure telltale/
TPMS malfunction indicator do
not illuminate for 3 seconds when
the ignition switch is turned to the
ON or engine is running.
2. The TPMS malfunction indicator remains illuminated after blinking
for approximately 1 minute.
3. The Low tire pressure position telltale remains illuminated.
Low tire pressure
telltale
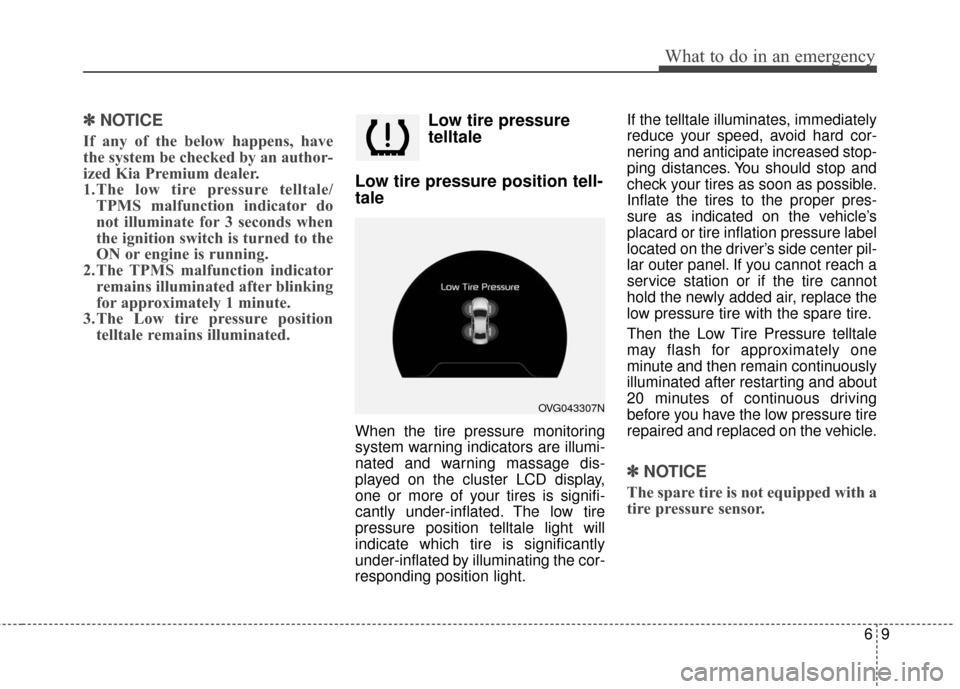
Low tire pressure position tell-
tale
When the tire pressure monitoring
system warning indicators are illumi-
nated and warning massage dis-
played on the cluster LCD display,
one or more of your tires is signifi-
cantly under-inflated. The low tire
pressure position telltale light will
indicate which tire is significantly
under-inflated by illuminating the cor-
responding position light. If the telltale illuminates, immediately
reduce your speed, avoid hard cor-
nering and anticipate increased stop-
ping distances. You should stop and
check your tires as soon as possible.
Inflate the tires to the proper pres-
sure as indicated on the vehicle’s
placard or tire inflation pressure label
located on the driver’s side center pil-
lar outer panel. If you cannot reach a
service station or if the tire cannot
hold the newly added air, replace the
low pressure tire with the spare tire.
Then the Low Tire Pressure telltale
may flash for approximately one
minute and then remain continuously
illuminated after restarting and about
20 minutes of continuous driving
before you have the low pressure tire
repaired and replaced on the vehicle.
✽ ✽
NOTICE
The spare tire is not equipped with a
tire pressure sensor.
OVG043307N
Page 303 of 419
What to do in an emergency
10
6
In winter or cold weather, the low tire
pressure telltale may be illuminated if
the tire pressure was adjusted to the
recommended tire inflation pressure
in warm weather. It does not mean
your TPMS is malfunctioning because
the decreased temperature leads to a
proportional lowering of tire pressure.
When you drive your vehicle from a
warm area to a cold area or from a cold
area to a warm area, or the outside
temperature is greatly higher or lower,
you should check the tire inflation pres-
sure and adjust the tires to the recom-
mended tire inflation pressure.TPMS (Tire Pressure
Monitoring System)
malfunction indicator
The TPMS malfunction indicator will
illuminate after it blinks for approxi-
mately one minute when there is a
problem with the Tire Pressure
Monitoring System. Ha ve the system
checked by an authorized Kia
Premium dealer as soon as possible
to determine the cause of the prob-
lem.
✽ ✽ NOTICE
If there is a malfunction with the
TPMS, the low tire pressure position
telltale will not be displayed even
though the vehicle has an under-
inflated tire.
The TPMS malfunction indicator may
be illuminated if the vehicle is moving
around electric power supply cables
or radios transmitter such as at
police stations, government and pub-
lic offices, broadcasting stations, mil-
itary installations, airports, or trans-
mitting towers, etc. This can interfere
with normal operation of the Tire
Pressure Monitoring System
(TPMS).
The TPMS malfunction indicator may
illuminate if snow chains or some
separately purchased devices such
as notebook computers, mobile
charger, remote starter, navigation
etc. are used in the vehicle. This can
interfere with normal operation of the
Tire Pressure Monitoring System
(TPMS).
WARNING- Low pressure
damage
Do not drive on low pressure
tires. Significantly low tire pres-
sure can cause the tires to over-
heat and fail making the vehicle
unstable resulting in increased
braking distances and a loss of
vehicle control.
Page 372 of 419
753
Maintenance
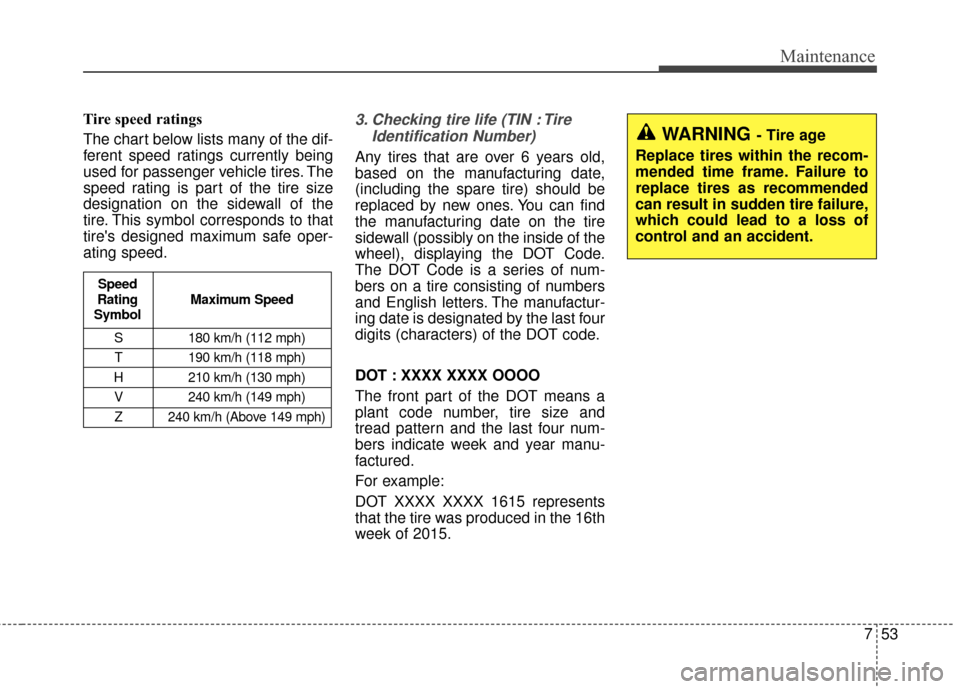
Tire speed ratings
The chart below lists many of the dif-
ferent speed ratings currently being
used for passenger vehicle tires. The
speed rating is part of the tire size
designation on the sidewall of the
tire. This symbol corresponds to that
tire's designed maximum safe oper-
ating speed.3. Checking tire life (TIN : TireIdentification Number)
Any tires that are over 6 years old,
based on the manufacturing date,
(including the spare tire) should be
replaced by new ones. You can find
the manufacturing date on the tire
sidewall (possibly on the inside of the
wheel), displaying the DOT Code.
The DOT Code is a series of num-
bers on a tire consisting of numbers
and English letters. The manufactur-
ing date is designated by the last four
digits (characters) of the DOT code.
DOT : XXXX XXXX OOOO
The front part of the DOT means a
plant code number, tire size and
tread pattern and the last four num-
bers indicate week and year manu-
factured.
For example:
DOT XXXX XXXX 1615 represents
that the tire was produced in the 16th
week of 2015.
S 180 km/h (112 mph)
T 190 km/h (118 mph)
H 210 km/h (130 mph) V 240 km/h (149 mph)Z 240 km/h (Above 149 mph)
Maximum Speed
Speed
Rating
Symbol
WARNING - Tire age
Replace tires within the recom-
mended time frame. Failure to
replace tires as recommended
can result in sudden tire failure,
which could lead to a loss of
control and an accident.
Page 415 of 419
Index
4I
Fuel requirements . . . . . . . . . . . . . . . . . . . . . . . . . . . . . . 1-3Do not use methanol . . . . . . . . . . . . . . . . . . . . . . . . . 1-5
Fuel Additives . . . . . . . . . . . . . . . . . . . . . . . . . . . . . . 1-5
Gasoline containing alcohol and methanol . . . . . . . . 1-3
Fuses . . . . . . . . . . . . . . . . . . . . . . . . . . . . . . . . . . . . \
. . . 7-60 Engine compartment fuse replacement . . . . . . . . . . 7-63
Fuse/relay panel description. . . . . . . . . . . . . . . . . . . 7-65
Instrument panel fuse replacement . . . . . . . . . . . . . 7-62
Harzard warning flasher . . . . . . . . . . . . . . . . . . . . . . . . 4-96
Hood . . . . . . . . . . . . . . . . . . . . . . . . . . . . . . . . . . . . \
. . . 4-27 Closing . . . . . . . . . . . . . . . . . . . . . . . . . . . . . . . . . . . 4-\
28
Opening . . . . . . . . . . . . . . . . . . . . . . . . . . . . . . . . . . 4-27\
How to use this manual . . . . . . . . . . . . . . . . . . . . . . . . . 1-2
If the engine overheats . . . . . . . . . . . . . . . . . . . . . . . . . . 6-7
If the engine will not start . . . . . . . . . . . . . . . . . . . . . . . 6-4 If engine doesn’t turn over or turns over slowly . . . . 6-4
If engine turns over normally but does not start . . . . 6-4
If you have a flat tire (with spare tire) . . . . . . . . . . . . . 6-13 Changing tires . . . . . . . . . . . . . . . . . . . . . . . . . . . . . 6-14
Jack and tools . . . . . . . . . . . . . . . . . . . . . . . . . . . . . . 6-13
Removing and storing the spare tire . . . . . . . . . . . . 6-14
In case of an emergency while driving . . . . . . . . . . . . . . 6-3 If engine stalls while driving . . . . . . . . . . . . . . . . . . . 6-3
If the engine stalls at a crossroad or crossing . . . . . . 6-3
If you have a flat tire while driving . . . . . . . . . . . . . . 6-3
Instrument cluster . . . . . . . . . . . . . . . . . . . . . . . . . . . . . 4-52 Gauges . . . . . . . . . . . . . . . . . . . . . . . . . . . . . . . . . . . 4-\
54
Instrument Cluster Control. . . . . . . . . . . . . . . . . . . . 4-53
LCD Display Control . . . . . . . . . . . . . . . . . . . . . . . . 4-53
Transaxle Shift Indicator . . . . . . . . . . . . . . . . . . . . . 4-58
Instrument panel overview . . . . . . . . . . . . . . . . . . . . . . . 2-5
Interior features. . . . . . . . . . . . . . . . . . . . . . . . . . . . . . 4-131 Air ventilation seat . . . . . . . . . . . . . . . . . . . . . . . . . 4-133
Clock . . . . . . . . . . . . . . . . . . . . . . . . . . . . . . . . . . . 4-\
136
Clothes hanger . . . . . . . . . . . . . . . . . . . . . . . . . . . . 4-137
Cup holder . . . . . . . . . . . . . . . . . . . . . . . . . . . . . . . 4-131
Floor mat anchor . . . . . . . . . . . . . . . . . . . . . . . . . . 4-137
Luggage net holder. . . . . . . . . . . . . . . . . . . . . . . . . 4-138
Navigation system . . . . . . . . . . . . . . . . . . . . . . . . . 4-139
Power outlet . . . . . . . . . . . . . . . . . . . . . . . . . . . . . . 4-135
Rear curtain . . . . . . . . . . . . . . . . . . . . . . . . . . . . . . 4-139
Seat warmer . . . . . . . . . . . . . . . . . . . . . . . . . . . . . . 4-132
Sunvisor . . . . . . . . . . . . . . . . . . . . . . . . . . . . . . . . . 4-131
USB charger . . . . . . . . . . . . . . . . . . . . . . . . . . . . . . 4-135
Interior light . . . . . . . . . . . . . . . . . . . . . . . . . . . . . . . . 4-107 Automatic turn off function . . . . . . . . . . . . . . . . . 4-107
Door courtesy lamp . . . . . . . . . . . . . . . . . . . . . . . . 4-109
Glove box lamp . . . . . . . . . . . . . . . . . . . . . . . . . . . 4-109
Map lamp . . . . . . . . . . . . . . . . . . . . . . . . . . . . . . . 4-107
Room lamp . . . . . . . . . . . . . . . . . . . . . . . . . . . . . . . 4-108
H
I