traction control KIA CADENZA 2018 Owners Manual
[x] Cancel search | Manufacturer: KIA, Model Year: 2018, Model line: CADENZA, Model: KIA CADENZA 2018Pages: 502, PDF Size: 9.77 MB
Page 270 of 502
531
Driving your vehicle
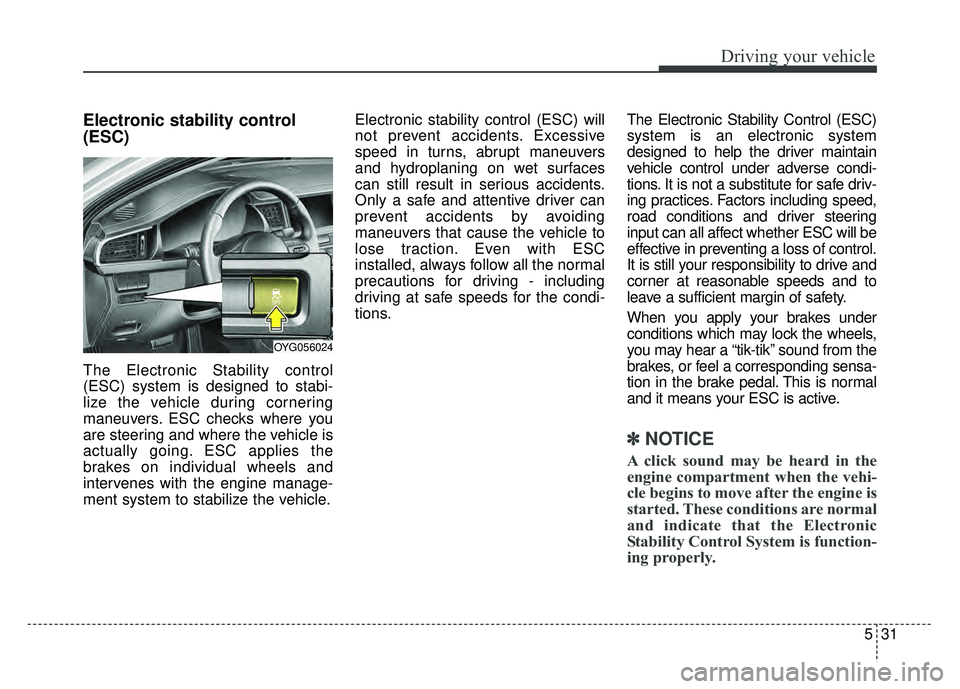
Electronic stability control
(ESC)
The Electronic Stability control
(ESC) system is designed to stabi-
lize the vehicle during cornering
maneuvers. ESC checks where you
are steering and where the vehicle is
actually going. ESC applies the
brakes on individual wheels and
intervenes with the engine manage-
ment system to stabilize the vehicle.Electronic stability control (ESC) will
not prevent accidents. Excessive
speed in turns, abrupt maneuvers
and hydroplaning on wet surfaces
can still result in serious accidents.
Only a safe and attentive driver can
prevent accidents by avoiding
maneuvers that cause the vehicle to
lose traction. Even with ESC
installed, always follow all the normal
precautions for driving - including
driving at safe speeds for the condi-
tions.
The Electronic Stability Control (ESC)
system is an electronic system
designed to help the driver maintain
vehicle control under adverse condi-
tions. It is not a substitute for safe driv-
ing practices. Factors including speed,
road conditions and driver steering
input can all affect whether ESC will be
effective in preventing a loss of control.
It is still your responsibility to drive and
corner at reasonable speeds and to
leave a sufficient margin of safety.
When you apply your brakes under
conditions which may lock the wheels,
you may hear a “tik-tik’’ sound from the
brakes, or feel a corresponding sensa-
tion in the brake pedal. This is normal
and it means your ESC is active.
✽ ✽
NOTICE
A click sound may be heard in the
engine compartment when the vehi-
cle begins to move after the engine is
started. These conditions are normal
and indicate that the Electronic
Stability Control System is function-
ing properly.
OYG056024
Page 272 of 502
533
Driving your vehicle
ESC off state 1
“Traction Control disabled”
To cancel ESC operation, press the
ESC OFF button (ESC OFF ) short-
ly (ESC OFF indicator light (ESC OFF ) illuminates). At this state, the
engine control function does not oper-
ate. It means the traction control func-
tion does not operate. Brake control
function only operates.
“Traction & Stability Control disabled”
To cancel ESC operation, press the
ESC OFF button (ESC OFF ) for
more than 3 seconds. ESC OFF indi-
cator light (ESC OFF ) illuminates
and ESC OFF warning chime will
sound. At this state, the engine con-
trol function and brake control func-
tion do not operate. It means the car
stability control function does not
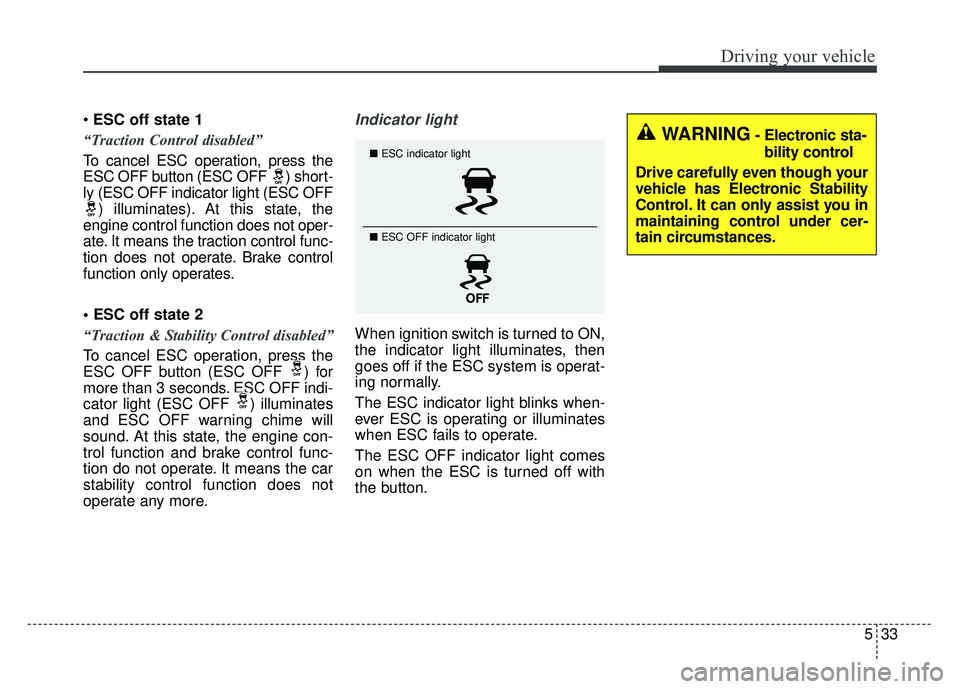
operate any more.Indicator light
When ignition switch is turned to ON,
the indicator light illuminates, then
goes off if the ESC system is operat-
ing normally.
The ESC indicator light blinks when-
ever ESC is operating or illuminates
when ESC fails to operate.
The ESC OFF indicator light comes
on when the ESC is turned off with
the button.
■ ESC indicator light
■ ESC OFF indicator light
WARNING- Electronic sta-
bility control
Drive carefully even though your
vehicle has Electronic Stability
Control. It can only assist you in
maintaining control under cer-
tain circumstances.
Page 279 of 502
Driving your vehicle
40
5
Prerequisite for activation
The AEB will activate when the AEB
is selected on the LCD display, and
when the following prerequisites are
satisfied:
- The ESC (Electronic Stability
Control) is activated.
- The driving speed is over 6 mph. (The AEB only works within a cer-
tain range of vehicle speeds)
- When the AEB recognizes a vehi- cle or the pedestrian in front. (The
AEB may not recognize every
obstacle or provide warnings and
braking in every situation, so do
not rely on the AEB to stop the
vehicle in instances where the driv-
er sees an obstacle and has the
ability to apply the brakes) The AEB automatically activates
when you turn the vehicle on.
The driver can deactivate the AEB
by canceling the system setting on
the LCD display.
The AEB automatically deactivates when canceling the ESC. When the
ESC is canceled, the AEB cannot
be activated on the LCD display.WARNING
To avoid driver distractions, do
not attempt to set or cancel the
AEB while operating the vehicle.
Page 336 of 502
597
Driving your vehicle
Driving in flooded areas
Avoid driving through flooded areas
unless you are sure the water is no
higher than the bottom of the wheel
hub. Drive through any water slowly.
Allow adequate stopping distance
because brake performance may be
affected.
After driving through water, dry the
brakes by gently applying them sev-
eral times while the vehicle is moving
slowly.
Driving off-road
Drive carefully off-road because your
vehicle may be damaged by rocks or
roots of trees. Become familiar with
the off-road conditions where you
are going to drive before you begin
driving.
Highway driving
Tires
Adjust the tire inflation pressures to
specification. Low tire inflation pres-
sures will result in overheating and
possible failure of the tires.
Avoid using worn or damaged tires
which may result in reduced traction
or tire failure.
Never exceed the maximum tire
inflation pressure shown on the tires.
Fuel, engine coolant and engine oil
High speed travel consumes more
fuel than urban motoring. Do not for-
get to check both the engine coolant
and engine oil.
Drive belt
A loose or damaged drive belt may
result in overheating of the engine.
WARNING- Under/overinflated tires
Always check the tires for proper
inflation before driving.
Underinflated or overinflated
tires can cause poor handling,
loss of vehicle control, and sud-
den tire failure leading to acci-
dents, injuries, and even death.
For proper tire pressures, refer to
“Tires and wheels” in chapter 8.
WARNING- Tire tread
Always check the tire tread
before driving your vehicle.
Worn-out tires can result in loss
of vehicle control. Worn-out tires
should be replaced as soon as
possible. For further information
and tread limits, refer to "Tires
and wheels" in chapter 7.
Page 374 of 502
Maintenance
Engine compartment . . . . . . . . . . . . . . . . . . . . . . . . 7-3
Maintenance services . . . . . . . . . . . . . . . . . . . . . . . . 7-4
• Owner’s responsibility . . . . . . . . . . . . . . . . . . . . . . . . . 7-4
• Owner maintenance precautions . . . . . . . . . . . . . . . . . 7-5
Owner maintenance . . . . . . . . . . . . . . . . . . . . . . . . . 7-6
• Owner maintenance schedule. . . . . . . . . . . . . . . . . . . . 7-6
Scheduled maintenance service. . . . . . . . . . . . . . . . 7-8
Explanation of scheduled maintenance items . . . 7-20
Checking fluid levels . . . . . . . . . . . . . . . . . . . . . . . 7-24
Engine oil. . . . . . . . . . . . . . . . . . . . . . . . . . . . . . . . . 7-24
• Checking the engine oil level . . . . . . . . . . . . . . . . . . . 7-24
• Changing the engine oil and filter . . . . . . . . . . . . . . . 7-25
Engine coolant . . . . . . . . . . . . . . . . . . . . . . . . . . . . 7-26
• Checking the coolant level . . . . . . . . . . . . . . . . . . . . . 7-26
• Changing the coolant . . . . . . . . . . . . . . . . . . . . . . . . . 7-28
Brake fluid . . . . . . . . . . . . . . . . . . . . . . . . . . . . . . . 7-29
• Checking the brake fluid level . . . . . . . . . . . . . . . . . . 7-29
Washer fluid . . . . . . . . . . . . . . . . . . . . . . . . . . . . . . 7-30
• Checking the washer fluid level . . . . . . . . . . . . . . . . . 7-30
Parking brake . . . . . . . . . . . . . . . . . . . . . . . . . . . . . 7-31
• Checking the parking brake. . . . . . . . . . . . . . . . . . . . 7-31
Air cleaner. . . . . . . . . . . . . . . . . . . . . . . . . . . . . . . . 7-32
• Filter replacement . . . . . . . . . . . . . . . . . . . . . . . . . . . 7-32
Climate control air filter . . . . . . . . . . . . . . . . . . . . 7-34
• Filter inspection . . . . . . . . . . . . . . . . . . . . . . . . . . . . . . 7-34
Wiper blades . . . . . . . . . . . . . . . . . . . . . . . . . . . . . . 7-36
• Blade inspection . . . . . . . . . . . . . . . . . . . . . . . . . . . . . . 7-36
• Blade replacement . . . . . . . . . . . . . . . . . . . . . . . . . . . . 7-36
Battery . . . . . . . . . . . . . . . . . . . . . . . . . . . . . . . . . . . 7-\
40
• For best battery service . . . . . . . . . . . . . . . . . . . . . . . 7-40
• Recharging the battery . . . . . . . . . . . . . . . . . . . . . . . . 7-41
• Reset items . . . . . . . . . . . . . . . . . . . . . . . . . . . . . . . . . . 7-42\
Tires and wheels . . . . . . . . . . . . . . . . . . . . . . . . . . . 7-43
• Tire care . . . . . . . . . . . . . . . . . . . . . . . . . . . . . . . . . . . . \
7-43
• Recommended cold tire inflation pressures . . . . . . . 7-43
• Tire pressure . . . . . . . . . . . . . . . . . . . . . . . . . . . . . . . . 7-44
• Checking tire inflation pressure. . . . . . . . . . . . . . . . . 7-44
• Tire rotation . . . . . . . . . . . . . . . . . . . . . . . . . . . . . . . . . 7-45
• Wheel alignment and tire balance . . . . . . . . . . . . . . . 7-46
• Tire replacement . . . . . . . . . . . . . . . . . . . . . . . . . . . . . 7-47
• Wheel replacement . . . . . . . . . . . . . . . . . . . . . . . . . . . 7-48
• Tire traction . . . . . . . . . . . . . . . . . . . . . . . . . . . . . . . . . 7-48
• Tire maintenance . . . . . . . . . . . . . . . . . . . . . . . . . . . . . 7-48
• Tire sidewall labeling . . . . . . . . . . . . . . . . . . . . . . . . . 7-48
• Tire terminology and definitions . . . . . . . . . . . . . . . . 7-52
• All season tires . . . . . . . . . . . . . . . . . . . . . . . . . . . . . . 7-55
• Summer tires . . . . . . . . . . . . . . . . . . . . . . . . . . . . . . . . 7-55
• Snow tires . . . . . . . . . . . . . . . . . . . . . . . . . . . . . . . . . . . 7-\
55
7
Page 421 of 502
Maintenance
48
7
Wheel replacement
When replacing the metal wheels for
any reason, make sure the new
wheels are equivalent to the original
factory units in diameter, rim width
and offset.
A wheel that is not the correct size
may adversely affect wheel and
bearing life, braking and stopping
abilities, handling characteristics,
ground clearance, body-to-tire clear-
ance, snow chain clearance,
speedometer and odometer calibra-
tion, headlight aim and bumper
height.
Tire traction
Tire traction can be reduced if you
drive on worn tires, tires that are
improperly inflated or on slippery
road surfaces. Tires should be
replaced when tread wear indicators
appear. Slow down whenever there
is rain, snow or ice on the road, to
reduce the possibility of losing con-
trol of the vehicle.
Tire maintenance
In addition to proper inflation, correct
wheel alignment helps to decrease
tire wear. If you find a tire is worn
unevenly, have your dealer check the
wheel alignment.
When you have new tires installed,
make sure they are balanced. This
will increase vehicle ride comfort and
tire life. Additionally, a tire should
always be rebalanced if it is removed
from the wheel.
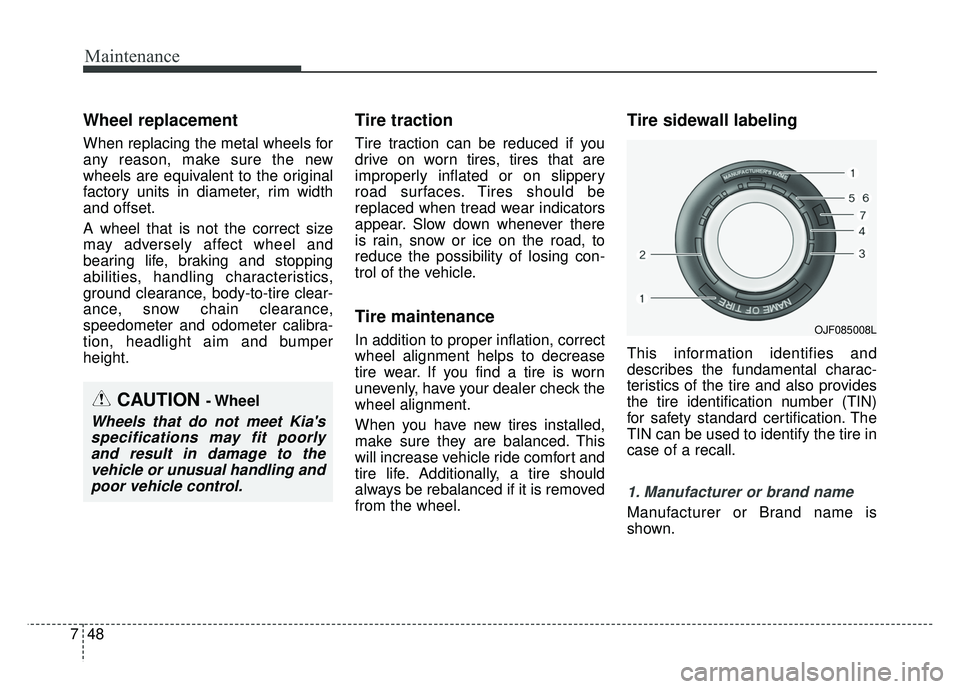
Tire sidewall labeling
This information identifies and
describes the fundamental charac-
teristics of the tire and also provides
the tire identification number (TIN)
for safety standard certification. The
TIN can be used to identify the tire in
case of a recall.
1. Manufacturer or brand name
Manufacturer or Brand name is
shown.
CAUTION - Wheel
Wheels that do not meet Kia's
specifications may fit poorlyand result in damage to thevehicle or unusual handling andpoor vehicle control.
OJF085008L
Page 423 of 502
Maintenance
50
7
3. Checking tire life (TIN : Tire
Identification Number)
Any tires that are over 6 years old,
based on the manufacturing date,
(including the spare tire) should be
replaced by new ones. You can find
the manufacturing date on the tire
sidewall (possibly on the inside of the
wheel), displaying the DOT Code.
The DOT Code is a series of num-
bers on a tire consisting of numbers
and English letters. The manufactur-
ing date is designated by the last four
digits (characters) of the DOT code.
DOT : XXXX XXXX OOOO
The front part of the DOT means a
plant code number, tire size and
tread pattern and the last four num-
bers indicate week and year manu-
factured.
For example:
DOT XXXX XXXX 1617 represents
that the tire was produced in the 16th
week of 2017.
4. Tire ply composition and mate-rial
The number of layers or plies of rub-
ber-coated fabric in the tire. Tire
manufacturers also must indicate the
materials in the tire, which include
steel, nylon, polyester, and others.
The letter "R" means radial ply con-
struction; the letter "D" means diago-
nal or bias ply construction; and the
letter "B" means belted-bias ply con-
struction.
5. Maximum permissible inflationpressure
This number is the greatest amount of
air pressure that should be put in the
tire. Do not exceed the maximum per-
missible inflation pressure. Refer to
the Tire and Loading Information label
for recommended inflation pressure.
6. Maximum load rating
This number indicates the maximum
load in kilograms and pounds that can
be carried by the tire. When replacing
the tires on the vehicle, always use a
tire that has the same load rating as
the factory installed tire.
7. Uniform tire quality grading
Quality grades can be found where
applicable on the tire sidewall
between tread shoulder and maxi-
mum section width.
For example:
TREADWEAR 440
TRACTION A
TEMPERATURE A
WARNING - Tire age
Replace tires within the recom-
mended time frame. Failure to
replace tires as recommended
can result in sudden tire failure,
which could lead to a loss of
control and an accident.
Page 424 of 502
751
Maintenance
Tread wear
The tread wear grade is a compara-
tive rating based on the wear rate of
the tire when tested under controlled
conditions on a specified govern-
ment test course. For example, a tire
graded 150 would wear one-and-a-
half times (1½) as well on the gov-
ernment course as a tire graded 100.
The relative performance of tires
depends upon the actual conditions
of their use, however, and may
depart significantly from the norm
due to variations in driving habits,
service practices and differences in
road characteristics and climate.Tires degrade over time, even when
they are not being used. Regardless
of the remaining tread, we recom-
mend that tires be replaced after
approximately six (6) years of normal
service. Heat caused by hot climates
or frequent high loading conditions
can accelerate the aging process.
These grades are molded on the
side-walls of passenger vehicle tires.
The tires available as standard or
optional equipment on your vehicles
may vary with respect to grade.
Traction - AA, A, B & C
The traction grades, from highest to
lowest, are AA, A, B and C. Those
grades represent the tires ability to
stop on wet pavement as measured
under controlled conditions on spec-
ified government test surfaces of
asphalt and concrete. A tire marked
C may have poor traction perform-
ance.
The traction grade assigned to this
tire is based on straight-ahead brak-
ing traction tests, and does not
include acceleration, cornering,
hydroplaning, or peak traction char-
acteristics.
Page 494 of 502
I7
Index
Gauges . . . . . . . . . . . . . . . . . . . . . . . . . . . . . . . . . . . . \
. 4-66
Glove box . . . . . . . . . . . . . . . . . . . . . . . . . . . . . . . . . . 4-14\
0
Glove box lamp. . . . . . . . . . . . . . . . . . . . . . . . . . . . . . 4-119
Glove box lamp bulb replacement . . . . . . . . . . . . . . . . 7-87
Gross vehicle weight. . . . . . . . . . . . . . . . . . . . . . . . . . . . 8-5
Hazard warning flasher . . . . . . . . . . . . . . . . . . . . . . . . . . 6-2
Hazardous driving conditions . . . . . . . . . . . . . . . . . . . . 5-94
Headlamp (High beam) bulb replacement . . . . . . . . . . 7-79
Headlamp (LED type) bulb replacement . . . . . . . . . . . 7-78
Headlamp (Low beam) bulb replacement . . . . . . . . . . 7-78
Headlight (Headlamp) escort function . . . . . . . . . . . . 4-120
Headlight leveling device . . . . . . . . . . . . . . . . . . . . . . 4-112
Headlight position. . . . . . . . . . . . . . . . . . . . . . . . . . . . 4-107
Headrest (rear) . . . . . . . . . . . . . . . . . . . . . . . . . . . . . . . 3-14
Headrest (front). . . . . . . . . . . . . . . . . . . . . . . . . . . . . . . 3-12
Heated steering wheel. . . . . . . . . . . . . . . . . . . . . . . . . . 4-50
High - beam operation . . . . . . . . . . . . . . . . . . . . . . . . 4-108
High Beam Assist . . . . . . . . . . . . . . . . . . . . . . . . . . . . 4-108
High mounted stop lamp (LED type) bulbreplacement . . . . . . . . . . . . . . . . . . . . . . . . . . . . . . . 7-85
Highway driving . . . . . . . . . . . . . . . . . . . . . . . . . . . . . . 5-97
Hill-start assist control (HAC) . . . . . . . . . . . . . . . . . . . 5-36
Hood . . . . . . . . . . . . . . . . . . . . . . . . . . . . . . . . . . . . \
. . . 4-36 Horn . . . . . . . . . . . . . . . . . . . . . . . . . . . . . . . . . . . . \
. . . 4-51
How to use this manual . . . . . . . . . . . . . . . . . . . . . . . . . 1-2
Immobilizer system . . . . . . . . . . . . . . . . . . . . . . . . . . . 4-12
Important safety precautions (seats) . . . . . . . . . . . . . . . . 3-2
Always wear your seat belt . . . . . . . . . . . . . . . . . . . . 3-2
Restrain all children . . . . . . . . . . . . . . . . . . . . . . . . . . 3-2
Air bag hazards . . . . . . . . . . . . . . . . . . . . . . . . . . . . . 3-2
Driver distraction . . . . . . . . . . . . . . . . . . . . . . . . . . . . 3-2
Control your speed . . . . . . . . . . . . . . . . . . . . . . . . . . . 3-3
Keep your vehicle in safe condition. . . . . . . . . . . . . . 3-3
Indicator Lights. . . . . . . . . . . . . . . . . . . . . . . . . . . . . . . 4-93
Inside rearview mirror . . . . . . . . . . . . . . . . . . . . . . . . . 4-52
Instrument cluster . . . . . . . . . . . . . . . . . . . . . . . . . . . . . 4-64 Instrument Cluster Control. . . . . . . . . . . . . . . . . . . . 4-65
LCD window Control. . . . . . . . . . . . . . . . . . . . . . . . 4-65
Gauges . . . . . . . . . . . . . . . . . . . . . . . . . . . . . . . . . . . 4-\
66
LCD windows . . . . . . . . . . . . . . . . . . . . . . . . . . . . . 4-70
Trip information (Trip computer) . . . . . . . . . . . . . . 4-70
Turn By Turn Mode . . . . . . . . . . . . . . . . . . . . . . . . . 4-75
ASCC Mode . . . . . . . . . . . . . . . . . . . . . . . . . . . . . . . 4-75
LDWS Mode . . . . . . . . . . . . . . . . . . . . . . . . . . . . . . 4-75
Service Mode . . . . . . . . . . . . . . . . . . . . . . . . . . . . . . 4-76
User settings mode . . . . . . . . . . . . . . . . . . . . . . . . . . 4-77
Warning and Indicator lights . . . . . . . . . . . . . . . . . . 4-86
H
I
G