turn signal KIA CADENZA 2019 User Guide
[x] Cancel search | Manufacturer: KIA, Model Year: 2019, Model line: CADENZA, Model: KIA CADENZA 2019Pages: 518, PDF Size: 11.08 MB
Page 332 of 518
Driving your vehicle
86
5
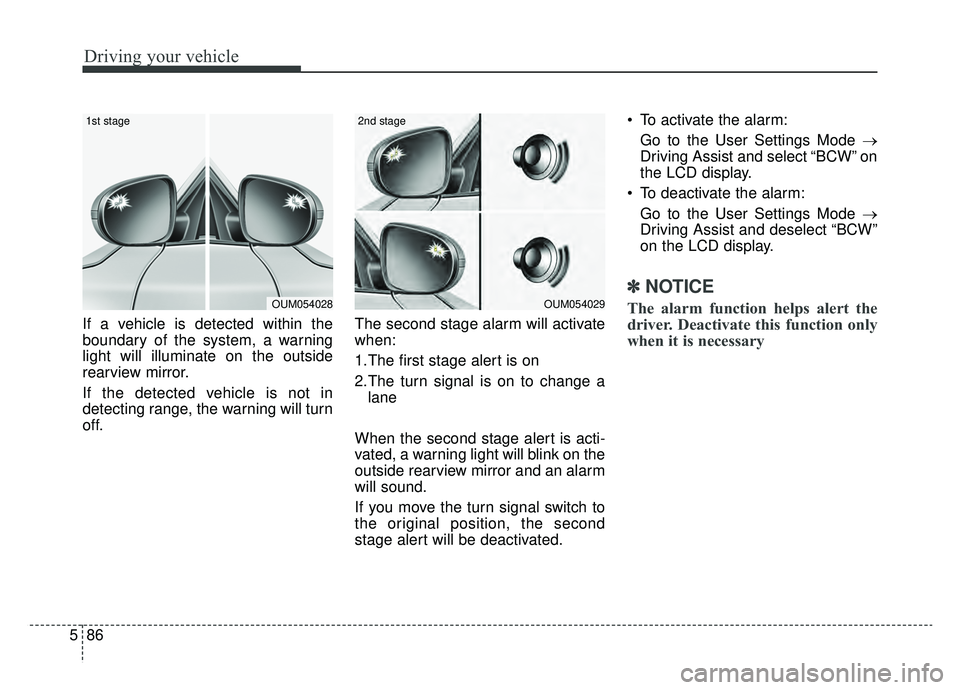
If a vehicle is detected within the
boundary of the system, a warning
light will illuminate on the outside
rearview mirror.
If the detected vehicle is not in
detecting range, the warning will turn
off. The second stage alarm will activate
when:
1.The first stage alert is on
2.The turn signal is on to change a
lane
When the second stage alert is acti-
vated, a warning light will blink on the
outside rearview mirror and an alarm
will sound.
If you move the turn signal switch to
the original position, the second
stage alert will be deactivated. To activate the alarm:
Go to the User Settings Mode →
Driving Assist and select “BCW” on
the LCD display.
To deactivate the alarm: Go to the User Settings Mode →
Driving Assist and deselect “BCW”
on the LCD display.
✽ ✽
NOTICE
The alarm function helps alert the
driver. Deactivate this function only
when it is necessaryOUM054029
2nd stage
OUM054028
1st stage
Page 348 of 518
Driving your vehicle
102
5
The driver is responsible for accu-
rate steering.
Even though the steering is assist- ed by the system, the driver may
control the steering wheel.
Turn off the system in the following situations.
- In bad weather
- In bad road conditions
- When the steering wheel needsto be controlled by the driver fre-
quently.
The steering wheel may feel heav- ier when the steering wheel is
assisted by the system than when
it is not.✽ ✽
NOTICE
• Even though the steering is assist-
ed by the system, the driver may
control the steering.
• The steering wheel may feel heav- ier when the steering wheel is
assisted by the system than when it
is not.
The system will be cancelled when:
You change lanes with the turn sig-
nal.
- Using the turn signal to change lanes.
- If you change lanes without the turn signal on, the steering wheel
might be controlled.
LKA SYSTEM can transit to steer- ing assist mode when the car is
near to middle of the lane after sys-
tem on or the lane was changed.
LKA SYSTEM can not assist steer-
ing if the vehicle follows lane mark-
er too close continuously before
transition to steering assist mode.
The control of ESC (Electronic Stability Control) or VSM (Vehicle
Stability Management) is activated.
The steering will not be assisted when your drive fast on a sharp
curve.
The steering will not be assisted when vehicle speed is below 40
mph (64 km/h) and over 110 mph
(177 kph). Always obey all traffic
laws and drive safely.
Page 374 of 518
What to do in an emergency
26
ROAD WARNING
Hazard warning flasher
The hazard warning flasher serves
as a warning to other drivers to exer-
cise extreme caution when
approaching, overtaking, or passing
your vehicle.It should be used whenever emer-
gency repairs are being made or
when the vehicle is stopped near the
edge of a roadway.
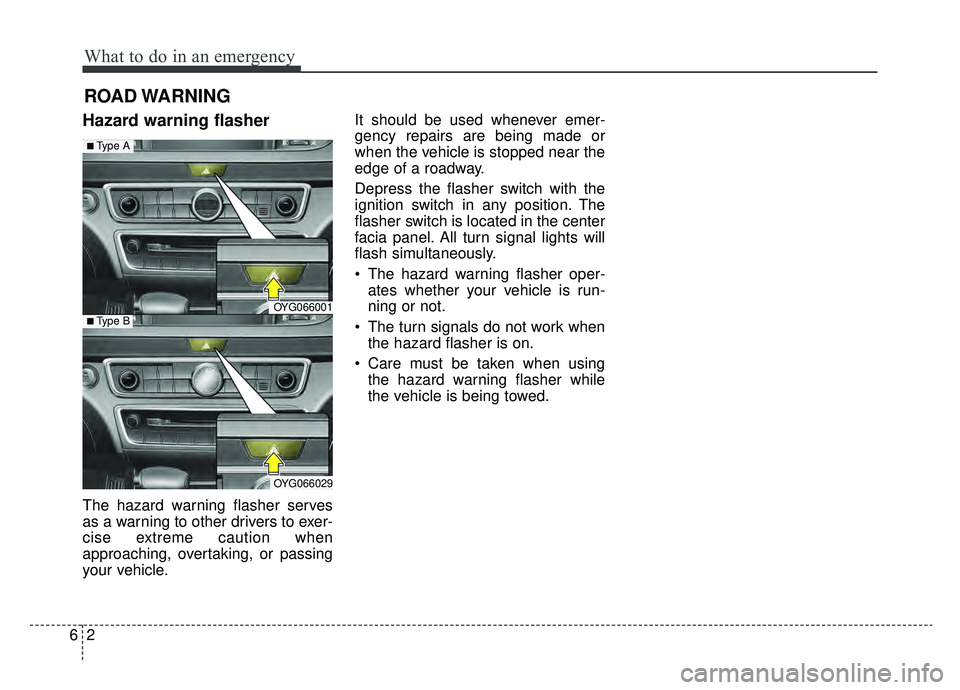
Depress the flasher switch with the
ignition switch in any position. The
flasher switch is located in the center
facia panel. All turn signal lights will
flash simultaneously.
• The hazard warning flasher oper-
ates whether your vehicle is run-
ning or not.
The turn signals do not work when the hazard flasher is on.
Care must be taken when using the hazard warning flasher while
the vehicle is being towed.
OYG066001
OYG066029
■Type A
■Type B
Page 402 of 518

• Radial-ply tires . . . . . . . . . . . . . . . . . . . . . . . . . . . . . . 7-49
• Low aspect ratio tire . . . . . . . . . . . . . . . . . . . . . . . . . . 7-49
Fuses . . . . . . . . . . . . . . . . . . . . . . . . . . . . . . . . . . . . \
7-51
• Inner panel fuse replacement . . . . . . . . . . . . . . . . . . . 7-52
• Engine compartment fuse replacement. . . . . . . . . . . 7-54
• Fuse/relay panel description. . . . . . . . . . . . . . . . . . . . 7-57
Light bulbs . . . . . . . . . . . . . . . . . . . . . . . . . . . . . . . 7-68
• Bulb replacement precaution . . . . . . . . . . . . . . . . . . 7-68
• Light bulb position (front) . . . . . . . . . . . . . . . . . . . . . 7-70
• Light bulb position (rear) . . . . . . . . . . . . . . . . . . . . . . 7-71
• Light bulb position (side) . . . . . . . . . . . . . . . . . . . . . . 7-71
• Headlamp (LED type) bulb replacement . . . . . . . . . 7-72
• Headlamp (Low beam) bulb replacement . . . . . . . . 7-72
• Headlamp (High beam) bulb replacement . . . . . . . . 7-73
• Front turn signal lamp bulb replacement . . . . . . . . 7-74
• Front fog lamp (LED type) bulb replacement . . . . . 7-75
• Position lamp + DRL* (LED type) bulb replacement . . . . . . . . . . . . . . . . . . . . . . . . . . . . . . . . 7-75
• Side repeater lamp bulb replacement . . . . . . . . . . . . 7-76
• Rear turn signal lamp bulb replacement . . . . . . . . . 7-76
• Stop and tail lamp (LED type) bulb replacement . . 7-77
• Back-up lamp bulb replacement . . . . . . . . . . . . . . . . 7-78
• License plate lamp bulb replacement . . . . . . . . . . . . 7-78
• High mounted stop lamp (LED type) bulb replacement . . . . . . . . . . . . . . . . . . . . . . . . . . . . . . . . 7-79 • Map lamp (LED type) bulb replacement . . . . . . . . . 7-79
• Vanity mirror lamp (LED type) bulb replacement . 7-80
• Room lamp (LED type) bulb replacement . . . . . . . . 7-80
• Personal lamp bulb replacement . . . . . . . . . . . . . . . . 7-81
• Glove box lamp bulb replacement . . . . . . . . . . . . . . . 7-81
• Trunk lamp (LED type) bulb replacement . . . . . . . . 7-81
Appearance care . . . . . . . . . . . . . . . . . . . . . . . . . . . 7-82
• Exterior care . . . . . . . . . . . . . . . . . . . . . . . . . . . . . . . . 7-82
• Interior care . . . . . . . . . . . . . . . . . . . . . . . . . . . . . . . . . 7-87
Emission control system . . . . . . . . . . . . . . . . . . . . 7-90
• Crankcase emission control system . . . . . . . . . . . . . . 7-90
• Evaporative emission control (including ORVR:
Onboard Refueling Vapor Recovery) system . . . . . 7-90
• Exhaust emission control system . . . . . . . . . . . . . . . . 7-91
California perchlorate notice . . . . . . . . . . . . . . . . 7-93
7
Page 407 of 518

77
Maintenance
At least monthly:
Check the coolant level in theengine coolant reservoir.
Check the operation of all exterior lights, including the stoplights, turn
signals and hazard warning flash-
ers.
Check the inflation pressures of all tires including the spare.
At least twice a year
(i.e., every Spring and Fall) :
Check the radiator, heater and air conditioning hoses for leaks or
damage.
Check the windshield washer spray and wiper operation. Clean
the wiper blades with clean cloth
dampened with washer fluid.
Check the headlight alignment.
Check the muffler, exhaust pipes, shields and clamps.
Check the lap/shoulder belts for wear and function.
Check for worn tires and loose wheel lug nuts.
At least once a year :
Clean the body and door drainholes.
Lubricate the door hinges and check the hood hinges.
Lubricate the door and hood locks and latches.
Lubricate the door rubber weather- strips.
Check the air conditioning system.
Inspect and lubricate automatic transaxle linkage and controls.
Clean the battery and terminals.
Check the brake fluid level.
Page 453 of 518

753
Maintenance
3. Pull the suspected fuse straightout. Use the removal tool provided
on the engine compartment fuse
panel cover.
4. Check the removed fuse; replace it if it is blown.
Spare fuses are provided in theengine compartment fuse panel.
5. Push in a new fuse of the same rating, and make sure it fits tightly
in the clips.
If it fits loosely, consult an authorized
Kia dealer.
If you do not have a spare, use a fuse of the same rating from a circuityou may not need for operating thevehicle, such as the power outletfuse.
If the head lamp, turn signal lamp,
stop signal lamp, fog lamp, DRL, tail
lamp, HMSL do not work and the
fuses are OK, check the fuse panel
in the engine compartment. If a fuse
is blown, it must be replaced.
✽ ✽ NOTICE
If the headlamp, fog lamp, turn sig-
nal lamp, or tail lamp malfunction
even without any problem to the
lamps, have the vehicle checked by
an authorized Kia dealer for assis-
tance.
✽ ✽NOTICE
• Set all switches to ON before driv-
ing.
• If the vehicle is going to be unused for over 1 month, set all switches
to OFF to prevent the batteries
from draining.
CAUTION - Fuse Panel
Covers
The contact points of the
switches may wear out withexcessive use. Please refrainfrom excessive use of theswitches (except for long-termparking for over 1 month).
OYG076029
Page 470 of 518
Maintenance
70
7
If you don’t have the necessary tools,
the correct bulbs and the expertise,
consult an authorized Kia dealer. In
many cases, it is difficult to replace
vehicle light bulbs because other
parts of the vehicle must be removed
before you can get to the bulb. This is
especially true if you have to remove
the headlamp assembly to get to the
bulb(s).
Removing/installing the headlamp
assembly can result in damage to
the vehicle.
If non-genuine parts or substandard
bulbs are used, it may lead to blow-
ing a fuse or other wiring damages.
Do not install extra lamps or LEDs to
the vehicle. If additional lights are
installed, it may lead to lamp mal-
functions and flickering. Additionally,
the fuse box and other writing may
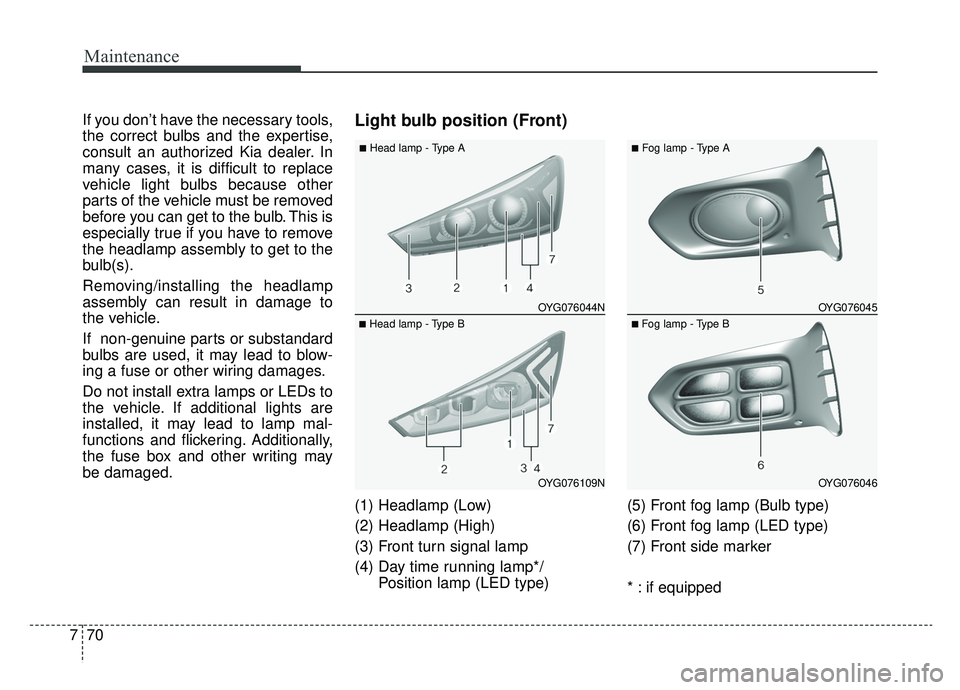
be damaged.Light bulb position (Front)
(1) Headlamp (Low)
(2) Headlamp (High)
(3) Front turn signal lamp
(4) Day time running lamp*/
Position lamp (LED type) (5) Front fog lamp (Bulb type)
(6) Front fog lamp (LED type)
(7) Front side marker
* : if equipped
OYG076044N
OYG076109N
■Head lamp - Type A
■Head lamp - Type B
OYG076045
OYG076046
■Fog lamp - Type A
■Fog lamp - Type B
Page 471 of 518
771
Maintenance
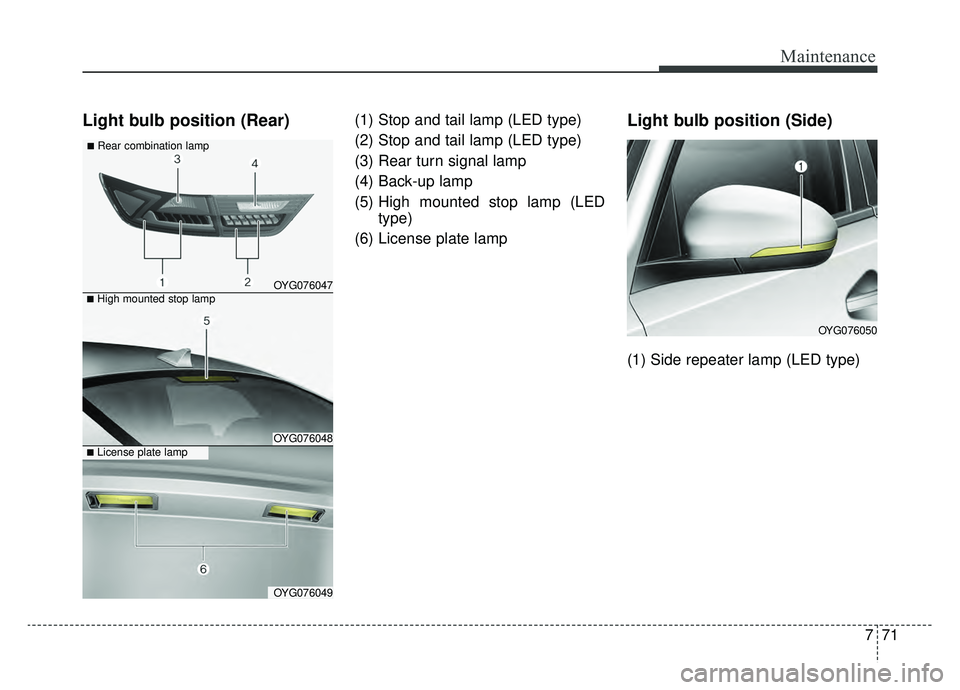
Light bulb position (Rear)(1) Stop and tail lamp (LED type)
(2) Stop and tail lamp (LED type)
(3) Rear turn signal lamp
(4) Back-up lamp
(5) High mounted stop lamp (LEDtype)
(6) License plate lampLight bulb position (Side)
(1) Side repeater lamp (LED type)
OYG076050
OYG076047
OYG076048
OYG076049
■Rear combination lamp
■High mounted stop lamp
■License plate lamp
Page 474 of 518

Maintenance
74
7
5. Install a new bulb-socket assem-
bly in the headlamp assembly by
aligning the tabs on the bulb-sock-
et with the slots in the headlamp
assembly. Push the bulb-socket
into the headlamp assembly and
turn the bulb-socket clockwise.
6. Install the headlamp bulb cover by turning it clockwise.Front turn signal lamp bulb
replacement
1. Open the hood.
2. Remove the bulb-socket from theheadlamp assembly by turning the
bulb-socket counterclockwise until
the tabs on the bulb-socket align
with the slots on the headlamp
assembly.
3. Remove the bulb from the bulb- socket by pressing it in and rotat-
ing it counterclockwise until the
tabs on the bulb align with the
slots in the bulb-socket. Pull the
bulb out of the bulb-socket. 4. Insert a new bulb by inserting it
into the bulb-socket and rotating it
until it locks into place.
5. Install the socket in the headlamp assembly by aligning the tabs on
the bulb-socket with the slots in
the assembly. Push the bulb-sock-
et into the headlamp assembly
and turn the socket clockwise.
OYG076053
Page 476 of 518

Maintenance
76
7
The LED lamps cannot be replaced
as a single unit because it is an inte-
grated unit. The LED lamps has to be
replaced with the unit.
A skilled technician should check or
repair the position lamp + DRL* (1),
for it may damage related parts of
the vehicle.
* : if equippedSide repeater lamp bulb
replacement
If the Side repeater lamp does not
operate, have the vehicle checked by
an authorized Kia dealer.
The LED lamps cannot be replaced
as a single unit because it is an inte-
grated unit. The LED lamps has to be
replaced with the unit.
A skilled technician should check or
repair the side repeater lamp, for it
may damage related parts of the
vehicle.
Rear turn signal lamp bulb
replacement
1. Open the trunk lid.
2. Open the service cover.
OYG076057OYG076050