buttons KIA CADENZA 2019 Owners Manual
[x] Cancel search | Manufacturer: KIA, Model Year: 2019, Model line: CADENZA, Model: KIA CADENZA 2019Pages: 518, PDF Size: 11.08 MB
Page 28 of 518

311
Safety features of your vehicle
Storing positions into memoryusing the buttons on the door
Storing driver’s seat positions
1. Shift the shift lever into P while the engine start/stop button is ON.
2. Adjust the driver’s seat and out- side rearview mirror comfortable
for the driver.
3. Press SET button on the control panel. The system will beep once.
4. Press one of the memory buttons (1 or 2) within 5 seconds after
pressing the SET button. The sys-
tem will beep twice when memory
has been successfully stored.
When recalling an adjustment mem-
ory button while sitting in the vehicle,
you can be surprised by the setting
chosen if the memory has been
adjusted by someone else. If that
occurs, immediately push the seat
position control knob in the direction
of the desired position to stop further
undesired movement. Recalling positions from memory
1. Shift the shift lever into P while the
engine start/stop button is ON.
2. To recall the position in the memo- ry, press the desired memory but-
ton (1 or 2). The system will beep
once, then the driver’s seat will
automatically adjust to the stored
position.
Adjusting the control switch for the
driver’s seat while the system is
recalling the stored position will
cause the movement to stop and
move in the direction that the control
switch is moved.
Easy access function (if equipped)
The system will move the driver's
seat automatically as follows:
With smart key system - It will move the driver’s seat rear-ward when the engine start/stop
button is changed to the OFF
position.
- It will move the driver’s seat for- ward when the engine start/stop
button is changed to the ACC or
START position.
- It will move the driver's seat for- ward when you get in your vehicle
with the smart key after closing
the driver's door.
You can activate or deactivate this
feature. Refer to "User settings" in
chapter 4.
Page 84 of 518
Mirrors . . . . . . . . . . . . . . . . . . . . . . . . . . . . . . . . . . 4-54\
• Inside rearview mirror . . . . . . . . . . . . . . . . . . . . . . . . 4-54
• Erasing programmed HomeLink buttons. . . . . . . . . 4-58
• Automatic-dimming function . . . . . . . . . . . . . . . . . . . 4-61
• Compass function . . . . . . . . . . . . . . . . . . . . . . . . . . . . 4-62
• Programming HomeLink
®. . . . . . . . . . . . . . . . . . . . . 4-64
• Standard programming . . . . . . . . . . . . . . . . . . . . . . . 4-64
• Rolling code programming . . . . . . . . . . . . . . . . . . . . . 4-65
• Gate operator & Canadian programming . . . . . . . . 4-66
• Operating HomeLink
®. . . . . . . . . . . . . . . . . . . . . . . . 4-66
• Reprogramming a single HomeLink®button. . . . . . 4-67
• Erasing HomeLink®buttons . . . . . . . . . . . . . . . . . . . 4-67
• Outside rearview mirror. . . . . . . . . . . . . . . . . . . . . . . 4-68
Instrument cluster . . . . . . . . . . . . . . . . . . . . . . . . . 4-71
• Instrument cluster control . . . . . . . . . . . . . . . . . . . . . 4-72
• LCD display control . . . . . . . . . . . . . . . . . . . . . . . . . . 4-72
• Gauges . . . . . . . . . . . . . . . . . . . . . . . . . . . . . . . . . . . . \
. 4-73
• Transaxle Shift Indicator . . . . . . . . . . . . . . . . . . . . . . 4-76
LCD windows . . . . . . . . . . . . . . . . . . . . . . . . . . . . . 4-77
• Over view . . . . . . . . . . . . . . . . . . . . . . . . . . . . . . . . . . 4-77\
• Trip information (Trip computer) . . . . . . . . . . . . . . . 4-77
• LCD modes. . . . . . . . . . . . . . . . . . . . . . . . . . . . . . . . . . 4-81\
Warning and indicator lights . . . . . . . . . . . . . . . . 4-93
• Warning lights . . . . . . . . . . . . . . . . . . . . . . . . . . . . . . . 4-93
• Indicator lights. . . . . . . . . . . . . . . . . . . . . . . . . . . . . . 4-100
Head Up Display (HUD) . . . . . . . . . . . . . . . . . . . 4-105
• Description . . . . . . . . . . . . . . . . . . . . . . . . . . . . . . . . . 4-105
• Head up display on/off . . . . . . . . . . . . . . . . . . . . . . . 4-106
• Head up display information . . . . . . . . . . . . . . . . . . 4-106
• Head up display setting. . . . . . . . . . . . . . . . . . . . . . . 4-106
Parking Distance Warning-Reverse (PDW-R) . 4-107
• Operation of the parking distance warning-reverse . . . . . . . . . . . . . . . . . . . . . . . . . . . . 4-107
• Non-operational conditions of parking distance warning-reverse . . . . . . . . . . . . . . . . . . . . . . . . . . . . 4-108
• Parking distance warning-reverse precautions . . . 4-109
• Self-diagnosis . . . . . . . . . . . . . . . . . . . . . . . . . . . . . . . 4-110
Rear view monitor . . . . . . . . . . . . . . . . . . . . . . . . 4-111
Surround view monitoring system (SVM) . . . . . 4-112
Lighting . . . . . . . . . . . . . . . . . . . . . . . . . . . . . . . . . 4-113
• Battery saver function . . . . . . . . . . . . . . . . . . . . . . . . 4-113
• Lighting control . . . . . . . . . . . . . . . . . . . . . . . . . . . . . 4-113
• High beam operation . . . . . . . . . . . . . . . . . . . . . . . . . 4-115
• High beam assist . . . . . . . . . . . . . . . . . . . . . . . . . . . . 4-116
• Turn signals and lane change signals. . . . . . . . . . . . 4-118
• Front fog light . . . . . . . . . . . . . . . . . . . . . . . . . . . . . . 4-118
• Check headlight . . . . . . . . . . . . . . . . . . . . . . . . . . . . 4-119
• Headlight leveling device . . . . . . . . . . . . . . . . . . . . . 4-119
4
Page 137 of 518
455
Features of your vehicle
Electrochromic mirror withHomeLink system (if equipped)
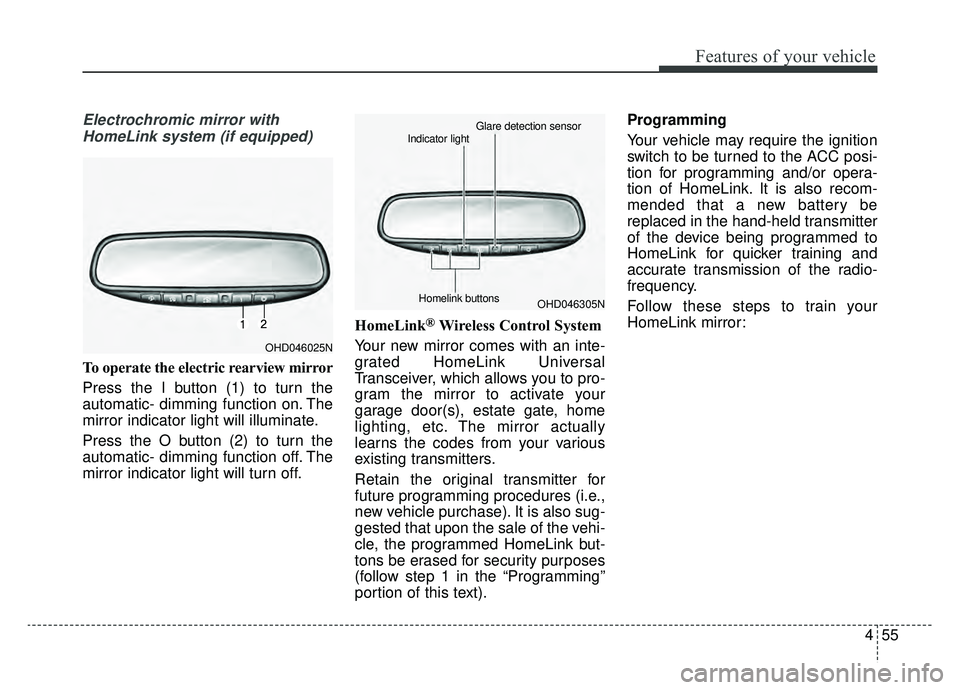
To operate the electric rearview mirror
Press the I button (1) to turn the
automatic- dimming function on. The
mirror indicator light will illuminate.
Press the O button (2) to turn the
automatic- dimming function off. The
mirror indicator light will turn off. HomeLink
®Wireless Control System
Your new mirror comes with an inte-
grated HomeLink Universal
Transceiver, which allows you to pro-
gram the mirror to activate your
garage door(s), estate gate, home
lighting, etc. The mirror actually
learns the codes from your various
existing transmitters.
Retain the original transmitter for
future programming procedures (i.e.,
new vehicle purchase). It is also sug-
gested that upon the sale of the vehi-
cle, the programmed HomeLink but-
tons be erased for security purposes
(follow step 1 in the “Programming”
portion of this text). Programming
Your vehicle may require the ignition
switch to be turned to the ACC posi-
tion for programming and/or opera-
tion of HomeLink. It is also recom-
mended that a new battery be
replaced in the hand-held transmitter
of the device being programmed to
HomeLink for quicker training and
accurate transmission of the radio-
frequency.
Follow these steps to train your
HomeLink mirror:
OHD046025N
OHD046305N
Glare detection sensor
Indicator light
Homelink buttons
Page 138 of 518
Features of your vehicle
56
4
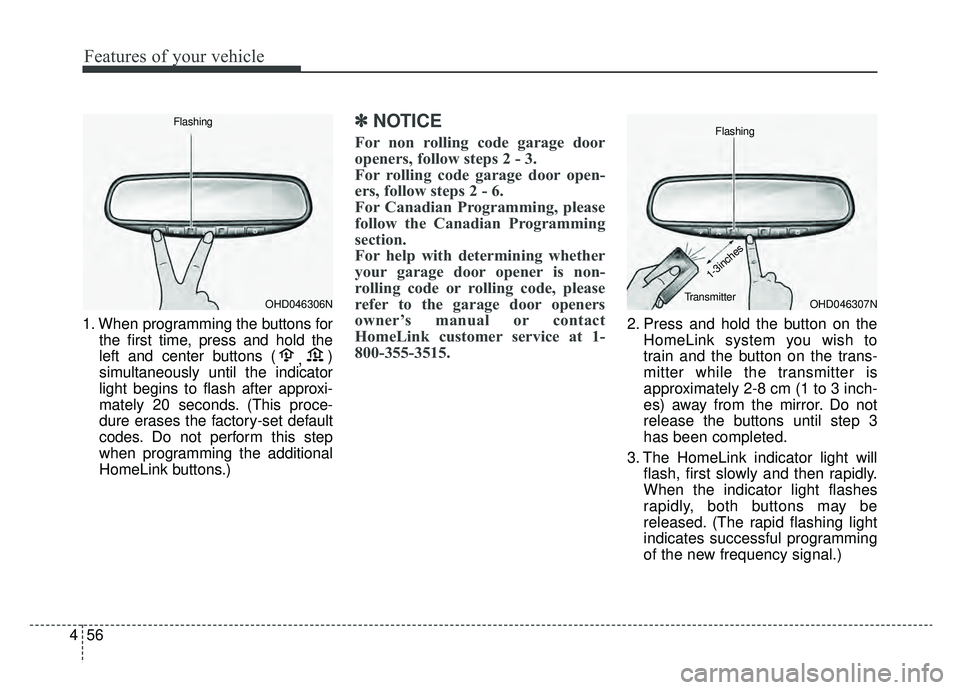
1. When programming the buttons for
the first time, press and hold the
left and center buttons ( ,)
simultaneously until the indicator
light begins to flash after approxi-
mately 20 seconds. (This proce-
dure erases the factory-set default
codes. Do not perform this step
when programming the additional
HomeLink buttons.)
✽ ✽ NOTICE
For non rolling code garage door
openers, follow steps 2 - 3.
For rolling code garage door open-
ers, follow steps 2 - 6.
For Canadian Programming, please
follow the Canadian Programming
section.
For help with determining whether
your garage door opener is non-
rolling code or rolling code, please
refer to the garage door openers
owner’s manual or contact
HomeLink customer service at 1-
800-355-3515.
2. Press and hold the button on the
HomeLink system you wish to
train and the button on the trans-
mitter while the transmitter is
approximately 2-8 cm (1 to 3 inch-
es) away from the mirror. Do not
release the buttons until step 3
has been completed.
3. The HomeLink indicator light will flash, first slowly and then rapidly.
When the indicator light flashes
rapidly, both buttons may be
released. (The rapid flashing light
indicates successful programming
of the new frequency signal.)
OHD046306N
FlashingOHD046307N
Flashing
1-3inches
Transmitter
Page 139 of 518
457
Features of your vehicle
✽ ✽NOTICE
Some gate and garage door openers
may require you to replace step #3
with the “cycling” procedure noted
in the “Canadian Programming”
section of this document.
Rolling code programming
To train a garage door opener (or other
rolling code equipped devices) with the
rolling code feature, follow these
instructions after completing the
“Programming” portion of this text. (A
second person may make the following
training procedures quicker & easier.)
4. Locate the “learn” or “smart” but-
ton on the device’s motor head
unit. Exact location and color of
the button may vary by product
brand. If there is difficulty locating
the “learn” or “smart” button, refer-
ence the device’s owner’s manual
or contact HomeLink at 1-800-
355-3515 or on the internet at
www.homelink.com.
5. Press and release the “learn” or “smart” button on the device’s
motor head unit. You have 30 sec-
onds to complete step number 6. 6. Return to the vehicle and firmly
press and release the pro-
grammed HomeLink button up to
three times. The rolling code
equipped device should now rec-
ognize the HomeLink signal and
activate when the HomeLink but-
ton is pressed. The remaining two
buttons may now be programmed
if this has not previously been
done. Refer to the “Programming”
portion of this text.
Page 140 of 518
Features of your vehicle
58
4
Operating HomeLink
To operate, simply press the pro-
grammed HomeLink button.
Activation will now occur for the
trained product (garage door, securi-
ty system, entry door lock, estate
gate, or home or office lighting). For
convenience, the hand-held trans-
mitter of the device may also be used
at any time. The HomeLink Wireless
Controls System (once programmed)
or the original hand-held transmitter
may be used to activate the device
(e.g. garage door, entry door lock,
etc.). In the event that there are still
programming difficulties, contact
HomeLink at 1-800-355-3515 or on
the internet at www.homelink.com.Erasing programmed
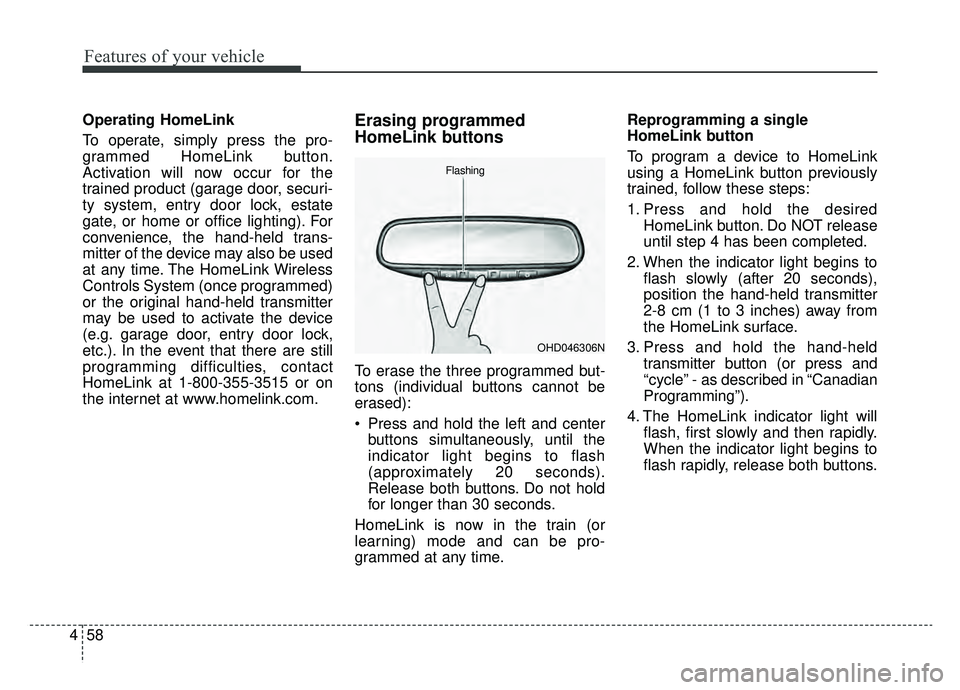
HomeLink buttons
To erase the three programmed but-
tons (individual buttons cannot be
erased):
Press and hold the left and center
buttons simultaneously, until the
indicator light begins to flash
(approximately 20 seconds).
Release both buttons. Do not hold
for longer than 30 seconds.
HomeLink is now in the train (or
learning) mode and can be pro-
grammed at any time. Reprogramming a single
HomeLink button
To program a device to HomeLink
using a HomeLink button previously
trained, follow these steps:
1. Press and hold the desired
HomeLink button. Do NOT release
until step 4 has been completed.
2. When the indicator light begins to flash slowly (after 20 seconds),
position the hand-held transmitter
2-8 cm (1 to 3 inches) away from
the HomeLink surface.
3. Press and hold the hand-held transmitter button (or press and
“cycle” - as described in “Canadian
Programming”).
4. The HomeLink indicator light will flash, first slowly and then rapidly.
When the indicator light begins to
flash rapidly, release both buttons.
OHD046306N
Flashing
Page 141 of 518
459
Features of your vehicle
The previous device has now been
erased and the new device can be
activated by pushing the HomeLink
button that has just been pro-
grammed. This procedure will not
affect any other programmed
HomeLink buttons.Canadian Programming
Garage & gate openers
During programming, your hand-held
transmitter may automatically stop
transmitting. Continue to press and
hold the HomeLink button (note steps
2 through 4 in the “Programming” por-
tion of this text) while you press and
re-press (“cycle”) your handheld
transmitter every two seconds until
the frequency signal has been
learned. The indicator light will flash
slowly and then rapidly after several
seconds upon successful training.Accessories
If you would like additional informa-
tion on the HomeLink Wireless
Control System, HomeLink compati-
ble products, or to purchase other
accessories such as the HomeLink
®
Lighting Package, please contact
HomeLink at 1-800-355-3515 or on
the internet at www.homelink.com.
Page 146 of 518
Features of your vehicle
64
4
Retain the original transmitter of the
RF device you are programming for
use in other vehicles as well as for
future HomeLink
®programming. It is
also suggested that upon the sale of
the vehicle, the programmed
HomeLink
®buttons be erased for
security purposes.
Programming HomeLink®
✽ ✽ NOTICE
• When programming a garage
door opener, it is advised to park
the vehicle outside of the garage.
• It is recommended that a new bat- tery be placed in the hand-held
transmitter of the device being pro-
grammed to HomeLink
®for quick-
er training and accurate transaxle of
the radio-frequency signal.
• Some vehicles may require the igni- tion switch to be turned to the sec-
ond position for programming
and/or operation of HomeLink
®.
• In the event that there are still pro- gramming difficulties or questions
after following the programming
steps listed below, contact
HomeLink
®at: www.homelink.com
or 1-800-355-3515.
Standard programming
To train most devices, follow these
instructions:
1. For first-time programming, press
and hold the two outside buttons,
HomeLink
®Channel 1 and
Channel 3 Buttons, until the indi-
cator light begins to flash (after 20
seconds). Release both buttons.
Do not hold the buttons for longer
than 30 seconds.
2. Position the end of your hand-held transmitter 1-3 inches (2-8 cm)
away from the HomeLink
®buttons
while keeping the indicator light in
view.
3. Simultaneously press and hold both the HomeLink
®and hand-
held transmitter button. DO NOT
release the buttons until step 4
has been completed.
4. While continuing to hold the but- tons the red Indicator Status LED
will flash slowly and then rapidly
after HomeLink
®successfully
trains to the frequency signal from
the hand-held transmitter. Release
both buttons.
Page 147 of 518
465
Features of your vehicle
5. Press and hold the just-trainedHomeLink®button and observe
the red Status Indicator LED. If the
indicator light stays on constantly,
programming is complete and
your device should activate when
the HomeLink
® button is pressed
and released.
6. To program the remaining two HomeLink
® buttons, follow steps 2
through 5.
Rolling code programming
Rolling code devices which are
“code-protected” and manufactured
after 1996 may be determined by the
following:
Reference the device owner's manual for verification.
The handheld transmitter appears to program the HomeLink
®
Universal Transceiver but does not
activate the device.
Press and hold the trained HomeLink
®button. The device has
the rolling code feature if the indi-
cator light flashes rapidly and then
turns solid after 2 seconds. To train rolling code devices, follow
these instructions:
1.At the garage door opener receiver
(motor-head unit) in the garage,
locate the “learn” or “smart” button.
This can usually be found where
the hanging antenna wire is
attached to the motor-head unit.
Exact location and color of the but-
ton may vary by garage door open-
er brand.
If there is difficulty locating the
training button, reference the
device owner's manual or please
visit our web site at www.home-
link.com.
2.Firmly press and release the “learn” or “smart” button (which
activates the “training light”).
✽ ✽ NOTICE
There are 30 seconds in which to ini-
tiate step 3.
Page 148 of 518
Features of your vehicle
66
4
3.Return to the vehicle, firmly press
and hold for two seconds the
desired HomeLink
®button then
release. Repeat the
“press/hold/release” sequence a
second time to complete the pro-
gramming. (Some devices may
require you to repeat this sequence
a third time to complete the pro-
gramming.)
4.Press and hold the just-trained HomeLink
®button and observe the
red Status Indicator LED. If the indi-
cator light stays on constantly, pro-
gramming is complete and your
device should activate.
5.To program the remaining two HomeLink
®buttons, follow either
steps 1 through 4 above for other
Rolling Code devices or steps 2
through 5 in Standard Programming
for standard devices.
Gate operator & Canadian pro-
gramming
During programming, your handheld
transmitter may automatically stop
transmitting. Continue to press the
Integrated HomeLink
®Wireless
Control System button (note steps 2
through 4 in the Standard
Programming portion of this docu-
ment) while you press and re-press
(“cycle”) your handheld transmitter
every two seconds until the frequen-
cy signal has been learned. The indi-
cator light will flash slowly and then
rapidly after several seconds upon
successful training.
Operating HomeLink®
To operate, simply press and release
the programmed HomeLink®button.
Activation will now occur for the
trained device (i.e. garage door
opener, gate operator, security sys-
tem, entry door lock, home/office
lighting, etc.). For convenience, the
hand-held transmitter of the device
may also be used at any time.