ignition KIA Carens 2007 2.G Workshop Manual
[x] Cancel search | Manufacturer: KIA, Model Year: 2007, Model line: Carens, Model: KIA Carens 2007 2.GPages: 343, PDF Size: 3.61 MB
Page 166 of 343
487
Features of your vehicle
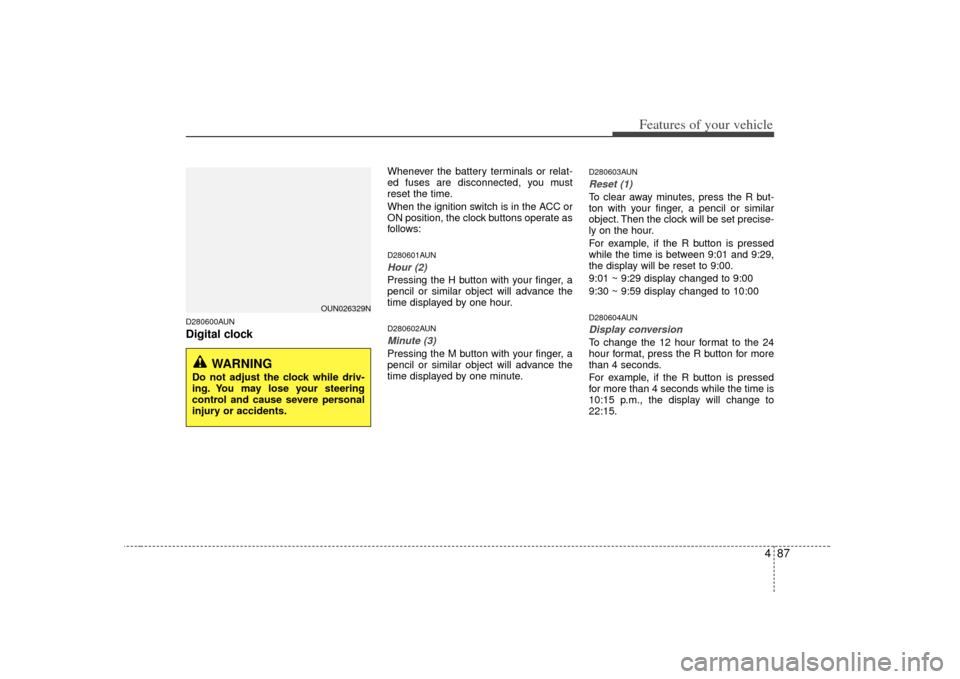
D280600AUNDigital clock
Whenever the battery terminals or relat-
ed fuses are disconnected, you must
reset the time.
When the ignition switch is in the ACC or
ON position, the clock buttons operate as
follows:D280601AUNHour (2)Pressing the H button with your finger, a
pencil or similar object will advance the
time displayed by one hour.D280602AUNMinute (3)Pressing the M button with your finger, a
pencil or similar object will advance the
time displayed by one minute.
D280603AUNReset (1)To clear away minutes, press the R but-
ton with your finger, a pencil or similar
object. Then the clock will be set precise-
ly on the hour.
For example, if the R button is pressed
while the time is between 9:01 and 9:29,
the display will be reset to 9:00.
9:01 ~ 9:29 display changed to 9:00
9:30 ~ 9:59 display changed to 10:00D280604AUNDisplay conversionTo change the 12 hour format to the 24
hour format, press the R button for more
than 4 seconds.
For example, if the R button is pressed
for more than 4 seconds while the time is
10:15 p.m., the display will change to
22:15.
WARNING
Do not adjust the clock while driv-
ing. You may lose your steering
control and cause severe personal
injury or accidents.
OUN026329N
Page 177 of 343
Features of your vehicle98
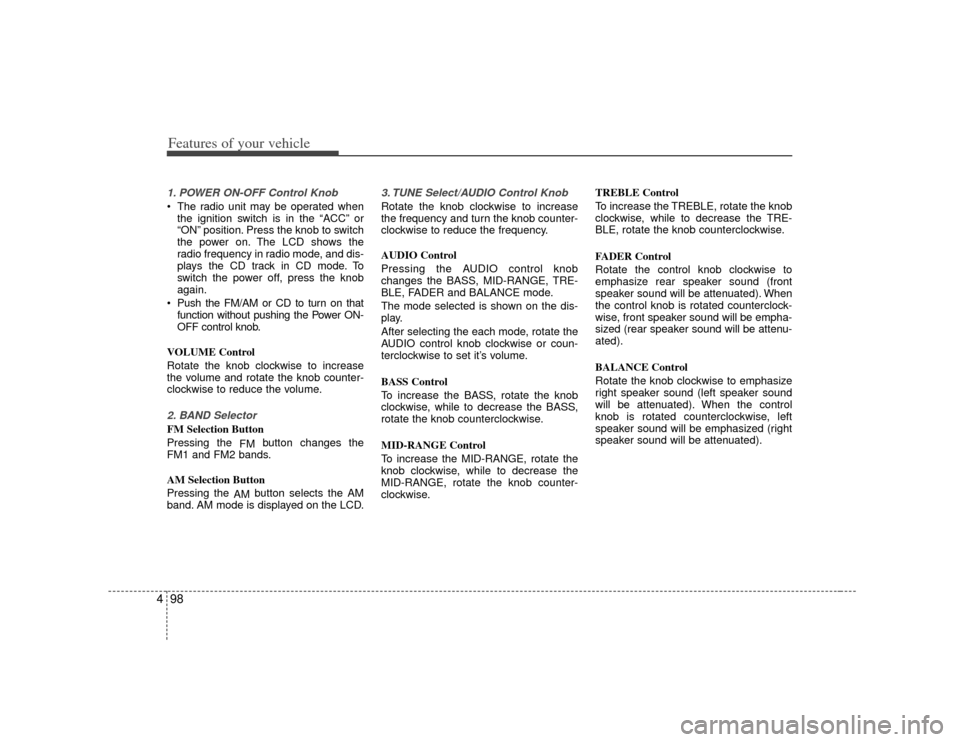
41. POWER ON-OFF Control Knob The radio unit may be operated when
the ignition switch is in the “ACC” or
“ON” position. Press the knob to switch
the power on. The LCD shows the
radio frequency in radio mode, and dis-
plays the CD track in CD mode. To
switch the power off, press the knob
again.
Push the FM/AM or CD to turn on that function without pushing the Power ON-
OFF control knob.
VOLUME Control
Rotate the knob clockwise to increase
the volume and rotate the knob counter-
clockwise to reduce the volume.2. BAND SelectorFM Selection Button
Pressing the FMbutton changes the
FM1 and FM2 bands.
AM Selection Button
Pressing the AMbutton selects the AM
band. AM mode is displayed on the LCD.
3. TUNE Select/AUDIO Control KnobRotate the knob clockwise to increase
the frequency and turn the knob counter-
clockwise to reduce the frequency.
AUDIO Control
Pressing the AUDIO control knob
changes the BASS, MID-RANGE, TRE-
BLE, FADER and BALANCE mode.
The mode selected is shown on the dis-
play.
After selecting the each mode, rotate the
AUDIO control knob clockwise or coun-
terclockwise to set it’s volume.
BASS Control
To increase the BASS, rotate the knob
clockwise, while to decrease the BASS,
rotate the knob counterclockwise.
MID-RANGE Control
To increase the MID-RANGE, rotate the
knob clockwise, while to decrease the
MID-RANGE, rotate the knob counter-
clockwise. TREBLE Control
To increase the TREBLE, rotate the knob
clockwise, while to decrease the TRE-
BLE, rotate the knob counterclockwise.
FADER Control
Rotate the control knob clockwise to
emphasize rear speaker sound (front
speaker sound will be attenuated). When
the control knob is rotated counterclock-
wise, front speaker sound will be empha-
sized (rear speaker sound will be attenu-
ated).
BALANCE Control
Rotate the knob clockwise to emphasize
right speaker sound (left speaker sound
will be attenuated). When the control
knob is rotated counterclockwise, left
speaker sound will be emphasized (right
speaker sound will be attenuated).
Page 180 of 343
4101
Features of your vehicle
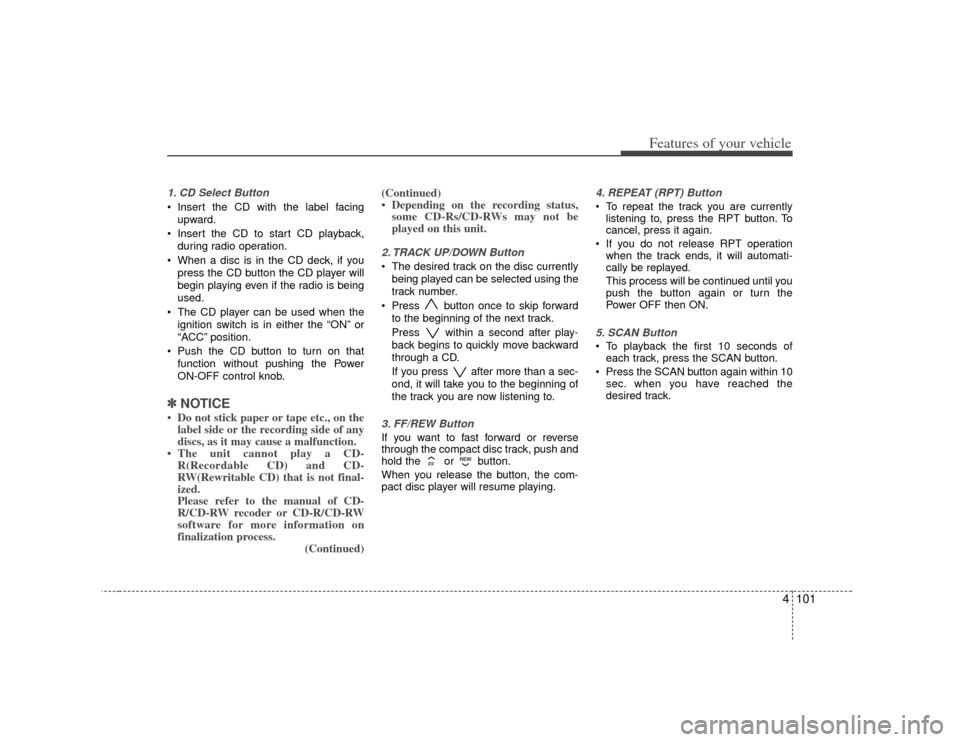
1. CD Select Button Insert the CD with the label facingupward.
Insert the CD to start CD playback, during radio operation.
When a disc is in the CD deck, if you press the CD button the CD player will
begin playing even if the radio is being
used.
The CD player can be used when the ignition switch is in either the “ON” or
“ACC” position.
Push the CD button to turn on that function without pushing the Power
ON-OFF control knob.✽ ✽ NOTICE• Do not stick paper or tape etc., on the
label side or the recording side of any
discs, as it may cause a malfunction.
• The unit cannot play a CD- R(Recordable CD) and CD-
RW(Rewritable CD) that is not final-
ized.
Please refer to the manual of CD-
R/CD-RW recoder or CD-R/CD-RW
software for more information on
finalization process. (Continued)(Continued)
• Depending on the recording status,
some CD-Rs/CD-RWs may not be
played on this unit.
2. TRACK UP/DOWN Button The desired track on the disc currently
being played can be selected using the
track number.
Press button once to skip forward to the beginning of the next track.
Press within a second after play-
back begins to quickly move backward
through a CD.
If you press after more than a sec-
ond, it will take you to the beginning of
the track you are now listening to.3. FF/REW Button If you want to fast forward or reverse
through the compact disc track, push and
hold the or button.
When you release the button, the com-
pact disc player will resume playing.
4. REPEAT (RPT) Button To repeat the track you are currentlylistening to, press the RPT button. To
cancel, press it again.
If you do not release RPT operation when the track ends, it will automati-
cally be replayed.
This process will be continued until you
push the button again or turn the
Power OFF then ON.5. SCAN Button To playback the first 10 seconds ofeach track, press the SCAN button.
Press the SCAN button again within 10 sec. when you have reached the
desired track.
Page 183 of 343
Features of your vehicle104
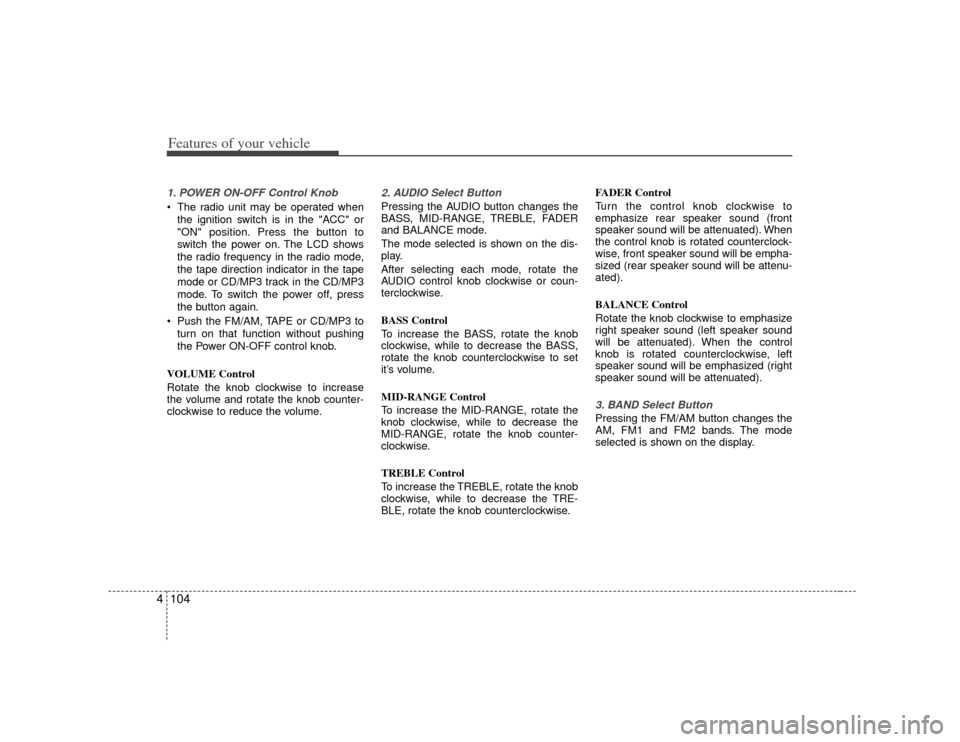
41. POWER ON-OFF Control Knob The radio unit may be operated when
the ignition switch is in the "ACC" or
"ON" position. Press the button to
switch the power on. The LCD shows
the radio frequency in the radio mode,
the tape direction indicator in the tape
mode or CD/MP3 track in the CD/MP3
mode. To switch the power off, press
the button again.
Push the FM/AM, TAPE or CD/MP3 to turn on that function without pushing
the Power ON-OFF control knob.
VOLUME Control
Rotate the knob clockwise to increase
the volume and rotate the knob counter-
clockwise to reduce the volume.
2. AUDIO Select ButtonPressing the AUDIO button changes the
BASS, MID-RANGE, TREBLE, FADER
and BALANCE mode.
The mode selected is shown on the dis-
play.
After selecting each mode, rotate the
AUDIO control knob clockwise or coun-
terclockwise.
BASS Control
To increase the BASS, rotate the knob
clockwise, while to decrease the BASS,
rotate the knob counterclockwise to set
it’s volume.
MID-RANGE Control
To increase the MID-RANGE, rotate the
knob clockwise, while to decrease the
MID-RANGE, rotate the knob counter-
clockwise.
TREBLE Control
To increase the TREBLE, rotate the knob
clockwise, while to decrease the TRE-
BLE, rotate the knob counterclockwise. FADER Control
Turn the control knob clockwise to
emphasize rear speaker sound (front
speaker sound will be attenuated). When
the control knob is rotated counterclock-
wise, front speaker sound will be empha-
sized (rear speaker sound will be attenu-
ated).
BALANCE Control
Rotate the knob clockwise to emphasize
right speaker sound (left speaker sound
will be attenuated). When the control
knob is rotated counterclockwise, left
speaker sound will be emphasized (right
speaker sound will be attenuated).
3. BAND Select ButtonPressing the FM/AM button changes the
AM, FM1 and FM2 bands. The mode
selected is shown on the display.
Page 189 of 343
Features of your vehicle110
41. AUDIO/MP3 CD Select Button Insert the CD with the label facing
upward.
Insert the CD to start CD playback, during radio operation or cassette tape
playback.
If you press the CD button while a disc is in the CD deck, the CD player will
begin playing even if the radio or cas-
sette player is being used.
The CD player can be used when the ignition switch is in either the “ON” or
“ACC” position.
Push the CD button to turn on that function without pushing the Power
ON-OFF control knob.✽ ✽ NOTICE• Do not stick paper or tape etc., on the
label side or the recording side of any
discs, as it may cause a malfunction.
• The unit can play a multi-session CD- R (recordable CD) and CD-RW
(rewritable CD) that consists of more
than two sessions.
Please refer to the manual of CD-
R/CD-RW recoder or CD-R/CD-RW
software for more information on
finalization process. (Continued)(Continued)
• Depending on the recording status,
some CD-Rs/CD-RWs may not be
played on this unit.
✽ ✽ NOTICEPlayback of MP3, AAC and WMA file
formats are supported. Load to play
time for these formats may be longer
due to the compressed nature of these
discs.2. TRACK UP/DOWN Button The desired track on the disc currently
being played can be selected using the
track number.
Press button once to skip forward to the beginning of the next track.
Press within a second after play-
back begins to quickly move backward
through a CD.
If you press after more than a sec-
ond, it will take you to the beginning of
the file you are now listening to.3. FF/REW Button If you want to fast forward or reverse
through the compact disc track, push and
hold the FF or REW button.
When you release the button, the com-
pact disc player will resume playing.
4. REPEAT (RPT) Button To repeat the track you are currentlylistening to, press the RPT button. To
cancel, press it again.
To repeat the music within selected folder, press the RPT button for more
than 0.8 seconds. To cancel, press it
again. (MP3 CD only)
If you do not release RPT operation when the track ends, it will automati-
cally be replayed.
This process will be continued until you
push the button again or turn the
power OFF then ON.5. RANDOM (RDM) ButtonWith random, you can listen to the tracks
in random, rather than sequential order.
To use random, do the following:
Press the RDM button to listen torecorded tracks in random sequence.
Press RDM again to cancel or turn the
power OFF then ON. The unit defaults
to playing tracks in sequential order.
To listen to the music within the select- ed folder in random order, press the
RDM button within a second. To can-
cel, press it again or turn the power
OFF then ON.(MP3 CD only)
Page 193 of 343
Features of your vehicle114
41. POWER ON-OFF Control Knob The radio unit may be operated when
the ignition switch is in the "ACC" or
“ON” position. Press the knob to switch
the power on. The LCD shows the
radio frequency in the radio mode, the
tape direction indicator in the tape
mode or CD/MP3 track in the CD/MP3
mode or CD AUTO CHANGER mode.
To switch the power off, press the knob
again.
Push the FM/AM, TAPE or CD/MP3 to turn on that function without pushing
the Power ON-OFF control knob.
VOLUME Control
Rotate the knob clockwise to increase
the volume and rotate the knob counter-
clockwise to reduce the volume.2. BAND Select ButtonPressing the FM/AM button changes the
AM, FM1 and FM2 bands. The mode
selected is shown on the display.
3. AUDIO Select ButtonPressing AUDIO button changes the
BASS, MID-RANGE, TREBLE, FADER
and BALANCE mode. The mode select-
ed is shown on the display.
After selecting the each mode, rotate the
AUDIO control knob clockwise or coun-
terclockwise to set it’s volume.
BASS Control
To increase the BASS, rotate the knob
clockwise, while to decrease the BASS,
rotate the knob counterclockwise.
MID-RANGE Control
To increase the MID-RANGE, rotate the
knob clockwise, while to decrease the
MID-RANGE, rotate the knob counter-
clockwise.
TREBLE Control
To increase the TREBLE, rotate the knob
clockwise, while to decrease the TRE-
BLE, rotate the knob counterclockwise. FADER Control
Rotate the control knob clockwise to
emphasize rear speaker sound (front
speaker sound will be attenuated). When
the control knob is rotated counterclock-
wise, front speaker sound will be empha-
sized (rear speaker sound will be attenu-
ated).
BALANCE Control
Rotate the knob clockwise to emphasize
right speaker sound (left speaker sound
will be attenuated). When the control
knob is rotated counterclockwise, left
speaker sound will be emphasized (right
speaker sound will be attenuated).
4. TUNE Select/AUDIO Control KnobRotate the knob clockwise to increase
the frequency and turn the knob counter-
clockwise to reduce the frequency.
Page 197 of 343

Features of your vehicle118
4When you have finished loading discs,
press LOAD button to cancel the loading
function or wait for 10 seconds. The CD
player will begin to play the last CD
loaded. As each CD starts to play, the
DISC number will appear on the display.✽ ✽
NOTICEThe disc player takes up to six discs. Do
not try to load more than six.2. Playing CD Button Press the CD Button to start CD play-
back, during radio operation.
When discs are in the CD deck, if you press the CD button, the CD player will
begin playing even if the radio is being
used.
The CD player can be used when the ignition switch is in either the “ON” or
“ACC” position.
Push the CD button to turn on that function without pushing the Power
ON-OFF control knob.
✽ ✽ NOTICE• Do not stick paper or tape etc., on the
label side or the recording side of any
discs, as it may cause a malfunction.
• The unit can play a multi-session CD- R (recordable CD) and CD-RW
(rewritable CD) that consists of more
than two sessions.
Please refer to the manual of CD-
R/CD-RW recorder or CD-R/CD-RW
software for more information on
finalization process.
• Depending on the recording status, some CD-Rs/CD-RWs may not play
on this unit.✽ ✽ NOTICEPlayback of MP3 and WMA file formats
are supported. Load to play time for
these formats may be longer due to the
compressed nature of these discs.3. CD EJECT Button When the button is pressed with a
CD loaded, the CD will eject.
To eject all of the discs, press this but- ton for one second or more.
4. TRACK UP/DOWN Button The desired track on the disc currentlybeing played can be selected using the
track number.
Press once to skip forward to the beginning of the next track.
Press once to skip back to the beginning of the track.
Press before playback begins to quickly move backward through a CD.5. SCROLL ButtonPress the button, and you can check the
file names with more than 16 characters
on MP3 CD(max 34 characters).
The button doesn’t work on file names
less than 16 characters.6. FF/REW ButtonIf you want to fast forward or reverse
through the compact disc track, push and
hold the FF or REW button.
When you release the button, the com-
pact disc player will resume playing.
Page 203 of 343
53
Driving your vehicle
E020100AUNBefore entering vehicle• Be sure that all windows, outside mir-ror(s), and outside lights are clean.
Check the condition of the tires.
Check under the vehicle for any sign of leaks.
Be sure there are no obstacles behind you if you intend to back up.E020200AUNNecessary inspections Fluid levels, such as engine oil, engine
coolant, brake fluid, and washer fluid
should be checked on a regular basis,
with the exact interval depending on the
fluid. Further details are provided in sec-
tion 7, “Maintenance”.
E020300AUNBefore starting Close and lock all doors.
Position the seat so that all controls areeasily reached.
Adjust the inside and outside rearview mirrors.
Be sure that all lights work.
Check all gauges.
Check the operation of warning lights when the ignition switch is turned to
the ON position.
Release the parking brake and make sure the brake warning light goes out.
For safe operation, be sure you are famil-
iar with your vehicle and its equipment.
BEFORE DRIVING
WARNING
All passengers must be properly
belted whenever the vehicle is mov-
ing. Refer to “Seat belts” in section
3 for more information on their
proper use.
WARNING
Always check the surrounding
areas near your vehicle for people,
especially children, before putting a
car into D (Drive) or R (Reverse).
Page 204 of 343

Driving your vehicle45
E030100AUNIlluminated ignition switch Whenever a front door is opened, the
ignition switch will be illuminated for your
convenience, provided the ignition switch
is not in the ON position. The light will go
off immediately when the ignition switch
is turned on or go off after about 10 sec-
onds when the door is closed.
Ignition switch positionE030201AUNLOCKThe steering wheel locks to protect
against theft. The ignition key can be
removed only in the LOCK position.
When turning the ignition switch to the
LOCK position, push the key inward at
the ACC position and turn the key toward
the LOCK position.
WARNING
- Driving under
the influence of alcohol or
drugs
Drinking and driving is dangerous.
Drunk driving is the number one
contributor to the highway death
toll each year. Even a small amount
of alcohol will affect your reflexes,
perceptions and judgment. Driving
while under the influence of drugs
is as dangerous or more dangerous
than driving drunk.
You are much more likely to have a
serious accident if you drink or
take drugs and drive.
If you are drinking or taking drugs,
don’t drive. Do not ride with a driv-
er who has been drinking or taking
drugs. Choose a designated driver
or call a cab.
OUN036001
1VQA3018
KEY POSITIONS
Page 205 of 343
55
Driving your vehicle
E030202AUNACC (Accessory)The steering wheel is unlocked and elec-
trical accessories are operative.✽ ✽NOTICEIf difficulty is experienced in turning the
ignition switch to the ACC position, turn
the steering wheel right and left to
release the tension and then turn the
key.E030203AUNONThe warning lights can be checked
before the engine is started. This is the
normal running position after the engine
is started.Do not leave the ignition switch ON if the
engine is not running to prevent batterydischarge.
E030204AUNSTARTTurn the ignition switch to the START
position to start the engine. The engine
will crank until you release the key; then
it returns to the ON position. The brake
warning lamp can be checked in this
position.
WARNING -
Ignition
switch
Never turn the ignition switch to LOCK or ACC while the vehicle is
moving. This would result in loss
of directional control and braking
function, which could cause an
accident.
The anti-theft steering column lock is not a substitute for the parking
brake. Before leaving the driver’s
seat, always make sure the shift
lever is engaged in P (Park) for the
automatic transaxle and set the
parking brake fully and shut the
engine off. Unexpected and sud-
den vehicle movement may occur
if these precautions are not taken.
Never reach for the ignition switch, or any other controls through the
steering wheel while the vehicle is
in motion. The presence of your
hand or arm in this area could
cause a loss of vehicle control, an
accident and serious bodily injury
or death.
Do not place any movable objects around the driver’s seat as they
may move while driving, interfere
with the driver and lead to an acci-
dent.