Flash KIA Carens 2008 2.G Owner's Manual
[x] Cancel search | Manufacturer: KIA, Model Year: 2008, Model line: Carens, Model: KIA Carens 2008 2.GPages: 341, PDF Size: 6.23 MB
Page 11 of 341
23
Your vehicle at a glance
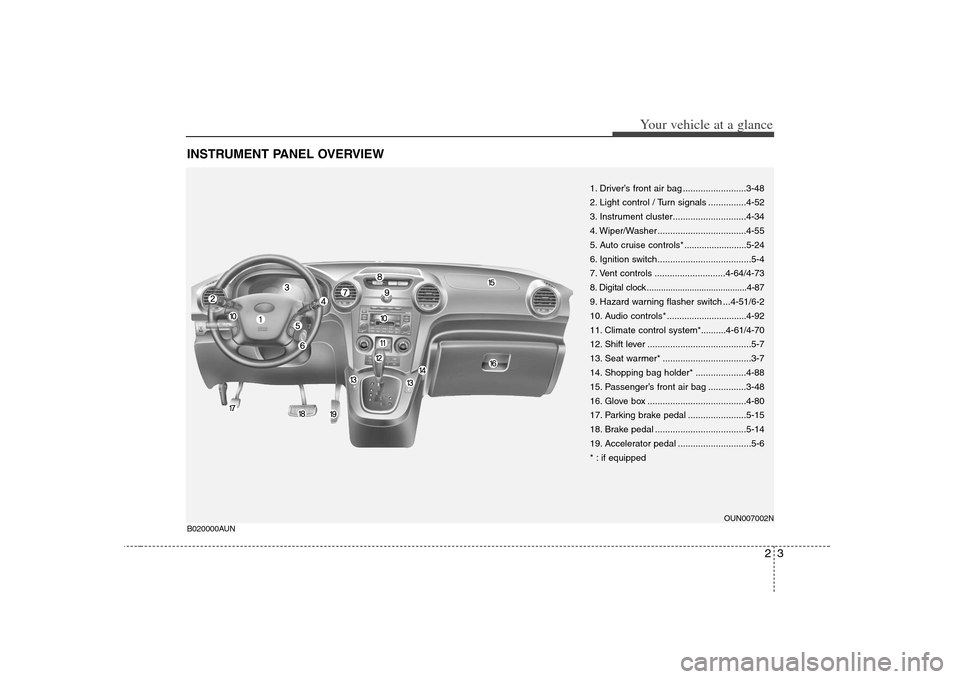
INSTRUMENT PANEL OVERVIEWB020000AUN
1. Driver’s front air bag .........................3-48
2. Light control / Turn signals ...............4-52
3. Instrument cluster.............................4-34
4. Wiper/Washer ...................................4-55
5. Auto cruise controls* .........................5-24
6. Ignition switch .....................................5-4
7. Vent controls ............................4-64/4-73
8. Digital clock ..........................................4-87
9. Hazard warning flasher switch ...4-51/6-2
10. Audio controls* ................................4-92
11. Climate control system*..........4-61/4-70
12. Shift lever .........................................5-7
13. Seat warmer* ...................................3-7
14. Shopping bag holder* ....................4-88
15. Passenger’s front air bag ...............3-48
16. Glove box .......................................4-80
17. Parking brake pedal .......................5-15
18. Brake pedal ....................................5-14
19. Accelerator pedal .............................5-6
* : if equipped
OUN007002N
Page 80 of 341
4
Keys / 4-3
Remote keyless entry / 4-6
Theft-alarm system / 4-9
Door locks / 4-11
Tailgate / 4-15
Windows / 4-17
Hood / 4-20
Fuel filler lid / 4-22
Sunroof / 4-25
Steering wheel / 4-29
Mirrors / 4-31
Instrument cluster / 4-34
Rear parking assist system / 4-48
Hazard warning flasher / 4-50
Lighting / 4-51
Wipers and washers / 4-54
Interior light / 4-58
Defroster / 4-59
Manual climate control system / 4-61
Automatic climate control system / 4-70
Windshield defrosting and defogging / 4-77
Storage compartment / 4-80
Interior features / 4-83
Features of your vehicle
Page 85 of 341
Features of your vehicle6 4Remote keyless entry system
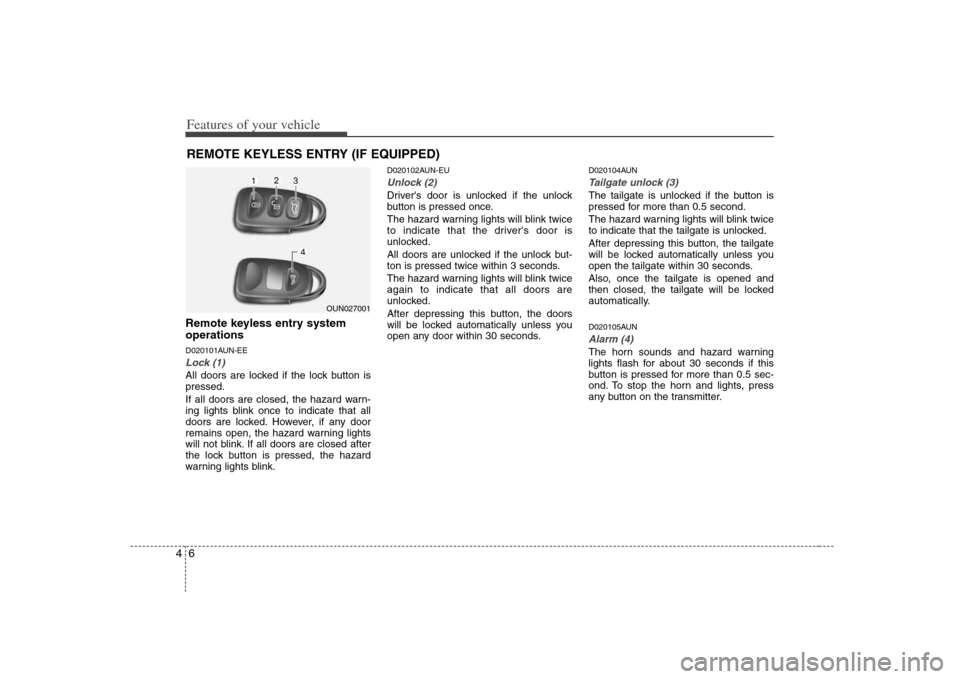
operationsD020101AUN-EELock (1)All doors are locked if the lock button is
pressed.
If all doors are closed, the hazard warn-
ing lights blink once to indicate that all
doors are locked. However, if any door
remains open, the hazard warning lights
will not blink. If all doors are closed after
the lock button is pressed, the hazard
warning lights blink.
D020102AUN-EUUnlock (2) Driver's door is unlocked if the unlock
button is pressed once.
The hazard warning lights will blink twice
to indicate that the driver's door is
unlocked.
All doors are unlocked if the unlock but-
ton is pressed twice within 3 seconds.
The hazard warning lights will blink twice
again to indicate that all doors are
unlocked.
After depressing this button, the doors
will be locked automatically unless you
open any door within 30 seconds.
D020104AUNTailgate unlock (3)The tailgate is unlocked if the button is
pressed for more than 0.5 second.
The hazard warning lights will blink twice
to indicate that the tailgate is unlocked.
After depressing this button, the tailgate
will be locked automatically unless you
open the tailgate within 30 seconds.
Also, once the tailgate is opened and
then closed, the tailgate will be locked
automatically.D020105AUNAlarm (4)The horn sounds and hazard warning
lights flash for about 30 seconds if this
button is pressed for more than 0.5 sec-
ond. To stop the horn and lights, press
any button on the transmitter.
REMOTE KEYLESS ENTRY (IF EQUIPPED)
OUN027001
Page 122 of 341
443
Features of your vehicle
D150304AUN-EUSeat belt warningDriver's seat belt warning
As a reminder to the driver, the driver's
seat belt warning light will blink for
approximately 6 seconds each time you
turn the ignition switch ON regardless of
belt fastening. If the driver's seat belt is
not fastened when the ignition switch is
turned ON or if it is disconnected after
the ignition switch is turn ON, the driver's
seat belt warning light will blink for
approximately 6 seconds and the seat
belt warning chime will sound for approx-
imately 6 seconds until the belt is fas-
tened. If the driver's seat belt is not fas-
tened for 36 seconds after starting the
engine, the driver's seat belt warning
light and chime will operate at most 11
times with a pattern of 6 seconds on and
24 seconds off or until the belt is fas-
tened.Front passenger's seat belt warning
As a reminder to the front passenger, the
front passenger's seat belt warning light
will blink for approximately 6 seconds
each time you turn the ignition switch ON
regardless of belt fastening. If the pas-
senger's seat belt is unfastened when
the vehicle speed exceeds 5 km/h (3
mph), the passenger's seat belt warning
light will blink for at least 6 seconds or
until the belt is fastened.
✽ ✽
NOTICE• You can find the front passenger’s
seat belt warning light on the center
fascia panel.
• Although the front passenger seat is
not occupied, the seat belt warning
light will blink for 6 seconds.
• The front passenger's seat belt warn-
ing can be operated when luggage is
placed on the front passenger seat.
D150305AUNTurn signal indicator lightsThe blinking green arrows on the instru-
ment panel show the direction indicated
by the turn signals. If the arrow comes on
but does not blink, blinks more rapidly
than normal, or does not illuminate at all,
a malfunction in the turn signal system is
indicated. Your dealer should be consult-
ed for repairs.D150306AUNHigh beam indicator This indicator illuminates when the head-
lights are on and in the high beam posi-
tion or when the turn signal lever is pulled
into the Flash-to-Pass position.
Page 129 of 341
Features of your vehicle50 4✽
✽
NOTICEThis system can only sense objects with-
in the range and location of the sensors;
It can not detect objects in other areas
where sensors are not installed. Also,
small or slim objects, such as poles or
objects located between sensors may not
be detected by the sensors.
Always visually check behind the vehi-
cle when backing up.
Be sure to inform any drivers of the
vehicle that may be unfamiliar with the
system regarding the systems capabili-
ties and limitations.
D170400BUNSelf-diagnosisIf you don’t hear an audible warning
sound or if the buzzer sounds intermit-
tently when shifting the gear to the R
(Reverse) position, this may indicate a
malfunction in the rear parking assist sys-
tem. If this occurs, have your vehicle
checked by an authorized KIA dealer as
soon as possible.
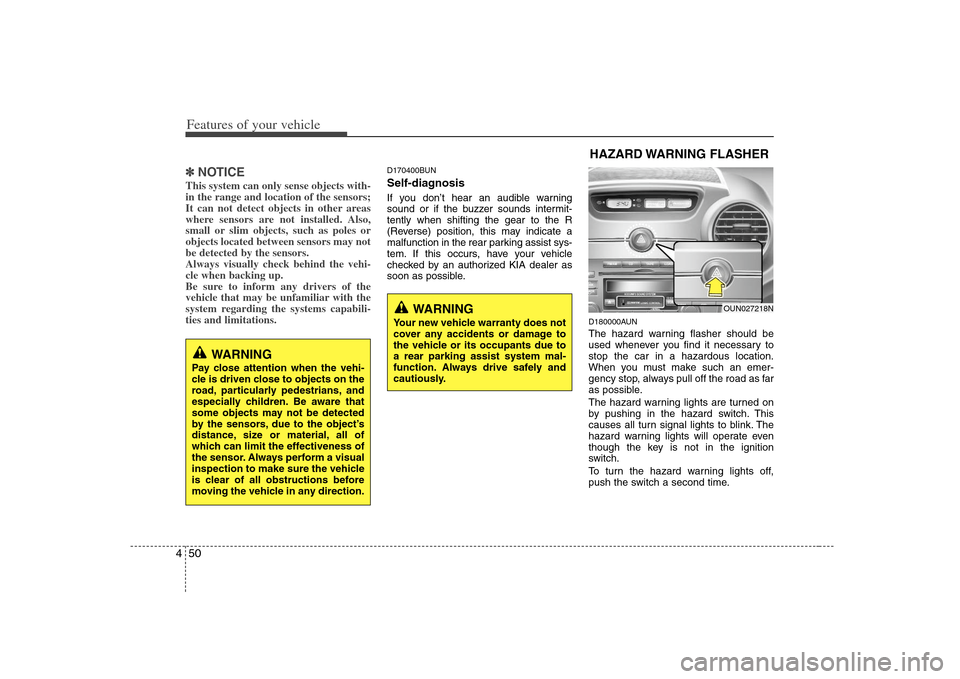
D180000AUNThe hazard warning flasher should be
used whenever you find it necessary to
stop the car in a hazardous location.
When you must make such an emer-
gency stop, always pull off the road as far
as possible.
The hazard warning lights are turned on
by pushing in the hazard switch. This
causes all turn signal lights to blink. The
hazard warning lights will operate even
though the key is not in the ignition
switch.
To turn the hazard warning lights off,
push the switch a second time.
WARNING
Pay close attention when the vehi-
cle is driven close to objects on the
road, particularly pedestrians, and
especially children. Be aware that
some objects may not be detected
by the sensors, due to the object’s
distance, size or material, all of
which can limit the effectiveness of
the sensor. Always perform a visual
inspection to make sure the vehicle
is clear of all obstructions before
moving the vehicle in any direction.
WARNING
Your new vehicle warranty does not
cover any accidents or damage to
the vehicle or its occupants due to
a rear parking assist system mal-
function. Always drive safely and
cautiously.
HAZARD WARNING FLASHER
OUN027218N
Page 131 of 341
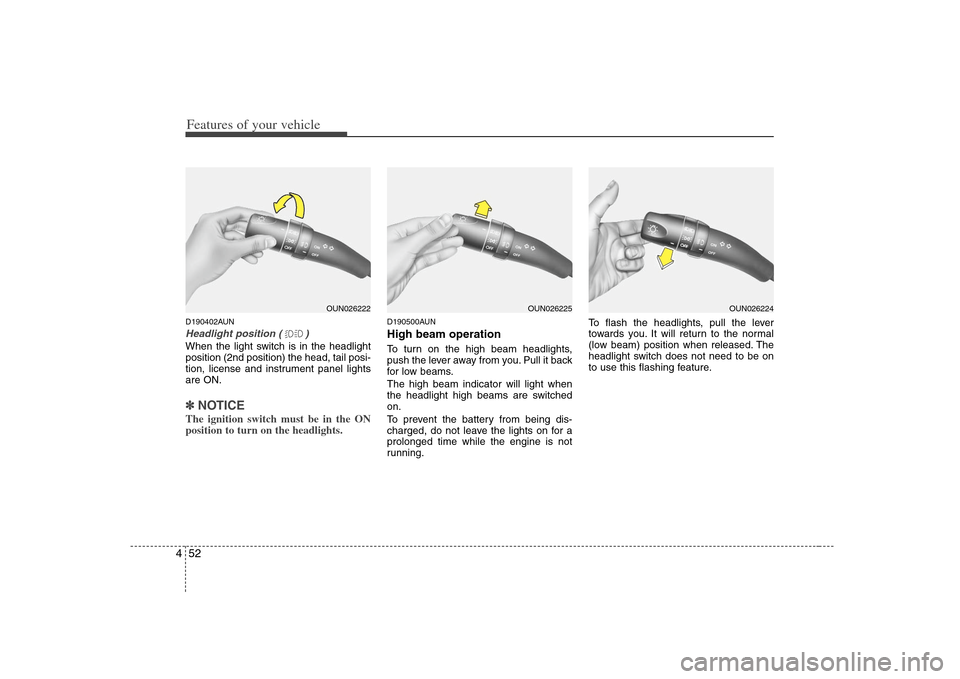
Features of your vehicle52 4D190402AUNHeadlight position ( )When the light switch is in the headlight
position (2nd position) the head, tail posi-
tion, license and instrument panel lights
are ON.✽ ✽
NOTICEThe ignition switch must be in the ON
position to turn on the headlights.
D190500AUNHigh beam operation To turn on the high beam headlights,
push the lever away from you. Pull it back
for low beams.
The high beam indicator will light when
the headlight high beams are switched
on.
To prevent the battery from being dis-
charged, do not leave the lights on for a
prolonged time while the engine is not
running.To flash the headlights, pull the lever
towards you. It will return to the normal
(low beam) position when released. The
headlight switch does not need to be on
to use this flashing feature.
OUN026222
OUN026224
OUN026225
Page 132 of 341
453
Features of your vehicle
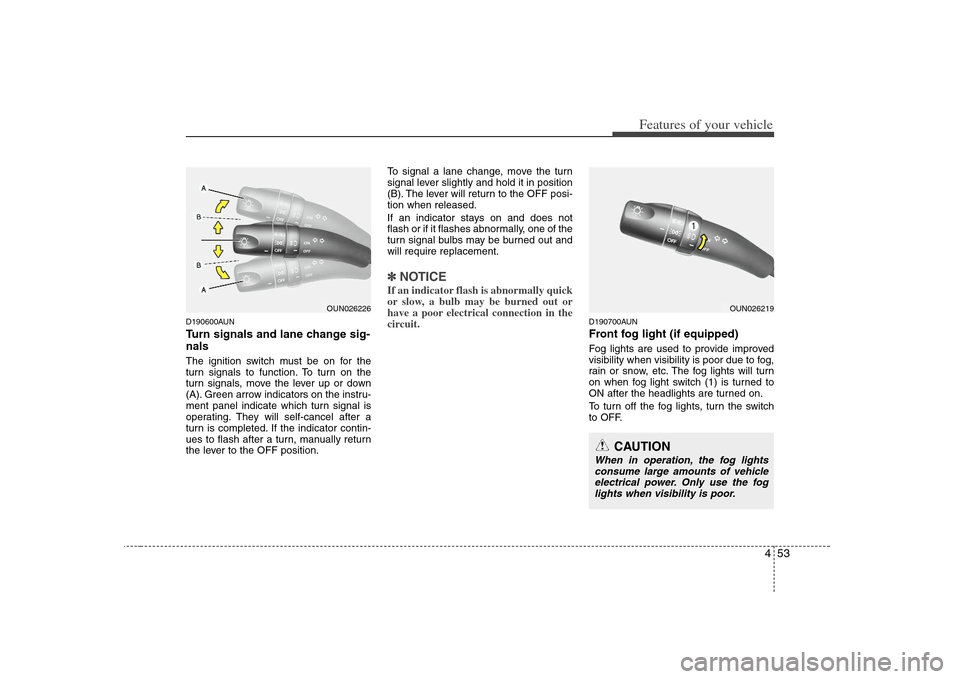
D190600AUNTurn signals and lane change sig-
nalsThe ignition switch must be on for the
turn signals to function. To turn on the
turn signals, move the lever up or down
(A). Green arrow indicators on the instru-
ment panel indicate which turn signal is
operating. They will self-cancel after a
turn is completed. If the indicator contin-
ues to flash after a turn, manually return
the lever to the OFF position.To signal a lane change, move the turn
signal lever slightly and hold it in position
(B). The lever will return to the OFF posi-
tion when released.
If an indicator stays on and does not
flash or if it flashes abnormally, one of the
turn signal bulbs may be burned out and
will require replacement.
✽ ✽
NOTICEIf an indicator flash is abnormally quick
or slow, a bulb may be burned out or
have a poor electrical connection in the
circuit.
D190700AUNFront fog light (if equipped) Fog lights are used to provide improved
visibility when visibility is poor due to fog,
rain or snow, etc. The fog lights will turn
on when fog light switch (1) is turned to
ON after the headlights are turned on.
To turn off the fog lights, turn the switch
to OFF.
OUN026226
OUN026219
CAUTION
When in operation, the fog lights
consume large amounts of vehicle
electrical power. Only use the fog
lights when visibility is poor.
Page 179 of 341
Features of your vehicle100 45. RADIO SCAN ButtonWhen you Press the button, frequency is
changed and the next channel is
received automatically.
To stay on a station, press the SCAN
button again.6. EQ ButtonPress the EQ button to select the CLAS-
SIC, POP, ROCK, JAZZ and OFF MODE
for the desired tone quality. Each press of
the button changes the display as fol-
lows;7. PRESET STATION Select ButtonsSix stations for AM, FM1 and FM2
respectively can be preset in the elec-
tronic memory circuit.HOW TO PRESET STATIONSSix AM and twelve FM stations may be
programmed into the memory of the
radio. Then, by simply pressing the AM/
FM band select buttons and/or one of the
six station select buttons, you may recall
any of these stations instantly.
To program the stations, follow these
steps: Press AM/FM selector to set the band
for AM, FM1 and FM2.
Select the desired station to be stored
by seek or manual tuning.
Determine the preset station select
button you wish to use to access that
station.
Press and hold the station select but-
ton for more than 0.8 seconds. A select
button indicator will show in the display
indicating which select button you have
depressed. The frequency display will
flash after it has been stored into the
memory. You should then release the
button, and proceed to program the
next desired station. A total of 18 sta-
tions can be programmed by selecting
one AM and two FM station per button.
When completed, any preset station
may be recalled by selecting AM, FM1
or FM2 band and the appropriate sta-
tion button.
✽ ✽
NOTICE• Do not place beverages close to the
audio system. The audio system mech-
anism may be damaged if you spill
them.
• Do not strike or allow anything to
impact the audio system, damage to
the system mechanisms could occur.
CLASSIC➟POP➟ROCK➟JAZZ➟OFF
Page 185 of 341
Features of your vehicle106 41. POWER ON-OFF Control Knob The radio unit may be operated when
the ignition switch is in the "ACC" or
"ON" position. Press the button to
switch the power on. The LCD shows
the radio frequency in the radio mode,
CD/ MP3 track in the CD/MP3 mode.
To switch the power off, press the but-
ton again.
Push the FM/AM or CD/MP3 to turn on
that function without pushing Power
ON-OFF control knob.
VOLUME Control
Rotate the knob clockwise to increase
the volume and turn the knob counter-
clockwise to reduce the volume.2. BAND Select ButtonPressing the FM/AM button changes the
AM, FM1 and FM2 bands. The mode
selected is shown on the display.3. RADIO SCAN ButtonWhen you press the button, frequency is
changed and the next channel is
received automatically.
To stay on a station, press the SCAN but-
ton again.
4. EQ ButtonPress the EQ button to select the CLAS-
SIC, POP, ROCK, JAZZ and OFF MODE
for the desired tone quality. Each press of
the button changes the display as fol-
lows;5. AUTO SEEK Select Button
(Automatic Channel Selection)Press the AUTO SEEK select button.
When the side is pressed, the unit
will automatically tune to the next higher
frequency and when the side is
pressed, it will automatically tune to the
next lower frequency.6. PRESET STATION Select ButtonsSix stations for AM, FM1 and FM2
respectively can be preset in the elec-
tronic memory circuit.HOW TO PRESET STATIONSSix AM and twelve FM stations may be
programmed into the memory of the
radio.Then, by simply pressing the AM/FM
band select button and/or one of the six
station select buttons, you may recall any
of these stations instantly. To program the
stations, follow these steps:
Press AM/FM selector to set the band
for AM, FM1 and FM2.
Select the desired station to be stored
by seek or manual tuning.
Determine the preset station select
button you wish to use to access that
station.
Press and hold the station select button
for more than 0.8 seconds. A select but-
ton indicator will show in the display indi-
cating which select button you have
depressed. The frequency display will
flash after it has been stored in to the
memory. You should then release the but-
ton, and proceed to program the next
desired station. A total of 18 stations can
be programmed by selecting one AM and
two FM station per button.
When completed, any preset station
may be recalled by selecting AM, FM1
or FM2 band and the appropriate sta-
tion button.
CLASSIC➟POP➟ROCK➟JAZZ➟OFF
Page 193 of 341
Features of your vehicle114 41. POWER ON-OFF Control Knob The radio unit may be operated when
the ignition key is in the "ACC" or “ON”
position. Press the knob to switch the
power on. The LCD shows the radio
frequency in the radio mode or
CD/MP3 track in the CD/MP3 mode or
CD AUTO CHANGER mode. To switch
the power off, press the knob again.
Push the FM/AM or CD/MP3 to turn on
that function without pushing Power
ON-OFF control knob.
VOLUME Control
Rotate the knob clockwise to increase
the volume and turn the knob counter-
clockwise to reduce the volume.2. BAND Select ButtonPressing the FM, AM button changes the
AM, FM1 and FM2 bands. The mode
selected is shown on the display.
3. AUTO SEEK Select Button
(Automatic Channel Selection)Press the AUTO SEEK select button.
When the side is pressed, the unit
will automatically tune to the next higher
frequency and when the side is
pressed, it will automatically tune to the
next lower frequency.4. RADIO SCAN ButtonWhen you press the button, frequency is
changed and the next channel is
received automatically.
To stay on a station, press the SCAN but-
ton again.5. EQ ButtonPress the EQ button to select the CLAS-
SIC, POP, ROCK, JAZZ and OFF MODE
for the desired tone quality. Each press of
the button changes the display as fol-
lows;6. PRESET STATION Select ButtonsSix stations for AM, FM1 and FM2
respectively can be preset in the elec-
tronic memory circuit.HOW TO PRESET STATIONS
Six AM and twelve FM stations may be
programmed into the memory of the
radio. Then, by simply pressing the AM/
FM band select button and/or one of the
six station select buttons, you may recall
any of these stations instantly. To pro-
gram the stations, follow these steps:
Press AM/FM selector to set the band
for AM, FM1 and FM2.
Select the desired station to be stored
by seek or manual tuning.
Determine the preset station select
button you wish to use to access that
station.
Press and hold the station select but-
ton for more than 0.8 seconds. A select
button indicator will show in the display
indicating which select button you have
depressed. The frequency display will
flash after it has been stored into the
memory. You should then release the
button, and proceed to program the
next desired station. A total of 18 sta-
tions can be programmed by selecting
one AM and two FM station per button.
When completed, any preset station
may be recalled by selecting AM, FM1
or FM2 band and the appropriate sta-
tion button.
CLASSIC➟POP➟ROCK➟JAZZ➟OFF