tire changing KIA Carens 2013 3.G Owner's Manual
[x] Cancel search | Manufacturer: KIA, Model Year: 2013, Model line: Carens, Model: KIA Carens 2013 3.GPages: 338, PDF Size: 6.52 MB
Page 232 of 338
531
Driving your vehicle
✽
✽NOTICE
The ESC system (if equipped) should be
turned OFF prior to rocking the vehicle.E110300AUN
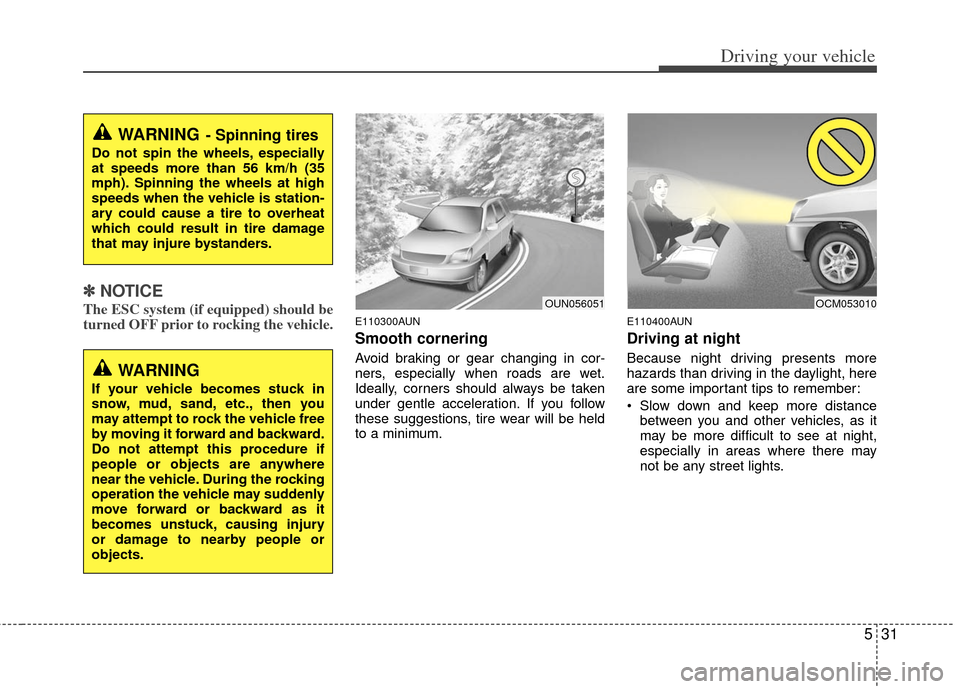
Smooth cornering
Avoid braking or gear changing in cor-
ners, especially when roads are wet.
Ideally, corners should always be taken
under gentle acceleration. If you follow
these suggestions, tire wear will be held
to a minimum.
E110400AUN
Driving at night
Because night driving presents more
hazards than driving in the daylight, here
are some important tips to remember:
Slow down and keep more distance
between you and other vehicles, as it
may be more difficult to see at night,
especially in areas where there may
not be any street lights.
WARNING- Spinning tires
Do not spin the wheels, especially
at speeds more than 56 km/h (35
mph). Spinning the wheels at high
speeds when the vehicle is station-
ary could cause a tire to overheat
which could result in tire damage
that may injure bystanders.
OUN056051OCM053010
WARNING
If your vehicle becomes stuck in
snow, mud, sand, etc., then you
may attempt to rock the vehicle free
by moving it forward and backward.
Do not attempt this procedure if
people or objects are anywhere
near the vehicle. During the rocking
operation the vehicle may suddenly
move forward or backward as it
becomes unstuck, causing injury
or damage to nearby people or
objects.
Page 253 of 338
63
What to do in an emergency
4. When changing a flat tire, follow theinstruction provided later in this sec-
tion.
F020300AUN
If engine stalls while driving
1. Reduce your speed gradually, keeping a straight line. Move cautiously off the
road to a safe place.
2. Turn on your emergency flashers.
3. Try to start the engine again. If your vehicle will not start, contact an
authorized Kia dealer or seek other
qualified assistance.
F030100AUN
If engine doesn't turn over or
turns over slowly
1. If your car has an automatic transaxle,be sure the gear selector lever is in N
(Neutral) or P (Park) and the emer-
gency brake is set.
2. Check the battery connections to be sure they are clean and tight.
3. Turn on the interior light. If the light dims or goes out when you operate the
starter, the battery is discharged.
4. Check the starter connections to be sure they are securely tightened.
5. Do not push or pull the vehicle to start it. See instructions for "Jump starting".
F030200AUN
If engine turns over normally but
does not start
1. Check fuel level.
2. With the ignition switch in the LOCKposition, check all connectors at igni-
tion, coil and spark plugs. Reconnect
any that may be disconnected or
loose.
3. Check the fuel line in the engine com- partment.
4. If the engine still does not start, call an authorized Kia dealer or seek other
qualified assistance.
IF THE ENGINE WILL NOT START
WARNING
If the engine will not start, do not
push or pull the car to start it. This
could result in a collision or cause
other damage. In addition, push or
pull starting may cause the catalyt-
ic converter to be overloaded and
create a fire hazard.
Page 257 of 338
67
What to do in an emergency
IF YOU HAVE A FLAT TIRE
F070100BUN-EU
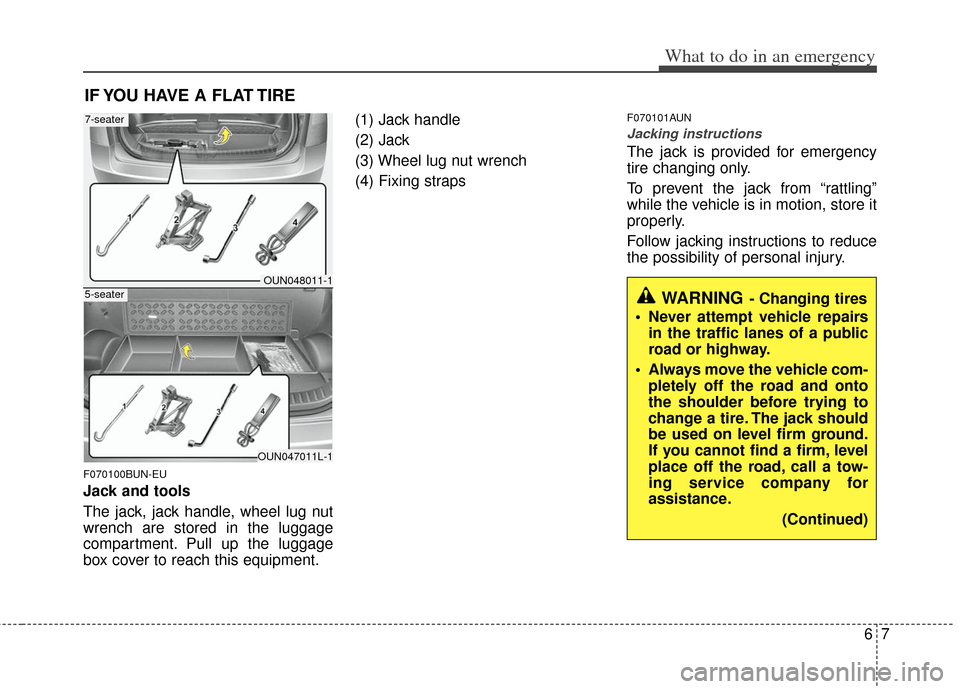
Jack and tools
The jack, jack handle, wheel lug nut
wrench are stored in the luggage
compartment. Pull up the luggage
box cover to reach this equipment.(1) Jack handle
(2) Jack
(3) Wheel lug nut wrench
(4) Fixing straps
F070101AUN
Jacking instructions
The jack is provided for emergency
tire changing only.
To prevent the jack from “rattling”
while the vehicle is in motion, store it
properly.
Follow jacking instructions to reduce
the possibility of personal injury.
WARNING- Changing tires
Never attempt vehicle repairs in the traffic lanes of a public
road or highway.
Always move the vehicle com- pletely off the road and onto
the shoulder before trying to
change a tire. The jack should
be used on level firm ground.
If you cannot find a firm, level
place off the road, call a tow-
ing service company for
assistance.
(Continued)
OUN048011-1
OUN047011L-1
7-seater
5-seater
Page 259 of 338
69
What to do in an emergency
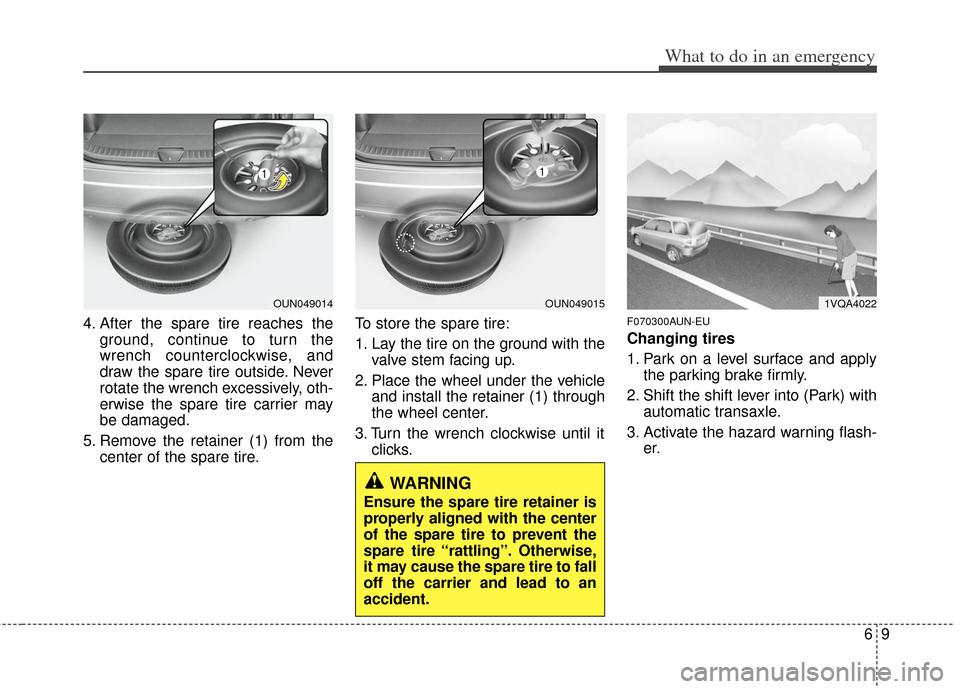
4. After the spare tire reaches theground, continue to turn the
wrench counterclockwise, and
draw the spare tire outside. Never
rotate the wrench excessively, oth-
erwise the spare tire carrier may
be damaged.
5. Remove the retainer (1) from the center of the spare tire. To store the spare tire:
1. Lay the tire on the ground with the
valve stem facing up.
2. Place the wheel under the vehicle and install the retainer (1) through
the wheel center.
3. Turn the wrench clockwise until it clicks.F070300AUN-EU
Changing tires
1. Park on a level surface and applythe parking brake firmly.
2. Shift the shift lever into (Park) with automatic transaxle.
3. Activate the hazard warning flash- er.
WARNING
Ensure the spare tire retainer is
properly aligned with the center
of the spare tire to prevent the
spare tire “rattling”. Otherwise,
it may cause the spare tire to fall
off the carrier and lead to an
accident.
1VQA4022OUN049014OUN049015
Page 260 of 338
What to do in an emergency
10
6
4. Remove the wheel lug nut wrench,
jack, jack handle, and spare tire
from the vehicle.
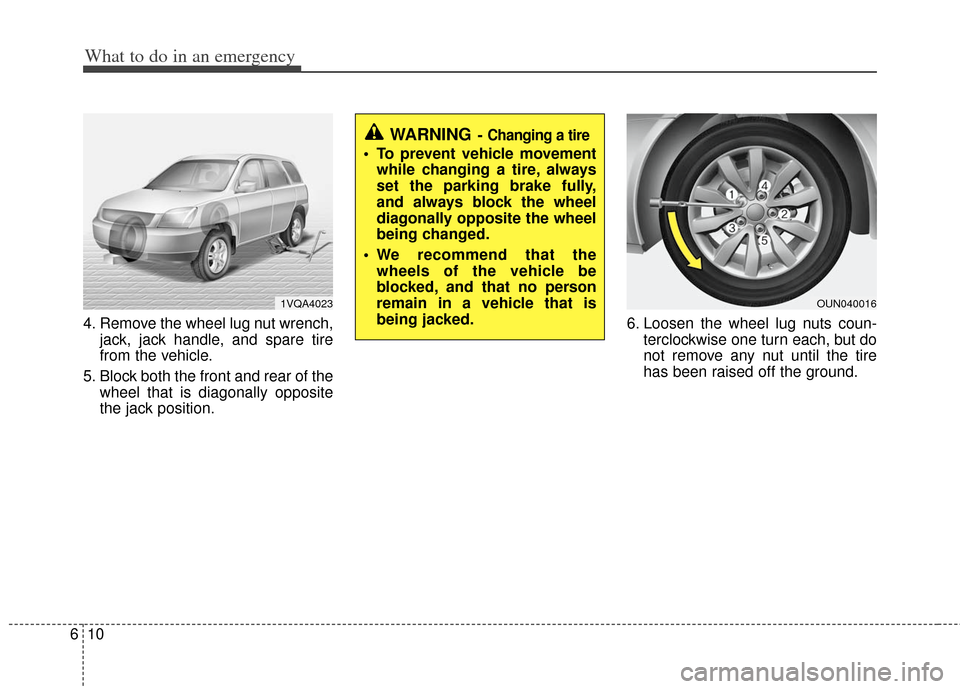
5. Block both the front and rear of the wheel that is diagonally opposite
the jack position. 6. Loosen the wheel lug nuts coun-
terclockwise one turn each, but do
not remove any nut until the tire
has been raised off the ground.
1VQA4023
WARNING- Changing a tire
To prevent vehicle movementwhile changing a tire, always
set the parking brake fully,
and always block the wheel
diagonally opposite the wheel
being changed.
We recommend that the wheels of the vehicle be
blocked, and that no person
remain in a vehicle that is
being jacked.
OUN040016
Page 261 of 338
611
What to do in an emergency
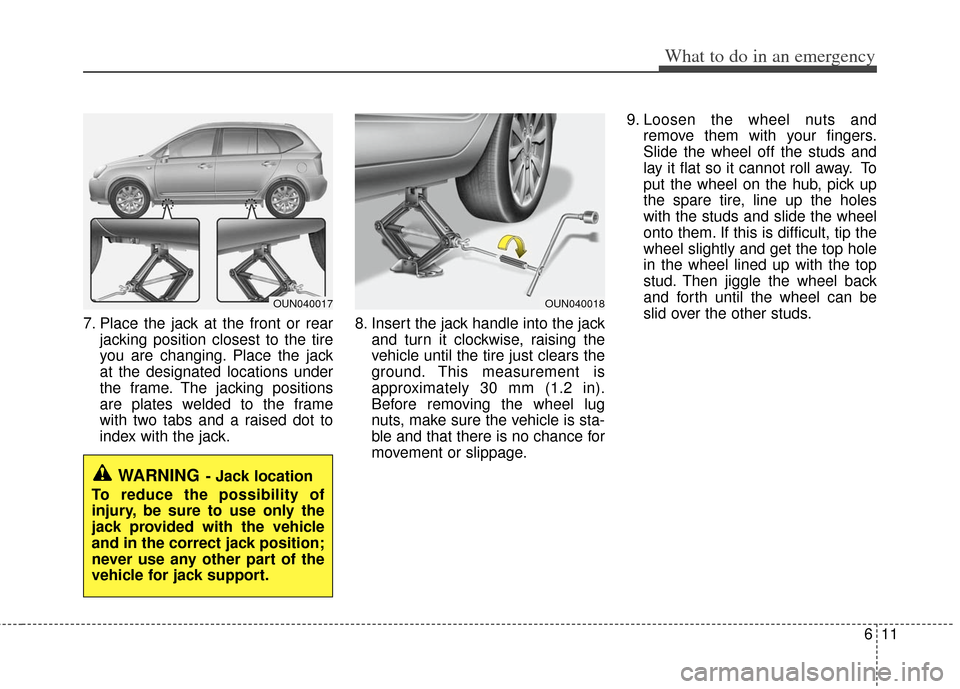
7. Place the jack at the front or rearjacking position closest to the tire
you are changing. Place the jack
at the designated locations under
the frame. The jacking positions
are plates welded to the frame
with two tabs and a raised dot to
index with the jack. 8. Insert the jack handle into the jack
and turn it clockwise, raising the
vehicle until the tire just clears the
ground. This measurement is
approximately 30 mm (1.2 in).
Before removing the wheel lug
nuts, make sure the vehicle is sta-
ble and that there is no chance for
movement or slippage. 9. Loosen the wheel nuts and
remove them with your fingers.
Slide the wheel off the studs and
lay it flat so it cannot roll away. To
put the wheel on the hub, pick up
the spare tire, line up the holes
with the studs and slide the wheel
onto them. If this is difficult, tip the
wheel slightly and get the top hole
in the wheel lined up with the top
stud. Then jiggle the wheel back
and forth until the wheel can be
slid over the other studs.
WARNING- Jack location
To reduce the possibility of
injury, be sure to use only the
jack provided with the vehicle
and in the correct jack position;
never use any other part of the
vehicle for jack support.
OUN040017OUN040018
Page 262 of 338
What to do in an emergency
12
6
10. To reinstall the wheel, hold it on
the studs, put the wheel nuts on
the studs and tighten them finger
tight. Jiggle the tire to be sure it is
completely seated, then tighten
the nuts as much as possible
with your fingers again.
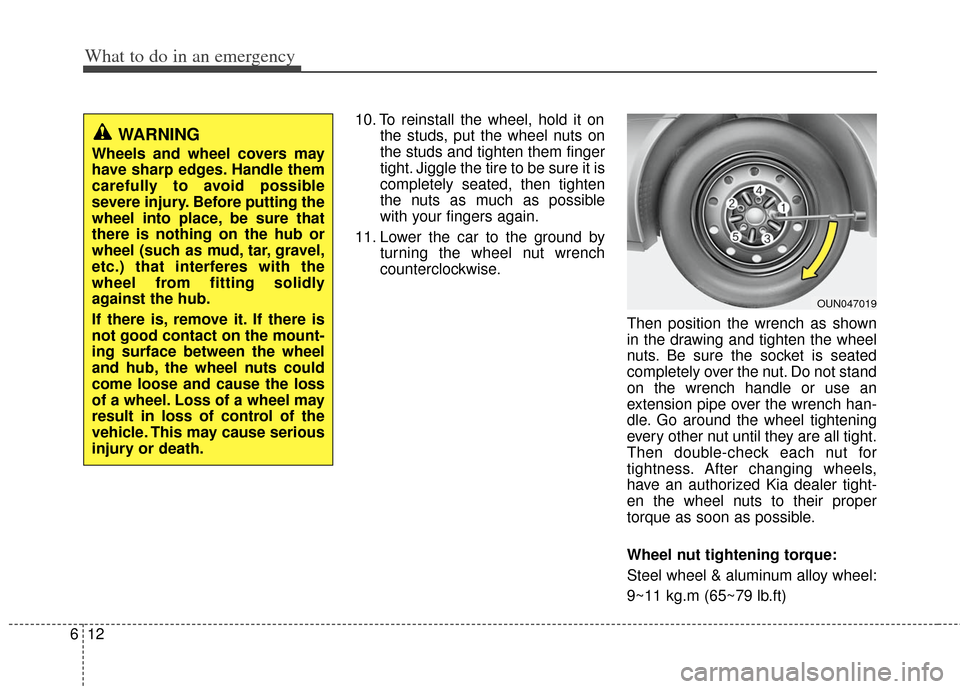
11. Lower the car to the ground by turning the wheel nut wrench
counterclockwise.
Then position the wrench as shown
in the drawing and tighten the wheel
nuts. Be sure the socket is seated
completely over the nut. Do not stand
on the wrench handle or use an
extension pipe over the wrench han-
dle. Go around the wheel tightening
every other nut until they are all tight.
Then double-check each nut for
tightness. After changing wheels,
have an authorized Kia dealer tight-
en the wheel nuts to their proper
torque as soon as possible.
Wheel nut tightening torque:
Steel wheel & aluminum alloy wheel:
9~11 kg.m (65~79 lb.ft)
WARNING
Wheels and wheel covers may
have sharp edges. Handle them
carefully to avoid possible
severe injury. Before putting the
wheel into place, be sure that
there is nothing on the hub or
wheel (such as mud, tar, gravel,
etc.) that interferes with the
wheel from fitting solidly
against the hub.
If there is, remove it. If there is
not good contact on the mount-
ing surface between the wheel
and hub, the wheel nuts could
come loose and cause the loss
of a wheel. Loss of a wheel may
result in loss of control of the
vehicle. This may cause serious
injury or death.
OUN047019