check engine light KIA Carens 2017 3.G Owner's Guide
[x] Cancel search | Manufacturer: KIA, Model Year: 2017, Model line: Carens, Model: KIA Carens 2017 3.GPages: 625, PDF Size: 19.69 MB
Page 581 of 625

881
Maintenance
LIGHT BULBS
Use only the bulbs of the specifiedwattage.
✽ ✽ NOTICE
After driving in heavy rain or wash-
ing the vehicle, headlight and tail-
light lenses could appear foggy. This
condition is caused by the tempera-
ture difference between the lamp
inside and outside. This is similar to
the condensation on your windows
inside your vehicle during rain and
does not indicate a problem with
your vehicle. If the water leaks into
the lamp bulb circuitry, we recom-
mend that the system be checked by
an authorized Kia dealer.WARNING - Working on
the lights
Prior to working on the light,
firmly apply the parking brake,
ensure that the ignition switch
is turned to the “LOCK” position
(smart key: turn off the engine)
and turn off the lights to avoid
sudden movement of the vehi-
cle and burning your fingers or
getting an electric shock.
CAUTION
Be sure to replace the burned- out bulb with one of the samewattage rating. Otherwise, itmay cause damage to the fuseor electric wiring system.
CAUTION
If you do not have necessarytools, the correct bulbs and theexpertise, we recommend thatyou consult an authorized Kiadealer. In many cases, it is diffi-cult to replace vehicle lightbulbs because other parts of thevehicle must be removed beforeyou can get to the bulb. This isespecially true if you have toremove the headlight assemblyto get to the bulb(s).
Removing/installing the head-light assembly can result indamage to the vehicle.
Page 587 of 625

887
Maintenance
Outside light
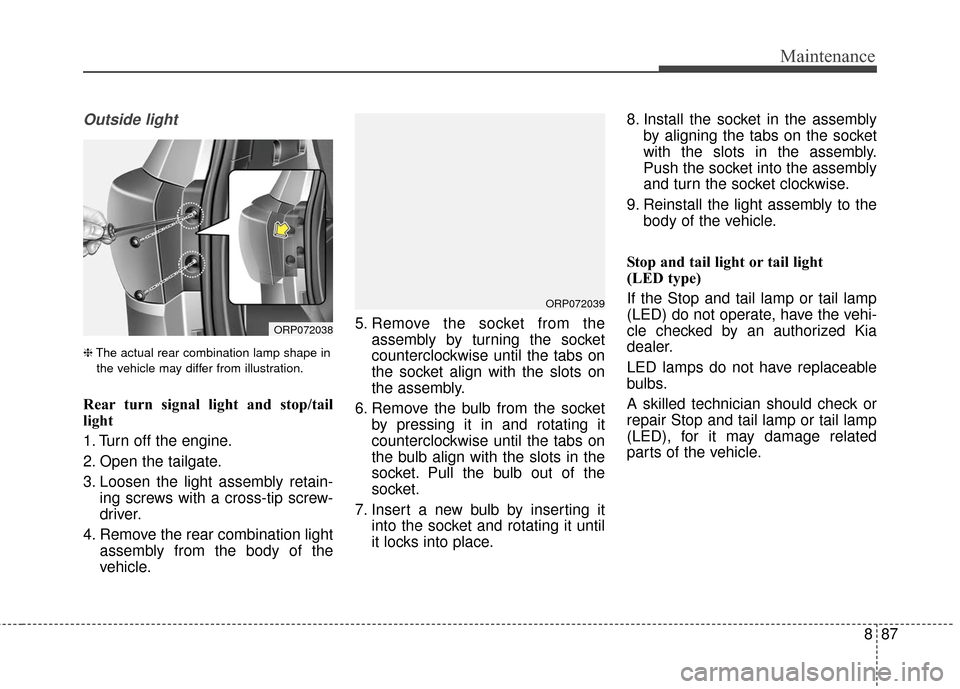
❈The actual rear combination lamp shape in
the vehicle may differ from illustration.
Rear turn signal light and stop/tail
light
1. Turn off the engine.
2. Open the tailgate.
3. Loosen the light assembly retain- ing screws with a cross-tip screw-
driver.
4. Remove the rear combination light assembly from the body of the
vehicle. 5. Remove the socket from the
assembly by turning the socket
counterclockwise until the tabs on
the socket align with the slots on
the assembly.
6. Remove the bulb from the socket by pressing it in and rotating it
counterclockwise until the tabs on
the bulb align with the slots in the
socket. Pull the bulb out of the
socket.
7. Insert a new bulb by inserting it into the socket and rotating it until
it locks into place. 8. Install the socket in the assembly
by aligning the tabs on the socket
with the slots in the assembly.
Push the socket into the assembly
and turn the socket clockwise.
9. Reinstall the light assembly to the body of the vehicle.
Stop and tail light or tail light
(LED type)
If the Stop and tail lamp or tail lamp
(LED) do not operate, have the vehi-
cle checked by an authorized Kia
dealer.
LED lamps do not have replaceable
bulbs.
A skilled technician should check or
repair Stop and tail lamp or tail lamp
(LED), for it may damage related
parts of the vehicle.
ORP072039
ORP072038
Page 621 of 625

I9
Index
MaintenanceEngine compartment ....................................................8-3
Maintenance services ....................................................8-4
Owner maintenance ......................................................8-6
Scheduled maintenance service ....................................8-8
Explanation of scheduled maintenance items ............8-25
Tire maintenance ........................................................8-56
Maintenance schedule......................................................8-8 Normal Maintenance Schedule ....................................8-9
Maintenance Under Severe Usage Conditions ..........8-23
Maintenance services ......................................................8-4 Owner’s responsibility ..................................................8-4
Owner maintenance precautions ..................................8-5
Manual Climate Control system ..................................4-124 Heating and air conditioning ....................................4-125
System operation ......................................................4-130
Climate control air filter ..........................................4-132
Checking the amount of air conditioner refrigerant and compressor lubricant ......................4-133
Map lamp ....................................................................4-118
Mirrors ........................................................................\
..4-53 Inside rearview mirror ................................................4-53
Day/night rearview mirror ..........................................4-53
Electrochromic mirror (ECM) ..................................4-54
Outside rearview mirror ..............................................4-55
Remote control ............................................................4-56
Folding the outside rearview mirror ..........................4-56 Occupant Detection System ..........................................3-57
Odometer ......................................................................4-\
62
Oil (Engine) ..................................................................8-29
Outside rearview mirror ................................................4-55
Overheats ........................................................................\
7-8
Owner maintenance ........................................................8-6
Owner maintenance schedule ......................................8-6
Paddle shifter - Automatic transaxle ............................6-19
Parking assist system ....................................................4-97 Operation of the parking assist system ......................4-98
Non-operational conditions of parking assist system ..4-100
Self-diagnosis............................................................4-102
Parking brake ................................................................8-37 Checking the parking brake ........................................8-37
Parking brake - Hand type ............................................6-25
Parking light position ..................................................4-106
Placing a passenger seat beltinto the auto lock mode ...... 3-44
Portable lamp usage ....................................................4-169
Power outlet ................................................................4-163
Power window lock button ............................................4-33
Precautions ....................................................................3-37\
Pre-tensioner seat belt....................................................3-34
M
P
O