change time KIA CARNIVAL 2007 Workshop Manual
[x] Cancel search | Manufacturer: KIA, Model Year: 2007, Model line: CARNIVAL, Model: KIA CARNIVAL 2007Pages: 1575, PDF Size: 44.86 MB
Page 161 of 1575
1.Turn the ignition switch to "OFF".
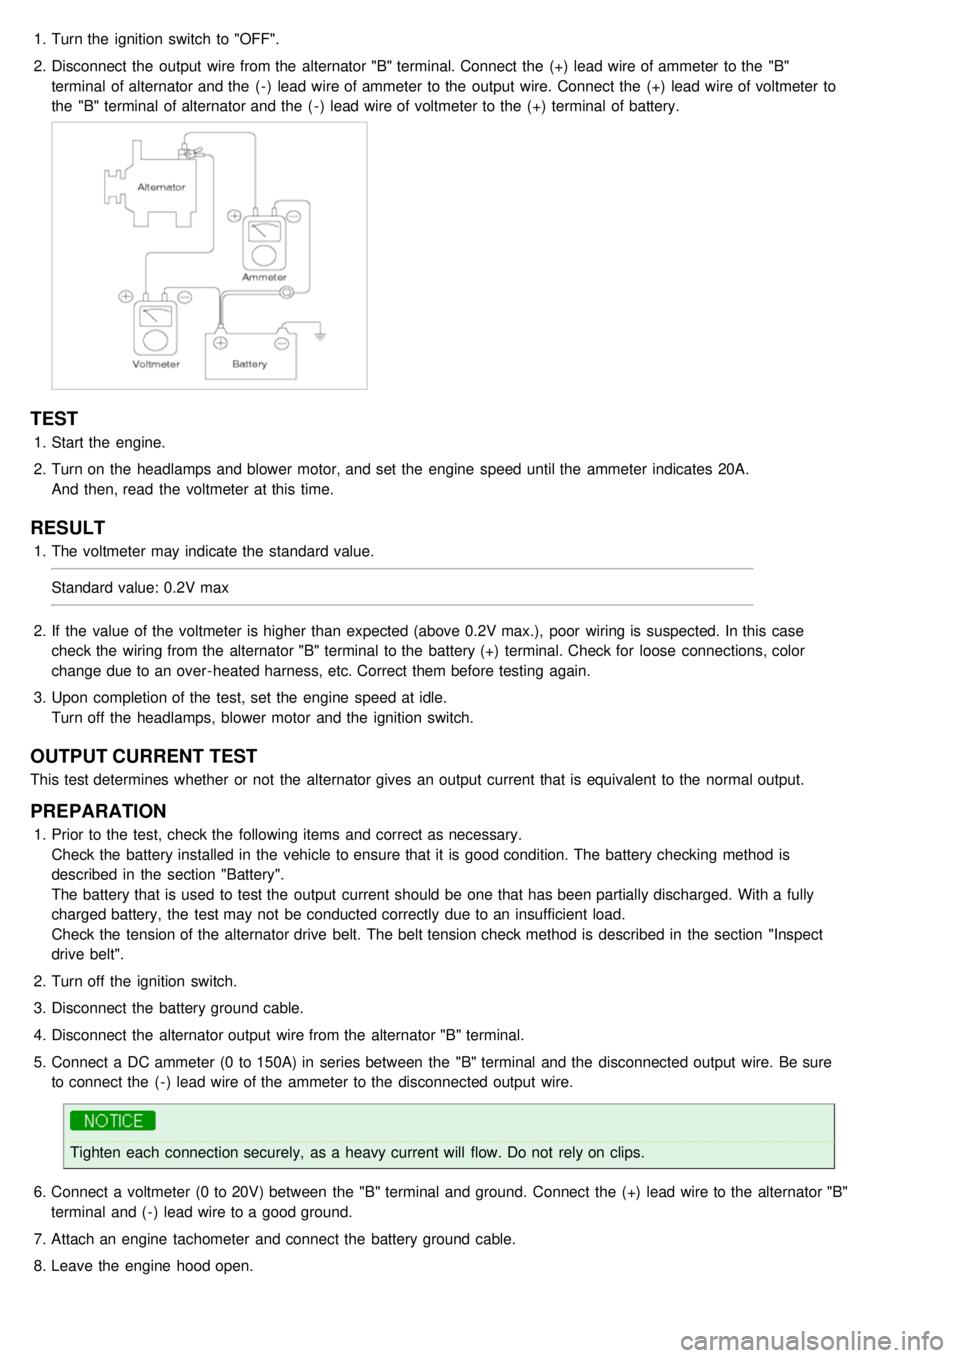
2. Disconnect the output wire from the alternator "B" terminal. Connect the (+) lead wire of ammeter to the "B"
terminal of alternator and the ( - ) lead wire of ammeter to the output wire. Connect the (+) lead wire of voltmeter to
the "B" terminal of alternator and the ( - ) lead wire of voltmeter to the (+) terminal of battery.
TEST
1.Start the engine.
2. Turn on the headlamps and blower motor, and set the engine speed until the ammeter indicates 20A.
And then, read the voltmeter at this time.
RESULT
1.The voltmeter may indicate the standard value.
Standard value: 0.2V max
2. If the value of the voltmeter is higher than expected (above 0.2V max.), poor wiring is suspected. In this case
check the wiring from the alternator "B" terminal to the battery (+) terminal. Check for loose connections, color
change due to an over - heated harness, etc. Correct them before testing again.
3. Upon completion of the test, set the engine speed at idle.
Turn off the headlamps, blower motor and the ignition switch.
OUTPUT CURRENT TEST
This test determines whether or not the alternator gives an output current that is equivalent to the normal output.
PREPARATION
1.Prior to the test, check the following items and correct as necessary.
Check the battery installed in the vehicle to ensure that it is good condition. The battery checking method is
described in the section "Battery".
The battery that is used to test the output current should be one that has been partially discharged. With a fully
charged battery, the test may not be conducted correctly due to an insufficient load.
Check the tension of the alternator drive belt. The belt tension check method is described in the section "Inspect
drive belt".
2. Turn off the ignition switch.
3. Disconnect the battery ground cable.
4. Disconnect the alternator output wire from the alternator "B" terminal.
5. Connect a DC ammeter (0 to 150A) in series between the "B" terminal and the disconnected output wire. Be sure
to connect the ( - ) lead wire of the ammeter to the disconnected output wire.
Tighten each connection securely, as a heavy current will flow. Do not rely on clips.
6. Connect a voltmeter (0 to 20V) between the "B" terminal and ground. Connect the (+) lead wire to the alternator "B"
terminal and ( - ) lead wire to a good ground.
7. Attach an engine tachometer and connect the battery ground cable.
8. Leave the engine hood open.
Page 339 of 1575
fluctuated even though turns on or off the input signal. The electrical ‘time constant’ is much more fast than one of
mechanical so the frequency of VFS is extremely higher than the conventional PWM type.
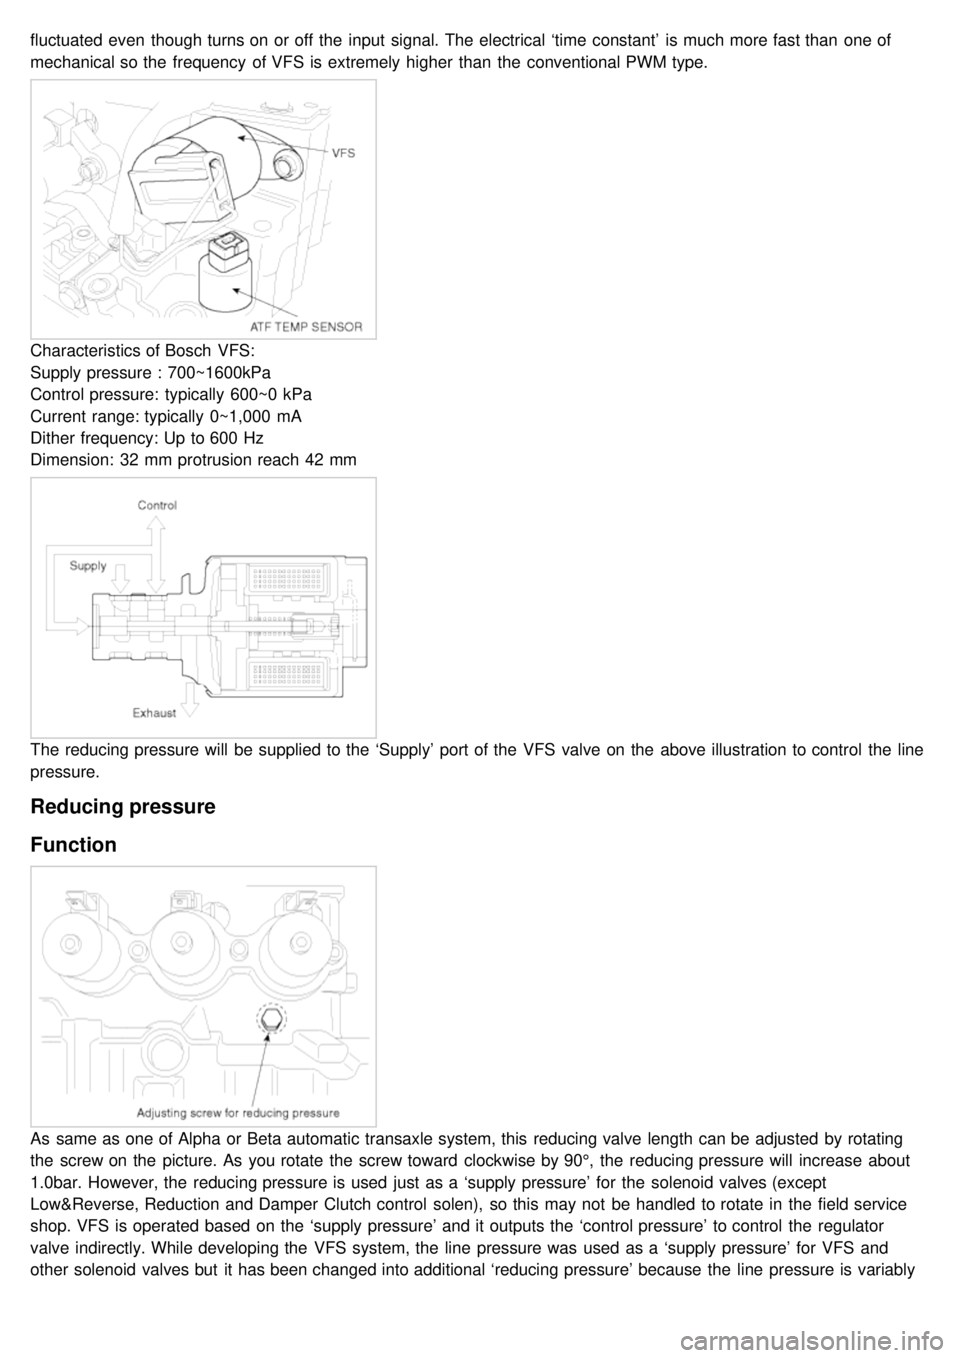
Characteristics of Bosch VFS:
Supply pressure : 700~1600kPa
Control pressure: typically 600~0 kPa
Current range: typically 0~1,000 mA
Dither frequency: Up to 600 Hz
Dimension: 32 mm protrusion reach 42 mm
The reducing pressure will be supplied to the ‘Supply’ port of the VFS valve on the above illustration to control the line
pressure.
Reducing pressure
Function
As same as one of Alpha or Beta automatic transaxle system, this reducing valve length can be adjusted by rotating
the screw on the picture. As you rotate the screw toward clockwise by 90°, the reducing pressure will increase about
1.0bar. However, the reducing pressure is used just as a ‘supply pressure’ for the solenoid valves (except
Low&Reverse, Reduction and Damper Clutch control solen), so this may not be handled to rotate in the field service
shop. VFS is operated based on the ‘supply pressure’ and it outputs the ‘control pressure’ to control the regulator
valve indirectly. While developing the VFS system, the line pressure was used as a ‘supply pressure’ for VFS and
other solenoid valves but it has been changed into additional ‘reducing pressure’ because the line pressure is variably
changed by VFS so the control pressure becomes unstable and some hydraulic pressure oscillation occurred. That is
Page 366 of 1575
32ND SOLENOID(SCSV C)
Solenoid valve driver for 5sec.3. P range
4. Vehicle speed 0km/h
5. Engine stop
6. No failure
7. TPS < 1V
4
OD SOLENOID(SCSV D)
5 TORQUE CONVERTER SOLENOID VALVE
6 A/T CONTROL RELAY OFF for 3 sec. -
7 INTELLIGENT SHIFT PROHIBIT Prohibit until IG off -
8 CLEAR LEARNING VALUE --
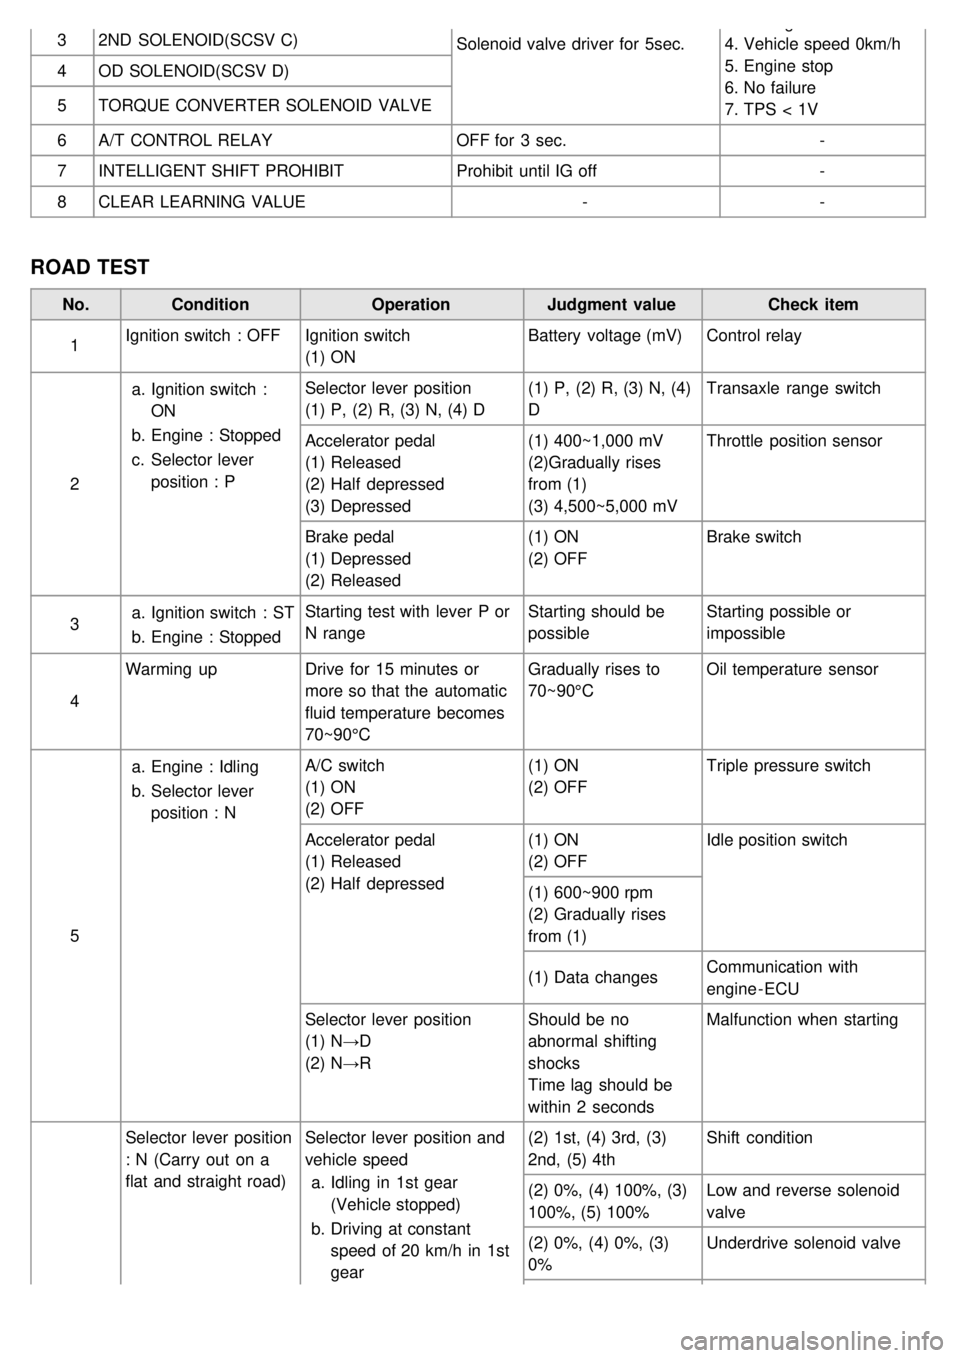
ROAD TEST
No.Condition OperationJudgment value Check item
1 Ignition switch : OFF
Ignition switch
(1) ON Battery voltage (mV)
Control relay
2 a.
Ignition switch :
ON
b. Engine : Stopped
c. Selector lever
position : P Selector lever position
(1) P, (2) R, (3) N, (4) D
(1) P, (2) R, (3) N, (4)
DTransaxle range switch
Accelerator pedal
(1) Released
(2) Half depressed
(3) Depressed (1) 400~1,000 mV
(2)Gradually rises
from (1)
(3) 4,500~5,000 mVThrottle position sensor
Brake pedal
(1) Depressed
(2) Released (1) ON
(2) OFF
Brake switch
3 a.
Ignition switch : ST
b. Engine : Stopped Starting test with lever P or
N range
Starting should be
possibleStarting possible or
impossible
4 Warming up
Drive for 15 minutes or
more so that the automatic
fluid temperature becomes
70~90°C Gradually rises to
70~90°C
Oil temperature sensor
5 a.
Engine : Idling
b. Selector lever
position : N A/C switch
(1) ON
(2) OFF
(1) ON
(2) OFF
Triple pressure switch
Accelerator pedal
(1) Released
(2) Half depressed (1) ON
(2) OFF
Idle position switch
(1) 600~900 rpm
(2) Gradually rises
from (1)
(1) Data changes Communication with
engine - ECU
Selector lever position
(1) N→D
(2) N→R Should be no
abnormal shifting
shocks
Time lag should be
within 2 secondsMalfunction when starting
Selector lever position
: N (Carry out on a
flat and straight road) Selector lever position and
vehicle speed
a. Idling in 1st gear
(Vehicle stopped)
b. Driving at constant
speed of 20 km/h in 1st
gear (2) 1st, (4) 3rd, (3)
2nd, (5) 4th
Shift condition
(2) 0%, (4) 100%, (3)
100%, (5) 100% Low and reverse solenoid
valve
(2) 0%, (4) 0%, (3)
0% Underdrive solenoid valve
Page 585 of 1575
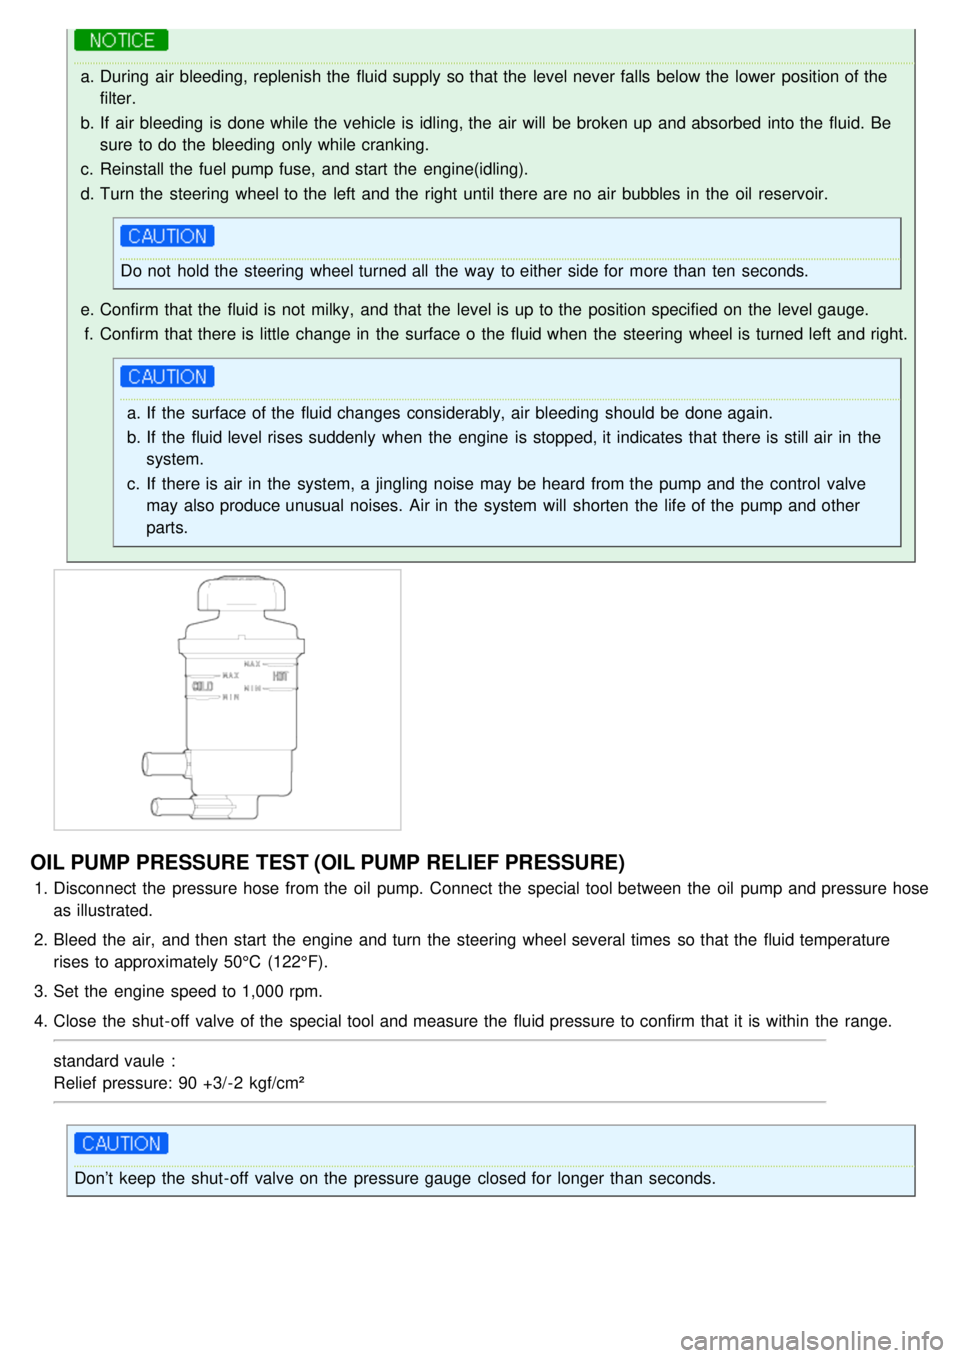
a.During air bleeding, replenish the fluid supply so that the level never falls below the lower position of the
filter.
b. If air bleeding is done while the vehicle is idling, the air will be broken up and absorbed into the fluid. Be
sure to do the bleeding only while cranking.
c. Reinstall the fuel pump fuse, and start the engine(idling).
d. Turn the steering wheel to the left and the right until there are no air bubbles in the oil reservoir.
Do not hold the steering wheel turned all the way to either side for more than ten seconds.
e. Confirm that the fluid is not milky, and that the level is up to the position specified on the level gauge.
f. Confirm that there is little change in the surface o the fluid when the steering wheel is turned left and right.
a. If the surface of the fluid changes considerably, air bleeding should be done again.
b. If the fluid level rises suddenly when the engine is stopped, it indicates that there is still air in the
system.
c. If there is air in the system, a jingling noise may be heard from the pump and the control valve
may also produce unusual noises. Air in the system will shorten the life of the pump and other
parts.
OIL PUMP PRESSURE TEST (OIL PUMP RELIEF PRESSURE)
1.Disconnect the pressure hose from the oil pump. Connect the special tool between the oil pump and pressure hose
as illustrated.
2. Bleed the air, and then start the engine and turn the steering wheel several times so that the fluid temperature
rises to approximately 50°C (122°F).
3. Set the engine speed to 1,000 rpm.
4. Close the shut- off valve of the special tool and measure the fluid pressure to confirm that it is within the range.
standard vaule :
Relief pressure: 90 +3/- 2 kgf/cm²
Don’t keep the shut- off valve on the pressure gauge closed for longer than seconds.
Page 869 of 1575
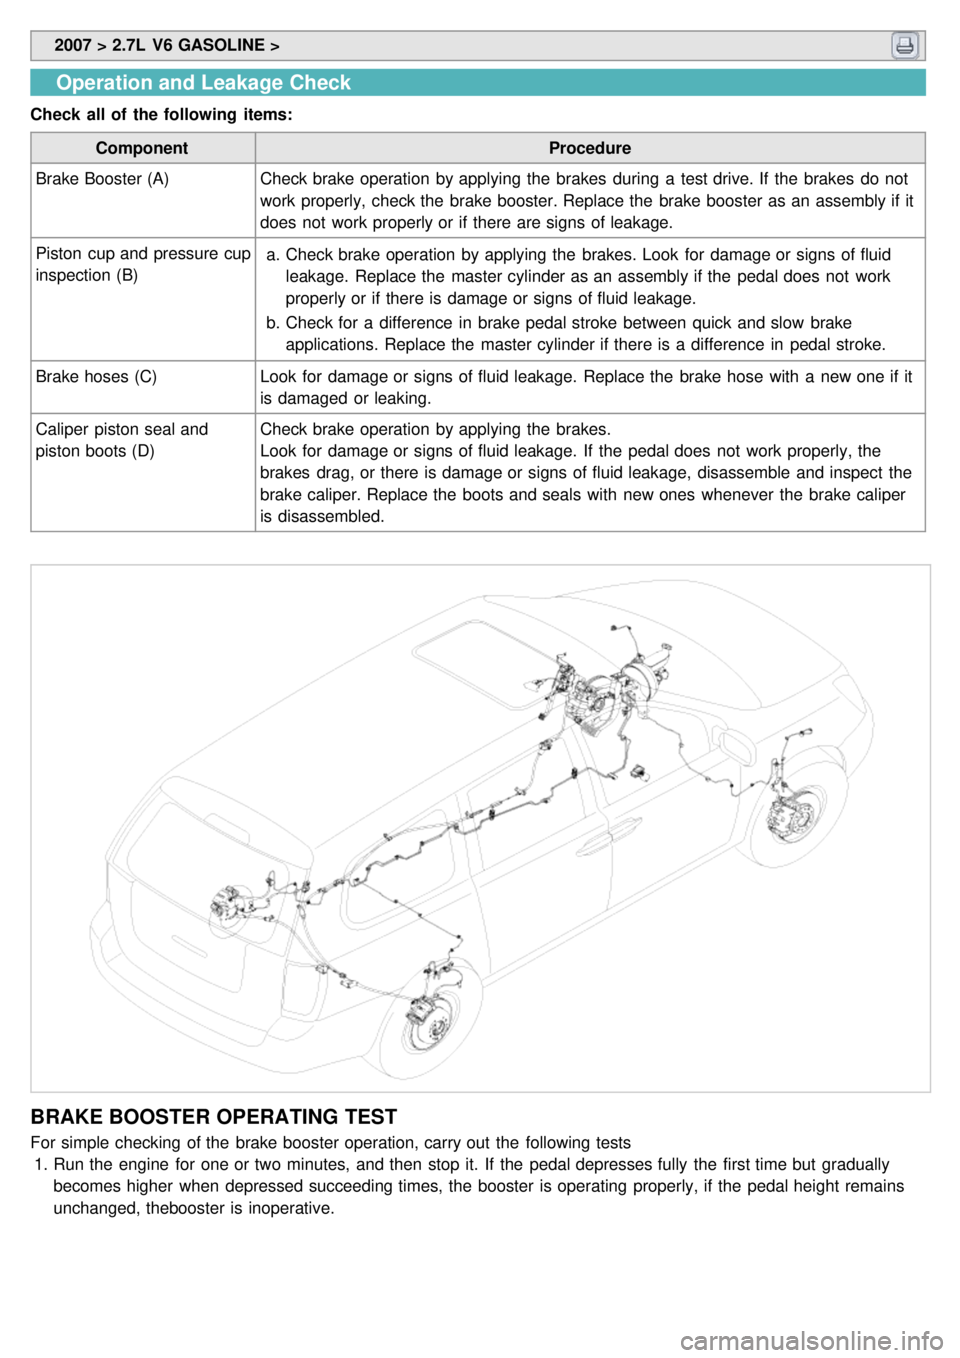
2007 > 2.7L V6 GASOLINE >
Operation and Leakage Check
Check all of the following items:
Component Procedure
Brake Booster (A) Check brake operation by applying the brakes during a test drive. If the brakes do not
work properly, check the brake booster. Replace the brake booster as an assembly if it
does not work properly or if there are signs of leakage.
Piston cup and pressure cup
inspection (B) a.
Check brake operation by applying the brakes. Look for damage or signs of fluid
leakage. Replace the master cylinder as an assembly if the pedal does not work
properly or if there is damage or signs of fluid leakage.
b. Check for a difference in brake pedal stroke between quick and slow brake
applications. Replace the master cylinder if there is a difference in pedal stroke.
Brake hoses (C) Look for damage or signs of fluid leakage. Replace the brake hose with a new one if it
is damaged or leaking.
Caliper piston seal and
piston boots (D) Check brake operation by applying the brakes.
Look for damage or signs of fluid leakage. If the pedal does not work properly, the
brakes drag, or there is damage or signs of fluid leakage, disassemble and inspect the
brake caliper. Replace the boots and seals with new ones whenever the brake caliper
is disassembled.
BRAKE BOOSTER OPERATING TEST
For simple checking of the brake booster operation, carry out the following tests
1. Run the engine for one or two minutes, and then stop it. If the pedal depresses fully the first time but gradually
becomes higher when depressed succeeding times, the booster is operating properly, if the pedal height remains
unchanged, thebooster is inoperative.
Page 870 of 1575
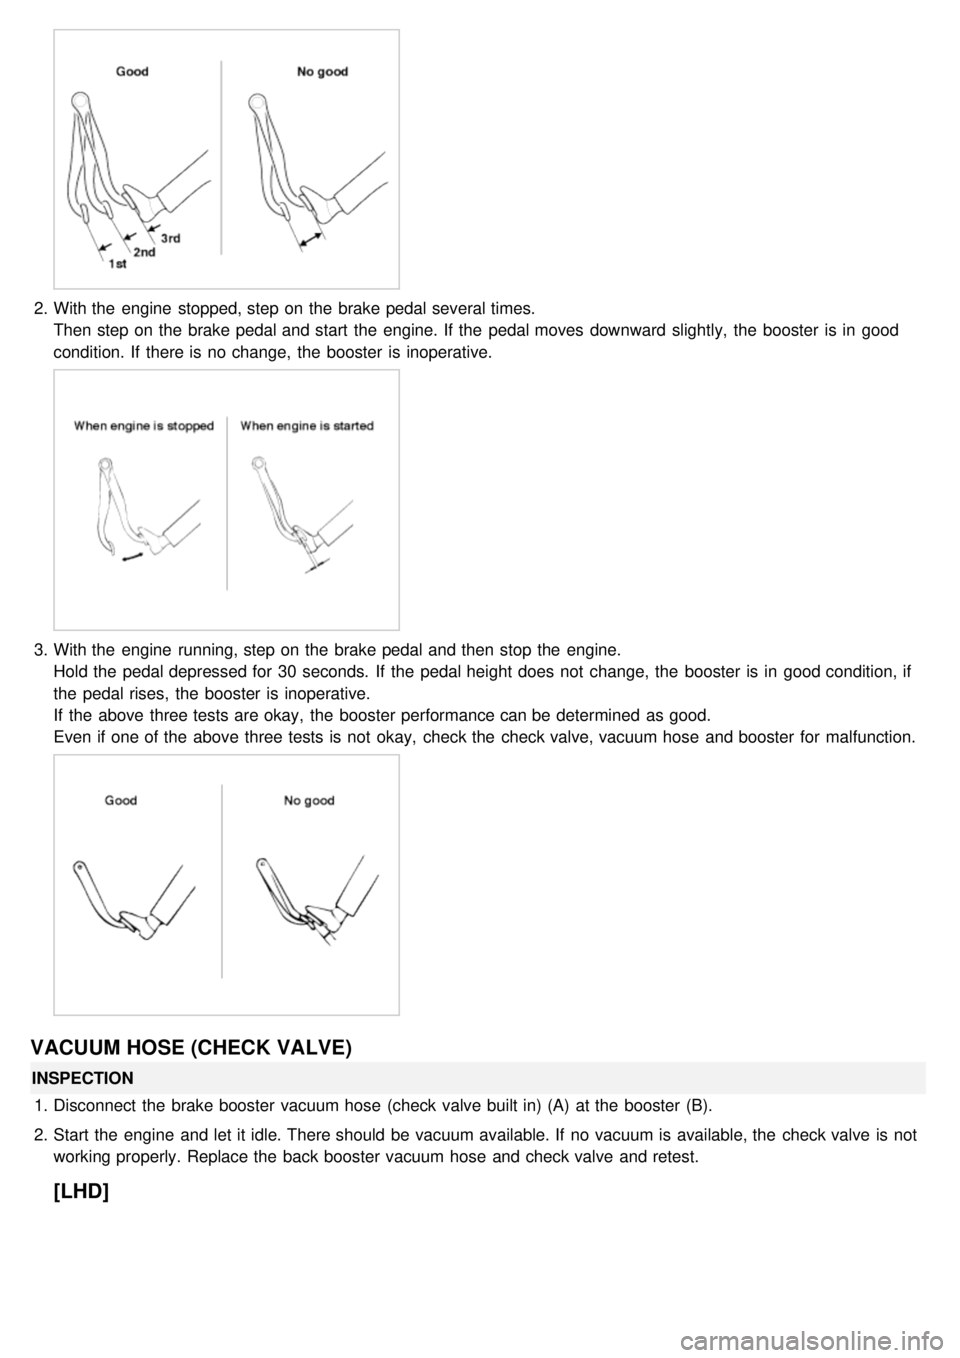
2.With the engine stopped, step on the brake pedal several times.
Then step on the brake pedal and start the engine. If the pedal moves downward slightly, the booster is in good
condition. If there is no change, the booster is inoperative.
3.With the engine running, step on the brake pedal and then stop the engine.
Hold the pedal depressed for 30 seconds. If the pedal height does not change, the booster is in good condition, if
the pedal rises, the booster is inoperative.
If the above three tests are okay, the booster performance can be determined as good.
Even if one of the above three tests is not okay, check the check valve, vacuum hose and booster for malfunction.
VACUUM HOSE (CHECK VALVE)
INSPECTION
1. Disconnect the brake booster vacuum hose (check valve built in) (A) at the booster (B).
2. Start the engine and let it idle. There should be vacuum available. If no vacuum is available, the check valve is not
working properly. Replace the back booster vacuum hose and check valve and retest.
[LHD]
Page 986 of 1575
2007 > 2.7L V6 GASOLINE >
DESCRIPTION
GENERAL DATA
The steering angle speed sensor detects the angle of the steering wheel in order to which direction a user chooses.
MEASUREING PRINCIPLE
A non contact, analog angle sensor carrying out absolute measuring by the use of the Anisotropic - Magneto- Resistive
effect (AMR).Measuring of the absolute angle by means of a toothed measuring gear with magnetic properties in
combination with different ratios. Corresponding AMR elements that change their electrical resistance according to the
magnetic field direction detect the angle position of the measuring gears.A micro- controller decodes the measured
voltage signals after A/D converting with the help of a mathematical function. Output of the digital angle value and
velocity via CAN- interface.
SPECIFICATION
Description Specification
Operating voltage 8~16 V
Operating temperature - 40 ~ 85 °C
Current consumption Max.150 mA
Steering angle velocity Max. ±2000 °/sec
Connection delay time t < 200 ms
Reverse voltage - 13.5 V
Measuring range Angle
- 780 ° ~ 779 °
Angular velocity 0~ 1016 °/s
Nonlinearity angle - 2.5 ° ~ +2.5 °
Hysteresis angle 0 ° ~ 5 °
Rotational friction torque measuring 10 °/s
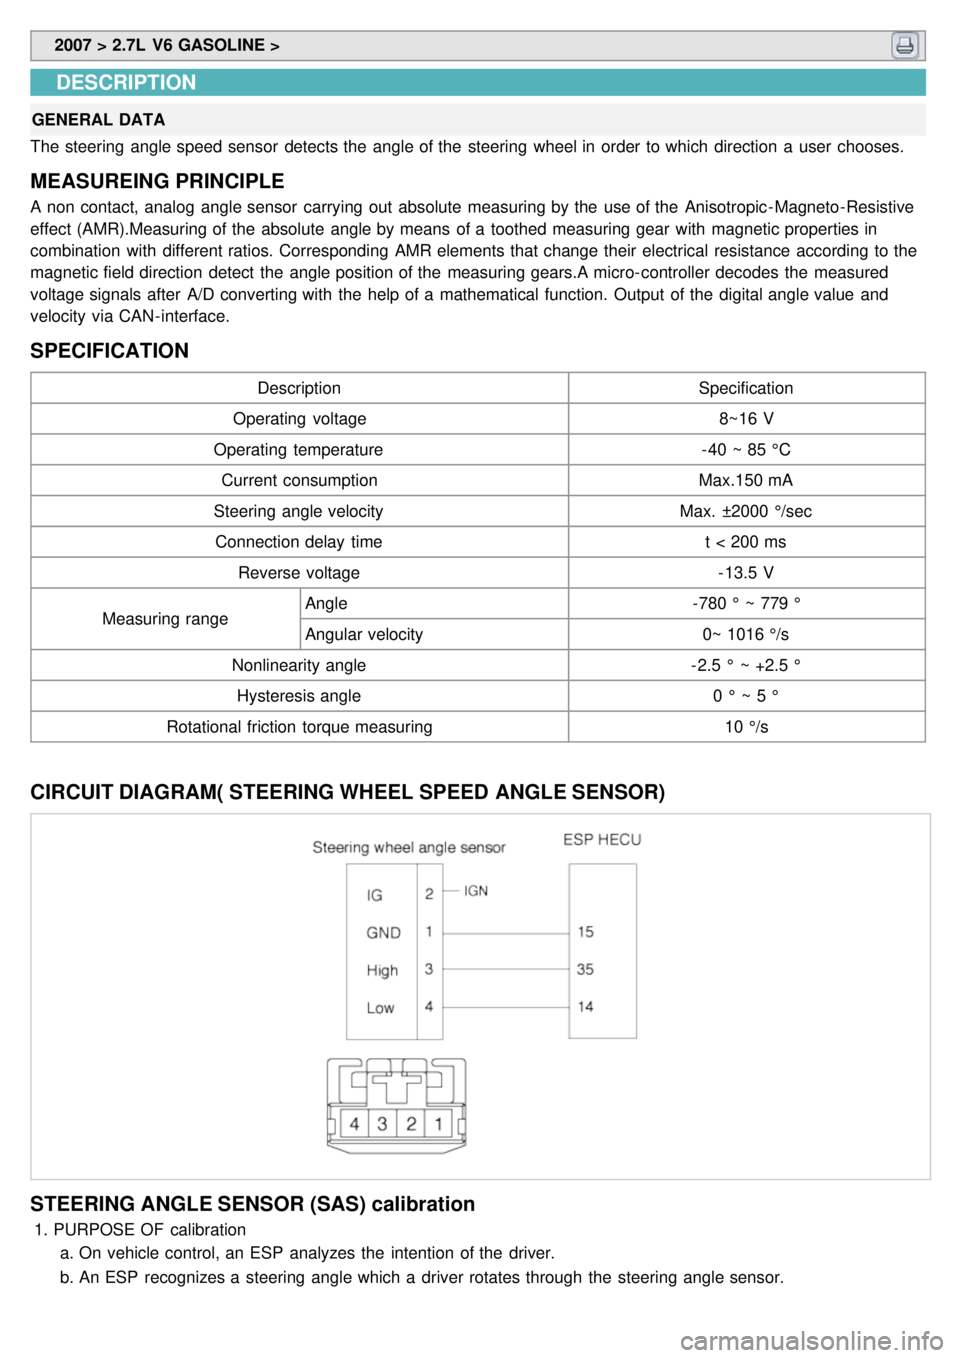
CIRCUIT DIAGRAM( STEERING WHEEL SPEED ANGLE SENSOR)
STEERING ANGLE SENSOR (SAS) calibration
1.PURPOSE OF calibration
a. On vehicle control, an ESP analyzes the intention of the driver.
b. An ESP recognizes a steering angle which a driver rotates through the steering angle sensor.
Page 1218 of 1575
b.When the multifunction switch is not in postion headlamps turned on or autolight
c. 20 mn after the driver door is open
d. 20mn after IGN leaves the positions RUN to ACC or OFF
e. If IPM receives RKE "LOCK" command two times
3. Escort function enables only "Head Lamp Low Beam", so Park/Tail lamp should be turned off when driver door is
opened at key out (Battery Saver function).
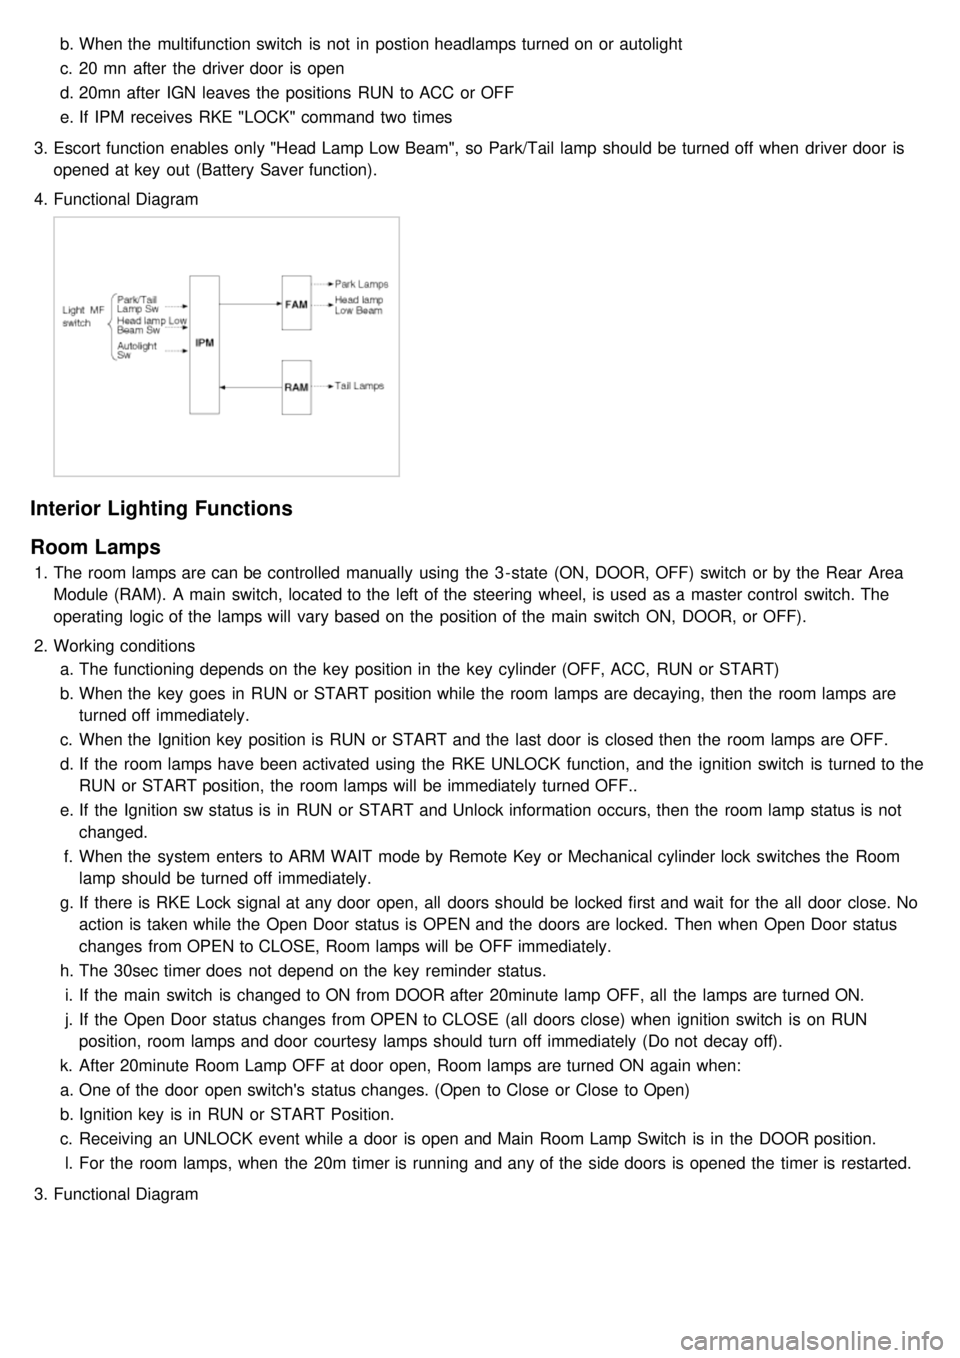
4. Functional Diagram
Interior Lighting Functions
Room Lamps
1.The room lamps are can be controlled manually using the 3 - state (ON, DOOR, OFF) switch or by the Rear Area
Module (RAM). A main switch, located to the left of the steering wheel, is used as a master control switch. The
operating logic of the lamps will vary based on the position of the main switch ON, DOOR, or OFF).
2. Working conditions
a. The functioning depends on the key position in the key cylinder (OFF, ACC, RUN or START)
b. When the key goes in RUN or START position while the room lamps are decaying, then the room lamps are
turned off immediately.
c. When the Ignition key position is RUN or START and the last door is closed then the room lamps are OFF.
d. If the room lamps have been activated using the RKE UNLOCK function, and the ignition switch is turned to the
RUN or START position, the room lamps will be immediately turned OFF..
e. If the Ignition sw status is in RUN or START and Unlock information occurs, then the room lamp status is not
changed.
f. When the system enters to ARM WAIT mode by Remote Key or Mechanical cylinder lock switches the Room
lamp should be turned off immediately.
g. If there is RKE Lock signal at any door open, all doors should be locked first and wait for the all door close. No
action is taken while the Open Door status is OPEN and the doors are locked. Then when Open Door status
changes from OPEN to CLOSE, Room lamps will be OFF immediately.
h. The 30sec timer does not depend on the key reminder status.
i. If the main switch is changed to ON from DOOR after 20minute lamp OFF, all the lamps are turned ON.
j. If the Open Door status changes from OPEN to CLOSE (all doors close) when ignition switch is on RUN
position, room lamps and door courtesy lamps should turn off immediately (Do not decay off).
k. After 20minute Room Lamp OFF at door open, Room lamps are turned ON again when:
a. One of the door open switch's status changes. (Open to Close or Close to Open)
b. Ignition key is in RUN or START Position.
c. Receiving an UNLOCK event while a door is open and Main Room Lamp Switch is in the DOOR position.
l. For the room lamps, when the 20m timer is running and any of the side doors is opened the timer is restarted.
3. Functional Diagram
Page 1234 of 1575
CLOSE signal.
b. RAM will pass this signal to LH PSD and RH PSD then the burglar alarm state is decided depending on the
vehicle condition.
f. PTG open/close
a. Only with the information received by RKE, the burglar alarm system cannot distinguish the OPEN signal from
CLOSE signal.
b. RAM will pass this signal to PTG module then the burglar alarm state is decided depending on the vehicle
condition.
g. Panic by key fob
a. Whenever this signal is received, the PANIC function is activated (unless the system is already in an ALARM
state).
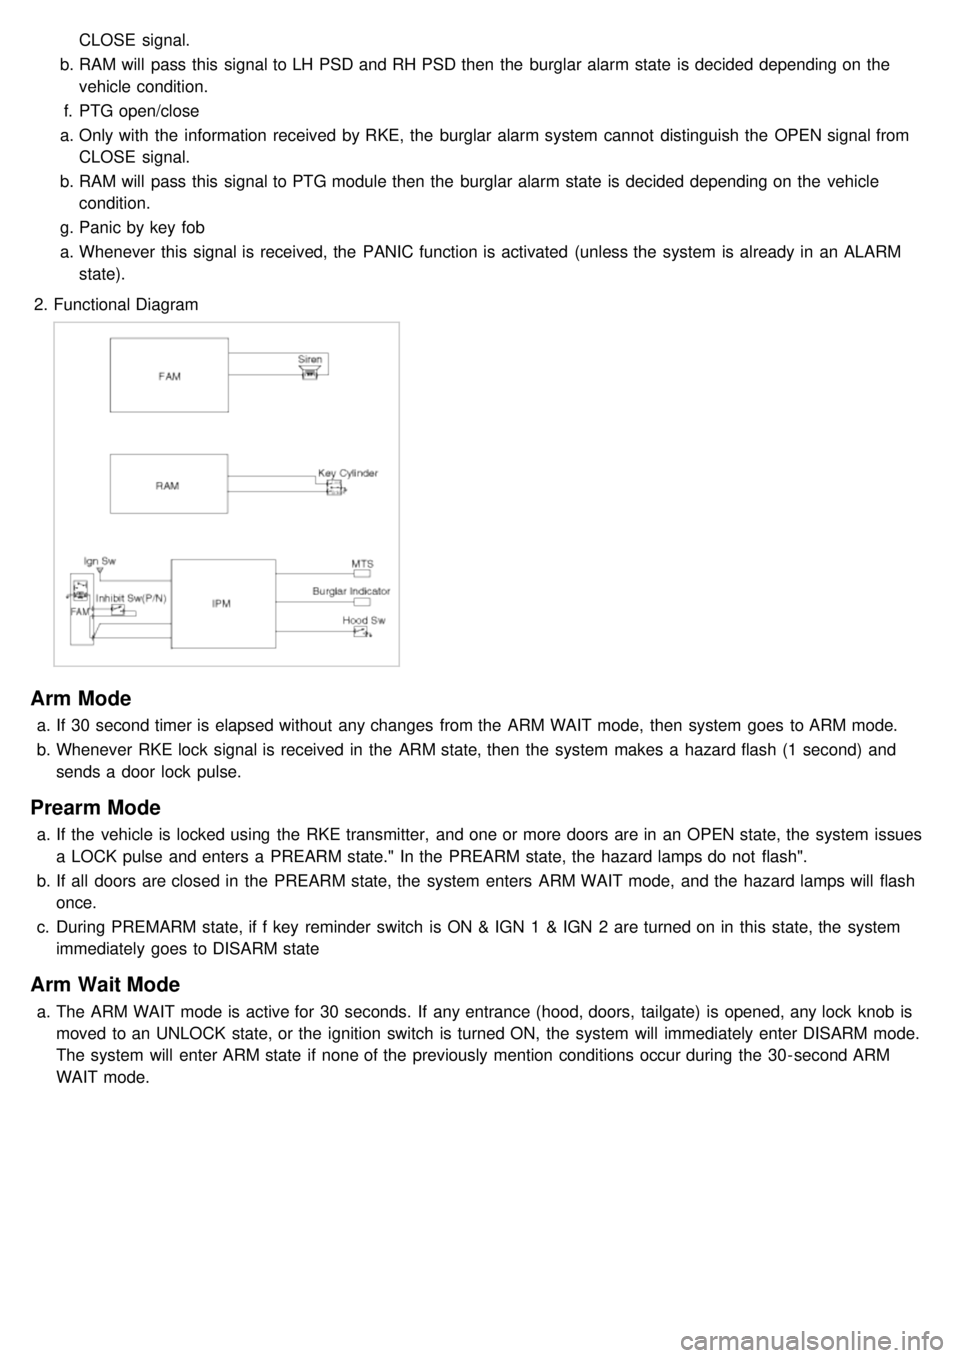
2. Functional Diagram
Arm Mode
a.If 30 second timer is elapsed without any changes from the ARM WAIT mode, then system goes to ARM mode.
b. Whenever RKE lock signal is received in the ARM state, then the system makes a hazard flash (1 second) and
sends a door lock pulse.
Prearm Mode
a.If the vehicle is locked using the RKE transmitter, and one or more doors are in an OPEN state, the system issues
a LOCK pulse and enters a PREARM state." In the PREARM state, the hazard lamps do not flash".
b. If all doors are closed in the PREARM state, the system enters ARM WAIT mode, and the hazard lamps will flash
once.
c. During PREMARM state, if f key reminder switch is ON & IGN 1 & IGN 2 are turned on in this state, the system
immediately goes to DISARM state
Arm Wait Mode
a.The ARM WAIT mode is active for 30 seconds. If any entrance (hood, doors, tailgate) is opened, any lock knob is
moved to an UNLOCK state, or the ignition switch is turned ON, the system will immediately enter DISARM mode.
The system will enter ARM state if none of the previously mention conditions occur during the 30- second ARM
WAIT mode.
Page 1260 of 1575
4.Operation control
a. Prioritization of operations
Motor starting is delayed for 100ms respectively in case of auto control to prevent rush current from overlap
when motors are running, and it follows the following order.
Slide > recline > front height > rear height > adjust pedal
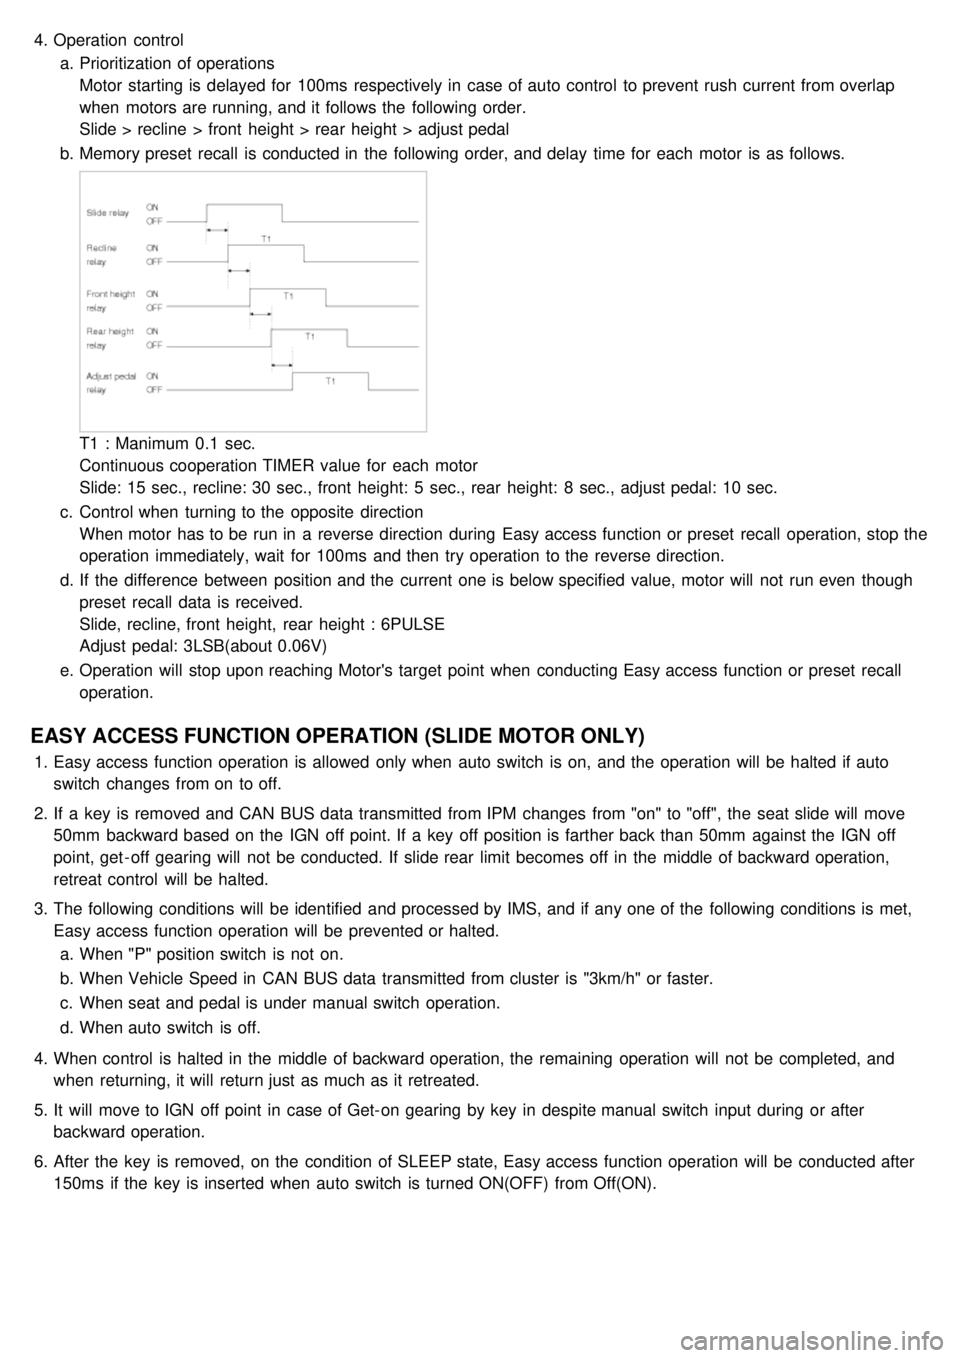
b. Memory preset recall is conducted in the following order, and delay time for each motor is as follows.
T1 : Manimum 0.1 sec.
Continuous cooperation TIMER value for each motor
Slide: 15 sec., recline: 30 sec., front height: 5 sec., rear height: 8 sec., adjust pedal: 10 sec.
c. Control when turning to the opposite direction
When motor has to be run in a reverse direction during Easy access function or preset recall operation, stop the
operation immediately, wait for 100ms and then try operation to the reverse direction.
d. If the difference between position and the current one is below specified value, motor will not run even though
preset recall data is received.
Slide, recline, front height, rear height : 6PULSE
Adjust pedal: 3LSB(about 0.06V)
e. Operation will stop upon reaching Motor's target point when conducting Easy access function or preset recall
operation.
EASY ACCESS FUNCTION OPERATION (SLIDE MOTOR ONLY)
1.Easy access function operation is allowed only when auto switch is on, and the operation will be halted if auto
switch changes from on to off.
2. If a key is removed and CAN BUS data transmitted from IPM changes from "on" to "off", the seat slide will move
50mm backward based on the IGN off point. If a key off position is farther back than 50mm against the IGN off
point, get - off gearing will not be conducted. If slide rear limit becomes off in the middle of backward operation,
retreat control will be halted.
3. The following conditions will be identified and processed by IMS, and if any one of the following conditions is met,
Easy access function operation will be prevented or halted.
a. When "P" position switch is not on.
b. When Vehicle Speed in CAN BUS data transmitted from cluster is "3km/h" or faster.
c. When seat and pedal is under manual switch operation.
d. When auto switch is off.
4. When control is halted in the middle of backward operation, the remaining operation will not be completed, and
when returning, it will return just as much as it retreated.
5. It will move to IGN off point in case of Get- on gearing by key in despite manual switch input during or after
backward operation.
6. After the key is removed, on the condition of SLEEP state, Easy access function operation will be conducted after
150ms if the key is inserted when auto switch is turned ON(OFF) from Off(ON).