light KIA CEED 2010 Owners Manual
[x] Cancel search | Manufacturer: KIA, Model Year: 2010, Model line: CEED, Model: KIA CEED 2010Pages: 442, PDF Size: 28.25 MB
Page 378 of 442
743
Maintenance
✽✽NOTICE
“C” (COLD) range is for reference only
and should NOT be used to determine
transaxle fluid level. ✽✽
NOTICE
New automatic transaxle fluid should be
red. The red dye is added so the assem-
bly plant can identify it as automatic
transaxle fluid and distinguish it from
engine oil or antifreeze. The red dye,
which is not an indicator of fluid quali-
ty, is not permanent. As the vehicle is
driven, the automatic transaxle fluid
will begin to look darker. The color may
eventually appear light brown.
Therefore, have an authorized KIA
dealer change the automatic transaxle
fluid according to the Scheduled
Maintenance at the beginning of this
section.
Use only specified automatic transaxle
fluid. (Refer to "Recommended lubricantsor capacities" in section 8.) Changing the automatic transaxle fluid
Have the automatic transaxle fluid
changed by an authorized KIA dealeraccording to the Maintenance Scheduleat the beginning of this section.
Page 380 of 442

745
Maintenance
FUEL FILTER (FOR DIESEL)
Draining water from the fuel filter
The fuel filter for diesel engine plays an
important role of separating water from
fuel and accumulating the water in itsbottom.
If water accumulates in the fuel filter, the
warning light comes on when the ignition
switch is in the ON position. If this warning light illuminates,
take your car to an authorized
KIA dealer and have drain the
water and checked the sys-tem. Extracting air from the fuel filter (1.6L Diesel engine)
If you drove until you have no fuel left
or if you replaced the fuel filter, be
sure to extract air in the fuel system
as it makes you difficult to start the
engine.
1. Remove the air extract nozzle cap
on the fuel filter.
2. Pump up and down until the fuel flows out of the plug opening.
✽✽NOTICE
Use cloths when you extract air so that the fuel is not sprayed around.
Clean the fuel around the fuel filter or
the injection pump before starting the
engine to prevent fire.
Finally, check each part if the fuel is leaking.
Fuel filter cartridge replacement
✽✽ NOTICE
When replacing the fuel filter cartridge,
use KIA genuine parts.
CAUTION
If the water accumulated in the fuel filter is not drained at proper times,damages to the major parts such asthe fuel system can be caused by
water permeation in the fuel filter.
OED070009
Page 387 of 442
Maintenance
52
7
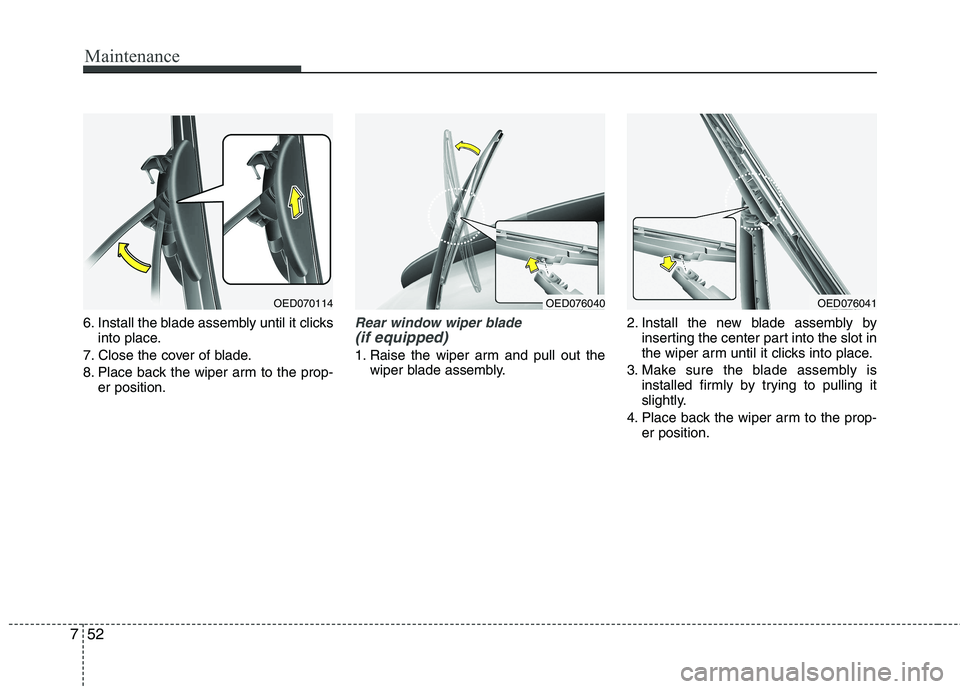
6. Install the blade assembly until it clicks
into place.
7. Close the cover of blade.
8. Place back the wiper arm to the prop- er position.Rear window wiper blade (if equipped)
1. Raise the wiper arm and pull out thewiper blade assembly. 2. Install the new blade assembly by
inserting the center part into the slot in
the wiper arm until it clicks into place.
3. Make sure the blade assembly is installed firmly by trying to pulling it
slightly.
4. Place back the wiper arm to the prop- er position.
OED076041OED076040OED070114
Page 388 of 442
753
Maintenance
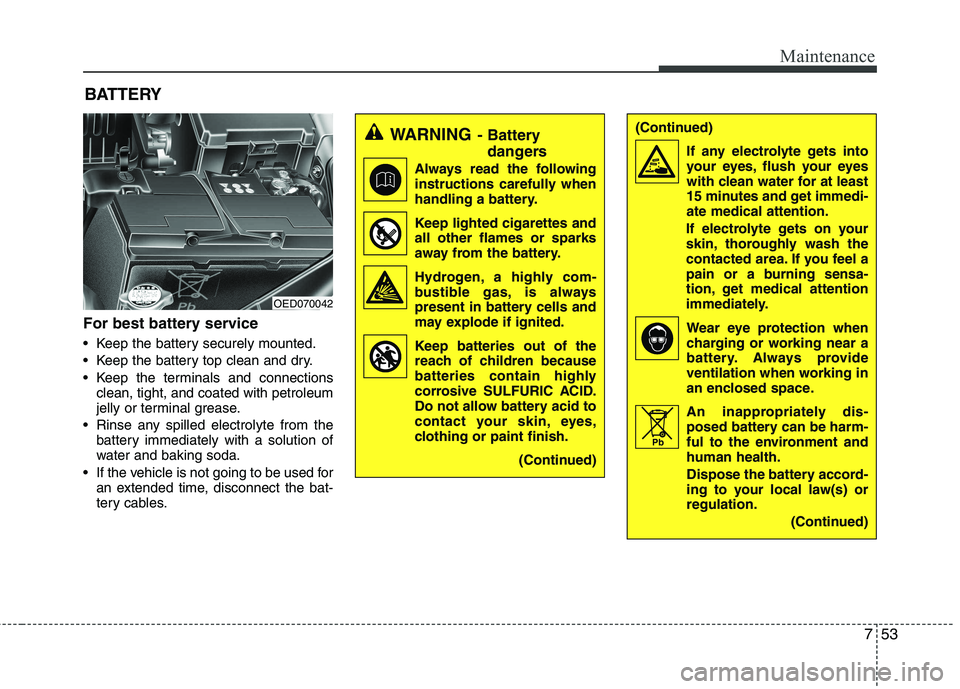
For best battery service
Keep the battery securely mounted.
Keep the battery top clean and dry.
Keep the terminals and connectionsclean, tight, and coated with petroleum
jelly or terminal grease.
Rinse any spilled electrolyte from the battery immediately with a solution of
water and baking soda.
If the vehicle is not going to be used for an extended time, disconnect the bat-
tery cables.
WARNING - Battery
dangers
Always read the following
instructions carefully when
handling a battery.
Keep lighted cigarettes and all other flames or sparks
away from the battery.
Hydrogen, a highly com- bustible gas, is always
present in battery cells and
may explode if ignited.
Keep batteries out of the reach of children because
batteries contain highly
corrosive SULFURIC ACID.
Do not allow battery acid to
contact your skin, eyes,
clothing or paint finish.
(Continued)(Continued)If any electrolyte gets intoyour eyes, flush your eyes
with clean water for at least
15 minutes and get immedi-ate medical attention.
If electrolyte gets on your
skin, thoroughly wash the
contacted area. If you feel a
pain or a burning sensa-
tion, get medical attention
immediately.
Wear eye protection whencharging or working near a
battery. Always provide
ventilation when working in
an enclosed space.
An inappropriately dis- posed battery can be harm-
ful to the environment andhuman health.
Dispose the battery accord-
ing to your local law(s) orregulation.
(Continued)
BATTERY
OED070042
Pb
Page 389 of 442
Maintenance
54
7
Battery recharging
Your vehicle has a maintenance-free,
calcium-based battery.
If the battery becomes discharged in a
short time (because, for example, the
headlights or interior lights were left on
while the vehicle was not in use),
recharge it by slow charging (trickle)
for 10 hours.
If the battery gradually discharges because of high electric load while the
vehicle is being used, recharge it at 20-
30A for two hours.(Continued)
When lifting a plastic-cased bat-tery, excessive pressure on the
case may cause battery acid to
leak, resulting in personal injury.
Lift with a battery carrier or with
your hands on opposite corners.
Never attempt to recharge the battery when the battery cablesare connected.
The electrical ignition system works with high voltage. Never
touch these components with theengine running or the ignition
switched on.
Failure to follow the above warn-
ings can result in serious bodily
injury or death.WARNING - Recharging
battery
When recharging the battery,
observe the following precautions:
The battery must be removed from the vehicle and placed in an area with good ventilation.
Do not allow cigarettes, sparks, or flame near the battery.
Watch the battery during charg- ing, and stop or reduce the charg-
ing rate if the battery cells begin
gassing (boiling) violently or if
the temperature of the electrolyte
of any cell exceeds 49°C (120°F).
Wear eye protection when check- ing the battery during charging.
Disconnect the battery charger in the following order.
1. Turn off the battery charger main switch.
2. Unhook the negative clamp from the negative battery terminal.
3. Unhook the positive clamp from the positive battery terminal.
Page 396 of 442

761
Maintenance
Compact spare tire replacement (if equipped)
A compact spare tire has a shorter
tread life than a regular size tire.
Replace it when you can see the
tread wear indicator bars on the tire.The replacement compact spare tire
should be the same size and design
tire as the one provided with your
new vehicle and should be mountedon the same compact spare tire
wheel. The compact spare tire is notdesigned to be mounted on a regular
size wheel, and the compact spare
tire wheel is not designed for mount-
ing a regular size tire. Wheel replacement
When replacing the metal wheels for
any reason, make sure the new
wheels are equivalent to the original
factory units in diameter, rim widthand offset.
Tire traction
Tire traction can be reduced if you
drive on worn tires, tires that are
improperly inflated or on slippery
road surfaces. Tires should be
replaced when tread wear indicators
appear. Slow down whenever there
is rain, snow or ice on the road, toreduce the possibility of losing con-
trol of the vehicle. Tire maintenance In addition to proper inflation, correct wheel alignment helps decrease tire
wear. If you find a tire worn unevenly,
have your dealer check the wheelalignment.
When you have new tires installed,
make sure they are balanced. This
will increase vehicle ride comfort and
tire life. Additionally, a tire should
always be rebalanced if it is removedfrom the wheel.
WARNING
A wheel that is not the correct
size may adversely affect wheel
and bearing life, braking and
stopping abilities, handling
characteristics, ground clear-
ance, body-to-tire clearance,
snow chain clearance,speedometer and odometer cal-
ibration, headlight aim and
bumper height.
Page 397 of 442

Maintenance
62
7
Tire sidewall labeling
This information identifies and
describes the fundamental charac-
teristics of the tire and also provides
the tire identification number (TIN)
for safety standard certification. TheTIN can be used to identify the tire incase of a recall.
1. Manufacturer or brand name
Manufacturer or Brand name is
shown.
2. Tire size designation
A tire’s sidewall is marked with a tire
size designation. You will need this
information when selecting replace-
ment tires for your car. The following
explains what the letters and num-
bers in the tire size designationmean.
Example tire size designation:
(These numbers are provided as an
example only; your tire size designa-
tor could vary depending on your
vehicle.) P205/65R15 92H
P - Applicable vehicle type (tires
marked with the prefix “P’’ are
intended for use on passenger
cars or light trucks; however, not
all tires have this marking).
205 - Tire width in millimeters.
65 - Aspect ratio. The tire’s section height as a percentage of its width.
R - Tire construction code (Radial).
15 - Rim diameter in inches. 92 - Load Index, a numerical code
associated with the maximum
load the tire can carry.
H - Speed Rating Symbol. See the speed rating chart in this section
for additional information.
Wheel size designation
Wheels are also marked with impor-
tant information that you need if you
ever have to replace one. The follow-
ing explains what the letters and
numbers in the wheel size designa-tion mean.
Example wheel size designation: 6.0JX15
6.0 - Rim width in inches. J - Rim contour designation.
15 - Rim diameter in inches.
I030B04JM
1
1
23
4
5,6
7
Page 401 of 442
Maintenance
66
7
FUSES
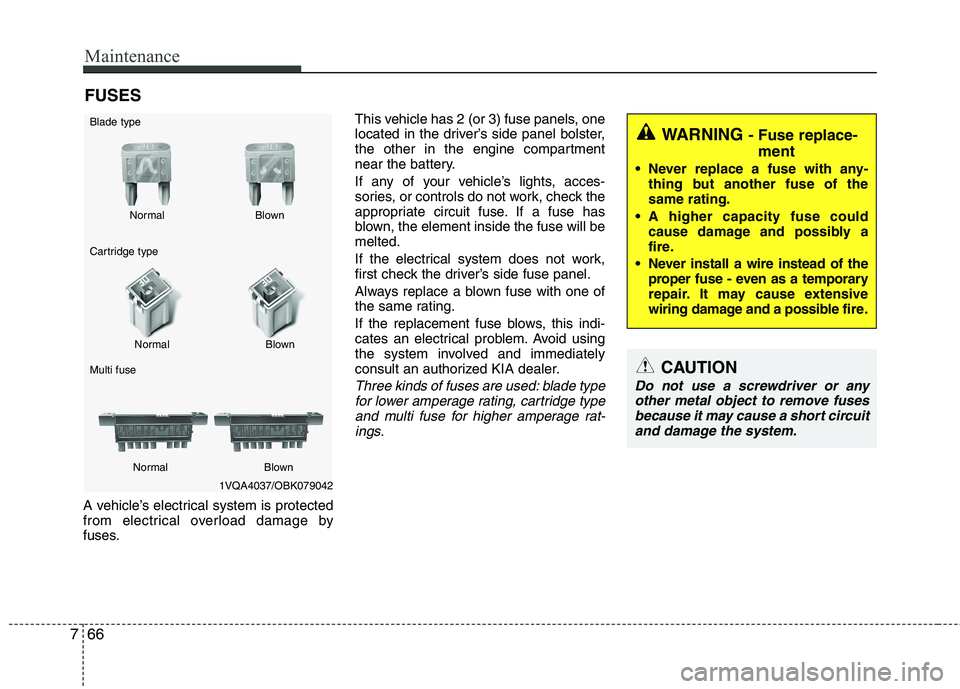
A vehicle’s electrical system is protected
from electrical overload damage by
fuses. This vehicle has 2 (or 3) fuse panels, one
located in the driver’s side panel bolster,
the other in the engine compartment
near the battery.
If any of your vehicle’s lights, acces-
sories, or controls do not work, check the
appropriate circuit fuse. If a fuse has
blown, the element inside the fuse will bemelted.
If the electrical system does not work,
first check the driver’s side fuse panel.
Always replace a blown fuse with one of
the same rating.
If the replacement fuse blows, this indi-
cates an electrical problem. Avoid using
the system involved and immediately
consult an authorized KIA dealer.
Three kinds of fuses are used: blade type
for lower amperage rating, cartridge type
and multi fuse for higher amperage rat-ings.
1VQA4037/OBK079042
Normal
Normal
Cartridge type Multi fuse Blown
Blown
Normal Blown
WARNING - Fuse replace-
ment
Never replace a fuse with any- thing but another fuse of the same rating.
A higher capacity fuse could cause damage and possibly a
fire.
Never install a wire instead of the proper fuse - even as a temporary
repair. It may cause extensive
wiring damage and a possible fire.
CAUTION
Do not use a screwdriver or any
other metal object to remove fuses because it may cause a short circuitand damage the system.
Blade type
Page 402 of 442
767
Maintenance
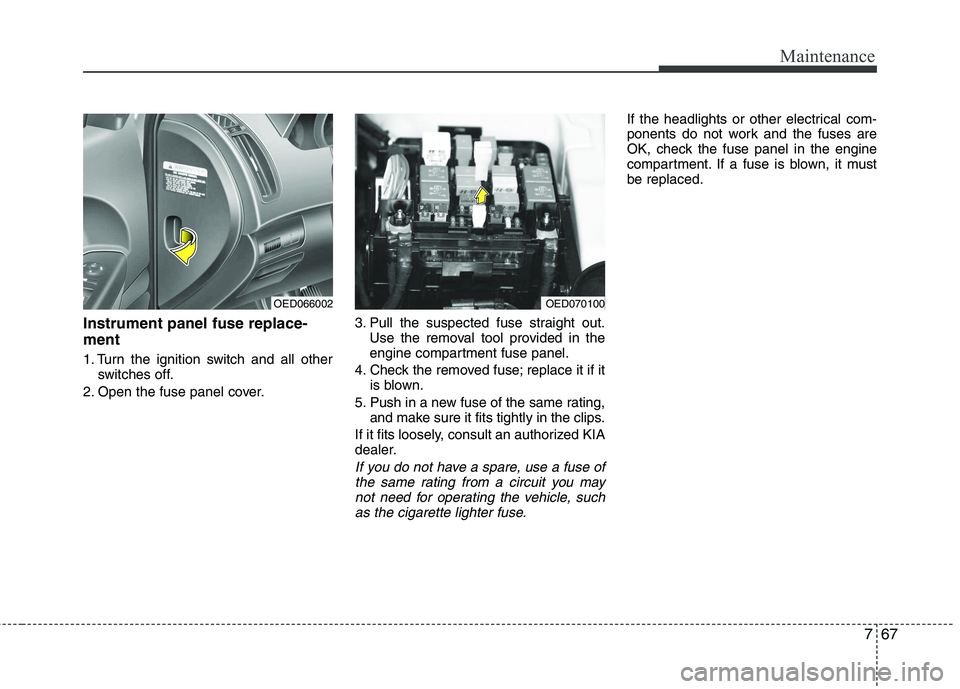
Instrument panel fuse replace- ment
1. Turn the ignition switch and all otherswitches off.
2. Open the fuse panel cover. 3. Pull the suspected fuse straight out.
Use the removal tool provided in the
engine compartment fuse panel.
4. Check the removed fuse; replace it if it is blown.
5. Push in a new fuse of the same rating, and make sure it fits tightly in the clips.
If it fits loosely, consult an authorized KIA
dealer.
If you do not have a spare, use a fuse of the same rating from a circuit you may
not need for operating the vehicle, such as the cigarette lighter fuse.
If the headlights or other electrical com-
ponents do not work and the fuses are
OK, check the fuse panel in the engine
compartment. If a fuse is blown, it mustbe replaced.
OED070100OED066002
Page 403 of 442

Maintenance
68
7
Memory fuse
Your vehicle is equipped with a memory
fuse to prevent battery discharge if your
vehicle is parked without being operated
for prolonged periods. Use the following
procedures before parking the vehicle for
prolonged periods.
1. Turn off the engine.
2. Turn off the headlights and tail lights.
3. Open the driver’s side panel cover and
pull up the memory fuse.
✽✽ NOTICE
If the memory fuse is pulled up from the fuse panel, the warning chime,
audio, clock and interior lamps, etc.,
will not operate. Some items must be
reset after replacement. Refer to
“Battery” in this section.
Even though the memory fuse is
pulled up, the battery can still be dis-
charged by operation of the head-
lights or other electrical devices.
Engine compartment panel fuse replacement
1. Turn the ignition switch and all other switches off.
2. Remove the fuse box cover by press- ing the tab and pulling up the cover.
OED066010
OFD079039E/OED066005
Diesel only