lamp KIA CEED 2010 Owners Manual
[x] Cancel search | Manufacturer: KIA, Model Year: 2010, Model line: CEED, Model: KIA CEED 2010Pages: 442, PDF Size: 28.25 MB
Page 11 of 442
Your vehicle at a glance
2
2
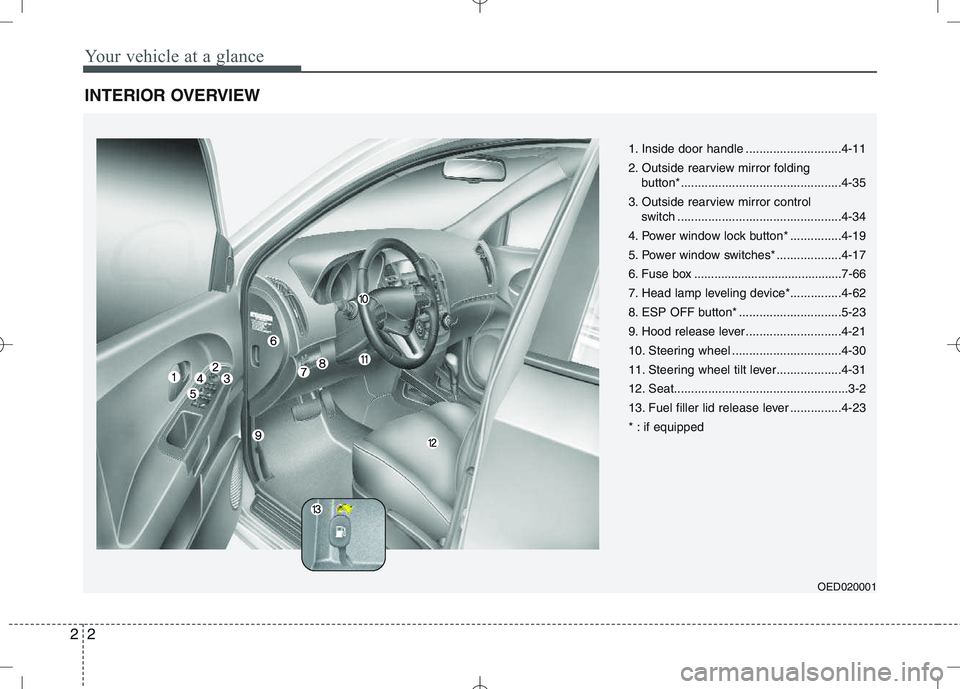
INTERIOR OVERVIEW
1. Inside door handle ............................4-11
2. Outside rearview mirror folding
button*...............................................4-35
3. Outside rearview mirror control switch ................................................4-34
4. Power window lock button* ...............4-19
5. Power window switches* ...................4-17
6. Fuse box ............................................7-66
7. Head lamp leveling device*...............4-62
8. ESP OFF button* ..............................5-23
9. Hood release lever ............................4-21
10. Steering wheel ................................4-30
11. Steering wheel tilt lever...................4-31
12. Seat...................................................3-2
13. Fuel filler lid release lever ...............4-23
* : if equipped
OED020001
Page 86 of 442
415
Features of your vehicle
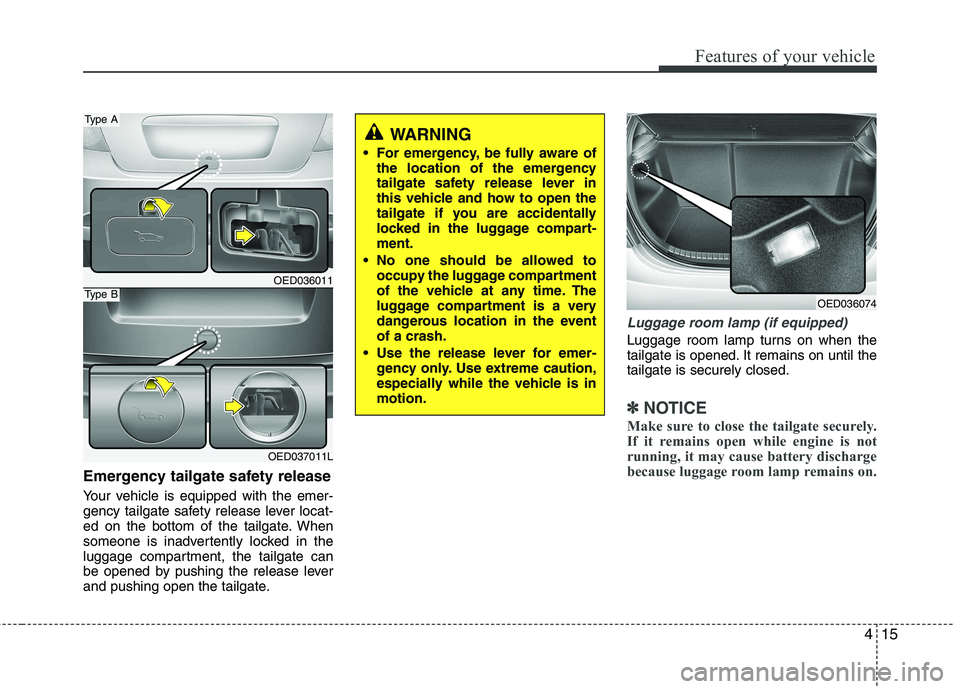
Emergency tailgate safety release
Your vehicle is equipped with the emer-
gency tailgate safety release lever locat-
ed on the bottom of the tailgate. When
someone is inadvertently locked in the
luggage compartment, the tailgate can
be opened by pushing the release lever
and pushing open the tailgate.
Luggage room lamp (if equipped)
Luggage room lamp turns on when the
tailgate is opened. It remains on until thetailgate is securely closed.
✽✽NOTICE
Make sure to close the tailgate securely.
If it remains open while engine is not
running, it may cause battery discharge
because luggage room lamp remains on.
WARNING
For emergency, be fully aware of the location of the emergency
tailgate safety release lever in
this vehicle and how to open the
tailgate if you are accidentally
locked in the luggage compart-ment.
No one should be allowed to occupy the luggage compartment
of the vehicle at any time. The
luggage compartment is a very
dangerous location in the eventof a crash.
Use the release lever for emer- gency only. Use extreme caution,
especially while the vehicle is inmotion.
OED036011
OED037011L
Type A
Type BOED036074
Page 119 of 442
Features of your vehicle
48
4
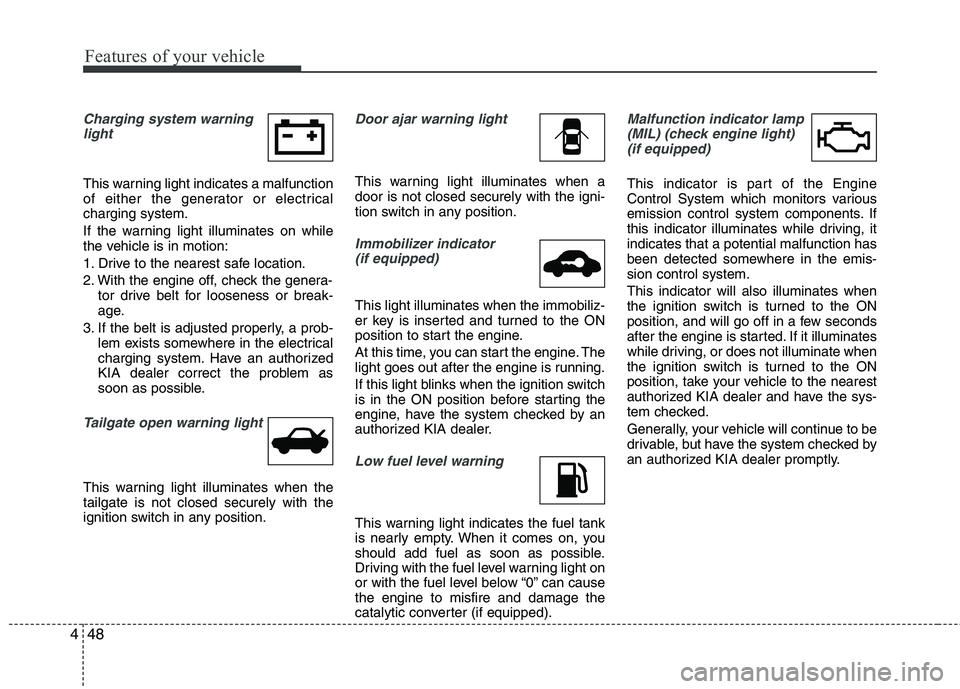
Charging system warning
light
This warning light indicates a malfunction
of either the generator or electricalcharging system.
If the warning light illuminates on while
the vehicle is in motion:
1. Drive to the nearest safe location.
2. With the engine off, check the genera- tor drive belt for looseness or break-
age.
3. If the belt is adjusted properly, a prob- lem exists somewhere in the electrical
charging system. Have an authorized
KIA dealer correct the problem as
soon as possible.
Tailgate open warning light
This warning light illuminates when the tailgate is not closed securely with the
ignition switch in any position.
Door ajar warning light
This warning light illuminates when a door is not closed securely with the igni-
tion switch in any position.
Immobilizer indicator
(if equipped)
This light illuminates when the immobiliz-
er key is inserted and turned to the ON
position to start the engine.
At this time, you can start the engine. The
light goes out after the engine is running.
If this light blinks when the ignition switch
is in the ON position before starting the
engine, have the system checked by an
authorized KIA dealer.
Low fuel level warning
This warning light indicates the fuel tank
is nearly empty. When it comes on, you
should add fuel as soon as possible.
Driving with the fuel level warning light on
or with the fuel level below “0” can causethe engine to misfire and damage the
catalytic converter (if equipped).
Malfunction indicator lamp
(MIL) (check engine light) (if equipped)
This indicator is part of the Engine
Control System which monitors various
emission control system components. If
this indicator illuminates while driving, itindicates that a potential malfunction has
been detected somewhere in the emis-sion control system. This indicator will also illuminates when
the ignition switch is turned to the ON
position, and will go off in a few seconds
after the engine is started. If it illuminates
while driving, or does not illuminate when
the ignition switch is turned to the ON
position, take your vehicle to the nearest
authorized KIA dealer and have the sys-
tem checked.
Generally, your vehicle will continue to be
drivable, but have the system checked by
an authorized KIA dealer promptly.
Page 125 of 442

Features of your vehicle
54
4
TPMS (if equipped)
The monitor will display the correspon-
ding tire that is low with pressure.
For details, see Tire Pressure Monitoring System on chapter 6.
Stop lamp fail display (if equipped)
The monitor will display the correspon- ding stop lamp that has malfunctioned.
(1) Right stop lamp failure
(2) Left stop lamp failure
(3) Left and Right stop lamp failure
OED040077OED040076 ① ② ③
Page 139 of 442
Features of your vehicle
68
4
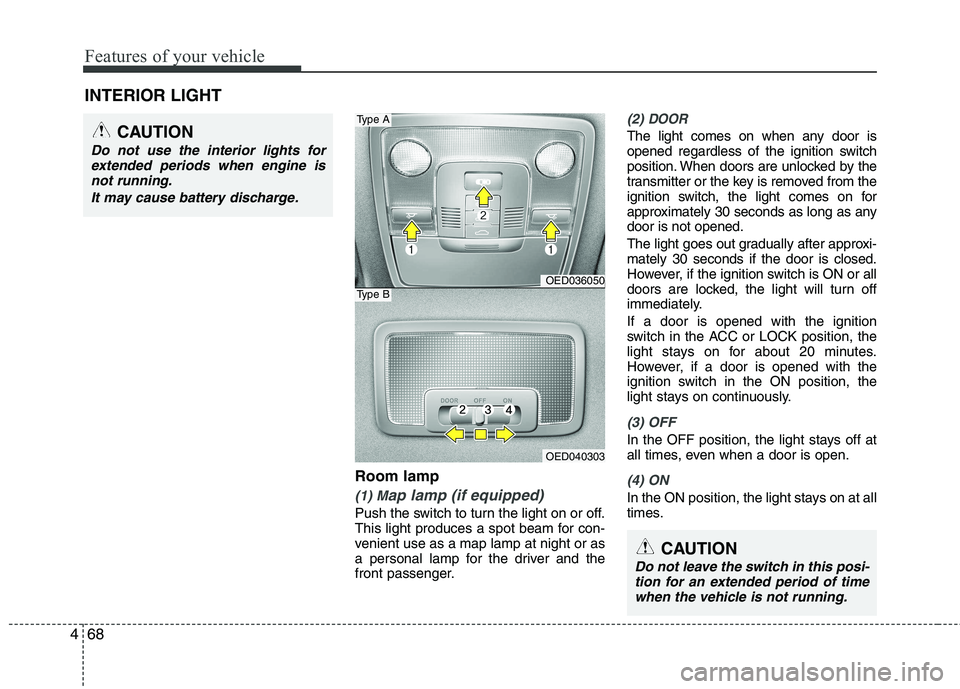
Room lamp
(1) Map lamp (if equipped)
Push the switch to turn the light on or off.
This light produces a spot beam for con-
venient use as a map lamp at night or as
a personal lamp for the driver and the
front passenger.
(2) DOOR
The light comes on when any door is
opened regardless of the ignition switch
position. When doors are unlocked by the
transmitter or the key is removed from the
ignition switch, the light comes on for
approximately 30 seconds as long as anydoor is not opened.
The light goes out gradually after approxi- mately 30 seconds if the door is closed.
However, if the ignition switch is ON or all
doors are locked, the light will turn off
immediately. If a door is opened with the ignition
switch in the ACC or LOCK position, the
light stays on for about 20 minutes.
However, if a door is opened with the
ignition switch in the ON position, the
light stays on continuously.
(3) OFF
In the OFF position, the light stays off at
all times, even when a door is open.
(4) ON
In the ON position, the light stays on at all
times.
INTERIOR LIGHT
CAUTION
Do not use the interior lights for
extended periods when engine is
not running.
It may cause battery discharge.
OED036050
OED040303
Type A
Type B
CAUTION
Do not leave the switch in this posi-tion for an extended period of time when the vehicle is not running.
Page 166 of 442
495
Features of your vehicle
Sunvisor
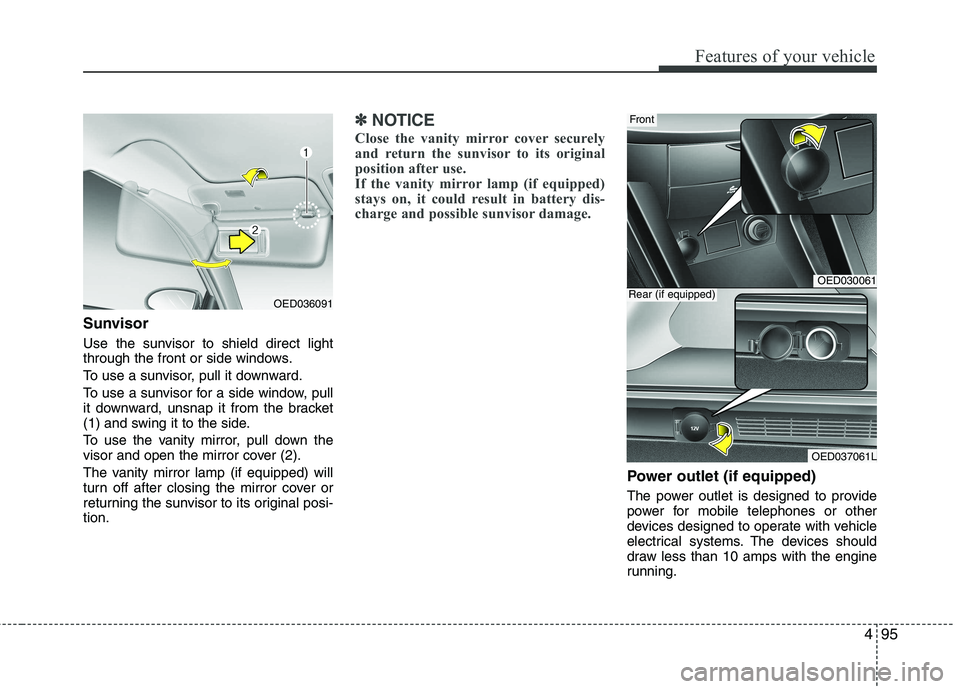
Use the sunvisor to shield direct light
through the front or side windows.
To use a sunvisor, pull it downward.
To use a sunvisor for a side window, pull
it downward, unsnap it from the bracket
(1) and swing it to the side.
To use the vanity mirror, pull down the
visor and open the mirror cover (2).
The vanity mirror lamp (if equipped) will
turn off after closing the mirror cover or
returning the sunvisor to its original posi-tion.
✽✽NOTICE
Close the vanity mirror cover securely
and return the sunvisor to its original
position after use.
If the vanity mirror lamp (if equipped)
stays on, it could result in battery dis-
charge and possible sunvisor damage.
Power outlet (if equipped)
The power outlet is designed to provide
power for mobile telephones or other
devices designed to operate with vehicle
electrical systems. The devices should
draw less than 10 amps with the engine
running.
OED036091
OED030061
OED037061L
Rear (if equipped)
Front
Page 342 of 442

77
Maintenance
At least monthly:
Check the coolant level in the enginecoolant reservoir.
Check the operation of all exterior lights, including the stoplights, turn sig-
nals and hazard warning flashers.
Check the inflation pressures of all tires including the spare.
At least twice a year
(i.e., every Spring and Fall):
Check the radiator, heater and air con- ditioning hoses for leaks or damage.
Check the windshield washer spray and wiper operation. Clean wiper
blades with clean cloth dampened with
washer fluid.
Check the headlight alignment.
Check the muffler, exhaust pipes, shields and clamps.
Check the lap/shoulder belts for wear and function.
Check for worn tires and loose wheel lug nuts.
At least once a year:
Clean the body and door drain holes.
Lubricate the door hinges and checks,and hood hinges.
Lubricate the door and hood locks and latches.
Lubricate the door rubber weather- strips.
Check the air conditioning system.
Inspect and lubricate automatic transaxle linkage and controls.
Clean the battery and terminals.
Check the brake/clutch fluid level.
Page 369 of 442

Maintenance
34
7
Timing belt (if equipped)
Inspect all parts related to the timing belt
for damage and deformation. Replace
any damaged parts immediately.
Vapor hose and fuel filler cap
The vapor hose and fuel filler cap should
be inspected at those intervals specified
in the maintenance schedule. Make sure
that a new vapor hose or fuel filler cap iscorrectly replaced. Vacuum crankcase ventilation hoses (if equipped)
Inspect the surface of hoses for evidence
of heat and/or mechanical damage. Hard
and brittle rubber, cracking, tears, cuts,
abrasions, and excessive swelling indi-
cate deterioration. Particular attention
should be paid to examine those hose
surfaces nearest to high heat sources,
such as the exhaust manifold. Inspect the hose routing to assure that the hoses do not come in contact with
any heat source, sharp edges or movingcomponent which might cause heat dam-
age or mechanical wear. Inspect all hose
connections, such as clamps and cou-
plings, to make sure they are secure, and
that no leaks are present. Hoses should
be replaced immediately if there is any
evidence of deterioration or damage.Air cleaner filter
A Genuine KIA air cleaner filter is recom- mended when the filter is replaced.
Spark plugs (for gasoline engine)
Make sure to install new spark plugs of
the correct heat range.
Valve clearance (if equipped)
Inspect for excessive valve noise and/or
engine vibration and adjust if necessary.
An authorized KIA dealer should perform
the operation.
Page 371 of 442
Maintenance
36
7
Steering gear box, linkage &
boots/lower arm ball joint
With the vehicle stopped and engine off,
check for excessive free-play in the
steering wheel.
Check the linkage for bends or damage.
Check the dust boots and ball joints for
deterioration, cracks, or damage.
Replace any damaged parts. Drive shafts and boots
Check the drive shafts, boots and clamps
for cracks, deterioration, or damage.
Replace any damaged parts and, if nec-
essary, repack the grease.
Air conditioning refrigerant (if equipped)
Check the air conditioning lines and con-
nections for leakage and damage.
Page 389 of 442
Maintenance
54
7
Battery recharging
Your vehicle has a maintenance-free,
calcium-based battery.
If the battery becomes discharged in a
short time (because, for example, the
headlights or interior lights were left on
while the vehicle was not in use),
recharge it by slow charging (trickle)
for 10 hours.
If the battery gradually discharges because of high electric load while the
vehicle is being used, recharge it at 20-
30A for two hours.(Continued)
When lifting a plastic-cased bat-tery, excessive pressure on the
case may cause battery acid to
leak, resulting in personal injury.
Lift with a battery carrier or with
your hands on opposite corners.
Never attempt to recharge the battery when the battery cablesare connected.
The electrical ignition system works with high voltage. Never
touch these components with theengine running or the ignition
switched on.
Failure to follow the above warn-
ings can result in serious bodily
injury or death.WARNING - Recharging
battery
When recharging the battery,
observe the following precautions:
The battery must be removed from the vehicle and placed in an area with good ventilation.
Do not allow cigarettes, sparks, or flame near the battery.
Watch the battery during charg- ing, and stop or reduce the charg-
ing rate if the battery cells begin
gassing (boiling) violently or if
the temperature of the electrolyte
of any cell exceeds 49°C (120°F).
Wear eye protection when check- ing the battery during charging.
Disconnect the battery charger in the following order.
1. Turn off the battery charger main switch.
2. Unhook the negative clamp from the negative battery terminal.
3. Unhook the positive clamp from the positive battery terminal.