display KIA CEED 2014 Owners Manual
[x] Cancel search | Manufacturer: KIA, Model Year: 2014, Model line: CEED, Model: KIA CEED 2014Pages: 1206, PDF Size: 50.15 MB
Page 363 of 1206
517
Driving your vehicle
Auto Start
To restart the engine from idle stopmode
Press the clutch pedal when the shift lever is in the N (Neutral) position.
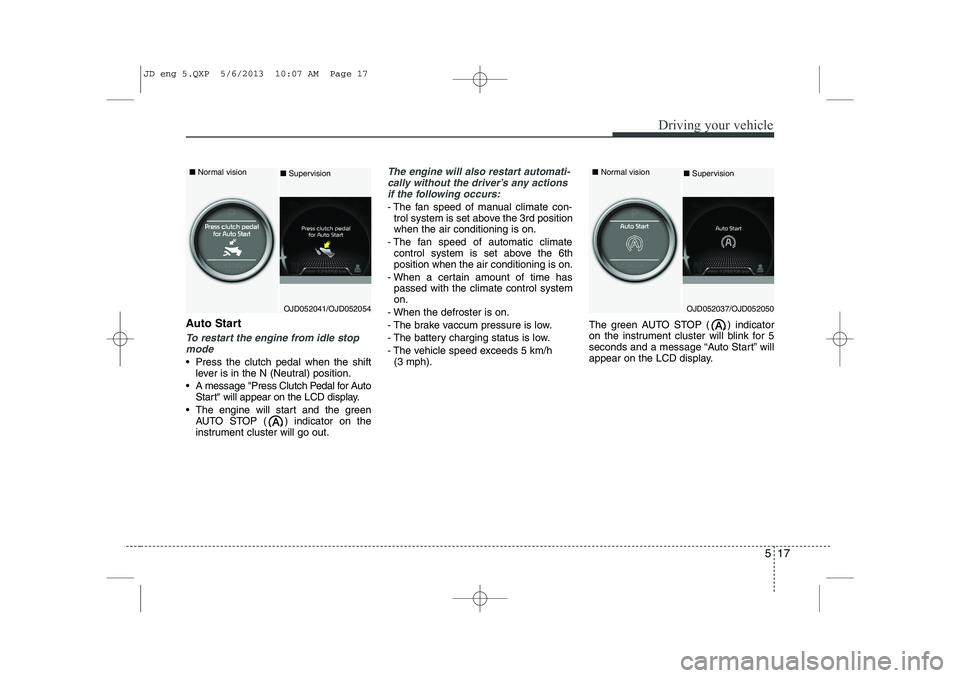
A message "Press Clutch Pedal for Auto Start" will appear on the LCD display.
The engine will start and the green AUTO STOP ( ) indicator on the
instrument cluster will go out.
The engine will also restart automati-
cally without the driver’s any actions if the following occurs:
- The fan speed of manual climate con- trol system is set above the 3rd position when the air conditioning is on.
- The fan speed of automatic climate control system is set above the 6thposition when the air conditioning is on.
- When a certain amount of time has passed with the climate control systemon.
- When the defroster is on.
- The brake vaccum pressure is low.
- The battery charging status is low.
- The vehicle speed exceeds 5 km/h (3 mph). The green AUTO STOP ( ) indicator
on the instrument cluster will blink for 5
seconds and a message “Auto Start” will
appear on the LCD display.
OJD052041/OJD052054
■
Normal vision
■Supervision
OJD052037/OJD052050
■
Normal vision
■ Supervision
JD eng 5.QXP 5/6/2013 10:07 AM Page 17
Page 371 of 1206
525
Driving your vehicle
CAUTION
To avoid damage to yourtransaxle, do not accelerate the
engine in R (Reverse) or any for- ward gear position with thebrakes on.
When stopped on an upgrade, do not hold the vehicle stationarywith engine power. Use the serv- ice brake or the parking brake.
Do not shift from N (Neutral) or P (Park) into D (Drive), or R
(Reverse) when the engine isabove idle speed.
CAUTION - Double clutch
transmission
If the vehicle is held by applying accelerator pedal at the hill, the
transmission and clutch will bedamaged. To hold at the hill, usethe parking brake or foot brake.
An overload of the clutch is indi- cated by a longitudinal judder anda blinking display. To exclude aclutch-damage, the clutch isopened and the torque flow inter-
rupted. If the clutch is opened,apply the foot brake and wait someminutes before driving again.
Ignoring the warnings can lead to severe injuries and damage onthe car.
If the LCD warning is active, the foot brake has to be applied.
When the problem of gear system occurs, the transaxle indicator
will blink. For your safety, we rec-ommend that you contact an authorized Kia dealer and havethe system checked.
(Continued)
(Continued) When the clutch is overheated, the safe protection mode oper-ates. According to the safe pro-tection mode, the transaxle indi-
cator blinks with buzzer sound.The buzzer beeps 3 times.
In this time, the LCD warningabout safe protection mode also
displays. In this condition, thedriving may not be smoothly. Ifyou ignore this warning, the driv-ing condition is getting worse and
the system may have problem. Toreturn the normal driving condi- tion, apply the foot brake and
stop the vehicle for few minutes before driving off.
While shifting the gear automati- cally, you may feel a correspon-ding shifting of gear. However, it
is not malfunction.
JD eng 5.QXP 5/6/2013 10:08 AM Page 25
Page 372 of 1206
Driving your vehicle
26
5
Transaxle ranges
The indicator lights in the instrument
cluster displays the shift lever position
when the ignition switch is in the ONposition.
P (Park)
Always come to a complete stop before
shifting into P (Park). This position locks
the transaxle and prevents the frontwheels from rotating. R (Reverse)
Use this position to drive the vehicle
backward. N (Neutral)
The wheels and transaxle are not
engaged. The vehicle will roll freely even
on the slightest incline unless the parking
brake or service brakes are applied.D (Drive)
This is the normal forward driving posi-
tion. The transaxle will automatically shift
through a 6-gear sequence, providing the
best fuel economy and power.
For extra power when passing another
vehicle or climbing grades, depress the
accelerator pedal fully (more than 80%)
until the kick down mechanism works
with a clicking noise, at which time the
transaxle will automatically downshift to
the next lower gear.
✽✽
NOTICE
Page 403 of 1206
557
Driving your vehicle
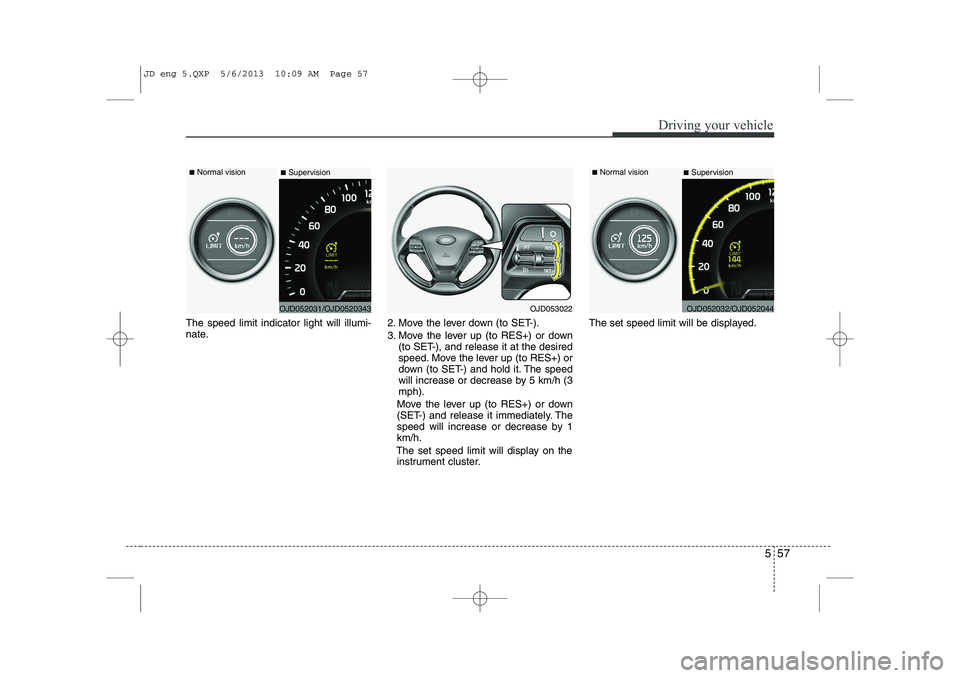
The speed limit indicator light will illumi-
nate.2. Move the lever down (to SET-).
3. Move the lever up (to RES+) or down
(to SET-), and release it at the desired
speed. Move the lever up (to RES+) or
down (to SET-) and hold it. The speed
will increase or decrease by 5 km/h (3mph).
Move the lever up (to RES+) or down
(SET-) and release it immediately. The
speed will increase or decrease by 1km/h.
The set speed limit will display on the instrument cluster. The set speed limit will be displayed.
OJD052031/OJD0520343
■
Normal vision
■SupervisionOJD053022OJD052032/OJD052044
■
Normal vision
■Supervision
JD eng 5.QXP 5/6/2013 10:09 AM Page 57
Page 406 of 1206
Driving your vehicle
60
5
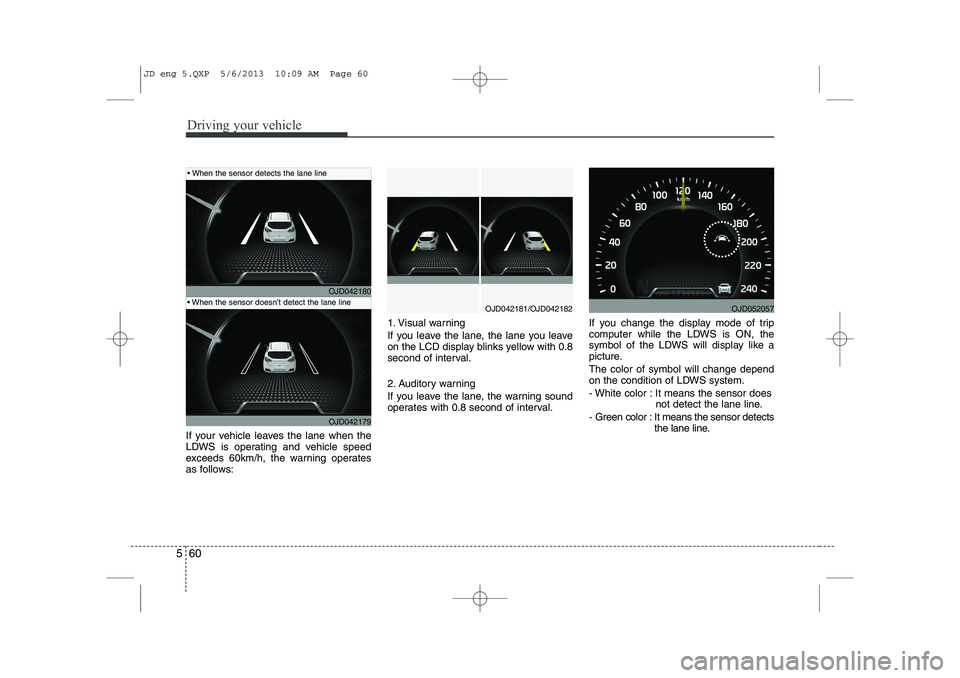
If your vehicle leaves the lane when the
LDWS is operating and vehicle speed
exceeds 60km/h, the warning operates
as follows: 1. Visual warning
If you leave the lane, the lane you leave
on the LCD display blinks yellow with 0.8
second of interval.
2. Auditory warning
If you leave the lane, the warning sound
operates with 0.8 second of interval.
If you change the display mode of trip
computer while the LDWS is ON, the
symbol of the LDWS will display like a
picture. The color of symbol will change depend
on the condition of LDWS system.
- White color : It means the sensor does
not detect the lane line.
- Green color : It means the sensor detects the lane line.
OJD042180
OJD042179
OJD042181/OJD042182
When the sensor detects the lane line
When the sensor doesn’t detect the lane lineOJD052057
JD eng 5.QXP 5/6/2013 10:09 AM Page 60
Page 445 of 1206
619
What to do in an emergency
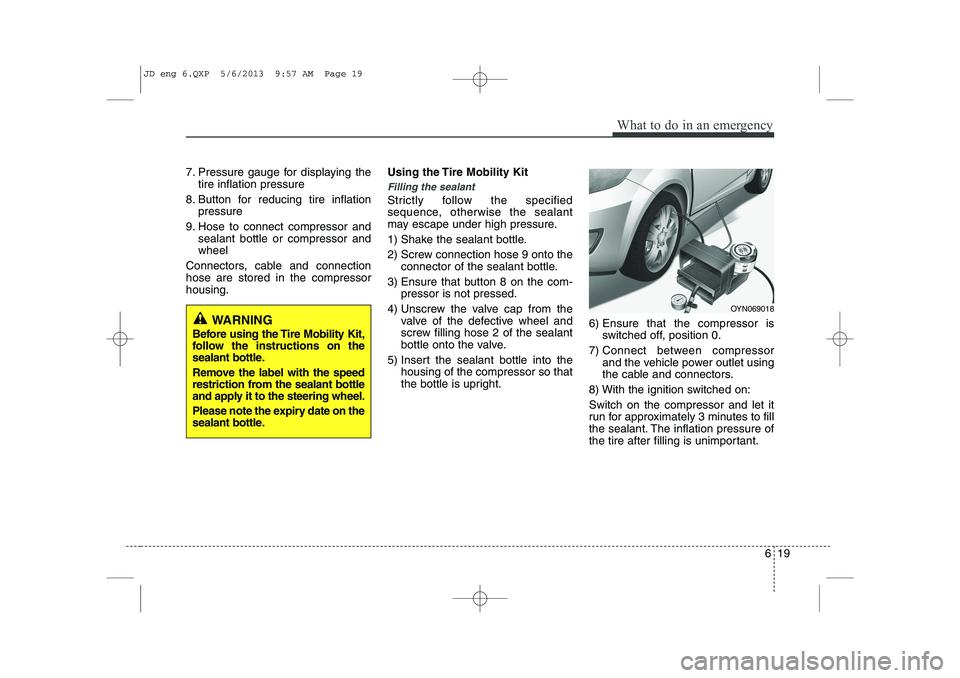
7. Pressure gauge for displaying thetire inflation pressure
8. Button for reducing tire inflation pressure
9. Hose to connect compressor and sealant bottle or compressor and wheel
Connectors, cable and connectionhose are stored in the compressorhousing. Using the Tire Mobility Kit
Filling the sealant
Strictly follow the specified
sequence, otherwise the sealant
may escape under high pressure.
1) Shake the sealant bottle.
2) Screw connection hose 9 onto the
connector of the sealant bottle.
3) Ensure that button 8 on the com- pressor is not pressed.
4) Unscrew the valve cap from the valve of the defective wheel and
screw filling hose 2 of the sealant
bottle onto the valve.
5) Insert the sealant bottle into the housing of the compressor so that
the bottle is upright. 6) Ensure that the compressor is
switched off, position 0.
7) Connect between compressor and the vehicle power outlet using
the cable and connectors.
8) With the ignition switched on: Switch on the compressor and let it
run for approximately 3 minutes to fill
the sealant. The inflation pressure of
the tire after filling is unimportant.
OYN069018
WARNING
Before using the Tire Mobility Kit,
follow the instructions on the
sealant bottle.
Remove the label with the speed
restriction from the sealant bottle
and apply it to the steering wheel.
Please note the expiry date on the
sealant bottle.
JD eng 6.QXP 5/6/2013 9:57 AM Page 19
Page 449 of 1206
623
What to do in an emergency
TIRE PRESSURE MONITORING SYSTEM (TPMS) (IF EQUIPPED)
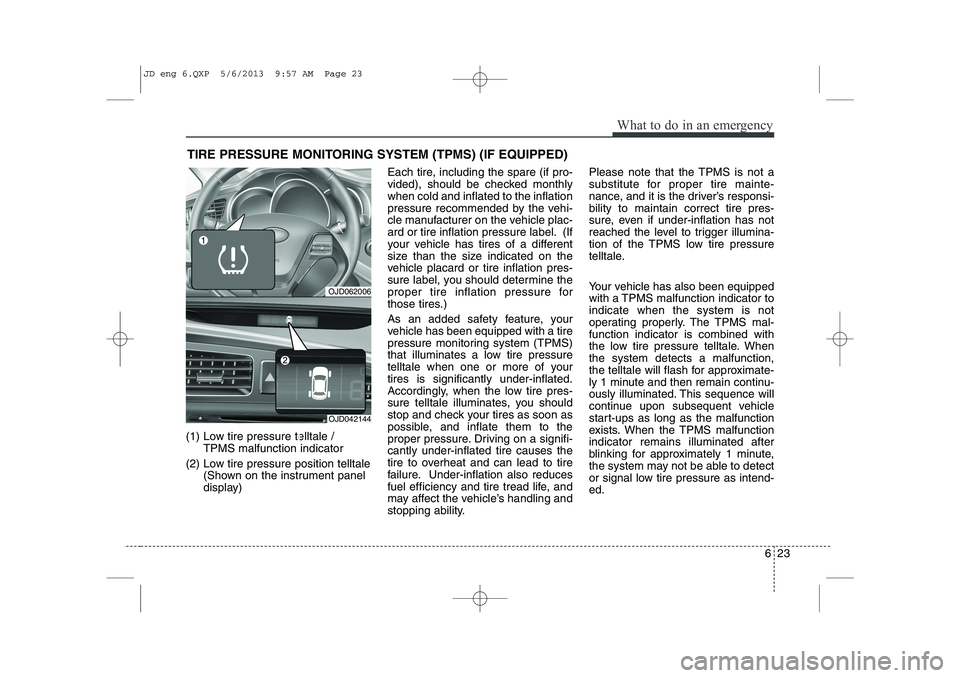
(1) Low tire pressure telltale / TPMS malfunction indicator
(2) Low tire pressure position telltale (Shown on the instrument panel
display) Each tire, including the spare (if pro-
vided), should be checked monthlywhen cold and inflated to the inflation
pressure recommended by the vehi-
cle manufacturer on the vehicle plac-
ard or tire inflation pressure label. (If
your vehicle has tires of a different
size than the size indicated on the
vehicle placard or tire inflation pres-
sure label, you should determine the
proper tire inflation pressure for
those tires.)
As an added safety feature, your
vehicle has been equipped with a tire
pressure monitoring system (TPMS)
that illuminates a low tire pressure
telltale when one or more of yourtires is significantly under-inflated.
Accordingly, when the low tire pres-
sure telltale illuminates, you should
stop and check your tires as soon as
possible, and inflate them to the
proper pressure. Driving on a signifi-cantly under-inflated tire causes the
tire to overheat and can lead to tire
failure. Under-inflation also reduces
fuel efficiency and tire tread life, and
may affect the vehicle’s handling and
stopping ability. Please note that the TPMS is not a
substitute for proper tire mainte-
nance, and it is the driver’s responsi-bility to maintain correct tire pres-
sure, even if under-inflation has not
reached the level to trigger illumina-
tion of the TPMS low tire pressure
telltale.
Your vehicle has also been equipped
with a TPMS malfunction indicator toindicate when the system is not
operating properly. The TPMS mal-function indicator is combined with
the low tire pressure telltale. Whenthe system detects a malfunction,
the telltale will flash for approximate-
ly 1 minute and then remain continu-
ously illuminated. This sequence will
continue upon subsequent vehicle
start-ups as long as the malfunction
exists. When the TPMS malfunctionindicator remains illuminated after
blinking for approximately 1 minute,
the system may not be able to detect
or signal low tire pressure as intend-ed.
OJD062006
OJD042144
JD eng 6.QXP 5/6/2013 9:57 AM Page 23
Page 520 of 1206
Maintenance
62
7
91 - Load Index, a numerical code
associated with the maximum
load the tire can carry.
H - Speed Rating Symbol. See the speed rating chart in this chapter
for additional information.
Wheel size designation
Wheels are also marked with impor-
tant information that you need if you
ever have to replace one. The follow-
ing explains what the letters and
numbers in the wheel size designa-tion mean.
Example wheel size designation: 6.0JX15
6.0 - Rim width in inches. J - Rim contour designation.
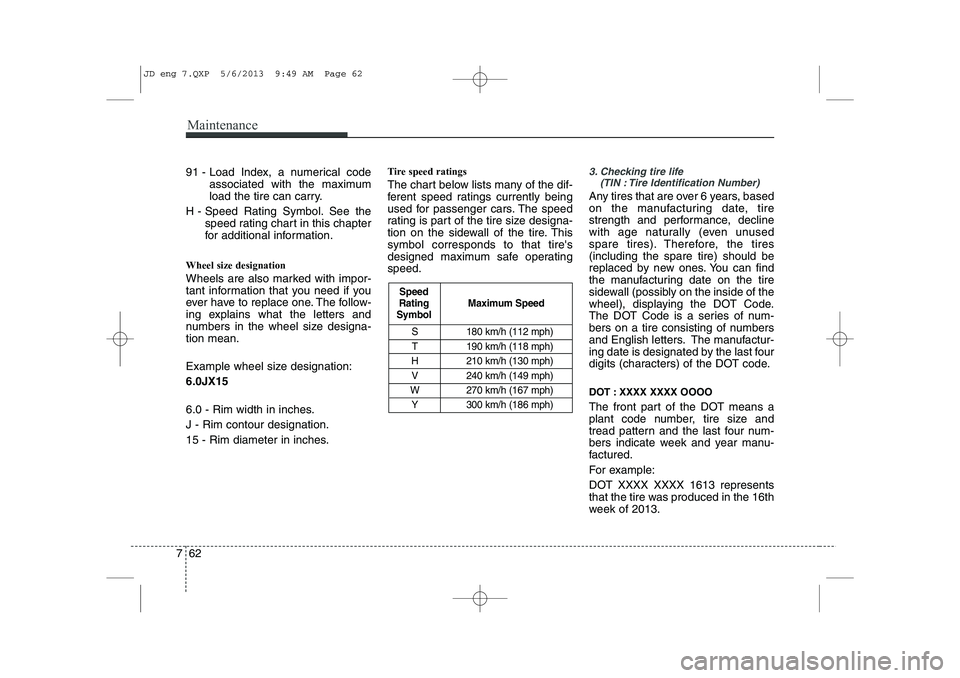
15 - Rim diameter in inches. Tire speed ratings
The chart below lists many of the dif-
ferent speed ratings currently being
used for passenger cars. The speed
rating is part of the tire size designa-
tion on the sidewall of the tire. Thissymbol corresponds to that tire's
designed maximum safe operatingspeed.3. Checking tire life
(TIN : Tire Identification Number)
Any tires that are over 6 years, based
on the manufacturing date, tire
strength and performance, decline
with age naturally (even unused
spare tires). Therefore, the tires(including the spare tire) should be
replaced by new ones. You can find
the manufacturing date on the tire
sidewall (possibly on the inside of the
wheel), displaying the DOT Code.
The DOT Code is a series of num-
bers on a tire consisting of numbers
and English letters. The manufactur-
ing date is designated by the last four
digits (characters) of the DOT code.
DOT : XXXX XXXX OOOO
The front part of the DOT means a
plant code number, tire size and
tread pattern and the last four num-
bers indicate week and year manu-
factured.
For example:
DOT XXXX XXXX 1613 represents
that the tire was produced in the 16th
week of 2013.
S 180 km/h (112 mph)
T 190 km/h (118 mph)
H 210 km/h (130 mph)
V 240 km/h (149 mph)
W 270 km/h (167 mph) Y 300 km/h (186 mph)
Maximum Speed
Speed
Rating
Symbol
JD eng 7.QXP 5/6/2013 9:49 AM Page 62
Page 594 of 1206
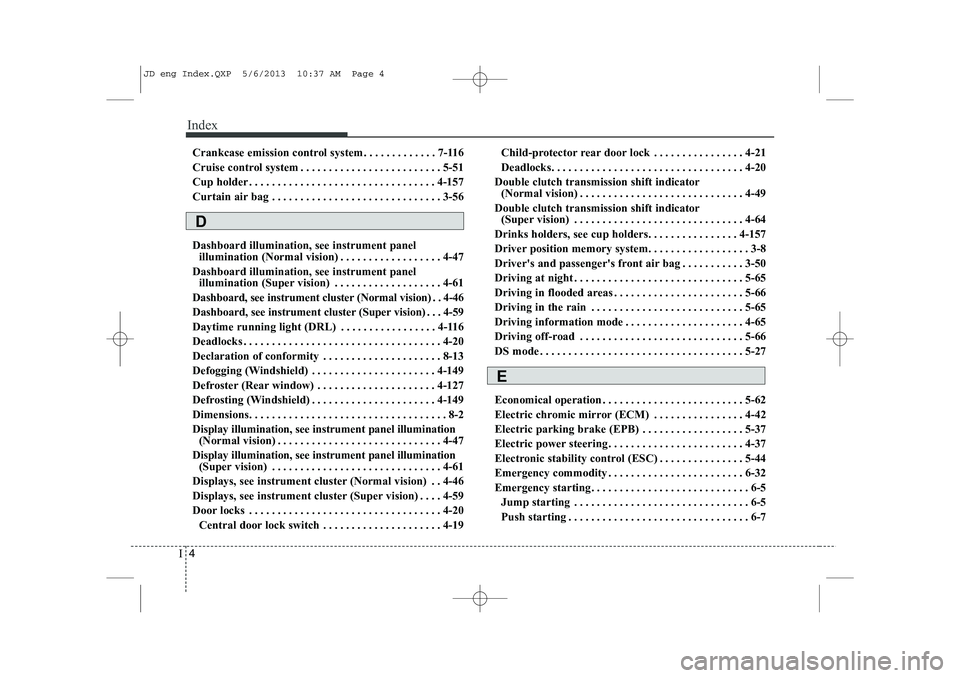
Index
4
I
Crankcase emission control system . . . . . . . . . . . . . 7-116
Cruise control system . . . . . . . . . . . . . . . . . . . . . . . . . 5-51
Cup holder . . . . . . . . . . . . . . . . . . . . . . . . . . . . . . . . . 4-157
Curtain air bag . . . . . . . . . . . . . . . . . . . . . . . . . . . . . . 3-56 Dashboard illumination, see instrument panel
illumination (Normal vision) . . . . . . . . . . . . . . . . . . 4-47
Dashboard illumination, see instrument panel illumination (Super vision) . . . . . . . . . . . . . . . . . . . 4-61
Dashboard, see instrument cluster (Normal vision) . . 4-46
Dashboard, see instrument cluster (Super vision) . . . 4-59
Daytime running light (DRL) . . . . . . . . . . . . . . . . . 4-116
Deadlocks . . . . . . . . . . . . . . . . . . . . . . . . . . . . . . . . . . . 4-20
Declaration of conformity . . . . . . . . . . . . . . . . . . . . . 8-13
Defogging (Windshield) . . . . . . . . . . . . . . . . . . . . . . 4-149
Defroster (Rear window) . . . . . . . . . . . . . . . . . . . . . 4-127
Defrosting (Windshield) . . . . . . . . . . . . . . . . . . . . . . 4-149
Dimensions. . . . . . . . . . . . . . . . . . . . . . . . . . . . . . . . . . . 8-2Display illumination, see instrument panel illumination (Normal vision) . . . . . . . . . . . . . . . . . . . . . . . . . . . . . 4-47
Display illumination, see instrument panel illumination (Super vision) . . . . . . . . . . . . . . . . . . . . . . . . . . . . . . 4-61
Displays, see instrument cluster (Normal vision) . . 4-46
Displays, see instrument cluster (Super vision) . . . . 4-59
Door locks . . . . . . . . . . . . . . . . . . . . . . . . . . . . . . . . . . 4-20 Central door lock switch . . . . . . . . . . . . . . . . . . . . . 4-19 Child-protector rear door lock . . . . . . . . . . . . . . . . 4-21
Deadlocks. . . . . . . . . . . . . . . . . . . . . . . . . . . . . . . . . . 4-20
Double clutch transmission shift indicator (Normal vision) . . . . . . . . . . . . . . . . . . . . . . . . . . . . . 4-49
Double clutch transmission shift indicator (Super vision) . . . . . . . . . . . . . . . . . . . . . . . . . . . . . . 4-64
Drinks holders, see cup holders. . . . . . . . . . . . . . . . 4-157
Driver position memory system. . . . . . . . . . . . . . . . . . 3-8
Driver's and passenger's front air bag . . . . . . . . . . . 3-50
Driving at night . . . . . . . . . . . . . . . . . . . . . . . . . . . . . . 5-65
Driving in flooded areas . . . . . . . . . . . . . . . . . . . . . . . 5-66
Driving in the rain . . . . . . . . . . . . . . . . . . . . . . . . . . . 5-65
Driving information mode . . . . . . . . . . . . . . . . . . . . . 4-65
Driving off-road . . . . . . . . . . . . . . . . . . . . . . . . . . . . . 5-66
DS mode . . . . . . . . . . . . . . . . . . . . . . . . . . . . . . . . . . . . 5-27
Economical operation . . . . . . . . . . . . . . . . . . . . . . . . . 5-62
Electric chromic mirror (ECM) . . . . . . . . . . . . . . . . 4-42
Electric parking brake (EPB) . . . . . . . . . . . . . . . . . . 5-37
Electric power steering . . . . . . . . . . . . . . . . . . . . . . . . 4-37
Electronic stability control (ESC) . . . . . . . . . . . . . . . 5-44
Emergency commodity . . . . . . . . . . . . . . . . . . . . . . . . 6-32
Emergency starting. . . . . . . . . . . . . . . . . . . . . . . . . . . . 6-5 Jump starting . . . . . . . . . . . . . . . . . . . . . . . . . . . . . . . 6-5
Push starting . . . . . . . . . . . . . . . . . . . . . . . . . . . . . . . . 6-7
E
D
JD eng Index.QXP 5/6/2013 10:37 AM Page 4
Page 596 of 1206

Index
6
I
Fuse switch . . . . . . . . . . . . . . . . . . . . . . . . . . . . . . . . 7-68
Fuse/relay panel description . . . . . . . . . . . . . . . . . . 7-71
Inner panel fuse . . . . . . . . . . . . . . . . . . . . . . . . . . . . 7-67
Main fuse . . . . . . . . . . . . . . . . . . . . . . . . . . . . . . . . . . 7-69
Multi fuse. . . . . . . . . . . . . . . . . . . . . . . . . . . . . . . . . . 7-70
Gauge (Normal vision) Engine coolant temperature gauge . . . . . . . . . . . . . 4-48
Fuel gauge . . . . . . . . . . . . . . . . . . . . . . . . . . . . . . . . . 4-48
Gauge (Super vision)
Engine coolant temperature gauge . . . . . . . . . . . . 4-63
Fuel gauge . . . . . . . . . . . . . . . . . . . . . . . . . . . . . . . . . 4-62
Glove box . . . . . . . . . . . . . . . . . . . . . . . . . . . . . . . . . . 4-153
Glove box lamp . . . . . . . . . . . . . . . . . . . . . . . . . . . . . 4-125
Hazard warning flasher . . . . . . . . . . . . . . . . . . . . . . 4-110
Hazardous driving conditions . . . . . . . . . . . . . . . . . . 5-64
Headlamp delay function . . . . . . . . . . . . . . . . . . . . . 4-111
Headlight (Headlamp) welcome function . . . . . . . . 4-111
Headlight bulb replacement. . . . . . . . . . . . . . . . . . . . 7-90
Headlight leveling device . . . . . . . . . . . . . . . . . . . . . 4-117
Headlight position . . . . . . . . . . . . . . . . . . . . . . . . . . . 4-113
Headlight washer . . . . . . . . . . . . . . . . . . . . . . . . . . . 4-122
Headrest(front) . . . . . . . . . . . . . . . . . . . . . . . . . . . . . . 3-10 Headrest(rear) . . . . . . . . . . . . . . . . . . . . . . . . . . . . . . . 3-14
Heated steering wheel. . . . . . . . . . . . . . . . . . . . . . . . . 4-38
High - beam operation . . . . . . . . . . . . . . . . . . . . . . . 4-114
Hight adjustment (seat belt) . . . . . . . . . . . . . . . . . . . 3-23
Highway driving . . . . . . . . . . . . . . . . . . . . . . . . . . . . . 5-66
Hill-start assist control (HAC). . . . . . . . . . . . . . . . . . 5-48
Hood . . . . . . . . . . . . . . . . . . . . . . . . . . . . . . . . . . . . . . . 4-28
Horn . . . . . . . . . . . . . . . . . . . . . . . . . . . . . . . . . . . . . . . 4-39
How to use this manual . . . . . . . . . . . . . . . . . . . . . . . . 1-2
Icy road warning . . . . . . . . . . . . . . . . . . . . . . . . . . . . . 4-91
Indicators and warnings . . . . . . . . . . . . . . . . . . . . . . 4-79
Inside rearview mirror . . . . . . . . . . . . . . . . . . . . . . . . 4-42Instrument cluster
LCD display information . . . . . . . . . . . . . . . . . . . . . 4-73
Warning and indicators . . . . . . . . . . . . . . . . . . . . . . 4-79
Instrument cluster (Normal vision). . . . . . . . . . . . . . 4-46 Automatic transaxle shift position indicator . . . . . 4-49
Double clutch transmission shift indicator . . . . . . 4-50
Fuel gauge . . . . . . . . . . . . . . . . . . . . . . . . . . . . . . . . . 4-48
Instrument panel illumination . . . . . . . . . . . . . . . . 4-47
Manual transaxle shift indicator. . . . . . . . . . . . . . . 4-49
Odometer . . . . . . . . . . . . . . . . . . . . . . . . . . . . . . . . . . 4-51
Speed limiter indicator. . . . . . . . . . . . . . . . . . . . . . . 4-50
Speedometer . . . . . . . . . . . . . . . . . . . . . . . . . . . . . . . 4-47
G
H
I
JD eng Index.QXP 5/6/2013 10:37 AM Page 6