turn signal KIA CEED 2014 Owner's Guide
[x] Cancel search | Manufacturer: KIA, Model Year: 2014, Model line: CEED, Model: KIA CEED 2014Pages: 1206, PDF Size: 50.15 MB
Page 1022 of 1206
573
Driving your vehicle
Trailer brakes
If your trailer is equipped with a braking
system, make sure it conforms to your
country’s regulations and that it is prop-
erly installed and operating correctly.
If your trailer weight exceeds the maxi-
mum allowed weight without trailer
brakes, then the trailer will also require its
own brakes as well. Be sure to read and
follow the instructions for the trailer
brakes so you’ll be able to install, adjust
and maintain them properly.
Do not tap into or modify your vehicle'sbrake system. Driving with a trailer
Towing a trailer requires a certain
amount of experience. Before setting out
for the open road, you must get to know
your trailer. Acquaint yourself with the
feel of handling and braking with the
added weight of the trailer. And always
keep in mind that the vehicle you are
driving is now a good deal longer and not
nearly so responsive as your vehicle is
by itself.
Before you start, check the trailer towbar
hitch and platform, safety chains, electri-
cal connector(s), lights, tyres and mirror
adjustment. If the trailer has electric
brakes, start your vehicle and trailer mov-
ing and then apply the trailer brake con-
troller by hand to be sure the brakes are
working. This lets you check your electri-
cal connection at the same time.
During your trip, check occasionally to be
sure that the load is secure, and that the
lights and any trailer brakes are still work-ing.Following distance
Stay at least twice as far behind the vehi-
cle ahead as you would when driving
your vehicle without a trailer. This can
help you avoid situations that require
heavy braking and sudden turns.
Passing
You’ll need more passing distance up
ahead when you’re towing a trailer. And,
because of the increased vehicle length,
you’ll need to go much farther beyond the
passed vehicle before you can return to
your lane.
Backing up
Hold the bottom of the steering wheel
with one hand. Then, to move the trailer
to the left, just move your hand to the left.
To move the trailer to the right, move your
hand to the right. Always back up slowly
and, if possible, have someone guide you.
Making turns
When you’re turning with a trailer, make
wider turns than normal. Do this so your
trailer won’t strike soft shoulders, curbs,
road signs, trees, or other objects. Avoid
jerky or sudden manoeuvres. Signal well
in advance.
WARNING
- Trailer brakes
Do not use a trailer with its own
brakes unless you are absolutely
certain that you have properly set
up the brake system. This is not a
task for amateurs. Use an experi-
enced, competent trailer shop for
this work.
JD RHD 5.QXP 4/29/2013 11:28 AM Page 73
Page 1023 of 1206
Driving your vehicle
74
5
Turn signals when towing a trailer
When you tow a trailer, your vehicle has
to have a different turn signal flasher and
extra wiring. The green arrows on your
instrument panel will flash whenever you
signal a turn or lane change. Properly
connected, the trailer lights will also flash
to alert other drivers you’re about to turn,
change lanes, or stop.
When towing a trailer, the green arrows
on your instrument panel will flash for
turns even if the bulbs on the trailer are
burned out. Thus, you may think drivers
behind you are seeing your signals
when, in fact, they are not. It is important
to check occasionally to be sure the trail-
er bulbs are still working. You must also
check the lights every time you discon-
nect and then reconnect the wires.
Do not connect a trailer lighting system
directly to your vehicle’s lighting system.
Use only an approved trailer wiring har-
ness.
An authorised Kia dealer can assist you
in installing the wiring harness.
Driving on grades
Reduce speed and shift to a lower gear
before you start down a long or steep
downgrade. If you don’t shift down, you
might have to use your brakes so much
that they would get hot and no longer
operate efficiently.
On a long uphill grade, shift down and
reduce your speed to around 70 km/h (45mph) to reduce the possibility of engine
and transaxle overheating.
If your trailer weighs more than the max-
imum trailer weight without trailer brakes
and you have an automatic transaxle,
you should drive in D (Drive) when tow-
ing a trailer.
Operating your vehicle in D (Drive) when
towing a trailer will minimize heat build up
and extend the life of your transaxle.
WARNING
Failure to use an approved trailer wiring harness could result in dam-
age to the vehicle electrical system
and/or personal injury.
CAUTION
When towing a trailer on steep grades (in excess of 6%) pay close
attention to the engine coolant temperature gauge to ensure theengine does not overheat.
If the coolant temperature redwarning light illuminates or the coolant temperature gauge movestowards “130”, pull over and stop as soon as it is safe to do so, and
allow the engine to idle until it cools down. You may proceed oncethe engine has cooled sufficiently.
You must decide driving speed depending on trailer weight anduphill grade to reduce the possi- bility of engine and transaxleoverheating.
JD RHD 5.QXP 4/29/2013 11:28 AM Page 74
Page 1031 of 1206
What to do in an emergency
2
6
ROAD WARNING
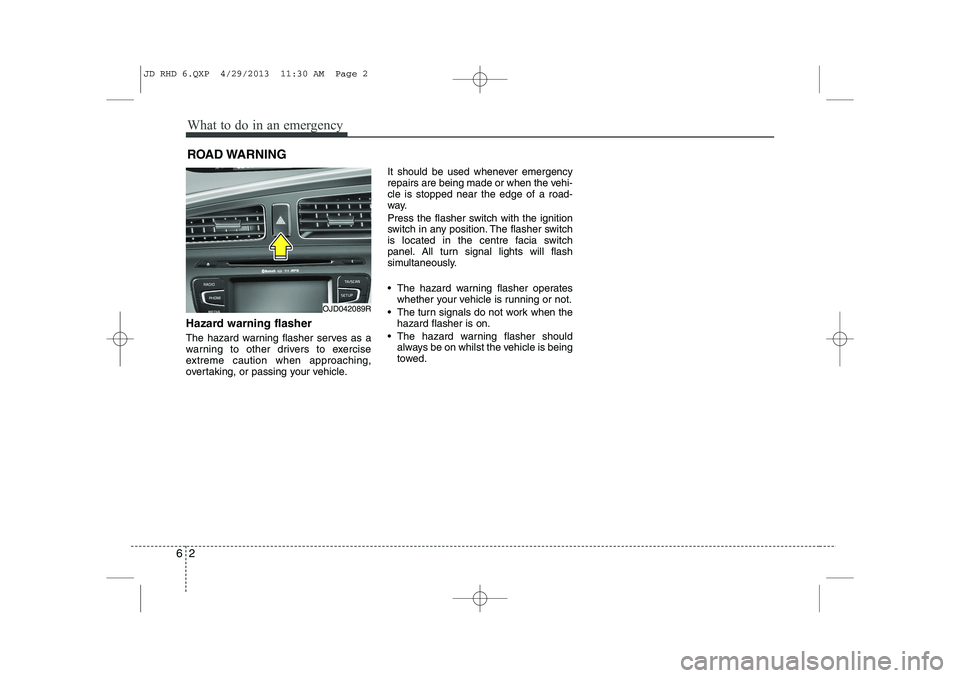
Hazard warning flasher
The hazard warning flasher serves as a
warning to other drivers to exercise
extreme caution when approaching,
overtaking, or passing your vehicle. It should be used whenever emergency
repairs are being made or when the vehi-cle is stopped near the edge of a road-
way.
Press the flasher switch with the ignition
switch in any position. The flasher switch
is located in the centre facia switch
panel. All turn signal lights will flash
simultaneously.
• The hazard warning flasher operates
whether your vehicle is running or not.
The turn signals do not work when the hazard flasher is on.
The hazard warning flasher should always be on whilst the vehicle is being
towed.
OJD042089R
JD RHD 6.QXP 4/29/2013 11:30 AM Page 2
Page 1128 of 1206

767
Maintenance
Inner panel fuse replacement
1. Turn the ignition switch and all otherswitches off.
2. Open the fuse panel cover. 3. Pull the suspected fuse straight out.
Use the removal tool provided in the
engine compartment fuse panel.
4. Check the removed fuse; replace it if it is blown.
5. Push in a new fuse of the same rating, and make sure it fits tightly in the clips.
If it fits loosely, we recommend that you
consult an authorised Kia dealer.
If you do not have a spare, use a fuse of the same rating from a circuit you may
not need for operating the vehicle, suchas the cigar lighter fuse.
If the headlights, fog lights, turn signallights, position lights or interior lights do not work and there is nothing wrong with
the bulbs, we recommend that you con- sult with an authorised Kia dealer.
OJD072016ROGDE071017R
CAUTION
When replacing a blown fuse or relay with a new one, make sure
the new fuse or relay fits tightlyinto the clips. The incomplete fas-tening fuse or relay may cause the vehicle wiring and electric
systems damage and a possiblefire.
Do not remove fuses, relays and terminals fastened with bolts or
nuts. The fuses, relays and termi-nals may be fastened incomplete-ly, and it may cause a possiblefire. If fuses, relays and terminals
fastened with bolts or nuts areblown, we recommend that youconsult with an authorised Kia
dealer.
Do not input any other objects except fuses or relays intofuse/relay terminals such as adriver or wiring. It may cause con-
tact failure and system malfunc-tion.
JD RHD 7.QXP 4/29/2013 11:34 AM Page 67
Page 1146 of 1206

785
Maintenance
FuseFuse ratingSymbolFuse NameProtected component
MULTIFUSE
80A1POWER
STEERINGEPS Unit
60AB+1B+1Inner Fuse Panel, IPS1 (H/LAMP HI LH,H/LAMP LOW LH, FRT TURN LH, POSITION LAMP LH),
IPS2 (STATIC BENDING LAMP LH/RH, DRL LH/RH)
40A1ABS1ESC Control Module, ABS Control Module
40A2ABS2ESC Control Module, ABS Control Module, Multipurpose Check Connector
40AIG2IG2W/O Smart Key : Ignition Switch, START RELAYWith Smart Key : IG2 RELAY, START RELAY, INNER FUSE PANEL (Fuse No. - 14/24/22/15/10)
60AB+2B+2Inner Fuse Panel, IPS3 (H/LAMP HI RH,H/LAMP LOW RH, FRT TURN RH,
POSITION LAMP RH), IPS4 (FRT FOG LAMP LH/RH, REAR TURN LH/RH),
IPS5 (REAR FOG LAMP, INT TAIL LAMP)
FUSE
40ARR
HTDRR HTDRR HTD RELAY , RR HTD
40AIG1IG1W/O Smart Key : Ignition Switch
With Smart Key : IG1 RELAY, ACC RELAY, INNER FUSE PANEL ( Fuse No. - 38/36/21/37/
23/29/28, Fuse No. - 13/8/35)
30A1EPB1Electric Parking Brake Module
30A2EPB2Electric Parking Brake Module
50AC/FANC/FAN LO RELAY, C/FAN HI RELAY
15ADEICERICM Relay Box (Front Deicer Relay)
15ASTOP
LAMPSTOP LAMPStop Signal Electronic Relay, HAC RELAY
Engine compartment main fuse panel (for diesel engine)
JD RHD 7.QXP 4/29/2013 11:35 AM Page 85
Page 1151 of 1206
Maintenance
90
7
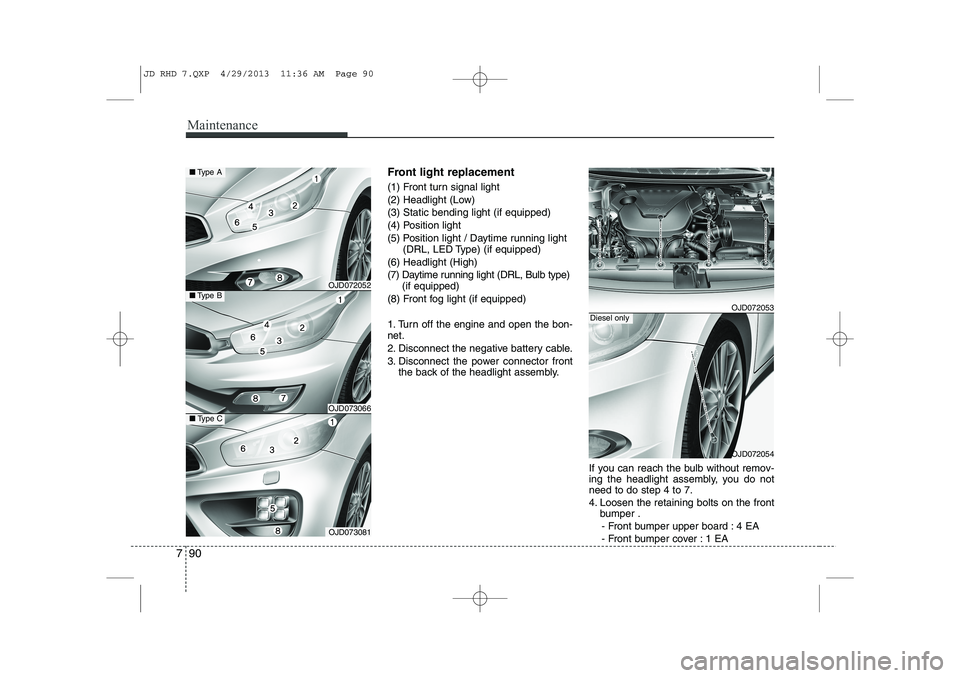
Front light replacement
(1) Front turn signal light
(2) Headlight (Low)(3) Static bending light (if equipped)
(4) Position light
(5) Position light / Daytime running light
(DRL, LED Type) (if equipped)
(6) Headlight (High)
(7) Daytime running light (DRL, Bulb type) (if equipped)
(8) Front fog light (if equipped)
1. Turn off the engine and open the bon- net.
2. Disconnect the negative battery cable.
3. Disconnect the power connector front the back of the headlight assembly.
If you can reach the bulb without remov-
ing the headlight assembly, you do notneed to do step 4 to 7.
4. Loosen the retaining bolts on the frontbumper .
- Front bumper upper board : 4 EA
- Front bumper cover : 1 EA
OJD072053
OJD072054
Diesel only
OJD072052
OJD073066
■ Type A
■Type B
OJD073081
■Type C
JD RHD 7.QXP 4/29/2013 11:36 AM Page 90
Page 1155 of 1206
Maintenance
94
7
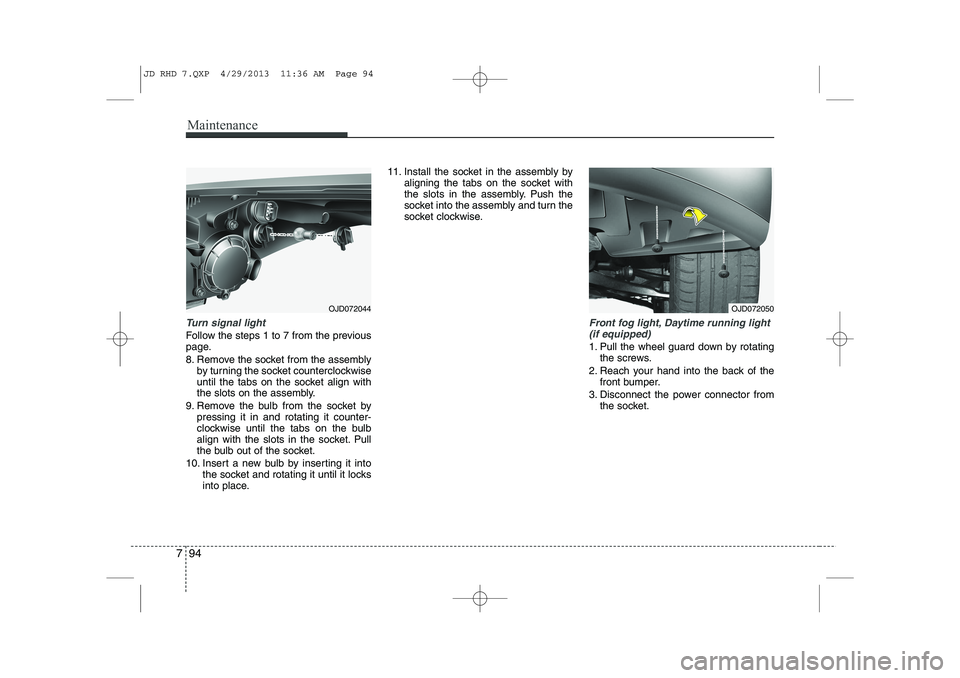
Turn signal light
Follow the steps 1 to 7 from the previous
page.
8. Remove the socket from the assembly
by turning the socket counterclockwise
until the tabs on the socket align with
the slots on the assembly.
9. Remove the bulb from the socket by pressing it in and rotating it counter-
clockwise until the tabs on the bulb
align with the slots in the socket. Pull
the bulb out of the socket.
10. Insert a new bulb by inserting it into the socket and rotating it until it locks
into place. 11. Install the socket in the assembly by
aligning the tabs on the socket with
the slots in the assembly. Push the
socket into the assembly and turn the
socket clockwise.
Front fog light, Daytime running light
(if equipped)
1. Pull the wheel guard down by rotating the screws.
2. Reach your hand into the back of the front bumper.
3. Disconnect the power connector from the socket.
OJD072044OJD072050
JD RHD 7.QXP 4/29/2013 11:36 AM Page 94
Page 1164 of 1206
7 103
Maintenance
Side repeater light bulb replace- ment
If the light bulb does not operate, we rec-
ommend that the system be checked by
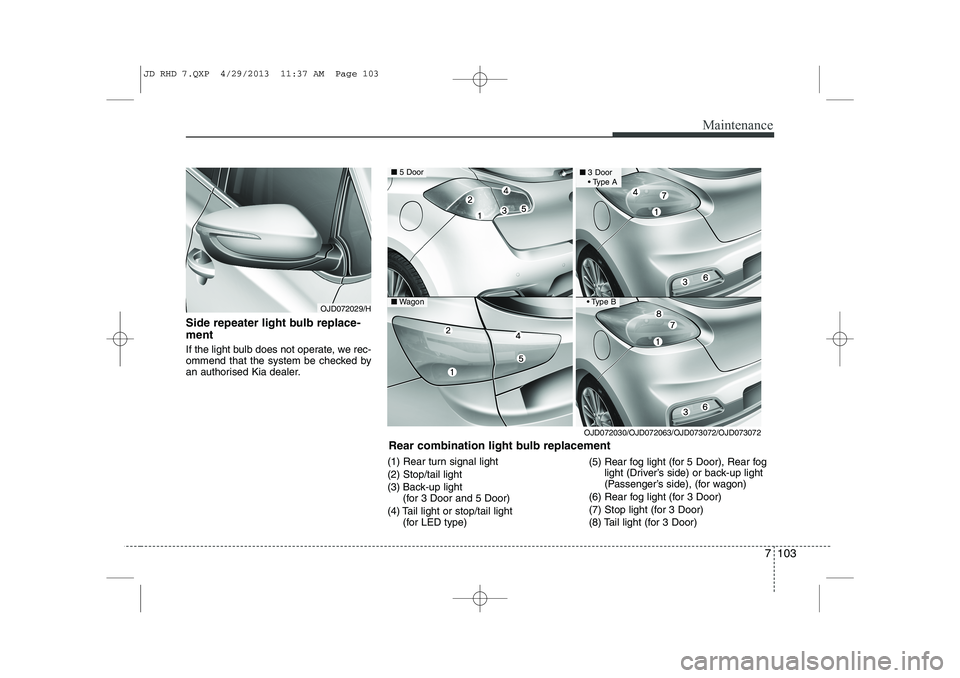
an authorised Kia dealer.(1) Rear turn signal light (2) Stop/tail light
(3) Back-up light (for 3 Door and 5 Door)
(4) Tail light or stop/tail light (for LED type) (5) Rear fog light (for 5 Door), Rear fog
light (Driver’s side) or back-up light
(Passenger’s side), (for wagon)
(6) Rear fog light (for 3 Door)
(7) Stop light (for 3 Door)
(8) Tail light (for 3 Door)
OJD072029/H
Rear combination light bulb replacement
■5 Door
■Wagon
■ 3 Door
Type A
Type B
OJD072030/OJD072063/OJD073072/OJD073072
JD RHD 7.QXP 4/29/2013 11:37 AM Page 103
Page 1165 of 1206
Maintenance
104
7
❈ The actual rear combination lamp shape in
the vehicle may differ from illustration.
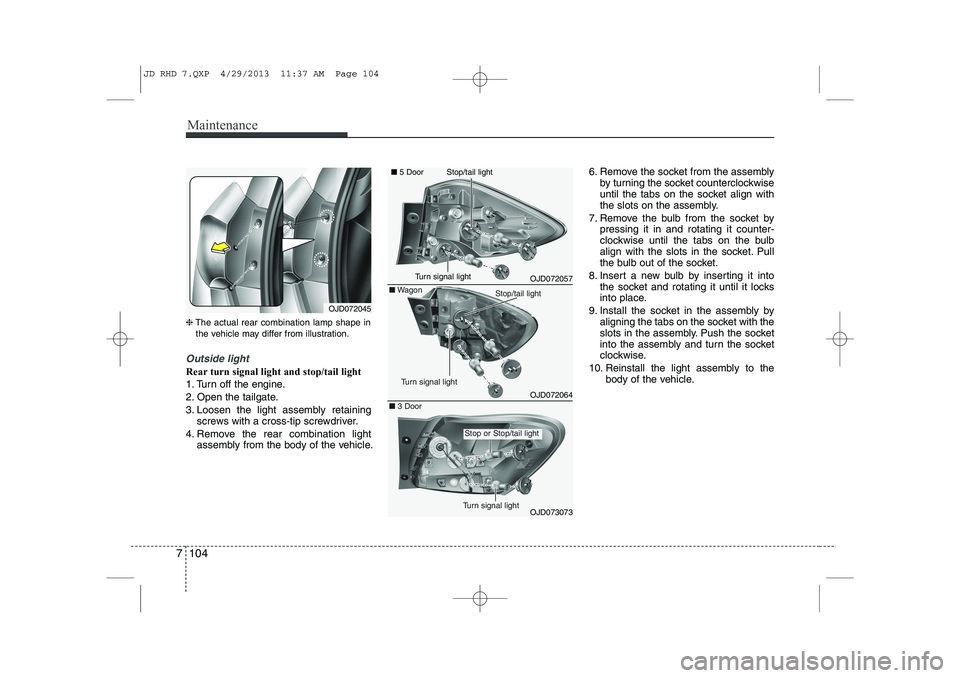
Outside light
Rear turn signal light and stop/tail light
1. Turn off the engine.
2. Open the tailgate.
3. Loosen the light assembly retaining
screws with a cross-tip screwdriver.
4. Remove the rear combination light assembly from the body of the vehicle. 6. Remove the socket from the assembly
by turning the socket counterclockwise
until the tabs on the socket align with
the slots on the assembly.
7. Remove the bulb from the socket by pressing it in and rotating it counter-
clockwise until the tabs on the bulb
align with the slots in the socket. Pull
the bulb out of the socket.
8. Insert a new bulb by inserting it into the socket and rotating it until it locks
into place.
9. Install the socket in the assembly by aligning the tabs on the socket with the
slots in the assembly. Push the socket
into the assembly and turn the socket
clockwise.
10. Reinstall the light assembly to the body of the vehicle.
OJD072045
OJD072057
OJD072064
■
5 Door
■Wagon
OJD073073
■ 3 Door
Turn signal light
Stop/tail light
Stop or Stop/tail light
Turn signal light
Stop/tail light
Turn signal light
JD RHD 7.QXP 4/29/2013 11:37 AM Page 104
Page 1186 of 1206
Specifications & Consumer information
6
8
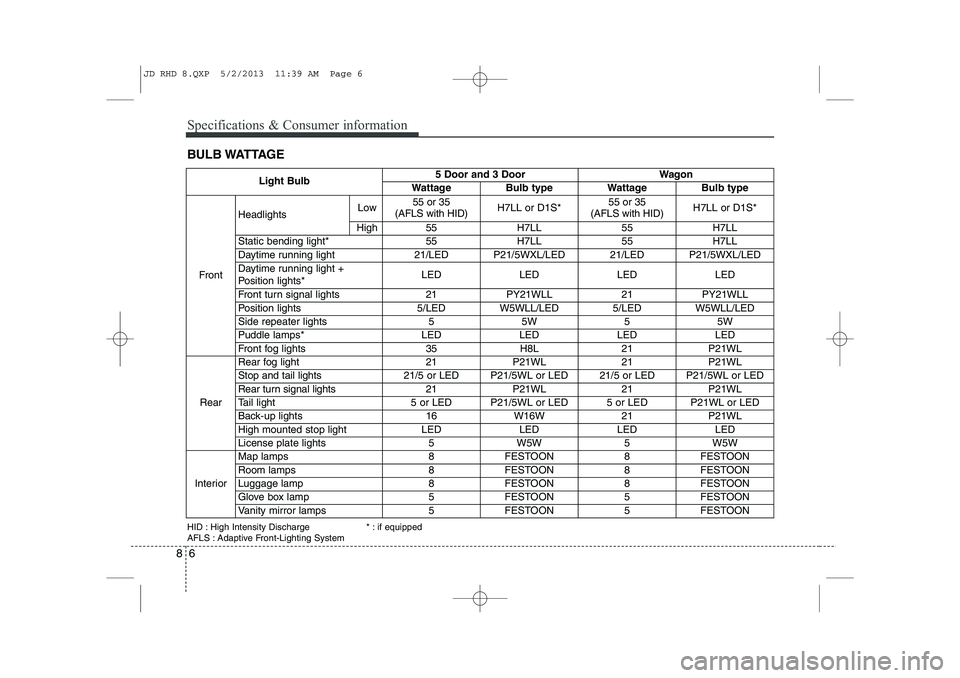
BULB WATTAGE
Light Bulb5 Door and 3 DoorWagon
WattageBulb typeWattageBulb type
Front
HeadlightsLow55 or 35
(AFLS with HID)H7LL or D1S*55 or 35
(AFLS with HID)H7LL or D1S*
High55H7LL55H7LL
Static bending light*55H7LL55H7LL
Daytime running light21/LEDP21/5WXL/LED21/LEDP21/5WXL/LED
Daytime running light +
Position lights*LEDLEDLEDLED
Front turn signal lights21PY21WLL21PY21WLL
Position lights5/LEDW5WLL/LED5/LEDW5WLL/LED
Side repeater lights55W55W
Puddle lamps*LEDLEDLEDLED
Front fog lights35H8L21P21WL
Rear
Rear fog light21P21WL21P21WL
Stop and tail lights 21/5 or LEDP21/5WL or LED21/5 or LEDP21/5WL or LED
Rear turn signal lights 21P21WL21P21WL
Tail light 5 or LEDP21/5WL or LED5 or LEDP21WL or LED
Back-up lights 16W16W21P21WL
High mounted stop lightLEDLEDLEDLED
License plate lights5W5W5W5W
Interior
Map lamps8FESTOON8FESTOON
Room lamps8FESTOON8FESTOON
Luggage lamp8FESTOON8FESTOON
Glove box lamp5FESTOON5FESTOON
Vanity mirror lamps5FESTOON5FESTOON
HID : High Intensity Discharge
AFLS : Adaptive Front-Lighting System * : if equipped
JD RHD 8.QXP 5/2/2013 11:39 AM Page 6