battery KIA CEED 2015 Owners Manual
[x] Cancel search | Manufacturer: KIA, Model Year: 2015, Model line: CEED, Model: KIA CEED 2015Pages: 1210, PDF Size: 35.92 MB
Page 14 of 1210
Your vehicle at a glance
6
2
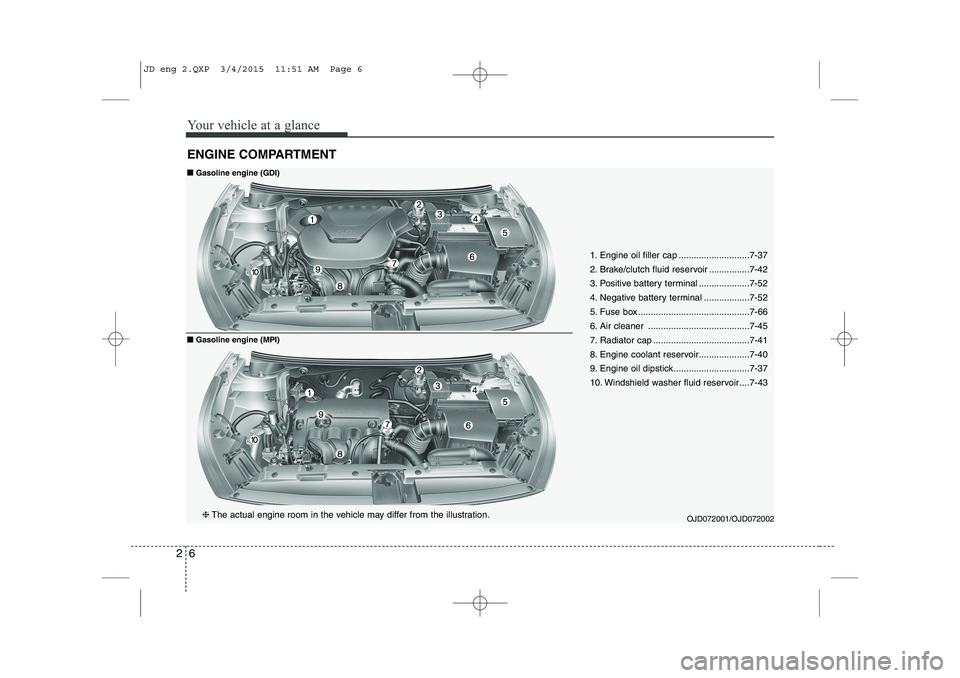
ENGINE COMPARTMENT
OJD072001/OJD072002
❈
The actual engine room in the vehicle may differ from the illustration. 1. Engine oil filler cap ............................7-37
2. Brake/clutch fluid reservoir ................7-42
3. Positive battery terminal ....................7-52
4. Negative battery terminal ..................7-52
5. Fuse box ............................................7-66
6. Air cleaner ........................................7-45
7. Radiator cap ......................................7-41
8. Engine coolant reservoir....................7-40
9. Engine oil dipstick..............................7-37
10. Windshield washer fluid reservoir ....7-43
■■
Gasoline engine (GDI)
■■Gasoline engine (MPI)
JD eng 2.QXP 3/4/2015 11:51 AM Page 6
Page 15 of 1210
27
Your vehicle at a glance
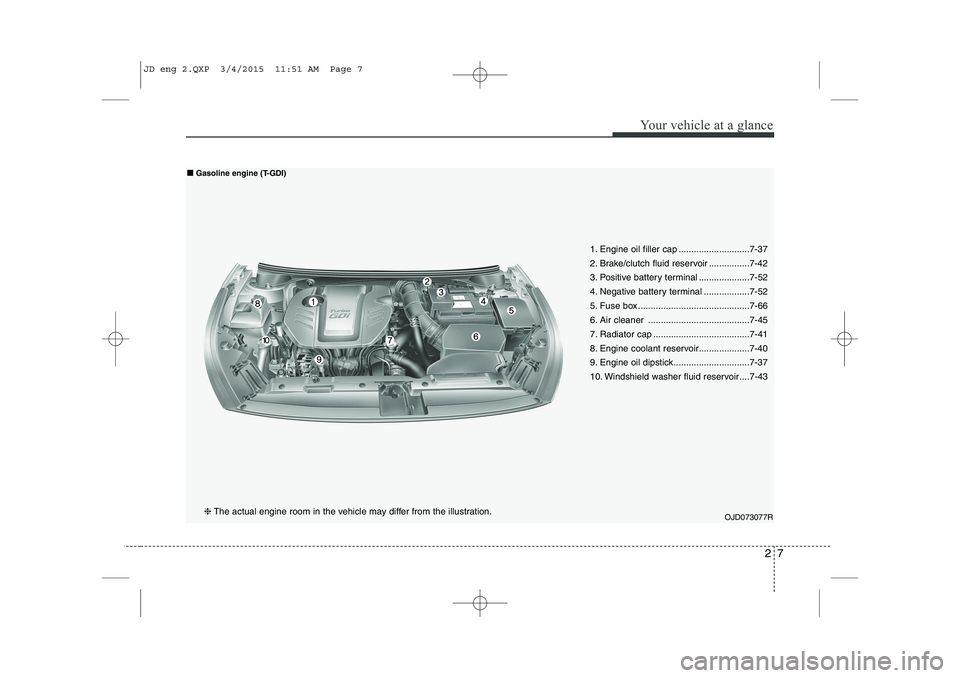
1. Engine oil filler cap ............................7-37
2. Brake/clutch fluid reservoir ................7-42
3. Positive battery terminal ....................7-52
4. Negative battery terminal ..................7-52
5. Fuse box ............................................7-66
6. Air cleaner ........................................7-45
7. Radiator cap ......................................7-41
8. Engine coolant reservoir....................7-40
9. Engine oil dipstick..............................7-37
10. Windshield washer fluid reservoir ....7-43
OJD073077R❈The actual engine room in the vehicle may differ from the illustration.
■
■
Gasoline engine (T-GDI)
JD eng 2.QXP 3/4/2015 11:51 AM Page 7
Page 16 of 1210
OJD072003
❈
The actual engine room in the vehicle may differ from the illustration.
■■
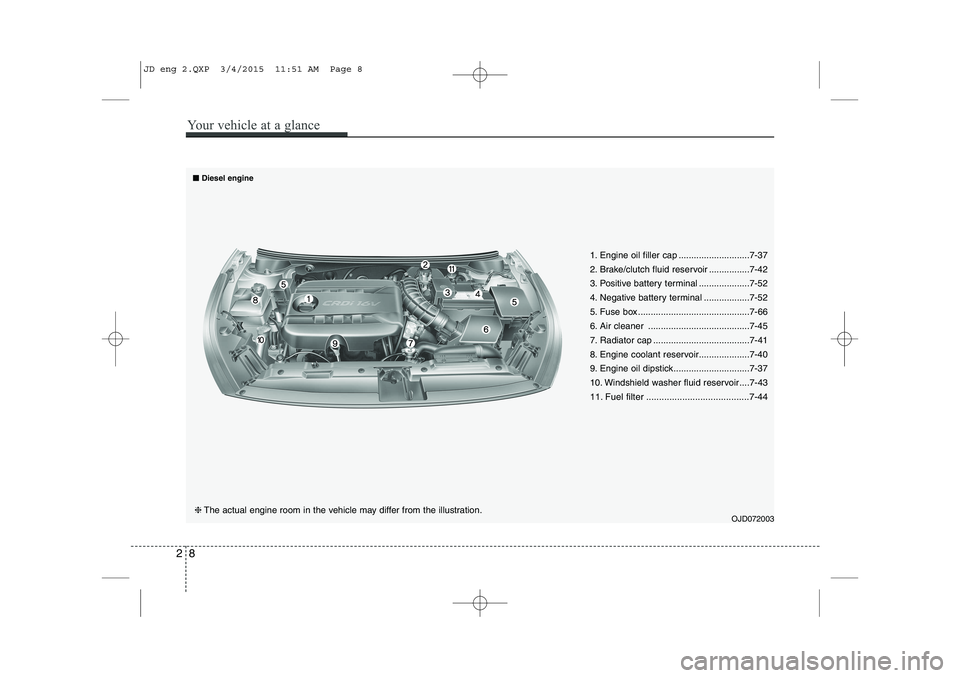
Diesel engine
28
Your vehicle at a glance
1. Engine oil filler cap ............................7-37
2. Brake/clutch fluid reservoir ................7-42
3. Positive battery terminal ....................7-52
4. Negative battery terminal ..................7-52
5. Fuse box ............................................7-66
6. Air cleaner ........................................7-45
7. Radiator cap ......................................7-41
8. Engine coolant reservoir....................7-40
9. Engine oil dipstick..............................7-37
10. Windshield washer fluid reservoir ....7-43
11. Fuel filter ........................................7-44
JD eng 2.QXP 3/4/2015 11:51 AM Page 8
Page 24 of 1210
Safety features of your vehicle
8
3
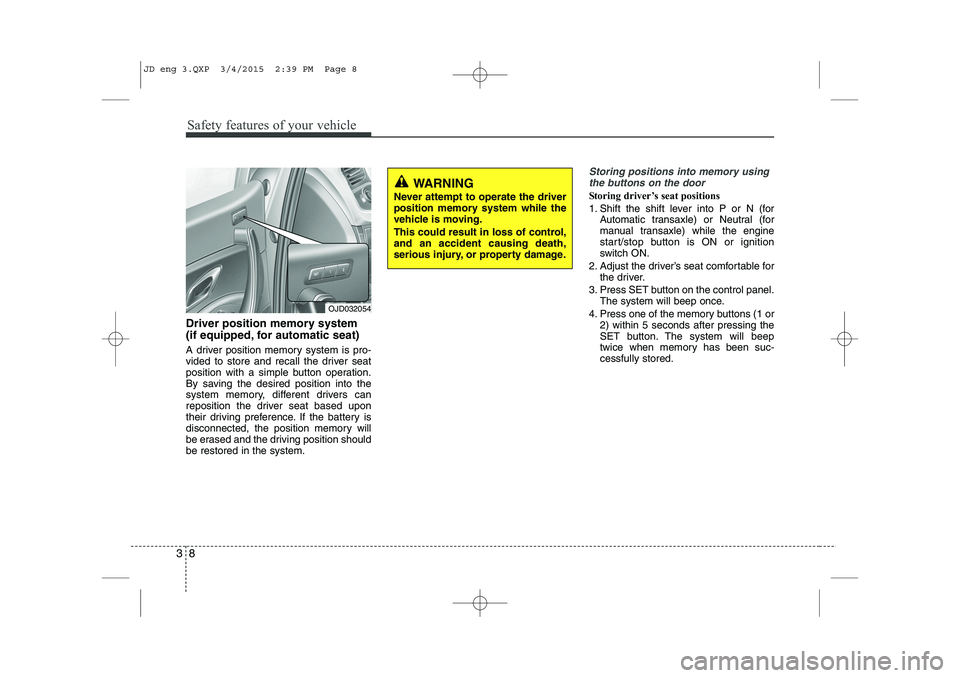
Driver position memory system
(if equipped, for automatic seat)
A driver position memory system is pro-
vided to store and recall the driver seat
position with a simple button operation.
By saving the desired position into the
system memory, different drivers can
reposition the driver seat based upon
their driving preference. If the battery is
disconnected, the position memory will
be erased and the driving position shouldbe restored in the system.
Storing positions into memory using
the buttons on the door
Storing driver’s seat positions
1. Shift the shift lever into P or N (for Automatic transaxle) or Neutral (for
manual transaxle) while the engine
start/stop button is ON or ignition
switch ON.
2. Adjust the driver’s seat comfortable for the driver.
3. Press SET button on the control panel. The system will beep once.
4. Press one of the memory buttons (1 or 2) within 5 seconds after pressing the
SET button. The system will beep
twice when memory has been suc-cessfully stored.
WARNING
Never attempt to operate the driver
position memory system while the
vehicle is moving.
This could result in loss of control, and an accident causing death,
serious injury, or property damage.
OJD032054
JD eng 3.QXP 3/4/2015 2:39 PM Page 8
Page 36 of 1210
Safety features of your vehicle
20
3
Seat belt restraint system SEAT BELTS(Continued)
Avoid wearing twisted seat belts.
A twisted belt can't do its job as
well. In a collision, it could even
cut into you. Be sure the belt web-bing is straight and not twisted.
Be careful not to damage the belt webbing or hardware. If the belt
webbing or hardware is dam-
aged, replace it.
WARNING
Seat belts are designed to bear
upon the bony structure of the
body, and should be worn low
across the front of the pelvis or the
pelvis, chest and shoulders, as
applicable; wearing the lap section
of the belt across the abdominal
area must be avoided. Seat belts should be adjusted as
firmly as possible, consistent with
comfort, to provide the protection
for which they have been designed.
A slack belt will greatly reduce the
protection afforded to the wearer.
(Continued)
WARNING
For maximum restraint system protection, the seat belts must
always be used whenever the car
is moving.
Seat belts are most effective when seatbacks are in theupright position.
Children age 12 and younger must always be properly restrained in
the rear seat. Never allow children
to ride in the front passenger seat.
If a child over 12 must be seated in
the front seat, he/she must be
properly belted and the seat
should be mo ved as far back as
possible.
Never wear the shoulder belt under your arm or behind your
back. An improperly positionedshoulder belt can cause serious
injuries in a crash. The shoulder
belt should be positioned midway
over your shoulder across your
collarbone.
(Continued)
(Continued)
Care should be taken to avoid con- tamination of the webbing with pol-
ishes, oils and chemicals, and par-
ticularly battery acid.
Cleaning may safely be carried out
using mild soap and water. The beltshould be replaced if webbing
becomes frayed, contaminated or
damaged. It is essential to replace
the entire assembly after it has
been worn in a severe impact even
if damage to the assembly is not
obvious. Belts should not be worn
with straps twisted. Each belt
assembly must only be used by one
occupant; it is dangerous to put a
belt around a child being carried onthe occupant's lap.
JD eng 3.QXP 3/4/2015 2:40 PM Page 20
Page 65 of 1210
349
Safety features of your vehicle
WARNING
If an air bag deploys, there may be a loud noise followed by a fine
dust released in the vehicle.These conditions are normal and
are not hazardous - the air bags
are packed in this fine powder.
The dust generated during air
bag deployment may cause skin
or eye irritation as well as aggra-
vate asthma for some persons.
Always wash all exposed skin
areas thoroughly with lukewarmwater and a mild soap after an
accident in which the air bags
were deployed.
(Continued)(Continued)
The SRS can function only whenthe ignition key is in the ON posi-
tion. If the SRS air bag warning
light does not illuminate, or con-
tinuously remains on after illumi-
nating for about 6 seconds when
the ignition key is turned to the
ON position, or after the engine is
started, comes on while driving,
the SRS is not working properly.
If this occurs, we recommend
that the system be inspected by
an authorized Kia dealer.
Before you replace a fuse or dis- connect a battery terminal, turn
the ignition switch to the LOCK
position and remove the ignition
key. Never remove or replace the
air bag related fuse(s) when the
ignition switch is in the ON posi-
tion. Failure to heed this warning
will cause the SRS air bag warn-
ing light to illuminate.
WARNING
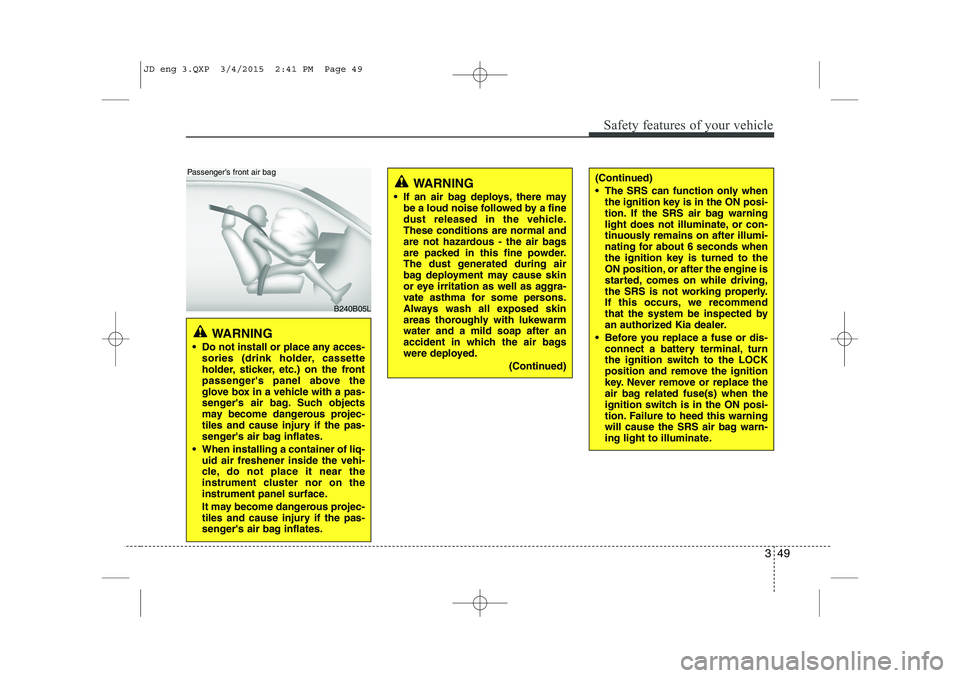
Do not install or place any acces- sories (drink holder, cassette
holder, sticker, etc.) on the front
passenger's panel above the
glove box in a vehicle with a pas-
senger's air bag. Such objects
may become dangerous projec-
tiles and cause injury if the pas-
senger's air bag inflates.
When installing a container of liq- uid air freshener inside the vehi-
cle, do not place it near the
instrument cluster nor on the
instrument panel surface.
It may become dangerous projec-
tiles and cause injury if the pas-
senger's air bag inflates.
B240B05L
Passenger’s front air bag
JD eng 3.QXP 3/4/2015 2:41 PM Page 49
Page 82 of 1210
Features of your vehicle
Keys . . . . . . . . . . . . . . . . . . . . . . . . . . . . . . . . . . . . . 4-4• Record your key number . . . . . . . . . . . . . . . . . . . . . 4-4
• Key operations . . . . . . . . . . . . . . . . . . . . . . . . . . . . . . 4-4
• Immobilizer system . . . . . . . . . . . . . . . . . . . . . . . . . . 4-4
Remote keyless entry . . . . . . . . . . . . . . . . . . . . . . . 4-6 • Remote keyless entry system operations . . . . . . . . . 4-6
• Transmitter precautions . . . . . . . . . . . . . . . . . . . . . . 4-8
• Battery replacement . . . . . . . . . . . . . . . . . . . . . . . . . 4-9
Smart key . . . . . . . . . . . . . . . . . . . . . . . . . . . . . . . . 4-11 • Smart key function . . . . . . . . . . . . . . . . . . . . . . . . . . 4-11
• Smart key precautions. . . . . . . . . . . . . . . . . . . . . . . . 4-13
• Door lock/unlock in an emergency situation . . . . . . 4-13
Theft-alarm system . . . . . . . . . . . . . . . . . . . . . . . . 4-14 • Armed stage . . . . . . . . . . . . . . . . . . . . . . . . . . . . . . . . 4-14
• Theft-alarm stage . . . . . . . . . . . . . . . . . . . . . . . . . . . . 4-15
• Disarmed stage . . . . . . . . . . . . . . . . . . . . . . . . . . . . . . 4-16
Door locks . . . . . . . . . . . . . . . . . . . . . . . . . . . . . . . . 4-17 • From outside. . . . . . . . . . . . . . . . . . . . . . . . . . . . . . . . 4-17
• From inside . . . . . . . . . . . . . . . . . . . . . . . . . . . . . . . . . 4-18
• Deadlocks . . . . . . . . . . . . . . . . . . . . . . . . . . . . . . . . . . 4-20
• Door lock/unlock features . . . . . . . . . . . . . . . . . . . . . 4-20
• Child-protector rear door lock . . . . . . . . . . . . . . . . . 4-21
Tailgate . . . . . . . . . . . . . . . . . . . . . . . . . . . . . . . . . . 4-22 • Opening the tailgate. . . . . . . . . . . . . . . . . . . . . . . . . . 4-22
• Closing the tailgate . . . . . . . . . . . . . . . . . . . . . . . . . . 4-22
• Emergency tailgate safety release . . . . . . . . . . . . . . 4-23
Windows . . . . . . . . . . . . . . . . . . . . . . . . . . . . . . . . . 4-24 • Power windows. . . . . . . . . . . . . . . . . . . . . . . . . . . . . . 4-25
• Manual windows . . . . . . . . . . . . . . . . . . . . . . . . . . . . 4-27 Hood . . . . . . . . . . . . . . . . . . . . . . . . . . . . . . . . . . . . 4-28
• Opening the hood . . . . . . . . . . . . . . . . . . . . . . . . . . . . 4-28
• Closing the hood. . . . . . . . . . . . . . . . . . . . . . . . . . . . . 4-29
Fuel filler lid . . . . . . . . . . . . . . . . . . . . . . . . . . . . . . 4-30 • Opening the fuel filler lid . . . . . . . . . . . . . . . . . . . . . 4-30
• Closing the fuel filler lid . . . . . . . . . . . . . . . . . . . . . . 4-30
Panorama sunroof . . . . . . . . . . . . . . . . . . . . . . . . . 4-33 • Sunroof open warning . . . . . . . . . . . . . . . . . . . . . . . . 4-33
• Sunshade . . . . . . . . . . . . . . . . . . . . . . . . . . . . . . . . . . . 4-34
• Sliding the sunroof . . . . . . . . . . . . . . . . . . . . . . . . . . . 4-34
• Tilting the sunroof . . . . . . . . . . . . . . . . . . . . . . . . . . . 4-34
• Closing the sunroof . . . . . . . . . . . . . . . . . . . . . . . . . . 4-35
• Resetting the sunroof . . . . . . . . . . . . . . . . . . . . . . . . . 4-36
Steering wheel . . . . . . . . . . . . . . . . . . . . . . . . . . . . 4-37 • Electronic power steering . . . . . . . . . . . . . . . . . . . . . 4-37
• Tilt and telescopic steering . . . . . . . . . . . . . . . . . . . . 4-38
• Heated steering wheel . . . . . . . . . . . . . . . . . . . . . . . . 4-38
• Horn . . . . . . . . . . . . . . . . . . . . . . . . . . . . . . . . . . . . . . 4-39
• Flex steering wheel. . . . . . . . . . . . . . . . . . . . . . . . . . . 4-40
Mirrors . . . . . . . . . . . . . . . . . . . . . . . . . . . . . . . . . . 4-42 • Inside rearview mirror . . . . . . . . . . . . . . . . . . . . . . . 4-42
• Outside rearview mirror . . . . . . . . . . . . . . . . . . . . . . 4-43
Instrument cluster (Normal vision) . . . . . . . . . . . 4-46 • Instrument panel illumination . . . . . . . . . . . . . . . . . 4-47
• Gauges . . . . . . . . . . . . . . . . . . . . . . . . . . . . . . . . . . . . . 4-47
• Manual transaxle shift indicator . . . . . . . . . . . . . . . 4-49
• Automatic transaxle shift position indicator . . . . . . 4-49
• Double clutch transmission shift indicator . . . . . . . 4-50
• Speed limiter indicator . . . . . . . . . . . . . . . . . . . . . . . 4-51
4
JD eng 4a.QXP 3/4/2015 4:21 PM Page 1
Page 83 of 1210
• Odometer . . . . . . . . . . . . . . . . . . . . . . . . . . . . . . . . . . 4-51
• Trip computer . . . . . . . . . . . . . . . . . . . . . . . . . . . . . . 4-51
• LCD display information . . . . . . . . . . . . . . . . . . . . . 4-73
• Warnings and indicators . . . . . . . . . . . . . . . . . . . . . . 4-79
Instrument cluster (Super vision) . . . . . . . . . . . . 4-59 • Instrument panel illumination . . . . . . . . . . . . . . . . . 4-61
• Cluster display mode conversion . . . . . . . . . . . . . . . 4-61
• Gauges . . . . . . . . . . . . . . . . . . . . . . . . . . . . . . . . . . . . . 4-61
• Manual transaxle shift indicator . . . . . . . . . . . . . . . 4-64
• Automatic transaxle shift position indicator . . . . . . 4-65
• Double clutch transmission shift indicator . . . . . . . 4-65
• Speed limiter indicator . . . . . . . . . . . . . . . . . . . . . . . 4-66
• Odometer . . . . . . . . . . . . . . . . . . . . . . . . . . . . . . . . . . 4-66
• Trip computer . . . . . . . . . . . . . . . . . . . . . . . . . . . . . . 4-67
• LCD display information . . . . . . . . . . . . . . . . . . . . . 4-73
• Warnings and indicators . . . . . . . . . . . . . . . . . . . . . . 4-79
LCD display warnings and indicators (instrument panel display) . . . . . . . . . . . . . . . . . 4-90
Rear parking assist system . . . . . . . . . . . . . . . . . . 4-92 • Operation . . . . . . . . . . . . . . . . . . . . . . . . . . . . . . . . . . 4-92
• Non-operational conditions . . . . . . . . . . . . . . . . . . . . 4-94
• Precautions . . . . . . . . . . . . . . . . . . . . . . . . . . . . . . . . . 4-94
• Self-diagnosis . . . . . . . . . . . . . . . . . . . . . . . . . . . . . . . 4-95
Parking assist system. . . . . . . . . . . . . . . . . . . . . . . 4-96 • Operation . . . . . . . . . . . . . . . . . . . . . . . . . . . . . . . . . . 4-96
• Non-operational conditions . . . . . . . . . . . . . . . . . . . . 4-98
• Self-diagnosis . . . . . . . . . . . . . . . . . . . . . . . . . . . . . . . 4-99
Smart Parking Assist System(SPAS) . . . . . . . . . . 4-100 • Operating condition . . . . . . . . . . . . . . . . . . . . . . . . . . 4-101 • Non-operating condition . . . . . . . . . . . . . . . . . . . . . . 4-101
• How the system works . . . . . . . . . . . . . . . . . . . . . . . . 4-104
• Additional instructions(messages) . . . . . . . . . . . . . . 4-109
• System malfunction . . . . . . . . . . . . . . . . . . . . . . . . . . 4-109
Rearview camera . . . . . . . . . . . . . . . . . . . . . . . . . . 4-110
Hazard warning flasher . . . . . . . . . . . . . . . . . . . . 4-110
Lighting. . . . . . . . . . . . . . . . . . . . . . . . . . . . . . . . . . 4-111 • Battery saver function . . . . . . . . . . . . . . . . . . . . . . . . 4-111
• Headlamp delay function . . . . . . . . . . . . . . . . . . . . . 4-111
• Headlight (Headlamp) welcome function . . . . . . . . 4-111
• Static bending light . . . . . . . . . . . . . . . . . . . . . . . . . . 4-112
• Lighting control . . . . . . . . . . . . . . . . . . . . . . . . . . . . . 4-112
• High - beam operation. . . . . . . . . . . . . . . . . . . . . . . . 4-114
• Turn signals and lane change signals . . . . . . . . . . . . 4-115
• Front fog light . . . . . . . . . . . . . . . . . . . . . . . . . . . . . . 4-116
• Rear fog light . . . . . . . . . . . . . . . . . . . . . . . . . . . . . . . 4-116
• Daytime running light . . . . . . . . . . . . . . . . . . . . . . . . 4-116
• Headlight leveling device. . . . . . . . . . . . . . . . . . . . . . 4-117
• Adaptive Front Lighting System (AFLS) . . . . . . . . 4-118
Wipers and washers . . . . . . . . . . . . . . . . . . . . . . . 4-119 • Windshield wipers (front) . . . . . . . . . . . . . . . . . . . . . 4-119
• Windshield washers (front) . . . . . . . . . . . . . . . . . . . . 4-121
• Rear window wiper and washer switch . . . . . . . . . . 4-122
Interior light . . . . . . . . . . . . . . . . . . . . . . . . . . . . . . 4-123 • Interior lamp AUTO cut . . . . . . . . . . . . . . . . . . . . . . 4-123
• Map lamp . . . . . . . . . . . . . . . . . . . . . . . . . . . . . . . . . . 4-123
• Room lamp . . . . . . . . . . . . . . . . . . . . . . . . . . . . . . . . . 4-124
• Vanity mirror lamp . . . . . . . . . . . . . . . . . . . . . . . . . . 4-124
• Luggage room lamp . . . . . . . . . . . . . . . . . . . . . . . . . . 4-125
4
JD eng 4a.QXP 3/4/2015 4:21 PM Page 2
Page 89 of 1210

Features of your vehicle
8
4
Transmitter precautions
✽NOTICE
The transmitter will not work if any of
following occur:
• The ignition key is in ignition switch.
• You exceed the operating distance limit (about 10 m [30 feet]).
• The battery in the transmitter is
weak.
• Other vehicles or objects may be
blocking the signal.
• The weather is extremely cold.
• The transmitter is close to a radio
transmitter such as a radio station or
an airport which can interfere with
normal operation of the transmitter.
When the transmitter does not work cor-
rectly, open and close the door with the
ignition key. If you have a problem with
the transmitter, we recommend that you
contact an authorized Kia dealer. (Continued)(Continued)
• If the transmitter is in close proximity
to your cell phone or smart phone, the
signal from the transmitter could be
blocked by normal operation of your
cell phone or smart phone. This is
especially important when the phone
is active such as making call, receiving
calls, text messaging, and/or sending/
receiving emails. Avoid placing the
transmitter and your cell phone or
smart phone in the same pants or
jacket pocket and maintain adequate
distance between the two devices. CAUTION
Changes or modifications not
expressly approved by the partyresponsible for compliance couldvoid the user’s authority to operate the equipment. If the keyless entry
system is inoperative due tochanges or modifications not expressly approved by the party
responsible for compliance, it will
not be covered by your manufactur-er’s vehicle warranty.
CAUTION
• Keep the transmitter away from
water or any liquid. If the keylessentry system is inoperative due to exposure to water or liquids, itwill not be covered by your manu-
facturer vehicle warranty.
• Keep the transmitter away from electromagnetic materials thatblocks electromagnetic waves to
the key surface.
JD eng 4a.QXP 3/4/2015 4:21 PM Page 8
Page 90 of 1210
49
Features of your vehicle
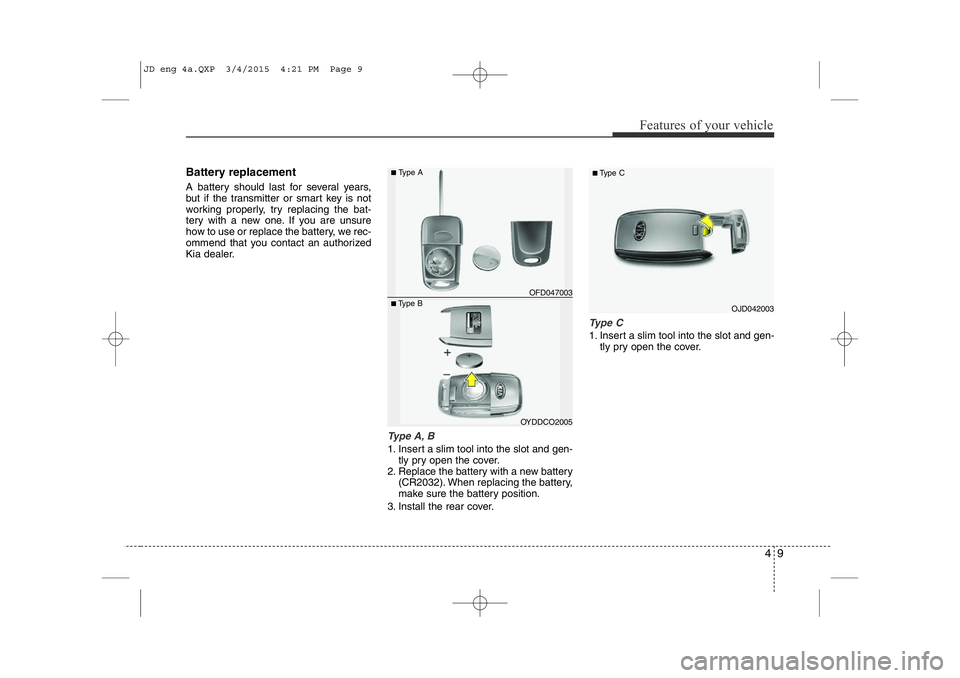
Battery replacement
A battery should last for several years,
but if the transmitter or smart key is not
working properly, try replacing the bat-
tery with a new one. If you are unsure
how to use or replace the battery, we rec-
ommend that you contact an authorized
Kia dealer.
Type A, B
1. Insert a slim tool into the slot and gen-tly pry open the cover.
2. Replace the battery with a new battery (CR2032). When replacing the battery,
make sure the battery position.
3. Install the rear cover.
Type C
1. Insert a slim tool into the slot and gen- tly pry open the cover.
OJD042003
■
Type C■Type B OFD047003
■
Type A
OYDDCO2005
JD eng 4a.QXP 3/4/2015 4:21 PM Page 9