KIA CEED 2016 Owners Manual
Manufacturer: KIA, Model Year: 2016, Model line: CEED, Model: KIA CEED 2016Pages: 643, PDF Size: 38.19 MB
Page 251 of 643
Features of your vehicle
168
4
OJD042140
OJD042154
■ Front
OJD042155
OJD042243
■Rear (if equipped)
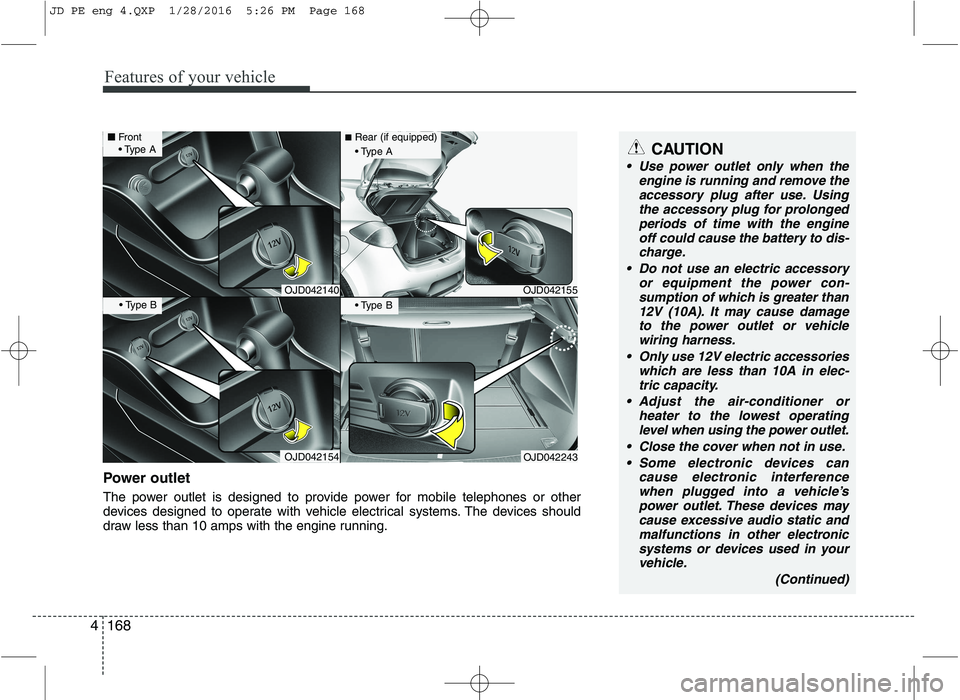
Power outlet
The power outlet is designed to provide power for mobile telephones or other
devices designed to operate with vehicle electrical systems. The devices should
draw less than 10 amps with the engine running.
CAUTION
Use power outlet only when the
engine is running and remove theaccessory plug after use. Usingthe accessory plug for prolonged
periods of time with the engineoff could cause the battery to dis- charge.
Do not use an electric accessory or equipment the power con-
sumption of which is greater than12V (10A). It may cause damage to the power outlet or vehiclewiring harness.
Only use 12V electric accessories which are less than 10A in elec-tric capacity.
Adjust the air-conditioner or heater to the lowest operating
level when using the power outlet.
Close the cover when not in use. Some electronic devices can cause electronic interferencewhen plugged into a vehicle’s power outlet. These devices may
cause excessive audio static and malfunctions in other electronicsystems or devices used in your vehicle.
(Continued)
JD PE eng 4.QXP 1/28/2016 5:26 PM Page 168
Page 252 of 643
4169
Features of your vehicle
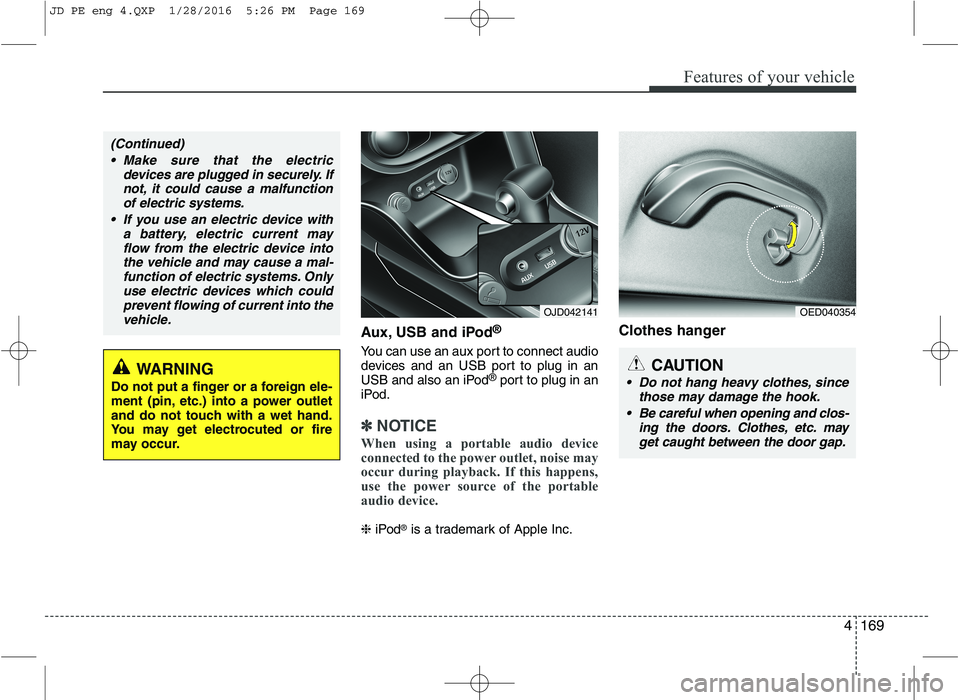
Aux, USB and iPod®
You can use an aux port to connect audio
devices and an USB port to plug in an
USB and also an iPod ®
port to plug in an
iPod.
✽✽ NOTICE
When using a portable audio device
connected to the power outlet, noise may
occur during playback. If this happens,
use the power source of the portable
audio device.
❈ iPod ®
is a trademark of Apple Inc. Clothes hanger
OJD042141
WARNING
Do not put a finger or a foreign ele-
ment (pin, etc.) into a power outlet
and do not touch with a wet hand.
You may get electrocuted or fire
may occur.
(Continued)
Make sure that the electric devices are plugged in securely. If
not, it could cause a malfunctionof electric systems.
If you use an electric device with a battery, electric current mayflow from the electric device into
the vehicle and may cause a mal-function of electric systems. Only use electric devices which could
prevent flowing of current into thevehicle.
OED040354
CAUTION
Do not hang heavy clothes, since those may damage the hook.
Be careful when opening and clos- ing the doors. Clothes, etc. mayget caught between the door gap.
JD PE eng 4.QXP 1/28/2016 5:26 PM Page 169
Page 253 of 643
Features of your vehicle
170
4
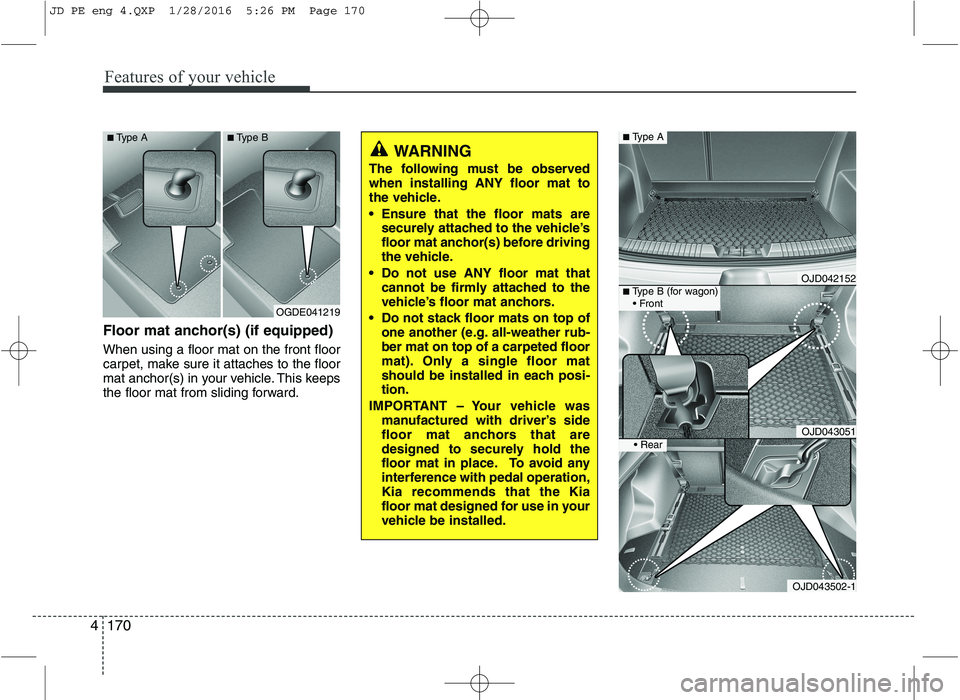
Floor mat anchor(s) (if equipped) When using a floor mat on the front floor
carpet, make sure it attaches to the floor
mat anchor(s) in your vehicle. This keeps
the floor mat from sliding forward.
WARNING
The following must be observed when installing ANY floor mat to
the vehicle.
Ensure that the floor mats are securely attached to the vehicle’s
floor mat anchor(s) before driving
the vehicle.
Do not use ANY floor mat that cannot be firmly attached to the
vehicle’s floor mat anchors.
Do not stack floor mats on top of one another (e.g. all-weather rub-ber mat on top of a carpeted floor
mat). Only a single floor mat
should be installed in each posi-tion.
IMPORTANT – Your vehicle was manufactured with driver’s side
floor mat anchors that are
designed to securely hold the
floor mat in place. To avoid any
interference with pedal operation,Kia recommends that the Kia
floor mat designed for use in your
vehicle be installed.
OGDE041219
■
Type A ■Type B
OJD042152
OJD043051
■Type A
■Type B (for wagon)
OJD043502-1
JD PE eng 4.QXP 1/28/2016 5:26 PM Page 170
Page 254 of 643
4171
Features of your vehicle
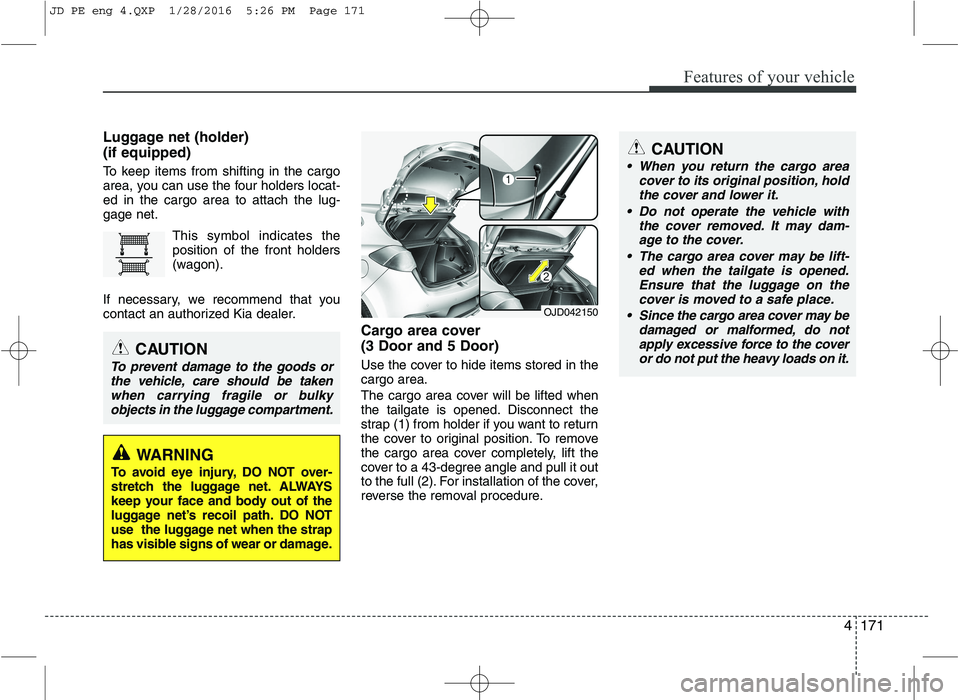
Luggage net (holder) (if equipped)
To keep items from shifting in the cargo
area, you can use the four holders locat-ed in the cargo area to attach the lug-gage net.This symbol indicates theposition of the front holders
(wagon).
If necessary, we recommend that you
contact an authorized Kia dealer. Cargo area cover (3 Door and 5 Door)
Use the cover to hide items stored in the cargo area.
The cargo area cover will be lifted when
the tailgate is opened. Disconnect the
strap (1) from holder if you want to return
the cover to original position. To remove
the cargo area cover completely, lift the
cover to a 43-degree angle and pull it out
to the full (2). For installation of the cover,
reverse the removal procedure.
CAUTION
To prevent damage to the goods orthe vehicle, care should be takenwhen carrying fragile or bulky
objects in the luggage compartment.
WARNING
To avoid eye injury, DO NOT over-
stretch the luggage net. ALWAYS
keep your face and body out of the
luggage net’s recoil path. DO NOT
use the luggage net when the strap
has visible signs of wear or damage.
OJD042150
CAUTION
When you return the cargo area cover to its original position, holdthe cover and lower it.
Do not operate the vehicle with the cover removed. It may dam-
age to the cover.
The cargo area cover may be lift- ed when the tailgate is opened.Ensure that the luggage on the cover is moved to a safe place.
Since the cargo area cover may be damaged or malformed, do notapply excessive force to the coveror do not put the heavy loads on it.
JD PE eng 4.QXP 1/28/2016 5:26 PM Page 171
Page 255 of 643
Features of your vehicle
172
4
Barrier net (wagon) (if equipped)
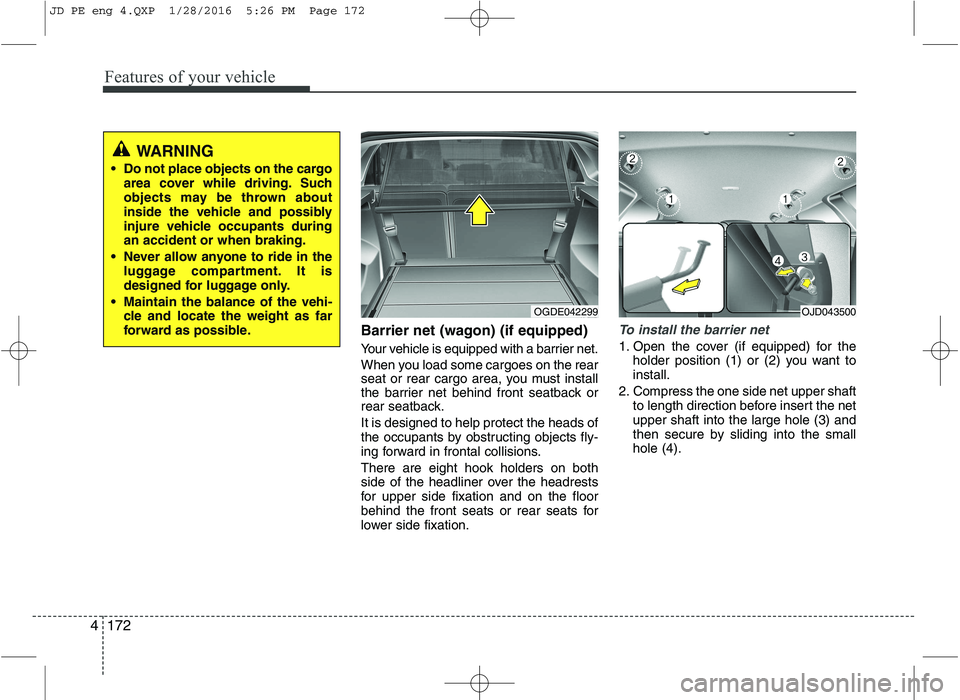
Your vehicle is equipped with a barrier net.
When you load some cargoes on the rear
seat or rear cargo area, you must install
the barrier net behind front seatback or
rear seatback. It is designed to help protect the heads of
the occupants by obstructing objects fly-
ing forward in frontal collisions. There are eight hook holders on both
side of the headliner over the headrests
for upper side fixation and on the floor
behind the front seats or rear seats for
lower side fixation.To install the barrier net
1. Open the cover (if equipped) for the
holder position (1) or (2) you want to install.
2. Compress the one side net upper shaft to length direction before insert the netupper shaft into the large hole (3) and
then secure by sliding into the smallhole (4).
WARNING
Do not place objects on the cargo area cover while driving. Such
objects may be thrown about
inside the vehicle and possibly
injure vehicle occupants duringan accident or when braking.
Never allow anyone to ride in the luggage compartment. It is
designed for luggage only.
Maintain the balance of the vehi- cle and locate the weight as far
forward as possible.
OGDE042299OJD043500
JD PE eng 4.QXP 1/28/2016 5:26 PM Page 172
Page 256 of 643
4173
Features of your vehicle
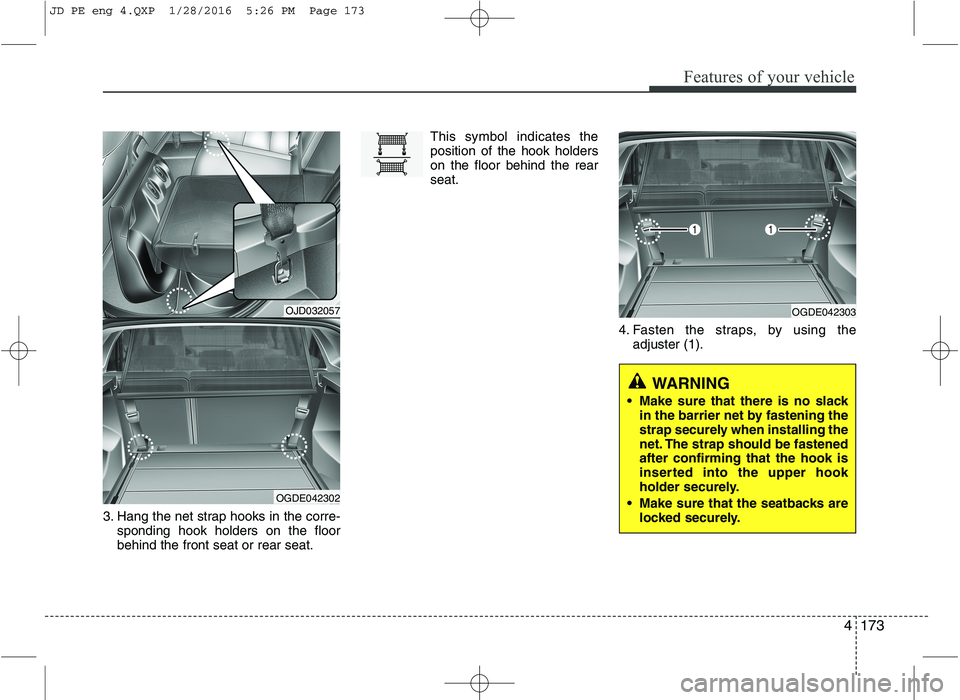
3. Hang the net strap hooks in the corre-sponding hook holders on the floor behind the front seat or rear seat. This symbol indicates theposition of the hook holderson the floor behind the rearseat.
4. Fasten the straps, by using theadjuster (1).
OJD032057
OGDE042302
OGDE042303
WARNING
Make sure that there is no slack in the barrier net by fastening the
strap securely when installing the
net. The strap should be fastenedafter confirming that the hook is
inserted into the upper hook
holder securely.
Make sure that the seatbacks are locked securely.
JD PE eng 4.QXP 1/28/2016 5:26 PM Page 173
Page 257 of 643
Features of your vehicle
174
4
To remove the barrier net
1. Loosen the straps by using the strap
adjusters and remove the strap hooks
from the hook holders.
2. Remove the net upper shaft by pulling it through the large holes.
3. Remove the barrier net.
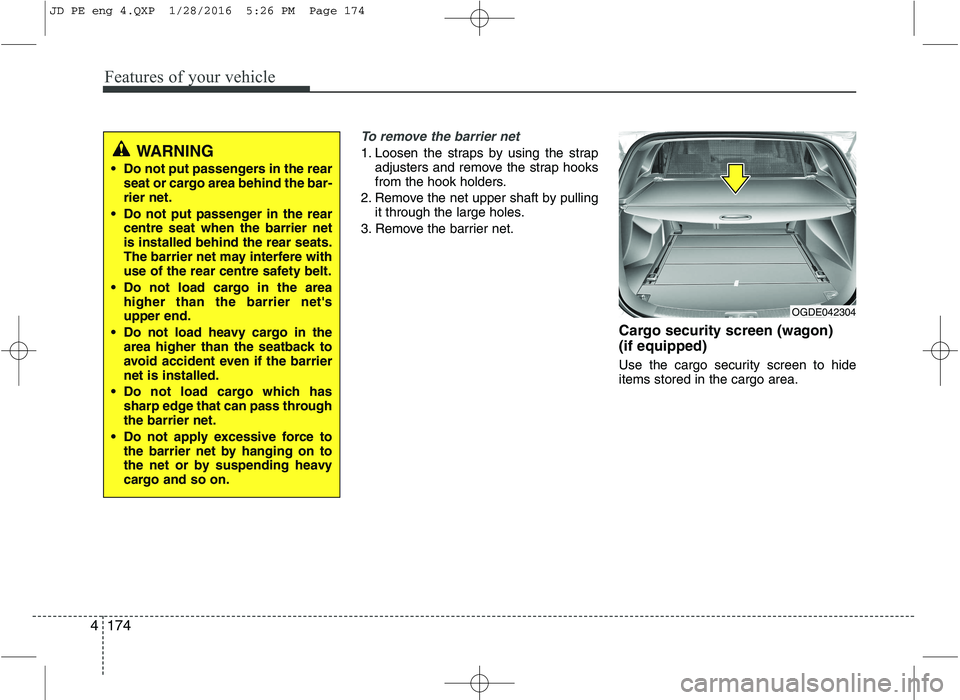
Cargo security screen (wagon) (if equipped)
Use the cargo security screen to hide items stored in the cargo area.WARNING
Do not put passengers in the rear seat or cargo area behind the bar- rier net.
Do not put passenger in the rear centre seat when the barrier netis installed behind the rear seats.
The barrier net may interfere with
use of the rear centre safety belt.
Do not load cargo in the area higher than the barrier net'supper end.
Do not load heavy cargo in the area higher than the seatback to
avoid accident even if the barriernet is installed.
Do not load cargo which has sharp edge that can pass throughthe barrier net.
Do not apply excessive force to the barrier net by hanging on to
the net or by suspending heavy
cargo and so on.
OGDE042304
JD PE eng 4.QXP 1/28/2016 5:26 PM Page 174
Page 258 of 643
4175
Features of your vehicle
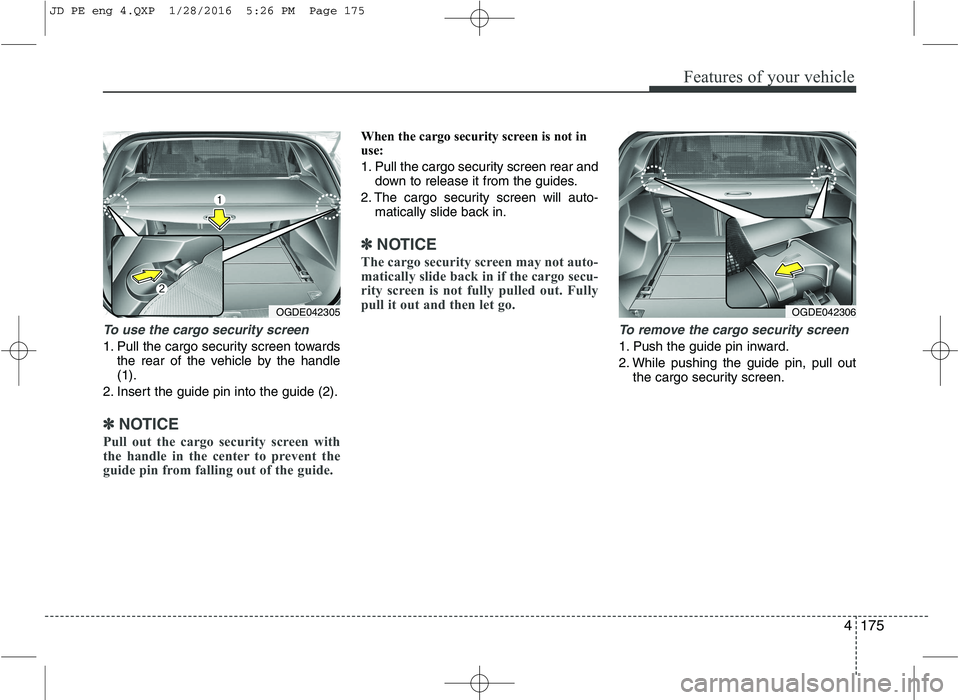
To use the cargo security screen
1. Pull the cargo security screen towardsthe rear of the vehicle by the handle (1).
2. Insert the guide pin into the guide (2).
✽✽ NOTICE
Pull out the cargo security screen with
the handle in the center to prevent the
guide pin from falling out of the guide.
When the cargo security screen is not in
use:
1. Pull the cargo security screen rear and down to release it from the guides.
2. The cargo security screen will auto- matically slide back in.
✽✽ NOTICE
The cargo security screen may not auto-
matically slide back in if the cargo secu-
rity screen is not fully pulled out. Fully
pull it out and then let go.
To remove the cargo security screen
1. Push the guide pin inward.
2. While pushing the guide pin, pull out the cargo security screen.
OGDE042305OGDE042306
JD PE eng 4.QXP 1/28/2016 5:26 PM Page 175
Page 259 of 643
Features of your vehicle
176
4
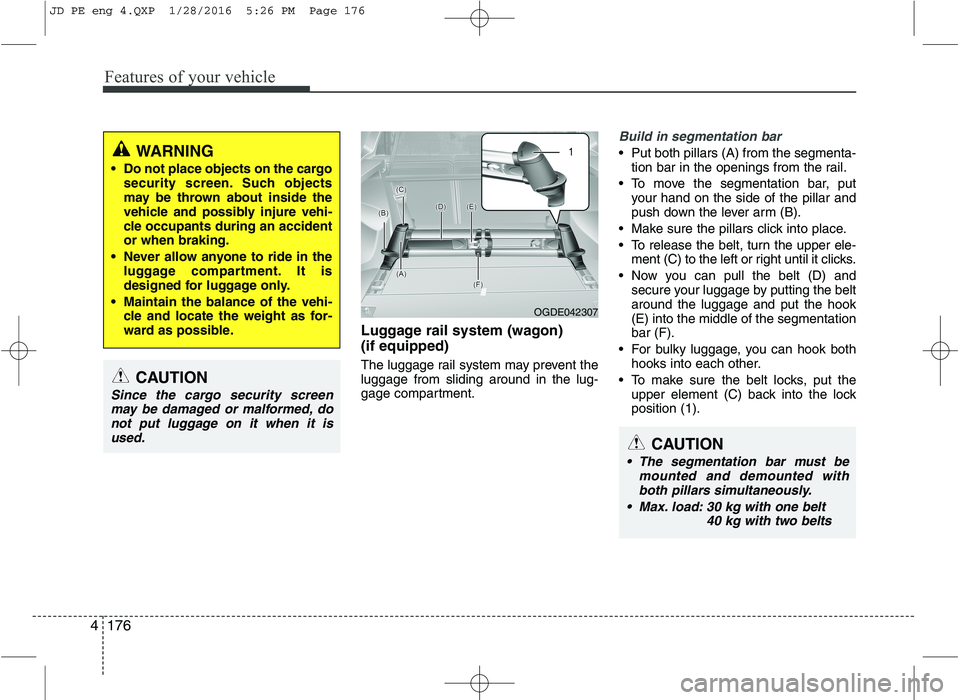
Luggage rail system (wagon) (if equipped)
The luggage rail system may prevent the luggage from sliding around in the lug-
gage compartment.
Build in segmentation bar
Put both pillars (A) from the segmenta-
tion bar in the openings from the rail.
To move the segmentation bar, put your hand on the side of the pillar and
push down the lever arm (B).
Make sure the pillars click into place.
To release the belt, turn the upper ele- ment (C) to the left or right until it clicks.
Now you can pull the belt (D) and secure your luggage by putting the belt around the luggage and put the hook(E) into the middle of the segmentationbar (F).
For bulky luggage, you can hook both hooks into each other.
To make sure the belt locks, put the upper element (C) back into the lockposition (1).WARNING
Do not place objects on the cargo security screen. Such objects
may be thrown about inside the
vehicle and possibly injure vehi-
cle occupants during an accidentor when braking.
Never allow anyone to ride in the luggage compartment. It is
designed for luggage only.
Maintain the balance of the vehi- cle and locate the weight as for-
ward as possible.
CAUTION
Since the cargo security screen
may be damaged or malformed, donot put luggage on it when it is used.
OGDE042307
CAUTION
The segmentation bar must be mounted and demounted withboth pillars simultaneously.
Max. load: 30 kg with one belt 40 kg with two belts
JD PE eng 4.QXP 1/28/2016 5:26 PM Page 176
Page 260 of 643
4177
Features of your vehicle
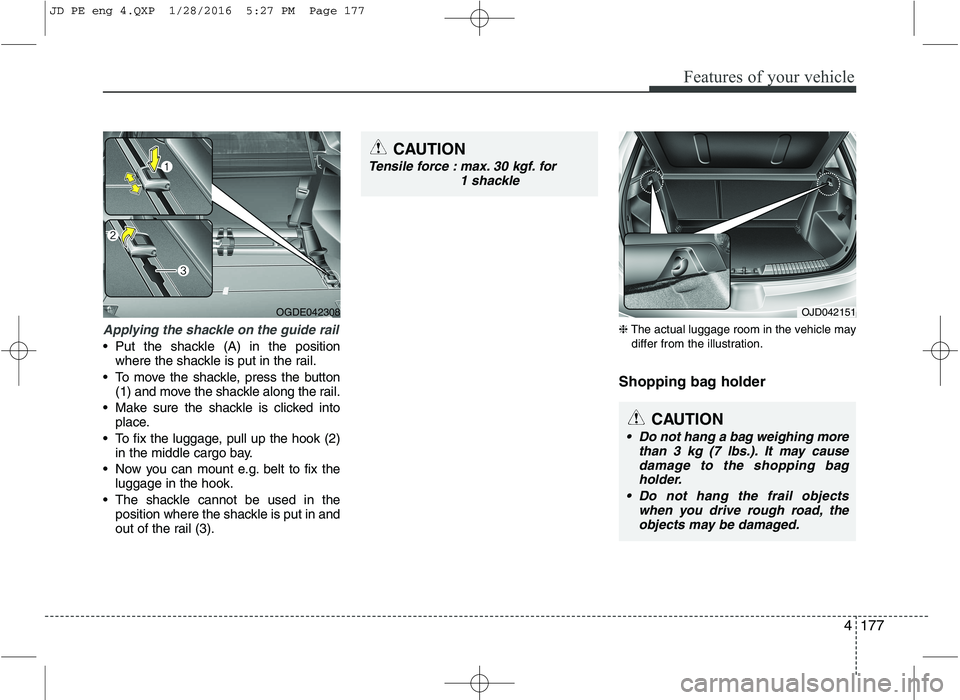
Applying the shackle on the guide rail
Put the shackle (A) in the positionwhere the shackle is put in the rail.
To move the shackle, press the button (1) and move the shackle along the rail.
Make sure the shackle is clicked into place.
To fix the luggage, pull up the hook (2) in the middle cargo bay.
Now you can mount e.g. belt to fix the luggage in the hook.
The shackle cannot be used in the position where the shackle is put in and
out of the rail (3). ❈
The actual luggage room in the vehicle may
differ from the illustration.
Shopping bag holder
OGDE042308
CAUTION
Do not hang a bag weighing more than 3 kg (7 lbs.). It may causedamage to the shopping bag holder.
Do not hang the frail objects when you drive rough road, the
objects may be damaged.
OJD042151
CAUTION
Tensile force : max. 30 kgf. for 1 shackle
JD PE eng 4.QXP 1/28/2016 5:27 PM Page 177