clock KIA CEED 2016 Owners Manual
[x] Cancel search | Manufacturer: KIA, Model Year: 2016, Model line: CEED, Model: KIA CEED 2016Pages: 643, PDF Size: 38.19 MB
Page 110 of 643

427
Features of your vehicle
Manual windows
(for 5 Door and wagon) (if equipped)
To raise or lower the window, turn the
window regulator handle clockwise or
counterclockwise.
CAUTION
To prevent possible damage to thepower window system, do not openor close two windows or more at the same time. This will also ensure
the longevity of the fuse.
Never try to operate the main switch on the driver's door andthe individual door windowswitch in opposing directions at
the same time. If this is done, the window will stop and cannot beopened or closed.WARNING - Windows
NEVER leave the keys in your vehicle with unsupervised chil- dren when the engine is running.
NEVER leave any child unattend- ed in the vehicle. Even very
young children may inadvertently
cause the vehicle to move, entan-
gle themselves in the windows,or otherwise injure themselves or
others.
Always double check to make sure all arms, hands, head and other
obstructions are safely out of the
way before closing a window.
Do not allow children to play with the power windows. Keep the dri-
ver’s door power window lock
switch in the LOCK position
(pressed). Serious injury can
result from unintentional window
operation by the child.
Do not extend face or arms out- side the window while driving.
OED036088
WARNING
When opening or closing the win-
dows, make sure your passenger's
arms, hands and body are safely
out of the way.
JD PE eng 4.QXP 1/28/2016 5:13 PM Page 27
Page 113 of 643

Features of your vehicle
30
4
Opening the fuel filler lid
1. To open the lid, press the center edge
of the lid when all doors are unlocked.
✽✽ NOTICE
The lid will open and close only when all
doors are unlocked.
2. Fully open the lid (1).
3. To open the cap, turn it counterclock- wise (2).
4. Refuel as needed.
✽✽ NOTICE
If the fuel-filler lid does not open because
ice has formed around it, tap lightly or
push on the lid to break the ice and
release the lid. Do not pry on the lid. If
necessary, spray around the lid with an
approved de-icer fluid (do not use radia-
tor anti-freeze) or move the vehicle to a
warm place and allow the ice to melt.
Closing the fuel filler lid
1. To install the cap, turn it clockwise until it “clicks”. This indicates that the cap is securely tightened.
2. To close the lid, press the edge of the lid. Make sure it is securely closed.
FUEL FILLER LID
OJD042025OJD042026
JD PE eng 4.QXP 1/28/2016 5:13 PM Page 30
Page 174 of 643
491
Features of your vehicle
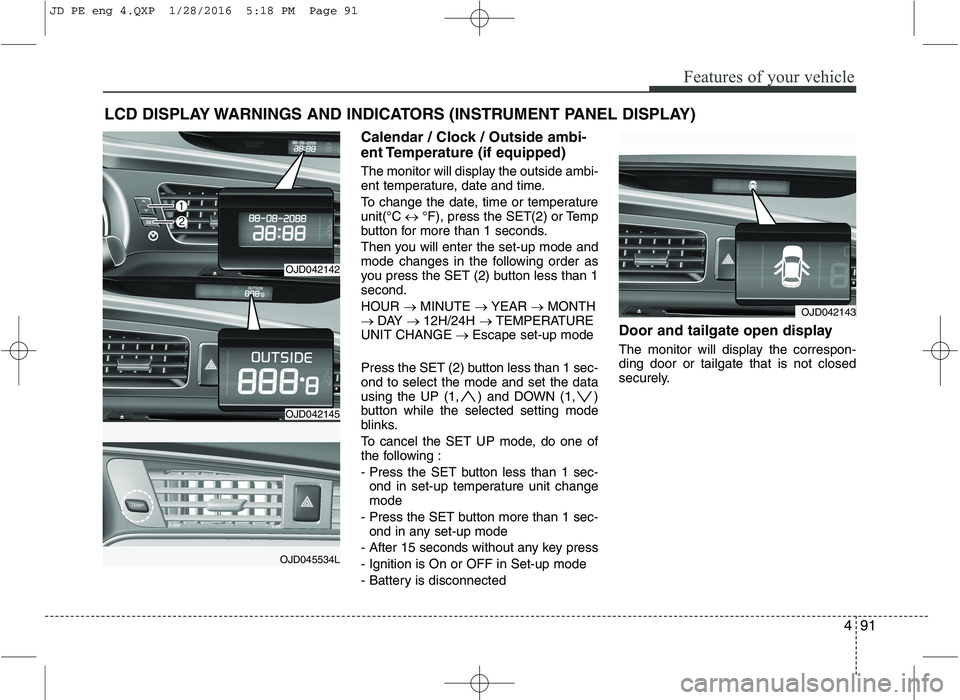
LCD DISPLAY WARNINGS AND INDICATORS (INSTRUMENT PANEL DISPLAY)Calendar / Clock / Outside ambi-
ent Temperature (if equipped)
The monitor will display the outside ambi-
ent temperature, date and time.
To change the date, time or temperature unit(°C � °F), press the SET(2) or Temp
button for more than 1 seconds.
Then you will enter the set-up mode and
mode changes in the following order as
you press the SET (2) button less than 1second. HOUR � MINUTE � YEAR � MONTH
� DAY � 12H/24H � TEMPERATURE
UNIT CHANGE � Escape set-up mode
Press the SET (2) button less than 1 sec- ond to select the mode and set the data
using the UP (1, ) and DOWN (1, )
button while the selected setting mode
blinks.
To cancel the SET UP mode, do one of
the following :
- Press the SET button less than 1 sec- ond in set-up temperature unit change mode
- Press the SET button more than 1 sec- ond in any set-up mode
- After 15 seconds without any key press
- Ignition is On or OFF in Set-up mode
- Battery is disconnected Door and tailgate open display
The monitor will display the correspon- ding door or tailgate that is not closed
securely.
OJD042143
OJD042142
OJD042145
OJD045534L
JD PE eng 4.QXP 1/28/2016 5:18 PM Page 91
Page 264 of 643
Features of your vehicle
4181
AUDIO SYSTEM
✽✽
NOTICE
If you install an after market HID
head lamp, your vehicle’s audio and
electronic device may malfunction.
❈ If your vehicle is equipped with
AVN(Audio, Video and Navigation)
system, refer to a separately sup-
plied manual for detailed informa-tion. Antenna
Pole type antenna
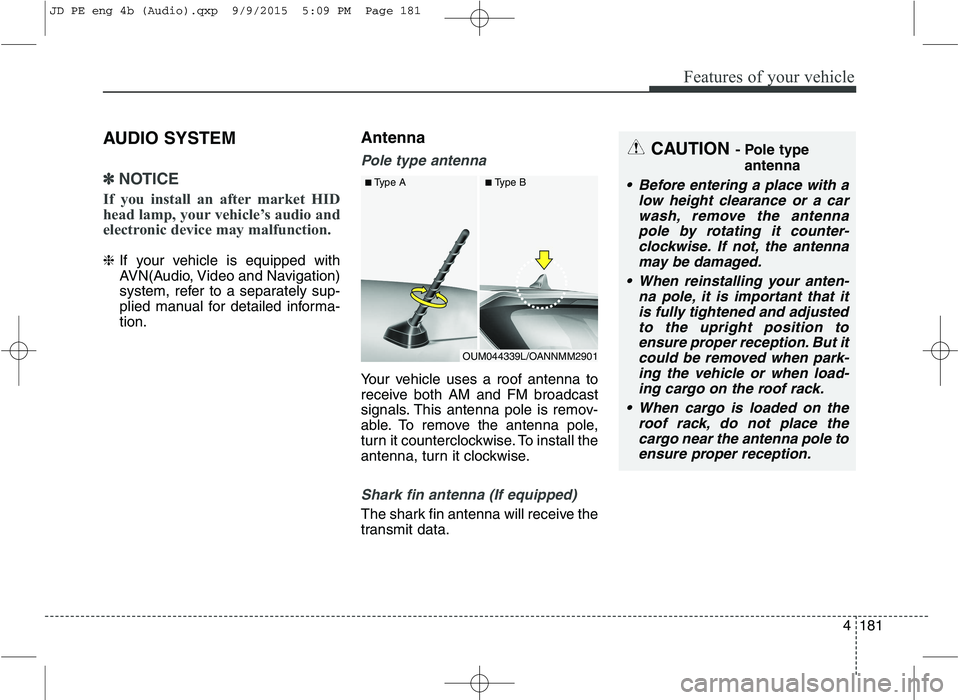
Your vehicle uses a roof antenna to
receive both AM and FM broadcast
signals. This antenna pole is remov-
able. To remove the antenna pole,
turn it counterclockwise. To install the
antenna, turn it clockwise.
Shark fin antenna (If equipped)
The shark fin antenna will receive the
transmit data.
CAUTION
- Pole type
antenna
• Before entering a place with a low height clearance or a carwash, remove the antennapole by rotating it counter-clockwise. If not, the antenna may be damaged.
When reinstalling your anten- na pole, it is important that itis fully tightened and adjustedto the upright position to ensure proper reception. But itcould be removed when park-ing the vehicle or when load- ing cargo on the roof rack.
When cargo is loaded on the roof rack, do not place thecargo near the antenna pole toensure proper reception.
OUM044339L/OANNMM2901
■
Type A ■Type B
JD PE eng 4b (Audio).qxp 9/9/2015 5:09 PM Page 181
Page 483 of 643

What to do in an emergency
10
6
Removing and storing the spare tire
Turn the tire hold-down wing bolt (1)
counterclockwise.
Store the tire in the reverse order of
removal.
To prevent the spare tire and tools
from “rattling” while the vehicle is in
motion, store them properly. Changing tires
1. Park on a level surface and apply
the parking brake firmly.
2. Shift the shift lever into R (Reverse) with manual transaxle
or P (Park) with automatic
transaxle.
3. Activate the hazard warning flash- er.
OGD061004
(Continued)
The vehicle can easily roll offthe jack causing serious
injury or death.
Do not get under a vehicle that is supported by a jack.
Do not start or run the engine while the vehicle is on the
jack.
Do not allow anyone to remain in the vehicle while it is on the
jack.
Make sure any children pres- ent are in a secure place away
from the road and from the
vehicle to be raised with the
jack.
OED066033
JD PE eng 6.QXP 11/26/2015 5:03 PM Page 10
Page 484 of 643
611
What to do in an emergency
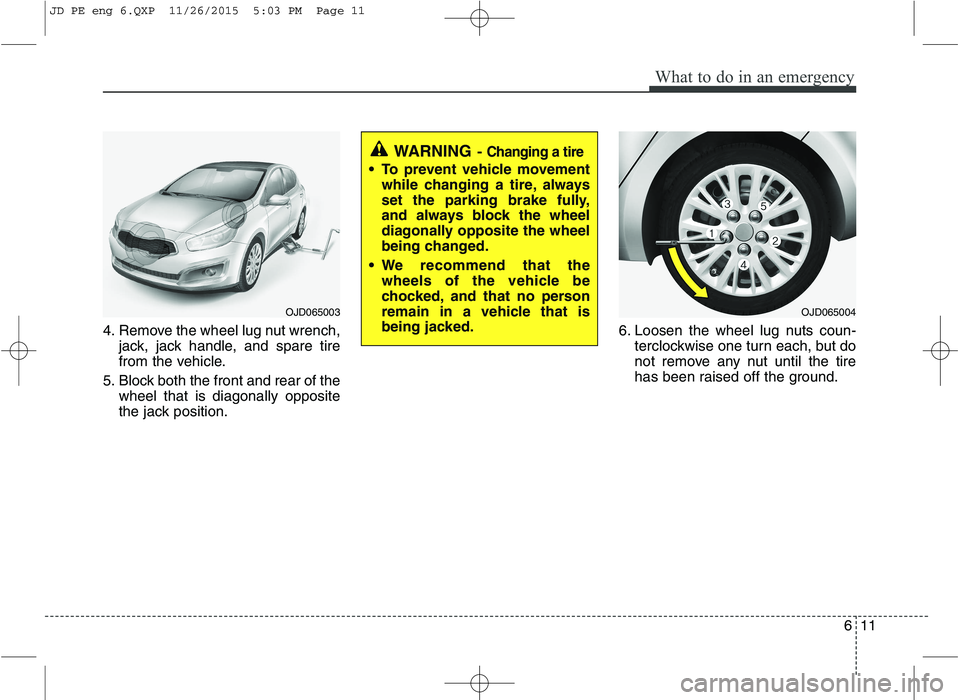
4. Remove the wheel lug nut wrench,jack, jack handle, and spare tire
from the vehicle.
5. Block both the front and rear of the wheel that is diagonally opposite
the jack position. 6. Loosen the wheel lug nuts coun-
terclockwise one turn each, but do
not remove any nut until the tire
has been raised off the ground.
WARNING - Changing a tire
To prevent vehicle movement
while changing a tire, always
set the parking brake fully,
and always block the wheel
diagonally opposite the wheel
being changed.
We recommend that the wheels of the vehicle be
chocked, and that no person
remain in a vehicle that is
being jacked.
OJD065003OJD065004
JD PE eng 6.QXP 11/26/2015 5:03 PM Page 11
Page 485 of 643

What to do in an emergency
12
6
7. Place the jack at the front (1) or
rear (2) jacking position closest to
the tire you are changing. Place
the jack at the designated loca-
tions under the frame. The jacking
positions are plates welded to the
frame with two tabs and a raised
dot to index with the jack. 8. Insert the jack handle into the jack
and turn it clockwise, raising the
vehicle until the tire just clears the
ground. This measurement is
approximately 30 mm (1.2 in).
Before removing the wheel lug
nuts, make sure the vehicle is sta-
ble and that there is no chance for
movement or slippage.
WARNING - Jack location
To reduce the possibility of
injury, be sure to use only the
jack provided with the vehicle
and in the correct jack position;
never use any other part of the
vehicle for jack support.
OJD065016
OJD065018
OJD065019
JD PE eng 6.QXP 11/26/2015 5:03 PM Page 12
Page 486 of 643
613
What to do in an emergency
9. Loosen the wheel nuts andremove them with your fingers. Slide the wheel off the studs and
lay it flat so it cannot roll away. To
put the wheel on the hub, pick up
the spare tire, line up the holeswith the studs and slide the wheel
onto them. If this is difficult, tip thewheel slightly and get the top holein the wheel lined up with the top
stud. Then jiggle the wheel back
and forth until the wheel can be
slid over the other studs. 10. To reinstall the wheel, hold it on
the studs, put the wheel nuts onthe studs and tighten them finger
tight. The nuts should be installedwith their tapered small diameter
ends directed inward. Jiggle thetire to be sure it is completely
seated, then tighten the nuts as
much as possible with your fin-gers again.
11. Lower the vehicle to the ground by turning the wheel nut wrench
counterclockwise.
WARNING
Wheels and wheel covers may have sharp edges. Handle
them carefully to avoid possi-
ble severe injury.
Before putting the wheel into place, be sure that there isnothing on the hub or wheel
(such as mud, tar, gravel, etc.)
that interferes with the wheel
from fitting solidly against the
hub. If there is, remove it. If thecontact of the mounting sur-face between the wheel and
hub is not good, the wheel
nuts could come loose and
cause loss of a wheel. Loss of
a wheel may result in losing
control of the vehicle. This may
cause serious injury or death.
JD PE eng 6.QXP 11/26/2015 5:03 PM Page 13
Page 503 of 643
What to do in an emergency
30
6
When towing your vehicle in an emer- gency without wheel dollies :
1. Set the ignition switch in the ACC posi-
tion.
2. Place the transaxle shift lever in N (Neutral).
3. Release the parking brake.
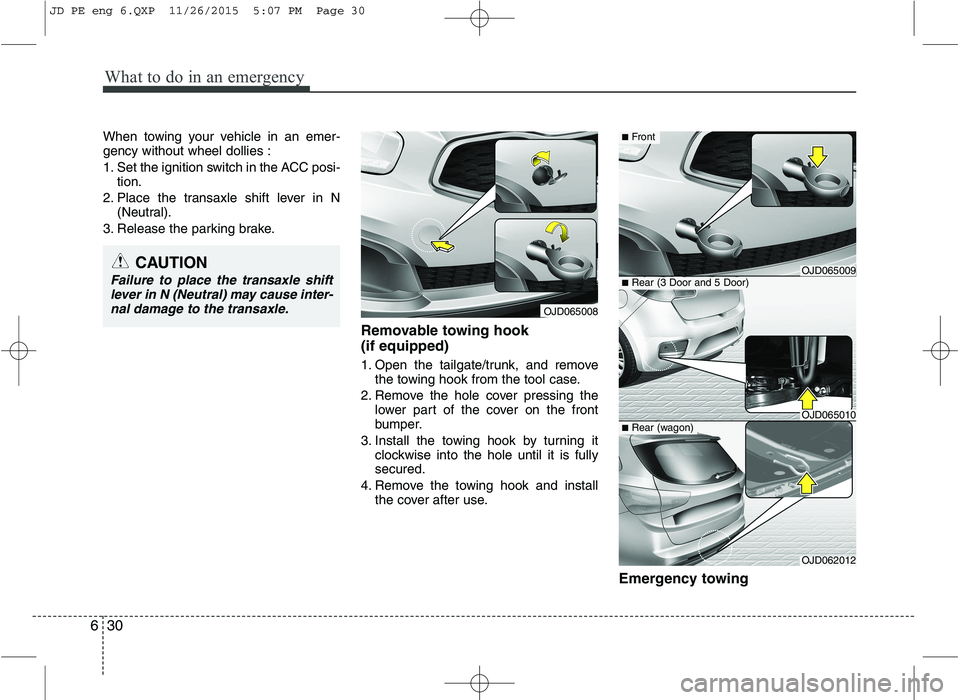
Removable towing hook (if equipped)
1. Open the tailgate/trunk, and removethe towing hook from the tool case.
2. Remove the hole cover pressing the lower part of the cover on the front
bumper.
3. Install the towing hook by turning it clockwise into the hole until it is fullysecured.
4. Remove the towing hook and install the cover after use.
Emergency towing
CAUTION
Failure to place the transaxle shiftlever in N (Neutral) may cause inter-nal damage to the transaxle.
OJD065008
■ Rear (3 Door and 5 Door)
OJD062012
■Rear (wagon)
■ Front
OJD065009
OJD065010
JD PE eng 6.QXP 11/26/2015 5:07 PM Page 30
Page 535 of 643
729
Maintenance
ENGINE COOLANT
The high-pressure cooling system has a
reservoir filled with year-round antifreeze
coolant. The reservoir is filled at the fac-
tory.
Check the antifreeze protection and
coolant concentration level at least once a
year, at the beginning of the winter season,
and before traveling to a colder climate. Checking the coolant level
WARNING
Removing radiatorcap
Never attempt to remove the radi- ator cap while the engine is oper-
ating or hot. Doing so might leadto cooling system and engine
damage and could result in seri-
ous personal injury from escap-ing hot coolant or steam.
Turn the engine off and wait until it cools down. Use extreme care
when removing the radiator cap.
Wrap a thick towel around it, and
turn it counterclockwise slowly to
the first stop. Step back while the
pressure is released from the cool-
ing system. When you are sure allthe pressure has been released,
press down on the cap, using a
thick towel, and continue turning
counterclockwise to remove it.
(Continued)
(Continued)
Even if the engine is not operat-ing, do not remove the radiator cap or the drain plug while the
engine and radiator are hot. Hot
coolant and steam may still blow
out under pressure, causing seri-
ous injury.
CAUTION
When the engine overheats from
low engine coolant, suddenlyadding engine coolant may causecracks in the engine. To preventdamage, add engine coolant
slowly in small quantities.
Do not drive with no engine coolant. It may cause water pumpfailure and engine seizure, etc.
JD PE eng 7.QXP 1/28/2016 5:35 PM Page 29